

Understanding the 160 SPD Asta Cheese Strategy
The 160 SPD threshold fundamentally changes action economy. Unlike generic builds, this breakpoint grants Asta 2 turns in cycles 1, 2, and 4—delivering 3 bonus turns across 5 cycles. Her Ultimate's +50 SPD team buff and Talent's 14% ATK per stack (70% at 5 stacks) maximize damage windows.
The cheese exploits Steadfast Safeguard mechanics: enemies take 50% less damage before Weakness Break but 100% more after. Asta's rapid cycling enables consistent breaks on Doomsday Beast's three parts—Dawn's Left Hand, Antimatter Engine, Disaster's Right Hand—while speed buffs ensure DPS units capitalize on doubled damage.
For efficient roster optimization, top up star rail express supply pass through BitTopup provides resources for relic farming and trace leveling. BitTopup offers competitive pricing and fast delivery.
This strategy achieves 60,000 points per stage for 300 Stellar Jades, 1 Self-Modelling Resin, and free Xueyi from Difficulty 2 first clear. Action Value Timer scoring rewards remaining AV and boss HP depleted, making Asta's action manipulation valuable for optimization.
Why 160 SPD Is the Magic Breakpoint
Speed breakpoints follow precise Action Value calculations. At 160 SPD, Asta crosses a threshold providing 2 turns in cycles 1, 2, and 4 versus 1 turn per cycle at standard builds—a 60% action frequency increase.
Asta's base SPD at Level 80 is 106, requiring +54 SPD. Achievable through SPD Feet (+25), 4-piece Messenger set (+12% SPD when using Ultimate), and substats. Higher investments (170-180 SPD) don't provide proportional returns—better allocated to 3800+ HP and 1000+ DEF for survival.
Action Value Mechanics Simplified
Action Value (AV) = 10,000 ÷ SPD. At 160 SPD, Asta's AV is 62.5. When she uses Ultimate, +50 SPD reduces allies' AV dramatically. A 120 base SPD DPS (83.3 AV) drops to 58.8 AV at 170 SPD, advancing their next action significantly.
Messenger 4-piece amplifies this with +12% SPD for 1 turn after Ultimate, pushing Asta to ~178 SPD momentarily for faster Ultimate cycling.
Expected Results
Consistently achieves 60,000 points on Difficulty 4 (level 90 enemies). Apocalyptic Shadow resets every 6 weeks Monday 04:00 server time, providing 300 Stellar Jades, Self-Modelling Resins, and character rewards per rotation.
Budget teams clear in 8-12 cycles, comfortably within scoring windows. Strategy focuses on mechanics exploitation rather than stat checks, accessible to mid-game players.
Doomsday Beast Mechanics & Why Asta Counters It
Doomsday Beast features 2 phases with three targetable parts. Breaking parts triggers Steadfast Safeguard's 100% damage increase while disabling specific attacks.
Phase 1: Single-target pressure and summons. Asta's Technique deals 50% ATK Fire damage to all enemies at battle start, generating Talent stacks. Her Skill provides AoE for summon clearing.

Phase 2: Activates at ~50% HP with enhanced AoE and faster actions. Asta's 160 SPD maintains buff uptime during accelerated phase, keeping DPS above critical thresholds.
Core strength: systematic Weakness Breaks. Focus Fire damage on individual parts sequentially to trigger doubled damage windows frequently. Once downed, switch to normal attacks to maximize damage during vulnerability.
Vulnerability Windows and Damage Timing
Weakness Break enters vulnerability state with 100% increased damage taken for 2-3 turns. Switch from Skills to normal attacks when boss is downed—normal attacks during doubled damage often exceed Skill damage from non-vulnerable states while conserving SP.
Asta's Ultimate timing should align with vulnerability windows. Cast immediately before or during Weakness Break for multiplicative damage spikes from both +50 SPD and 100% increased damage taken.
Energy Regen Rope enables 2-3 turn Ultimate cycling. E4 Eidolon grants +15% Energy Regen at 2+ Talent stacks, improving availability (base strategy works without Eidolons).
How Asta's Speed Buff Exploits Boss Mechanics
+50 SPD transforms action economy by granting 1-2 additional actions before Doomsday Beast's next turn. These extra actions enable Weakness Breaks, healing, or damage without extending fight duration.
Particularly powerful against predictable attack patterns. Boss telegraphs major attacks, and Asta's SPD buff allows interruption through Weakness Breaks. Breaking Antimatter Engine delays boss Ultimate, preventing wipes.
For maximizing account potential, cheap hsr top up at BitTopup ensures investment in multiple builds without resource constraints.
Common Wipe Scenarios
Phase 2 transition: Teams fail to break parts before coordinated attacks. Prevention: maintain Ultimate uptime and focus Fire damage on low-Toughness parts before Phase 2.
SP starvation: Skill spam exhausts resources by turn 5-6. Solution: use normal attacks during non-vulnerable states, reserve Skills for Weakness Breaks and emergency healing.
Insufficient survivability: Without 3800+ HP and 1000+ DEF, Asta dies to Phase 2 AoE, removing buffs. This stat floor is non-negotiable.
Mistimed Ultimate: Casting when boss is broken or DPS have full gauges wastes value. Optimal: 1 turn before anticipated Weakness Break.
Building 160 SPD Asta: Complete Stat Requirements
Main Stats: Body HP%/DEF%, Feet SPD, Sphere HP%/DEF%, Rope Energy Regen. Balances 160 SPD with 3800 HP and 1000 DEF.

Calculation: 106 base + 25 Feet + 19 Messenger bonus (12% of ~160) + 10 substats = 160 SPD.
Substats: SPD (+10 total), Energy Regen (35-40% total), Effect RES (30%+ for Broken Keel), HP%/DEF% (reach minimums).
Reaching 160 SPD: Breakdown
106 base + 25 Feet = 131 SPD. Messenger 4-piece grants +12% when using Ultimate (131 × 0.12 = 16), reaching 147 SPD during buff.
Remaining 13 SPD from substats across 5 pieces: Hands +4 (2 rolls), Body +2 (1 roll), Sphere +4 (2 rolls), Rope +2 (1 roll), Planar +2 (1 roll) = +14 SPD.
Final: 106 + 25 + 14 = 145 permanent, reaching 161 when Messenger activates.
Investment Trade-offs
Minimum: 160 SPD, 3800 HP, 1000 DEF with +12-15 relics, Traces 6/6/8/8. Requires 2-3 weeks farming (1200-1500 Trailblaze Power).
Optimal: +15 relics, 170+ SPD, Traces 4/10/10/10. Requires 4-6 weeks, provides 10-15% faster clears.
Recommended: minimum investment initially, gradual optimization using natural upgrades.
Best Relic Sets
Messenger Traversing Hackerspace 4pc: +6% SPD (2pc) + 12% SPD for 1 turn after Ultimate (4pc) = 18% total (~19 SPD at 160). Synergizes perfectly with Ultimate-focused kit.

Broken Keel Planar: Requires 30% Effect RES. Grants team +10% Effect RES and +15% CRIT DMG. Prevents debuffs while amplifying DPS.
Alternatives: Fleet of the Ageless (+8% ATK when 120+ SPD) for teams lacking ATK buffs. Sprightly Vonwacq (40% action advance at start) for faster first Ultimate but less sustained value.
Farming Efficiency
Messenger: Cavern of Corrosion: Path of Gelid Wind, 40 Power/run. 15-20 runs (600-800 Power) for 4 pieces with SPD substats.
Broken Keel: Simulated Universe World 3+, 40 Power/run. 10-15 runs (400-600 Power) for Sphere/Rope with correct main stats.
Farm during 2x relic events (every 3-4 weeks) to halve Power investment. Follow 80/20 rule: achieve 80% optimal stats with 20% effort.
4-Star Light Cone Comparison
Meshing Cogs (F2P King): 8 Energy per Basic ATK at S5. Accelerates Ultimate cycling to 2-3 turns. Available from Herta's Store (20 Bonds/copy, 100 total for S5). Obtainable in 4-6 weeks.
Memories of the Past: 16-28% DEF based on Superimposition, helps reach 1000 DEF minimum. Skill-triggered Shield Strength conflicts with SP economy. Gacha-dependent.
Dance Dance Dance: 16-24% action advance after Ultimate. Creates double acceleration with +50 SPD buff. No Energy Regen bonuses—requires perfect optimization. Advanced execution.
Superimposition Priority
Meshing Cogs S5 top priority (4/5/6/7/8 Energy scaling—S5 provides 2x S1 value). Memories/Dance accept S1-S3, don't chase S5 through gacha.
Trace Leveling Priority
Talent Level 10 first: 14% ATK/stack vs 10% at Level 1. At 5 stacks: 70% vs 50% ATK—20% team damage increase.
Ultimate Level 10 second: +50 SPD vs +36 at Level 1. 14 SPD difference across all allies.
Skill Level 6-8: Adequate AoE for summons. Primary value is Weakness Break application, not damage.
Basic ATK Level 4-6: Energy generation via Meshing Cogs doesn't scale with level. Minimal damage contribution.
Optimal Rotation
Pre-battle: Asta Technique for 50% ATK AoE damage, generates 1-2 Talent stacks.
Turn 1: Basic ATK (8 Energy + 1 SP)
Turn 2-3: Skill if summons present, else Basic ATK
Turn 4-5: Ultimate at 100 Energy, align with Weakness Break
Post-Ultimate: Basic ATK to regenerate Energy
Skill Point Economy
Use Skill when: (1) summons present, (2) SP is 4+, (3) Weakness Break imminent.
Use Basic ATK when: (1) SP below 3, (2) no summons, (3) Energy below 80.
Maintain 2+ SP minimum. Recovery from starvation requires 2-3 turns exclusive Basic ATK.
Team Compositions Without 5-Stars
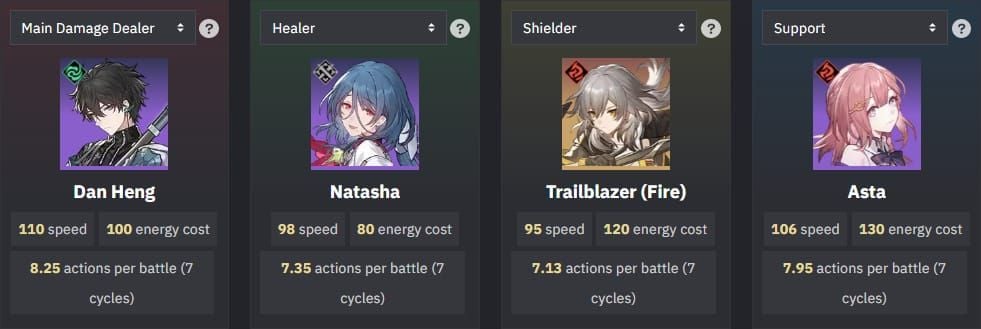
Core F2P: March 7th (shield), Asta (support), Dan Heng (DPS), Natasha (heal). Provides shielding, speed/ATK buffs, Wind damage, and sustain.
Alternative DPS: Serval (AoE Lightning), Hook (Fire synergy), Himeko (Burn focus).
Dual DPS: Replace March 7th with second DPS. Sacrifices shields for 2x damage, reduces clear by 2-4 cycles but requires precise execution.
Best 4-Star DPS Partners
Dan Heng: 130% ATK Skill with 3-4 hits at 160+ SPD (390-520% total). 240% ATK Ultimate. Optimal single-target.
Serval: 108% ATK Skill to all enemies, 108% ATK Ultimate + 36% DoT for 2 turns. Sustained AoE damage.
Hook: 140% ATK Skill in Enhanced state, 280% ATK Ultimate + Burn. Fire synergy with Asta.
Sustain Options
Natasha: 92.4% ATK + 577 AoE heal (Ultimate), 75% ATK + 468 single-target (Skill). Free from story, default choice.
Lynx: HP-scaling heals, Taunt mechanics, Cleanse on Ultimate. Different optimization.
March 7th: DEF-scaling shields (1200+ DEF required), Taunt redirects attacks. Suits high-DPS quick clear teams.
Step-by-Step Clear Strategy
Cycle 1: Establish buffs and SP. Asta Basic ATK, DPS Skill on Dawn's Left Hand, March shields DPS, Natasha Basic ATK.
Cycle 2-3: Target first Weakness Break on Left Hand. Asta Skill if summons, else Basic ATK. DPS focus Fire/Wind/Lightning on Left Hand.
Cycle 4-5: Exploit vulnerability. Cast Ultimate after Weakness Break, DPS switch to normal attacks during doubled damage, conserve SP.
Phase Transition Management
Phase 2 at ~50% HP introduces enhanced AoE. Maintain Ultimate availability, ensure healer has 80+ Energy.
Scripted AoE attack at transition—Natasha Ultimate or Skill lowest HP. March shields on DPS prevent deaths.
Asta Ultimate ready within 1-2 turns. Cast immediately for +50 SPD. Focus Antimatter Engine to delay boss Ultimate.
Emergency Recovery
Character death: Focus survival, 3-character teams can clear with extended duration.
SP starvation: 2-3 turns exclusive Basic ATK to rebuild to 3-4 SP.
Ultimate unavailable: Use Skill/Basic ATK, plan for next vulnerability window.
Common Mistakes
Speed tuning errors: 158-159 SPD misses breakpoint, loses 15-20% actions. Verify SPD before battle.
SP starvation: Skill spam exhausts reserves. Default to Basic ATK, reserve Skills for critical moments.
Mistiming Ultimate: Casting with full ally gauges wastes buff. Optimal: allies at 30-50% gauge.
Overinvesting SPD: 175-180 SPD sacrifices HP/DEF, causes Phase 2 deaths. 160 is optimal, additional points only after meeting survivability minimums.
Stat Priority Errors
SPD beyond 160 shows diminishing returns. Next breakpoint ~180 SPD requires +20 for marginal gains.
ATK% on Asta is trap—personal damage negligible vs buff value. CRIT substats completely wasted.
Energy Regen beyond 35-40% shows diminishing returns. 40% achieves 2-3 turn Ultimate consistently.
Alternative Strategies Below 160 SPD
At 150 SPD: 6.8 actions in 5 cycles vs 7.42 (8% fewer). Extends clears 1-2 cycles but viable for Difficulty 4.
Compensate with enhanced survivability (4200+ HP, 1100+ DEF) and heavier DPS investment.
145-155 SPD Modified Approach
At 150 SPD, AV is 66.67 vs 62.5 at 160. Approximately 0.6 fewer actions across 5 cycles.
Messenger remains optimal—+12% at 150 base grants +18, reaching 168 during buff.
Ultimate timing more critical with fewer actions. Each cast must align with vulnerability windows.
Compensating with Eidolons
E4: +15% Energy Regen at 2+ stacks. Enables 2-turn Ultimate even at 150 SPD.
E2: +15% DEF at 2+ stacks (69 DEF bonus), eases stat requirements.
E6: Additional Skill damage, marginal value.
Priority: E4 > E2 > E6.
Resource Investment Analysis
Total cost: 1800-2400 Trailblaze Power (relics), 3M Credits (Traces), 18 Obsidian Dread, 69 Desolation, 139 Obsession, 12 Tracks of Destiny. 3-4 weeks focused farming.
6-month rewards: 1200 Stellar Jades (4 rotations × 300), 400-600 Resin equivalent, 200-300 Trace materials = 1800-2100 total value.
ROI: 2400 Power investment (20 days natural regen) returns ~10:1 over 6 months. Highly efficient.
Long-term value: Functions in Memory of Chaos, Pure Fiction, Simulated Universe. Multi-mode utility justifies investment.
Breakdown
Messenger farming: 600-800 Power (15-20 runs)
Broken Keel: 400-600 Power (10-15 runs)
Enhancement: 600K-900K Credits
Traces: 200-280 Power (Crimson Calyx)
Total: ~1800-2400 Power, 3M+ Credits.
FAQ
What is the 160 SPD breakpoint?
Grants 2 turns in cycles 1, 2, 4 for 3 bonus turns across 5 cycles (7.42 total actions). Maximizes +50 SPD buff uptime and 70% ATK buff.
Can you clear without 5-stars?
Yes. March 7th, Asta, Dan Heng, Natasha clear Difficulty 4 for 60,000 points in 8-12 cycles.
How does cheese strategy work?
Exploits Steadfast Safeguard: 50% less damage pre-break, 100% more post-break. 160 SPD enables rapid Ultimate cycling (+50 SPD) and Talent stacks (70% ATK), accelerating Weakness Breaks for doubled damage windows.
What relics for 160 SPD?
Messenger 4pc (+18% SPD total), Broken Keel Planar (+10% Effect RES, +15% CRIT DMG to team). Main stats: Body HP%/DEF%, Feet SPD, Sphere HP%/DEF%, Rope Energy Regen.
Best 4-star light cone?
Meshing Cogs S5 (8 Energy/Basic ATK). Enables 2-3 turn Ultimate cycling. Obtainable from Herta's Store in 4-6 weeks.
What team composition?
Core: March 7th, Asta, Dan Heng, Natasha. Alternatives: Dual DPS (Serval/Hook replace March), Burn teams (Himeko/Hook/Asta/healer).
Ready to maximize Apocalyptic Shadow rewards? Get Stellar Jade and resources for your perfect 160 SPD Asta at BitTopup—fast, secure, player-trusted for all Honkai Star Rail top-ups!


