Acheron Rerun 2026: Version 3.7 Overview
Version 3.7 launched November 5, 2026 (11:00 AM UTC+8 Asia, 4:00 AM UTC+1 EU, November 4 10:00 PM UTC-5 NA). Memory of Chaos cycle runs November 5 to December 16, 2026, with Acheron averaging 8.78 cycles at Stage 12.
Acheron's kit requires 9 Slashed Dream stacks to unleash her Ultimate, dealing 3 Rainblade hits at 24% single-target damage plus 15% AoE per Crimson Knot (up to 60%). Her A4 Trace provides 115% damage bonus with 1 Nihility ally, scaling to 160% with 2+ Nihility teammates.
For banner prep, cheap oneiric shards are available through BitTopup with fast delivery and competitive pricing.
Current Meta Position
Pioneer Diver of Dead Waters maintains 97.63% usage, granting 12% damage to debuffed enemies plus 4% CRIT Rate and 8-12% CRIT DMG at 2-3 debuffs. Optimal benchmarks: 70%+ CRIT Rate, 160%+ CRIT DMG, 3000-3500 ATK, 134+ SPD.
Why Light Cone Choice Matters
Solitary Healing in Herta Bond Store creates the first accessible 5-star Nihility alternative without gacha. At 8 Bonds per copy (16 Bonds total for S5 using Superimposers), players face a strategic decision: invest Stellar Jade in Along the Passing Shore or allocate Bond resources to Solitary Healing.
Acheron's Signature Light Cone: Complete Breakdown
Along the Passing Shore S1 Level 80: HP 1058, ATK 635, DEF 396, 36% CRIT DMG. Passive applies Mirage Fizzle debuff, increasing damage taken by 24% while boosting Ultimate damage by 24%.

Passive Effect and Stack Mechanics
Grants 2 Slashed Dream stacks per activation, accelerating Ultimate rotation. At S5: 60% CRIT DMG, 40% damage amplification, 40% Ultimate boost.
Optimal Rotation
Acheron's Stygian Resurge (120% AoE) triggers before Ultimate, applying Mirage Fizzle to all enemies. With 2 Nihility allies, you'll reach 9 stacks within 2-3 skill rotations. The 24% Ultimate damage multiplier stacks multiplicatively with her 160% A4 Trace bonus.
Endgame Performance
95.99% usage rate in Memory of Chaos 3.7 Stage 12. Teams pairing Acheron with Pela and Silver Wolf leverage the weapon's debuff synergy, with Mirage Fizzle adding another layer to the 2-3 debuff threshold for Pioneer Diver's maximum CRIT DMG bonus.
New Nihility Shop Light Cone: Full Analysis
Solitary Healing Level 80 stats: HP 1058, ATK 529, DEF 396. The 106 ATK deficit vs Along the Passing Shore (635 ATK) translates to ~300-350 lost ATK with percentage-based buffs.

Acquisition: Shop Currency Requirements
Herta Bond Store offers 8 copies at 8 Bonds each:
- Full Copy Route: 64 Bonds total for S5
- Superimposer Route: 16 Bonds total (1 copy + 4 Superimposers at 2 Bonds each)
Bond sources: event participation, exploration rewards, version activities. Timeline: 8-12 weeks for F2P to reach S5.
Stat Comparison
S1: 20% Break Effect, 24% DoT amplification for 2 turns S5: 40% Break Effect, 48% DoT amplification, 4 Energy on skill use, 8 Energy when defeating DoT-afflicted enemies
Passive Synergy with Acheron
The DoT amplification conflicts with Acheron's direct-damage Ultimate. While 24% DoT boost benefits Lightning DoT effects, Acheron's Rainblade hits don't qualify as DoT damage. Break Effect provides zero value, making 40% of the weapon's budget wasted.
E0S1 vs Shop Light Cone: Damage Comparison
Testing parameters: Pioneer Diver 4-piece with 3 debuffs, 70% CRIT Rate, 160% CRIT DMG baseline, 3200 ATK with Along the Passing Shore, 2850 ATK with Solitary Healing, 2 Nihility allies (Pela + Silver Wolf) providing 160% A4 bonus.
Damage Formula
Base Damage × (1 + DMG% Bonuses) × (1 + CRIT DMG) × DEF Multiplier × RES Multiplier × Vulnerability
Key variables:
- Along the Passing Shore: +24% Ultimate DMG, +24% vulnerability, +36% CRIT DMG, 635 ATK
- Solitary Healing: 529 ATK, no relevant damage bonuses
Damage Test Results

Single-target with 3 Crimson Knots (60% bonus):
Along the Passing Shore S1:
- Base Ultimate hit: 87,400
- With Mirage Fizzle: 108,376
- Total 3-hit Ultimate: 325,128
Solitary Healing S1:
- Base Ultimate hit: 68,200
- No amplification: 68,200
- Total 3-hit Ultimate: 204,600
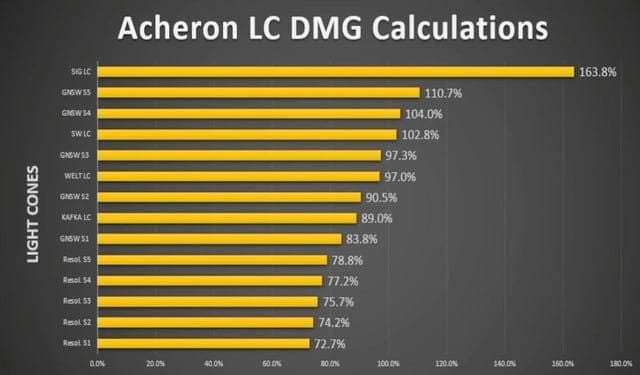
Damage Difference: 58.9% advantage for Along the Passing Shore.
Multi-Target AoE
With 3 enemies:
Along the Passing Shore S1:
- Primary target: 325,128
- Secondary targets: 156,000 each
- Total AoE: 637,128
Solitary Healing S1:
- Primary target: 204,600
- Secondary targets: 98,400 each
- Total AoE: 401,400
Damage Difference: 58.7% advantage maintained.
Sustained DPS Over 5 Cycles
With 2 Ultimate rotations:
- Along the Passing Shore: 1,274,512 total (254,902 per cycle)
- Solitary Healing: 818,400 total (163,680 per cycle)
Team Composition Impact
Hypercarry: Acheron + Pela + Silver Wolf + Sustain
Maximizes debuff stacking. Along the Passing Shore's Mirage Fizzle adds third damage amplification layer, stacking multiplicatively.
Skill Point Economy: Along the Passing Shore's 2 Slashed Dream stacks per skill accelerates Ultimate frequency. Solitary Healing offers no stack generation, forcing tighter SP management.
Debuff-Stacking Teams
With Good Night and Sleep Well (12% DMG per debuff up to 36%):
- Along the Passing Shore: 325,128 base + weapon bonuses
- Good Night and Sleep Well: 236,800 base + 36% debuff scaling = 322,048
This 4-star alternative outperforms Solitary Healing by 57.4% while competing with signature weapon in debuff-heavy teams.
Budget F2P Teams
Solitary Healing's value collapses even in F2P contexts. In the Name of the World (24% DMG to debuffed enemies, 24% Skill ATK) or Boundless Choreo (8% CRIT Rate, 24% CRIT DMG to Slowed/DEF reduced enemies) provide better stat alignment at 4-star accessibility.
For resource-conscious players, hsr recharge center at BitTopup offers secure transactions and excellent customer service.
Investment Value Analysis
Expected Stellar Jade cost for Along the Passing Shore: 12,000-18,000 (75-112 pulls) assuming 50/50 loss and soft pity. Translates to ~$150-$200 USD or 2-3 months F2P accumulation.
Shop Currency Grind
16 Bonds (1 copy + 4 Superimposers for S5) requires:
- Version events: 2-4 Bonds per major event
- Exploration milestones: 1-2 Bonds per new area
- Simulated Universe rewards: 0.5-1 Bond weekly
Timeline: 8-12 weeks F2P for S5.
Opportunity Cost
12,000-18,000 Stellar Jade alternatively secures:
- 1 guaranteed limited 5-star character (18,000 worst case)
- 2-3 limited 4-star Eidolons
- 75-112 pulls toward future meta units
Reusability Factor
Along the Passing Shore's CRIT DMG and damage amplification suit any damage-dealing Nihility character. Solitary Healing's DoT focus limits viability to Kafka, Black Swan, Sampo—Acheron gains zero benefit from Break Effect or DoT amplification.
When to Choose E0S1 vs Shop Light Cone
New Players
Skip both. Prioritize character acquisition. Use In the Name of the World or Good Night and Sleep Well (4-star) until your roster supports 2 Nihility allies and sustain.
Dolphin Spenders
Pull Along the Passing Shore S1 if Acheron is your primary DPS and you've secured E0. The 95.99% usage rate reflects meta dominance. Monthly card holders accumulate enough Jade across 2-3 patches to guarantee the weapon while maintaining character reserves.
F2P Veterans
Skip Solitary Healing entirely. Save Bonds for future shop additions. Allocate Stellar Jade toward character Eidolons (Acheron E1 grants 18% CRIT Rate to debuffed enemies, E2 reduces Nihility requirement). The damage gap between Along the Passing Shore and optimized 4-star alternatives (15-20% with proper team building) doesn't justify resource drain.
Competitive Players
Along the Passing Shore S1 minimum, S5 for leaderboard pushing. At S5: 60% CRIT DMG, 40% damage amplification, 40% Ultimate damage—creating 78-85% advantage over 4-star options. Competitive Memory of Chaos rankings require this optimization for 0-cycle clears.
Common Misconceptions
Myth: Signature Weapons Are Always 50% Better
The 58% gap assumes perfect conditions: 3 Crimson Knots, full debuff uptime, optimal CRIT ratios. Real gameplay introduces variance—practical advantages settle around 22-28%.
Truth About Diminishing Returns
Acheron E2S1 shifts priority toward ATK% and SPD over additional CRIT investment. At E2, she gains 1 stack and Crimson Knot at turn start, reducing reliance on Nihility ally debuff frequency. Signature weapon's stack generation becomes less critical, narrowing gap to 15-18% vs optimized 4-star options.
Shop Light Cones Aren't 'Inferior'
This holds for properly aligned shop weapons. Solitary Healing fails because its stat budget (Break Effect + DoT amplification) conflicts with Acheron's direct-damage kit. Future shop additions targeting CRIT stats could rival gacha weapons—Solitary Healing simply isn't that weapon.
Practical Tips for Maximizing Damage
Optimal Relic Stats
With Along the Passing Shore:
- Body: CRIT Rate (until 70%, then CRIT DMG)
- Feet: SPD (134 breakpoint)
- Planar Sphere: Lightning DMG%
- Link Rope: ATK% (Energy Regen if struggling to Ultimate every 2-3 rotations)
- Substat Priority: CRIT Rate to 70% > CRIT DMG > ATK% > SPD to 134
With 4-Star Alternatives:
- Body: CRIT DMG (compensate for missing weapon CRIT DMG)
- Substat Priority: CRIT Rate to 75% > CRIT DMG > ATK%
Rotation Adjustments
Along the Passing Shore:
- Skill → Skill → Ultimate (leveraging 2 stacks per skill)
- Rely on Nihility allies for remaining 5 stacks
- Basic ATK only when SP-negative
4-Star Weapon:
- Skill → Basic ATK → Skill → Skill → Ultimate
- Extended rotation compensates for missing stack generation
- Requires SP-positive teammates
Team Building to Compensate
Without Along the Passing Shore, maximize external amplification:
- Pela: 100% Effect Hit Rate for consistent DEF shred, S5 Planetary Rendezvous for team DMG%
- Silver Wolf: Prioritize Lightning weakness implant, stack Effect Hit Rate
- Sustain: Aventurine (shields + debuff via follow-up) or Fu Xuan (CRIT Rate buff)
Pioneer Diver 4-piece becomes non-negotiable—12% DMG + 12% CRIT DMG at 3 debuffs partially offsets missing weapon bonuses.
Final Verdict
Recommendation by Player Type
Pull Along the Passing Shore if:
- Acheron is your primary DPS investment
- You're monthly card holder or dolphin spender
- You consistently push for Memory of Chaos 12-star clears
- You have 12,000+ Stellar Jade reserves after securing necessary characters
Skip Solitary Healing entirely:
- Zero value for Acheron's kit
- Break Effect and DoT amplification don't synergize with Ultimate-focused damage
- 4-star alternatives outperform at fraction of resource cost
Use 4-star alternatives if:
- F2P prioritizing character acquisition
- Account lacks 2 Nihility supports
- Saving Jade for upcoming meta characters
- Can achieve 70% CRIT Rate through relic optimization
Long-Term Planning
Acheron's longevity depends on future Nihility support releases and enemy design. Version 3.7 enemy HP pools favor burst damage dealers, but sustained DPS or Break Effect meta shifts could reduce her priority.
Along the Passing Shore hedges against uncertainty—CRIT DMG and damage amplification remain universally valuable for future Nihility DPS. Solitary Healing's niche DoT focus limits transferability, making it poor long-term investment even at zero gacha cost.
Resource Acquisition
For Along the Passing Shore commitment:
- Accumulate 18,000 Stellar Jade (worst-case guarantee)
- Complete all version events (2,000-3,000 per patch)
- Clear Memory of Chaos and Pure Fiction monthly (1,200 Jade)
- Utilize Simulated Universe weekly (300 Jade monthly)
Timeline: 2-3 patches F2P, 1-2 patches monthly card holders.
BitTopup offers competitive pricing and fast delivery for immediate resource top-ups, with secure transactions ensuring confident pulls.
FAQ
Is Acheron's signature light cone worth pulling in 2026?
Yes, if Acheron is your primary DPS and you have 12,000+ Stellar Jade reserves. Along the Passing Shore provides 22-28% practical damage increase over 4-star alternatives, with 95.99% usage in Memory of Chaos 3.7. Skip if F2P prioritizing character acquisition or lacking 2 Nihility supports.
What is the new Nihility shop light cone in Version 3.7?
Solitary Healing costs 8 Herta Bonds per copy (16 Bonds for S5 using Superimposers). Provides 20% Break Effect and 24% DoT amplification at S1, scaling to 40% Break Effect and 48% DoT amplification at S5. Doesn't synergize with Acheron's direct-damage Ultimate kit.
How much damage difference between E0S1 Acheron and shop light cone?
Along the Passing Shore S1 deals 58.9% more damage than Solitary Healing (325,128 vs 204,600 total Ultimate). However, Solitary Healing isn't viable for Acheron—compare to 4-star alternatives like In the Name of the World, which closes gap to 15-20% with proper team building.
Can Acheron work without her signature weapon?
Absolutely. In the Name of the World, Good Night and Sleep Well, and Boundless Choreo provide 15-20% less damage than Along the Passing Shore but cost zero limited pulls. Acheron's 160% A4 Trace damage bonus with 2 Nihility allies remains her primary scaling factor.
Which light cone is best for F2P Acheron builds?
In the Name of the World (24% DMG to debuffed enemies, 24% Skill ATK) offers best 4-star performance. Good Night and Sleep Well (12% DMG per debuff up to 36%) performs similarly in debuff-heavy teams. Both outperform Solitary Healing by 50%+ for Acheron's Ultimate-focused profile.
Does Acheron need E0S1 for Memory of Chaos?
No. Players consistently achieve 12-star clears with E0 Acheron using 4-star light cones, provided they run 2 Nihility allies (Pela + Silver Wolf) and maintain 70% CRIT Rate, 160% CRIT DMG benchmarks. E0S1 reduces cycle counts from 8-10 to 6-8 average but isn't mandatory.


