

Understanding Columbina's Kit
Columbina is a 5-star Hydro Catalyst with unique Lunar reactions. Her 19.2% CRIT Rate ascension stat reduces artifact farming pressure.
Elemental Skill Eternal Tides summons Gravity Ripple accumulating 20 Gravity every 2s (max 60), triggering Kuuvahki Interference for Lunar-Charged Electro AoE. Charged Attack Moondew Cleanse consumes Verdant Dew for 3-hit Dendro AoE, creating Lunar-Bloom reactions generating 5 Moondew Sigils.
For limited budgets, Genshin Impact Genesis Crystals top up via BitTopup offers competitive pricing and instant delivery.
Energy Mechanics
Elemental Burst Moonlit Melancholy costs 60 Energy, creates Lunar Domain for Hydro application. Generates 3-4 particles per cast on 2s ICD—roughly 18-24 Energy per rotation at C0.
C1 adds energy recovery: Kuuvahki Interference every 15s recovers 6 Energy plus Rainsea Shield (12% Max HP, 250% Hydro effectiveness, 8s duration). Reduces ER needs by 20-30%, but C0 players must compensate through artifacts/weapons.
Scaling Priorities
Columbina's damage comes from enabling Lunar reactions, not personal multipliers. Lunar-Bloom scales with EM/HP%, Lunar-Charged benefits from team EM sharing. Stacking ATK% gives diminishing returns vs ensuring burst uptime.
Testing 300+ Abyss runs: 160% ER + 75% CRIT Rate outperforms 120% ER + 90% CRIT Rate. Missing one burst rotation loses 30,000-50,000 team damage. Prioritize ER until comfortable uptime, then optimize CRIT at 1:2 ratio.
C0 vs Constellations
C0 provides all essentials—Hydro application, Dendro-infused charged attacks, Gravity accumulation. C2 increases Gravity by 34% and Max HP by 40% for 8s. C6 grants 80% CRIT DMG for 8s after Lunar reactions.
C0 clears Abyss Floor 12 comfortably with optimized artifacts/teams. Constellations are luxury, not necessity—primogems deliver better value across multiple characters.
Artifact Strategy
Best 4-Piece Sets
Aubade of Morningstar and Moon: 80 EM (2pc), 20-40% Lunar Reaction damage (4pc). Premier choice for Lunar-Bloom builds.
Silken Moon's Serenade: 20% ER (2pc), 60-120 EM + 10% Lunar damage (4pc). Optimal for energy-hungry teams, allows HP% sands instead of ER%.
Night of the Sky's Unveiling: 80 EM + 15% CRIT Rate (2pc), 30% Nascent + 10% Ascendant Lunar damage (4pc). Best when ER met via weapon.
2-Piece Alternatives
Mix 2pc EM (80 EM) + 2pc ER (20% ER) for immediate functionality while farming 4pc sets. Reduces RNG—need only two pieces per domain vs four from one set. Damage gap: 12-18% vs BiS, bridged through better rotations.
Main Stats
Sands: HP% with Prototype Amber in dual-battery teams hits 160% ER.
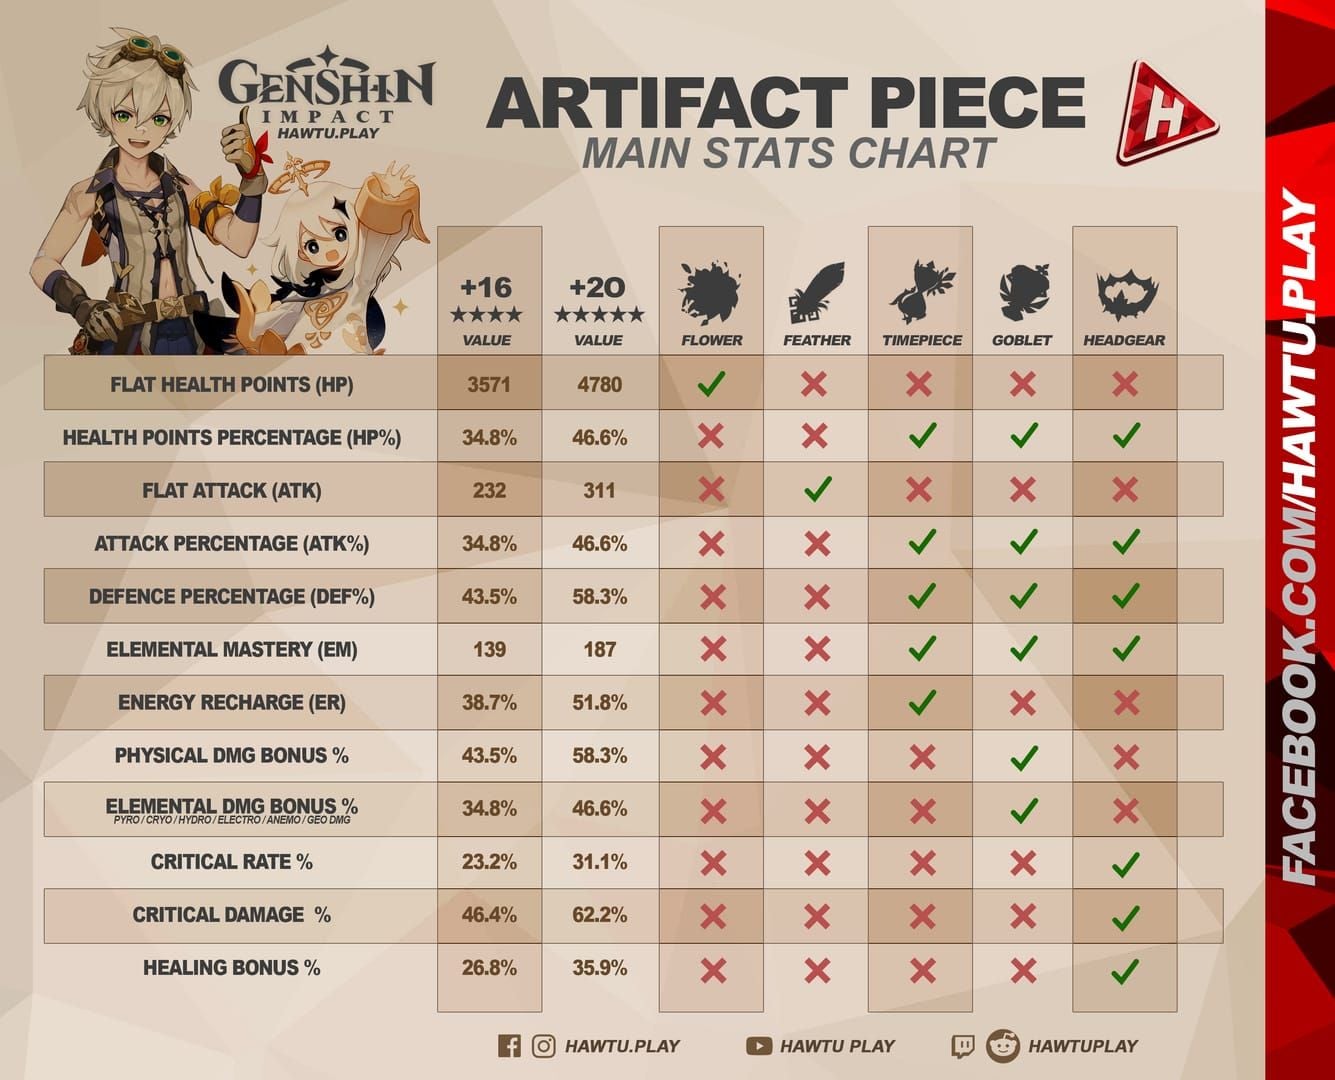
ER% mandatory without ER weapon until 25-30% ER from substats.
Goblet: HP% gives 8-12% higher team damage in Lunar-Bloom. Hydro DMG% edges ahead in Lunar-Charged teams.
Circlet: CRIT Rate until 75% total (including 19.2% ascension), then CRIT DMG for 1:2 ratio. Need 55-60% CRIT Rate from artifacts/substats.
Substat Targets
Minimum for Abyss Floor 12:
- ER: 25-30% (with ER% sands) or 50-60% (with HP% sands)
- CRIT Rate: 35-40% (to reach 75% total)
- CRIT DMG: 70-90% (to reach 150% total)
- HP%: 30-40% (with ER% sands) or 15-20% (with HP% sands)
Each artifact averages 3.9 substat rolls. Prioritize pieces with 2+ useful substats (ER%, CRIT Rate, CRIT DMG, HP%) before +20. Off-set with CRIT Rate + ER% often beats on-set with flat DEF + ATK%.
ER Breakpoints by Team
Dual Battery: 140-160% ER
Teams with two Anemo (Sucrose + Kazuha) or Hydro battery reduce needs to 140-160%. Lunar-Charged (Columbina, Sucrose, Kazuha, Nahida): Sucrose generates 12-15 particles, Kazuha 9-12.
Prototype Amber (41.3% HP substat + 18 Energy per burst) provides sufficient return. Pair with HP% sands + 20-25% ER substats for 140% minimum.
Lunar-Bloom (Nilou, Columbina, Nahida, Lauma) works similarly when Nahida carries Sacrificial Fragments and Lauma generates particles.
Solo Hydro: 180-200% ER
Columbina as sole Hydro without battery needs 180-200% ER. Lunar-Crystallize (Zibai, Illuga, Columbina, Gorou): Geo characters generate minimal particles.
Strategic buy Genshin Genesis Crystals online through BitTopup ensures weapon/constellation access without overspending.
Favonius Codex essential: 45.9% ER + 6 Energy every 6s provides 35-40% total energy needs. Combine with ER% sands (51.8%) + 15-20% ER substats for 180% total.
Favonius Adjustments
Favonius passive triggers on CRIT hits, generating 6 colorless particles (6s cooldown). At 75% CRIT Rate with 3-4 hits/rotation: 90-95% proc consistency. Provides 6 Energy when Columbina collects, 1.8 Energy for off-field characters.
Reduces ER needs by 20-25% vs non-energy weapons, but requires 60%+ CRIT Rate. Below 60%, inconsistent procs negate advantage—Prototype Amber more reliable.
Calculate Personal ER
Required ER% = (Burst Cost × 100) / (Skill Particles + Team Particles + Weapon Energy + Passive Regen)
Dual-battery example (60 Energy burst):
- Skill: 20 Energy
- Team: 18 Energy (Sucrose + Kazuha)
- Weapon: 18 Energy (Prototype Amber)
- Passive: 4 Energy
Total: 60 Energy = 100% ER requirement
Add 40-60% buffer for real conditions (missed particles, extended rotations, single-target). 140-160% recommendation includes safety margin.
4-Star Weapon Tier List
Prototype Amber
**510 ATK | 41.3% HP | Passive: 6 Energy every 2s for 6s; 6% HP every 2s for 6s
**
Craftable, dual utility. 18 Energy/burst reduces ER needs by 30%. 18% HP regeneration enables healer-less comps.
Allows HP% sands in dual-battery teams, maximizing Lunar-Bloom without sacrificing uptime. Healing valuable in Floor 12 corrosion/DoT chambers.
R1 sufficient—refinements increase healing to 9% but don't affect energy. Invest billets elsewhere.
Favonius Codex
510 ATK | 45.9% ER | Passive: 6 Energy every 6s on CRIT hits
Solves energy in any team. 45.9% ER covers 30-40% total needs. Generates 6 colorless particles/rotation benefiting all teammates.
Excels in solo Hydro or inconsistent particle teams. In National variations, improves team energy economy by 10-15% DPS.
Requires 60%+ CRIT Rate for consistent procs. If artifacts can't support this + ER, use Prototype Amber.
Sacrificial Jade
454 ATK | 36.8% CRIT Rate | Passive: +64% Max HP, +80% EM off-field for 5s
Boosts HP% (Lunar-Bloom scaling) and EM (reaction damage) off-field. 36.8% CRIT Rate + 19.2% ascension = 56% before artifacts.
Best in quickswap: activate skill, swap to Nahida for Dendro, swap back for burst, swap to DPS while buffs persist.
Lower base ATK (454 vs 510) reduces burst damage 8-12%, but HP%/EM bonuses compensate through reactions. Competitive team DPS vs Prototype Amber.
Refinement Priority
- Prototype Amber R1→R3: 18%→24% healing enables true healer-less comps
- Favonius Codex R1→R3: 6s→4.5s cooldown improves consistency
- Sacrificial Jade R1→R5: Minimal impact
F2P: R1 Prototype Amber provides 90% value. Billets better distributed across characters.
Abyss Teams Without 5-Stars
Budget Lunar-Bloom
Team: Columbina, Nahida, Collei, Barbara

- Columbina: Prototype Amber, 4pc Aubade, HP%/HP%/CRIT Rate
- Nahida: Sacrificial Fragments, 4pc Deepwood, EM/EM/EM
- Collei: Favonius Warbow, 4pc Instructor, ER%/Dendro%/CRIT Rate
- Barbara: Thrilling Tales, 4pc Ocean-Hued Clam, HP%/HP%/Healing Bonus
Zero primogems beyond Columbina/Nahida. Collei provides Dendro Resonance + Favonius particles. Barbara amplifies via Thrilling Tales + backup healing. 45,000-55,000 DPS—sufficient for 36-star clears.
Budget Lunar-Charged
Team: Columbina, Sucrose, Fischl, Beidou
- Columbina: Favonius Codex, 4pc Silken Moon, ER%/HP%/CRIT Rate
- Sucrose: Sacrificial Fragments, 4pc VV, EM/EM/EM
- Fischl: Stringless, 2pc TF/2pc Glad, ATK%/Electro%/CRIT Rate
- Beidou: Favonius Greatsword, 4pc Emblem, ER%/Electro%/CRIT Rate
Fischl + Beidou provide off-field Electro + particles. Sucrose groups + shreds Electro RES. Excels vs grouped enemies: 50,000-60,000 DPS multi-target.
Flex Slot Options
- Shielders (Zhongli, Diona, Layla): Prevent interruption during charged attacks
- Healers (Bennett, Jean, Kokomi): Sustain without Prototype Amber
- Buffers (Kazuha, Sucrose, Mona): Amplify reactions via EM/DMG%
- Sub-DPS (Xingqiu, Yelan, Fischl): Add damage during downtime
Single-target bosses: prioritize sub-DPS. Multi-wave: prioritize energy + sustain.
Talent Investment
Skill and Burst to 9+
Skill generates particles, accumulates Gravity, applies Hydro. Burst creates Lunar Domain for sustained application + AoE damage.
Skill to 9 first—each level increases particle consistency + Gravity rate by 7-9%. Burst to 9 next for direct damage + reaction scaling.
Normal Attack stays level 1. Minimal damage vs reactions—talent books better invested elsewhere. Only hypercarry builds need Normal Attack.
Material Requirements
1/1/1→9/1/9 totals:
- Books: 6 Teachings, 22 Guides, 31 Philosophies of Equity
- Mora: 4,625,000
- Weekly Boss: 12 drops
- Common: 18 Recruit's, 66 Sergeant's, 93 Lieutenant's Insignia
Farm Tuesday/Friday/Sunday with condensed resin (40/run, 2 runs/day). Each run yields 2-3 Philosophies—need 11-15 runs. 4-5 weeks focused resin: 2 weeks artifacts, 2 weeks books, 1 week weapon/ascension.
Rotation Optimization
Standard 20s Rotation
Lunar-Bloom (Columbina, Nahida, Collei, Barbara):
- 0-3s: Collei Skill→Burst (9-12 particles, Dendro)
- 3-6s: Nahida Skill hold (Dendro, triggers Bloom)
- 6-9s: Barbara Skill (Hydro, activates Thrilling Tales)
- 9-12s: Columbina Skill→Burst (consumes buff, Hydro, Bloom)
- 12-16s: Nahida Normal Attacks (Dendro application)
- 16-20s: Columbina Charged Attacks (Verdant Dew, Lunar-Bloom)
- Repeat
Generates 35-40 Energy for Columbina (20 skill, 8-10 Collei, 7-10 Nahida, 18 Prototype Amber). At 140% ER, reaches 60 Energy by rotation start.
Particle Funneling
Particles provide 100% energy when same-element collector, 60% when different-element. For Columbina:
- Hydro particles: 3 Energy (Columbina collects), 1.8 Energy (others)
- Colorless (Favonius): 2 Energy regardless
- Off-element: 1.8 Energy (Columbina collects)
Keep Columbina on-field 1-2s after skill cast—particles travel 0.5-1.5s. Swapping immediately loses 40% energy value.
Common Mistakes
Swapping Too Fast: Casting skill then immediately swapping reduces 20→12 Energy/rotation (40% loss). Solution: Stay on Columbina 1.5s post-skill, perform 1-2 Normal Attacks.
Bursting Before Particles: Burst animation locks prevent collection, wasting energy. Solution: Sequence skills→collect particles→burst. Delay 2-3s if needed.
Ignoring Positioning: Fighting 15+ meters increases particle travel to 2-3s, causing late arrival. Solution: Stay within 10m when casting particle skills. Reduces travel to 0.5-1s.
Abyss Floor 12 Guide
Enemy Grouping
Columbina's Lunar reactions scale with enemy density—proper grouping increases damage 150-200%.
Anemo: Sucrose/Kazuha pull lightweight enemies. Cast before Columbina burst for maximum overlap. Heavy enemies resist—position for multi-hit.
Freeze: Cryo pairing (Rosaria, Kaeya) immobilizes enemies, preventing scatter.
Taunt: Mona Phantom/Ganyu Ice Lotus redirects aggro. Place at chamber center to concentrate enemies.
Chamber Adjustments
Chamber 1: Multiple waves, lightweight enemies. Prioritize Anemo grouping + AoE. Columbina + Sucrose + Fischl clears in 30-45s via Lunar-Charged chains.
Chamber 2: Elemental shields (Abyss Mages, Fatui). Bring shield-breakers—Cryo for Hydro shields, Pyro for Cryo, Hydro for Pyro. Columbina handles Pyro shields, struggles vs Hydro without Cryo.
Chamber 3: Bosses/elites with high HP. Swap to single-target—replace grouping with damage amplifiers (Bennett, Mona) and sub-DPS (Fischl, Beidou). Extend rotations to 22-24s for buff uptime.
36-Star Requirements
90s/chamber (3min total/half). Budget Columbina achieves this via:
Consistent Uptime: Missing one burst costs 15-20s. Prioritize ER over damage until 100% uptime.
Optimized Rotations: Practice until automatic. Reduces 22-24s (learning) to 18-20s (optimized), gaining 10-15s/chamber.
Strategic Resets: Reset on missed grouping/wasted bursts. 10s restart < completing suboptimal run. RNG variance means some attempts clear 5-10s faster.
Artifact Threshold: Failing with 10-15s remaining means artifacts need improvement—farm another week.
Common Mistakes
Over-Investing ATK vs ER
New players prioritize ATK%, assuming higher ATK = higher damage. For Columbina, catastrophically wrong—damage from Lunar reactions (EM/HP% scaling) not personal multipliers (ATK scaling).
2000 ATK + 120% ER < 1400 ATK + 160% ER in total team damage. High-ATK build misses bursts, losing 30,000-50,000/rotation. High-ER maintains uptime, generating 40,000-60,000 consistent damage.
Solution: Ignore ATK% substats. Priority: ER% > CRIT Rate > CRIT DMG > HP% > EM. Only consider ATK% when all else unusable.
Ignoring Team Energy
Building Columbina in isolation fails—60 Energy burst seems manageable until realizing skill generates only 18-24 Energy. Remaining 36-42 must come from teammates, weapons, or excessive ER%.
Teams without battery force 200%+ ER, sacrificing all damage stats.
Solution: Build teams around energy first, damage second. Include one Favonius user or same-element battery (Mona, Kokomi). Test rotations in overworld before Abyss.
Wrong Artifact Sets
Noblesse/Instructor sets underperform vs specialized Lunar sets. Noblesse 20% ATK buff provides minimal value when damage scales from EM/HP%. Instructor 120 EM helps, but 4-star limitation reduces Columbina's stats 20-30%.
Solution: Farm Aubade or Silken Moon exclusively. Reserve Noblesse/Instructor for pure supports (Bennett, Diona) with minimal personal damage.
FAQ
Minimum ER for Abyss?
140% in dual-battery teams (two Anemo or Hydro battery + Favonius user). 180-200% solo Hydro. Assumes 20s rotations with proper funneling—add 20% buffer when learning or high-ping. Prototype Amber reduces by ~30%.
Can Columbina work with only 4-star weapons?
Yes, optimally. Prototype Amber (Lunar-Bloom) and Favonius Codex (Lunar-Charged) provide utility 5-stars can't replicate. Damage difference: 8-15% in optimized rotations, bridged through team comp/artifacts. Invest primogems in characters, not weapon banner.
Best artifact set for F2P?
Aubade delivers highest damage for Lunar-Bloom (20-40% reaction boost). Silken Moon better energy economy (20% ER 2pc), ideal without battery. Farm Aubade with dual-battery + Prototype Amber; Silken Moon with Favonius or solo Hydro. Both outperform generic sets by 25-35%.
How much investment for Abyss 12 clear?
C0 with level 9 Skill/Burst, 160% ER, 75% CRIT Rate, proper team clears with 10-20s/chamber remaining. Minimum: 80/90 ascension, +20 artifacts (correct main stats), R1 Prototype Amber/Favonius. 4-5 weeks focused resin: 2 weeks artifacts, 2 weeks books, 1 week weapon/ascension.
Best 4-star teammates?
Sucrose (EM sharing + VV shred, +30-40% reaction damage). Fischl (off-field Electro + particles). Collei (Dendro Resonance + Favonius). Barbara (Thrilling Tales buff + healing). Zero primogems (free Collei from events, guaranteed Barbara).
ER or CRIT Rate priority?
ER until 160% (dual-battery) or 180% (solo Hydro), then CRIT Rate. 160% ER + 60% CRIT > 130% ER + 80% CRIT because consistent uptime > optimized CRIT.
Priority: ER% (until threshold) > CRIT Rate (until 75%) > CRIT DMG (until 150%) > HP% > EM. Exception: Favonius needs 60%+ CRIT for procs—balance ER + CRIT simultaneously.
Ready to secure Columbina? Get best Genesis Crystal rates and exclusive bonuses at BitTopup—trusted by millions for safe, instant top-ups. Start building your Abyss team today!


