

Understanding ER Thresholds: Why Columbina's Energy Matters
ER thresholds represent the minimum percentage needed to consistently activate Columbina's Elemental Burst on cooldown. For this 5-star Hydro Catalyst character with 60 Energy Burst cost, hitting these breakpoints determines Spiral Abyss success or failure.
The difference between 200% and 220% ER separates smooth 18-second rotations from bricked sequences wasting 6-10 seconds. These delays compound across chambers, often meaning the difference between 36-star clears and timeouts. Columbina's Burst, Moonlit Melancholy, creates a 12-second Lunar Domain on 15-second cooldown, making consistent uptime critical.
For optimization resources, Genshin Impact Genesis Crystals recharge through BitTopup provides fast, secure access to Primogems for weapon pulls and constellation upgrades.
What Makes Columbina's Energy Profile Unique
Columbina's Elemental Skill, Eternal Tides, summons a Gravity Ripple dealing Hydro damage every 2 seconds. This generates 4-5 Hydro particles per 12-second cycle—moderate self-sufficiency but insufficient for solo operation without substantial ER investment. Her 60 Energy cost sits mid-range: lower than 80-cost Bursts, higher than 40-cost abilities.
Her 19.2% CRIT Rate ascension stat offers offensive scaling, but becomes meaningless without consistent Burst activation. Players often overcorrect by stacking excessive ER, sacrificing critical damage stats. The goal: find minimum viable ER threshold for your team, then redirect substats toward offense.
The Hidden Cost of Bricked Rotations
When Columbina's Burst fails to recharge on cooldown, team rotations collapse. Buff windows and reaction triggers misalign. In Lunar-Crystallize teams, missing one Burst means losing 8-12 reaction procs over 18 seconds—unrecoverable damage.
Spiral Abyss Floor 12 chambers allow 90-180 seconds. One bricked rotation consuming extra 8 seconds = 4-9% of total time. Across three chambers, this compounds to 24-27 seconds—often the exact margin between 3-star and 2-star clears.
Columbina's Base Energy Mechanics
Columbina's 60 Energy Burst requires careful particle management. Her Skill generates 4-5 Hydro particles per activation, with Gravity Ripple persisting 12 seconds. This provides ~24-30 Energy per rotation when on-field catching own particles, but only 14.4-18 Energy off-field due to 60% particle value reduction.
On-field vs off-field absorption fundamentally shapes ER requirements. Characters receive 100% particle value when active, 60% when swapped out. For Columbina's Hydro particles: 6 Energy per particle on-field vs 3.6 off-field. Same-element particles provide triple energy of off-element particles.
Columbina's Lunar Reactions don't generate additional particles. These mechanics enhance damage but require external energy sources for Burst uptime.
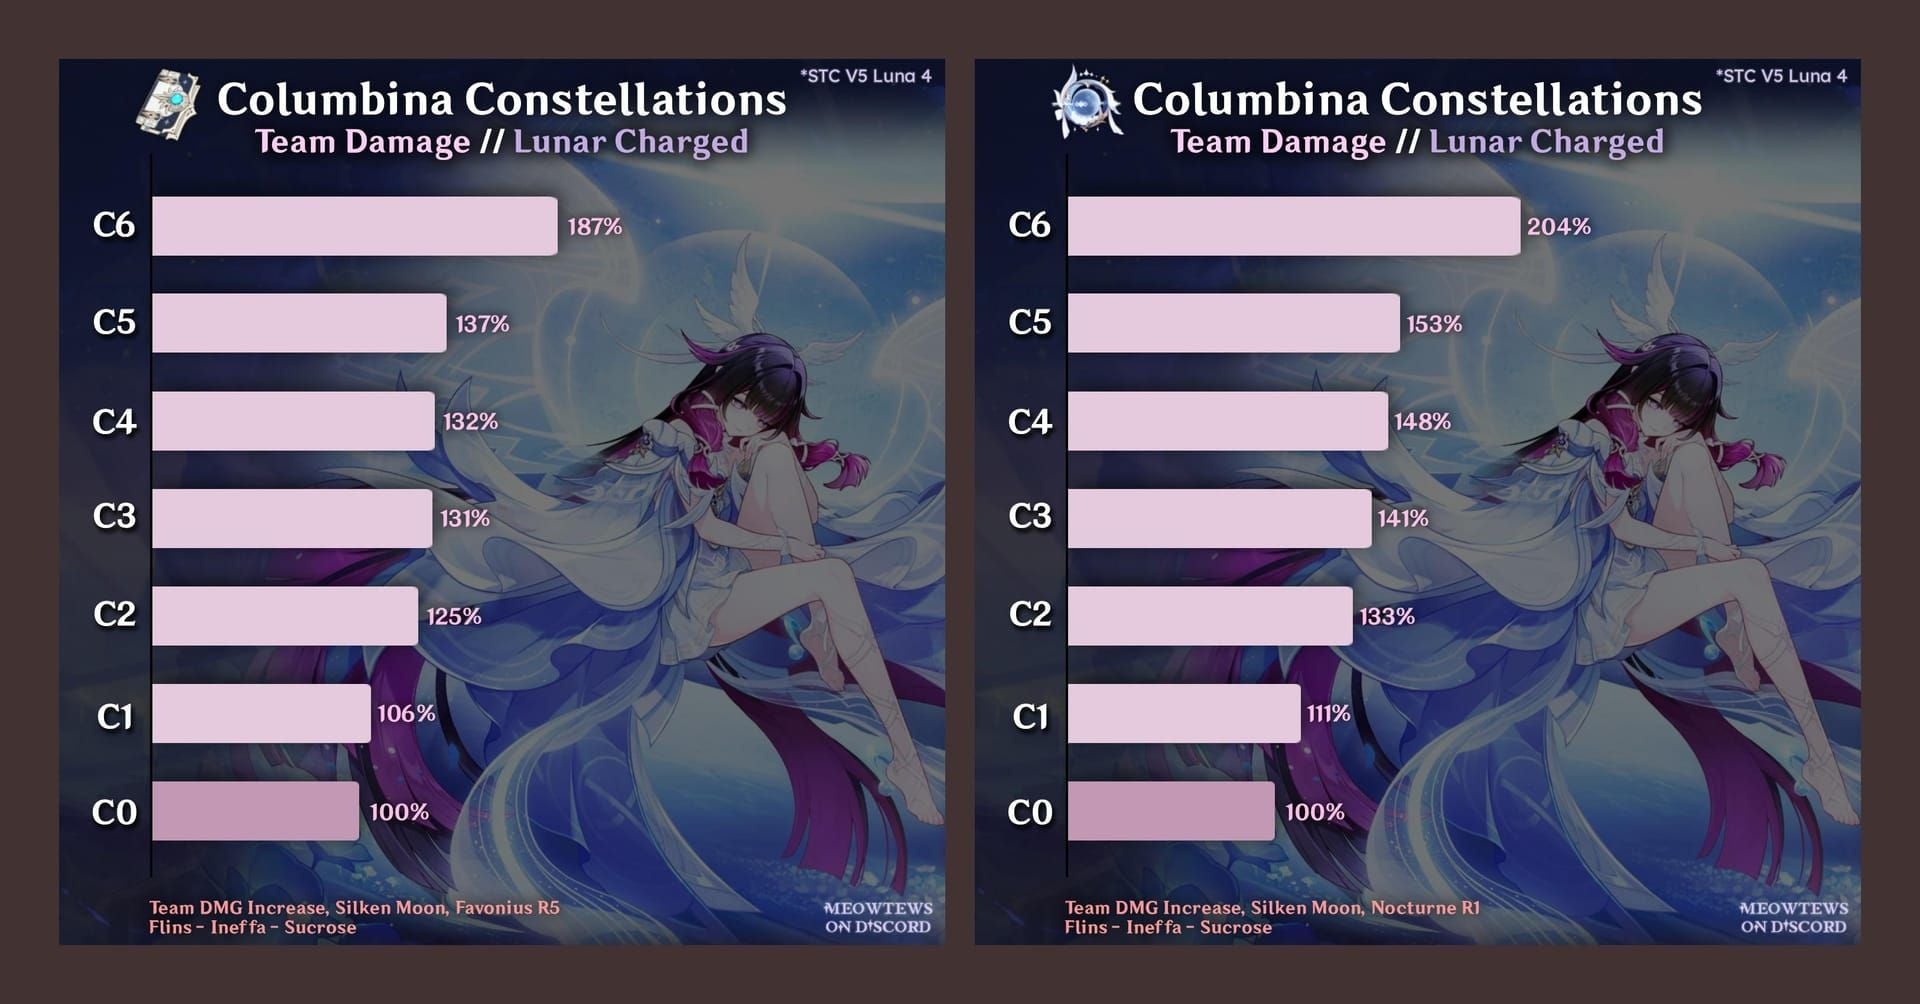
Constellation Energy Gains
C1: 6 Energy per Lunar-Charged reaction = 10% energy refund per trigger. In optimal rotations with 2-3 triggers, this recovers 12-18 Energy, reducing ER requirements by 20-30%. Transforms artifact priorities, allowing HP% Sands instead of ER Sands.
C4: 4 Energy when Skill ends = 6.7% refund per rotation. Combined with C1, these provide 16-22 Energy per cycle—37% of Burst cost. C1+ players operate at 140-180% ER in dual Hydro teams, while C0 requires 170-220% for identical comps. This gap = 40-80 substat rolls difference.
Solo Hydro ER Thresholds: Highest Requirements
Solo Hydro Columbina demands 220-240% ER without specialized weapons. This stems from no same-element particle support—complete reliance on her 4-5 particle Skill and off-element particles providing only 2 Energy each. Requires ~36-40 artifact substat rolls purely for ER.
Off-element particles contribute minimally. Fischl generating 5 Electro particles provides only 10 Energy to Columbina vs 30 Energy if Hydro particles. This 3:1 efficiency gap explains extreme ER requirements.
Weapon Solutions for Solo Hydro
- Prototype Amber R5: Reduces to 160-180% ER, regenerating 18 Energy per rotation. 510 base ATK, 41.3% HP%. Craftable, accessible, adds healing.
- Favonius Codex: Lowers to 160-170% ER through CRIT-triggered particles. Generates 6 colorless particles (9 Energy for Columbina) per proc. Requires 40-50% CRIT Rate.
- Nocturne's Curtain Call: Reduces to 180-200% ER. 542 base ATK, 88.2% CRIT DMG, recovers 12-16 Energy every 18 seconds off-field. Best balance of offense and energy.
Dual Hydro ER Thresholds: The Sweet Spot
Dual Hydro reduces requirements to 170-190% ER baseline, or 110-120% with Nocturne's Curtain Call. Second Hydro character generates same-element particles providing triple energy value. Xingqiu/Yelan generating 4-5 particles contributes 24-30 Energy when funneled—nearly half Burst cost.
Particle funneling: After second Hydro activates Skill, immediately swap to Columbina to absorb particles. Ensures 100% particle value vs 60% off-field penalty. Proper timing adds 8-12 Energy per rotation = 15-20% ER equivalent.
For dual Hydro resources, Genshin Genesis Crystals top up instant through BitTopup ensures you acquire necessary weapons and constellations without delays.
Optimal Dual Hydro Partners
- Yelan: Highest efficiency. 4 particles per 10-second cooldown. A4 passive increases active character damage up to 50% over 14 seconds. Reduces Columbina's ER to 140-160% standard weapons, 110-120% with Nocturne's.
- Xingqiu: Defensive utility via damage reduction and healing. 5 particles per Skill, 15-second cooldown aligns with Columbina's Burst. Rainsword damage contributes Hydro application for Lunar-Bloom.
- Kokomi: Healer + battery. Minimal particle generation. Best in triple Hydro where collective particles eliminate individual ER concerns.
Triple Hydro ER Thresholds: Minimum Investment
Triple Hydro reduces to 100-110% ER—essentially base with minimal artifact investment. Three Hydro characters generating 12-15 total particles provide 72-90 Energy collectively, far exceeding 60 Energy cost. Allows complete focus on HP%, CRIT Rate, CRIT DMG, EM.
Trade-off: reduced team flexibility and reaction diversity. Limits Electro-Charged, Vaporize, Freeze reactions. Focuses on Hydro Resonance's 25% HP bonus and pure Hydro damage.
Artifact Optimization for Low-ER Builds
With 100-110% ER, prioritize HP% Sands over ER Sands, gaining 46.6% HP (10,000-12,000 additional HP). HP directly scales Lunar reaction damage. Hydro DMG% Goblet provides 5-7% more reaction damage than HP% Goblet.
Substat priorities: CRIT Rate > CRIT DMG > HP% > ER. Each CRIT Rate roll (3.9%) provides more value than ER since energy is solved. Yields 20-30% higher personal damage vs solo Hydro builds.
Emblem of Severed Fate 4pc becomes less valuable, providing only 25-27.5% Burst DMG at 100-110% ER. Alternatives: 2pc Heart of Depth + 2pc Tenacity (15% Hydro DMG + 20% HP) or 4pc Nymph's Dream.
Lunar-Bloom Team ER Requirements: The Exception
Lunar-Bloom teams require 220%+ ER despite dual Hydro. This stems from rotation structures keeping Columbina off-field during particle generation. Dendro characters (Nahida, Alhaitham) occupy on-field time, while Columbina's Ripple operates off-field, reducing absorption to 60%.
18-second rotation: Burst → Geo Skill → Elemental application → Columbina Skill. During Geo/Elemental phases (8-10 seconds), Columbina stays off-field while teammates generate particles. Even dual Hydro, she catches only 60% value.
Balancing ER with Elemental Mastery
Lunar-Bloom demands dual priorities: 220%+ ER for consistency and 200-300 EM for reaction scaling. Creates severe artifact pressure: ER Sands, Hydro DMG Goblet, CRIT Rate Circlet with substats across ER, EM, CRIT. Requires 200-300 resin beyond standard builds.
Hakushin Ring R5: 165 EM, reduces to 180-200% ER. For Lunar-Bloom, Prototype Amber remains superior—18 Energy regeneration solves energy crisis while providing healing.
Substat distribution: 220% ER → 200 EM → 50% CRIT Rate → remaining into CRIT DMG/HP%.
Weapon Comparison: ER Impact

Nocturne's Curtain Call: Gold standard. Reduces ER by 40-60% across all comps via 12-16 Energy every 18 seconds. 542 base ATK, 88.2% CRIT DMG. Dual Hydro needs only 110-120% ER, solo Hydro 180-200%.
Prototype Amber R5: Best F2P. Regenerates 18 Energy per Burst. Reduces solo Hydro to 160-180%, dual Hydro to 120-140%. 510 base ATK (32 lower than 5-star) = 8-12% less damage. Adds 18% Max HP healing over 6 seconds.
Favonius Codex: Conditional reduction via CRIT particles. R5 with 50% CRIT Rate generates 6 colorless particles every 6 seconds = 18 Energy per rotation. Reduces solo Hydro to 160-170%, dual Hydro to 130-150%. Requires CRIT Rate investment.
5-Star Alternatives Without ER Passives
Lost Prayer to the Sacred Winds and Skyward Atlas provide no energy support. Require 220-240% ER solo Hydro, 170-190% dual Hydro. High base ATK (608/674) and offensive secondaries (33.1% CRIT Rate/ATK%) maximize damage but demand prohibitive artifact requirements.
Suit triple Hydro (100-110% ER), allowing full offensive investment. Skyward Atlas: 12% Elemental DMG + AoE procs. Lost Prayer: stacks to 32% Elemental DMG. Damage ceiling exceeds Prototype Amber by 15-20% in low-ER scenarios.
Artifact Optimization: Reaching Your Threshold
ER Sands mandatory when target exceeds 160-180%, providing 51.8% ER at +20. For 220% ER requirement (120% above base), breakdown: 51.8% Sands, 30-40% weapon, 30-40% substats across four artifacts.
Substat ER rolls: 5.8% per max roll. Each artifact needs 2-3 ER rolls = 11.6-17.4% ER. Across four pieces, requires 8-12 total rolls—achievable within 150-200 resin.
Substat Priority Hierarchy
ER (until threshold) > CRIT Rate (until 60%) > CRIT DMG (1:2 ratio) > HP% > Flat HP > EM. Ensures rotation functionality before damage optimization. Once ER threshold met, additional ER = wasted potential.
Calculate total ER from all sources before evaluating pieces. Circlet with 20% CRIT DMG + 0% ER might seem better than 15% CRIT DMG + 11.6% ER, but if latter completes threshold while former leaves you short, worse piece enables 100% uptime.
Emblem of Severed Fate: ER-to-Damage Conversion
4pc Emblem converts ER to Burst DMG at 0.25:1 ratio, capping at 75% bonus from 300% ER. For 220% ER builds, provides 55% Burst DMG—equivalent to fully-stacked 5-star passive. Partially mitigates damage loss from ER investment.
Less valuable below 160% ER (only 40% Burst DMG). In triple Hydro at 100-110% ER, Emblem provides 25-27.5%, underperforming 2pc Heart of Depth + 2pc Tenacity (15% Hydro DMG + 20% HP). Use Emblem for 180%+ ER, mixed sets for lower.
Common Mistakes That Brick Rotations
Overcapping ER: Investing 260-280% when 220% suffices wastes 40-60% ER worth of substats = 15-20% more damage through CRIT stats. ER provides binary value: reach Burst on cooldown (100% value) or don't (0% value). Every point beyond threshold contributes nothing.
Incorrect Particle Funnel Timing: Must swap to Columbina within 1-2 seconds of teammate Skill activation, before particles arrive. Particles travel ~1.5 seconds. Optimal sequence: Teammate Skill → 0.5s delay → swap to Columbina → particles arrive at 100% value. Proper funneling adds 12-18 Energy per rotation = 20-30% ER equivalent.
Ignoring Enemy Phase Transitions: Ruin Guards at 70% HP, Abyss Heralds at 50% HP, Maguu Kenki at 70% HP create 2-4 second invulnerability. Activating Skill before transition wastes entire duration, losing 4-5 particles. Delay Skill until after transitions complete.
Constellation Breakpoints: C0 vs C1 vs C4
C0: Baseline generation. Solo Hydro 220-240% ER, dual Hydro 170-190%, triple Hydro 100-110%. Highest investment tier, consuming 8-12 substat rolls. Often requires ER Sands over HP% Sands. Achieves 60-70% of C1 damage output.
C1: 6 Energy per Lunar-Charged reduces ER by 20-30%. In rotations with 2-3 triggers, provides 12-18 Energy = 20-30% of Burst cost. Solo Hydro drops to 180-200%, dual Hydro to 140-160%, triple Hydro to 80-90%. Can switch ER Sands to HP% Sands, gaining 46.6% HP (10,000-12,000). Damage increases 15-25% vs C0. Single highest value constellation.
C4: 4 Energy when Skill ends = 6.7% refund. Combined with C1, provides 16-22 Energy per cycle—37% of Burst cost. Solo Hydro 160-180%, dual Hydro 120-140%, triple Hydro 70-80%. Diminishing returns vs C1—only 10-15% ER reduction vs C1's 20-30%. Damage increase 5-8% vs C1's 15-25%.
Troubleshooting: Rotation Still Failing?
Particle absorption timing: Columbina must be on-field when particles arrive for 100% value; off-field = 60%. Review rotation frame-by-frame, identify moments where particles generate while inactive. Adjust swap timing.
Particle ICD: Skills generate particles once per activation, regardless of hits. Columbina's Ripple generates 4-5 particles when summoned, but subsequent damage ticks every 2 seconds produce none.
Enemy interruptions: Ruin Guard missiles, Abyss Lector shields, Maguu Kenki dashes cancel Skill before particles generate. Use shields (Zhongli, Diona) or interruption resistance (Xingqiu Rainswords, Beidou Burst).
Enemy positioning: Particles generate at enemy location, travel toward active character. If enemies teleport/dash after Skill, particles may generate too far. Position near spawn points, use crowd control.
Investment Priority: Balancing ER with Damage
Optimal sequence: ER to threshold → CRIT Rate to 60% → CRIT DMG to 120% → HP% → additional CRIT. Ensures functional rotations before damage optimization. 1:2 CRIT Rate to CRIT DMG ratio = optimal balance. For Columbina with 19.2% CRIT Rate ascension, target 60-70% CRIT Rate and 120-140% CRIT DMG.
Damage Per Rotation vs Damage Per Screenshot
DPR (Damage Per Rotation): Total damage across full cycles, accounting for Burst uptime, Skills, reactions. DPS (Damage Per Screenshot): Peak single-instance damage. High-ER builds sacrifice DPS for consistent DPR. Low-ER achieves higher DPS but inconsistent DPR.
For Abyss, DPR matters more. Build dealing 80,000 Burst every rotation (100% uptime) outputs more than 100,000 Burst every 1.5 rotations (67% uptime). Consistent = 240,000 across three rotations. Inconsistent = 200,000. This 20% difference determines success vs failure.
Test builds in Floor 12 across multiple runs, measure total clear time. Build producing fastest average = optimal investment.
Resin Efficiency: When to Stop
Artifact farming has severe diminishing returns beyond initial ER threshold. First 150-200 resin produces functional ER and 50-60% CRIT Rate. Next 300-400 resin improves to 60-70% CRIT Rate and 120-140% CRIT DMG. Beyond this, each 100 resin = only 1-2% damage improvement.
Optimal stopping point: ER threshold + 60% CRIT Rate + 120% CRIT DMG + 20,000 HP. Enables consistent rotations with competitive damage. Perfectionist farming for 70% CRIT Rate and 150% CRIT DMG requires 500-800 additional resin for 8-12% improvement—better spent on team-wide upgrades.
Four characters at 80% optimization outperform one at 100% and three at 60%. Distribute resin across all team members.
FAQ
What is Columbina's exact ER threshold for solo Hydro teams? 220-240% ER without specialized weapons. Prototype Amber R5 reduces to 160-180%, Nocturne's Curtain Call to 180-200%.
How much does C1 reduce Columbina's ER requirements? 20-30% across all comps via 6 Energy per Lunar-Charged reaction. In rotations with 2-3 triggers, provides 12-18 Energy per cycle.
Why do dual Hydro teams need less ER than solo Hydro? Same-element particles provide triple energy value vs off-element. Second Hydro generating 4-5 particles contributes 24-30 Energy when funneled, reducing requirements to 170-190% vs solo's 220-240%.
Can Columbina function with 160% ER in any team? Yes. Dual Hydro with Prototype Amber R5 or Favonius Codex operates at 160-170%. Triple Hydro needs only 100-110% regardless of weapon. Solo Hydro cannot reach consistent uptime at 160% without specialized weapons.
What happens if Columbina has too much ER? Excess ER beyond threshold provides zero value, wasting substats. 280% ER performs identically to 220% in rotation consistency but deals 15-20% less damage due to missing offensive substats.
Which weapon provides best ER value for F2P? Prototype Amber R5. Regenerates 18 Energy per rotation, 41.3% HP% secondary. Reduces solo Hydro to 160-180%, dual Hydro to 120-140%. Craftable 4-star.
Ready to maximize Columbina's potential? BitTopup provides secure, instant Genesis Crystal top-ups with competitive pricing. Whether pulling for Nocturne's Curtain Call, unlocking constellations, or refreshing resin for artifacts, BitTopup delivers resources with fast transactions and exclusive discounts. Power up your account and dominate Spiral Abyss with perfectly optimized Columbina builds!


