

Genshin Impact 6.0 Artifact Meta Overview
Current Meta Shifts and Trends
Here’s the thing about Version 6.0 – it’s not just adding new artifacts, it’s fundamentally changing the game. Nightsoul and Moonsign mechanics aren’t just fancy new terms; they’re genuinely challenging the established artifact hierarchy we’ve relied on for years.
Take Obsidian Codex, for instance. A flat 40% CRIT Rate for Natlan DPS characters in Nightsoul’s Blessing state? That’s not incremental improvement – that’s revolutionary. Meanwhile, Scroll of the Hero of Cinder City is offering 40% Elemental DMG bonuses that make reaction teams absolutely sing.
What really caught my attention (and honestly surprised me) is how Night of the Sky’s Unveiling scales from 15% to 30% CRIT Rate depending on your Nod-Krai character count. It’s the kind of team-building incentive that makes you completely rethink your roster priorities.
But here’s where it gets interesting – Lauma’s introduction has created what I’d call a Nahida problem. Her Dendro support capabilities convert standard Bloom reactions into CRIT-capable Lunar-Blooms, which has catapulted Nilou straight into S-tier territory. The catch? Lauma needs 800+ Elemental Mastery and 200% Energy Recharge, making Silken Moon’s Serenade practically mandatory. She’s now directly competing with Nahida for team slots, which means you’re forced into some tough Deepwood Memories allocation decisions.
Current Spiral Abyss trends are favoring sustained damage over those traditional burst windows we’re all used to. Floor 12 is practically begging for Hyperbloom, Vaporize, and Lunar Reactions, which has dramatically increased demand for Flower of Paradise Lost and Gilded Dreams. Higher HP enemies make Golden Troupe’s consistent off-field damage significantly more valuable than Noblesse Oblige’s burst-focused approach.
For optimizing builds with new characters, safe Genesis Crystal top up through BitTopup provides instant access to wishes. BitTopup offers competitive pricing, fast delivery, and 24/7 customer support for seamless artifact farming resource acquisition.
S-Tier Artifact Sets: Universal Powerhouses
Emblem of Severed Fate Analysis
Let’s be honest – Emblem remains the undisputed king of artifact sets. Converting Energy Recharge into Burst damage (75% bonus at 300% ER) while simultaneously solving energy requirements? It’s almost unfair how good this set is.
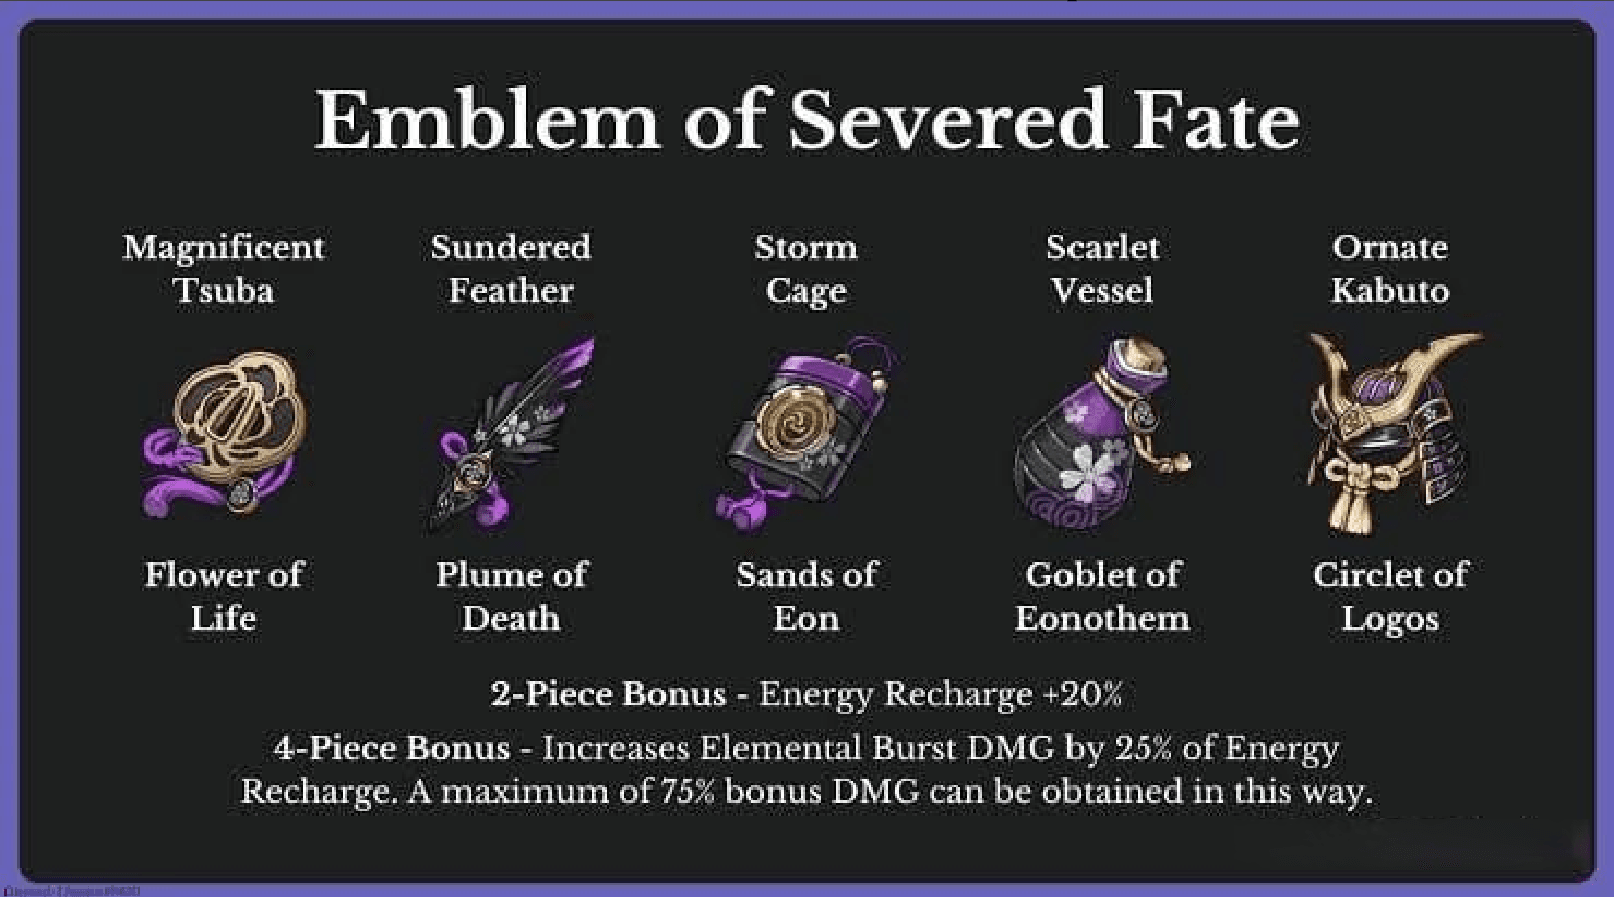
Best-in-slot for Xiangling, Xingqiu, Yelan, and basically every Burst-reliant Sub-DPS you can think of. The Momiji-Dyed Court domain pairs it with Shimenawa’s Reminiscence 2-piece (18% ATK), which means literally zero wasted Resin – something that’s become increasingly rare as the artifact pool expands.
Characters achieve their highest damage potential while maintaining consistent Burst uptime. The set’s efficiency really shines in teams where multiple characters need high ER, allowing supports to contribute meaningful damage while still fulfilling their energy roles.
Golden Troupe for Skill-Based DPS
Golden Troupe’s 70% Skill damage increase for off-field characters perfectly captures the current quickswap meta emphasis. Furina, Fischl, and Yae Miko reach their damage ceiling with this set, making their off-field contributions genuinely competitive with on-field DPS numbers.
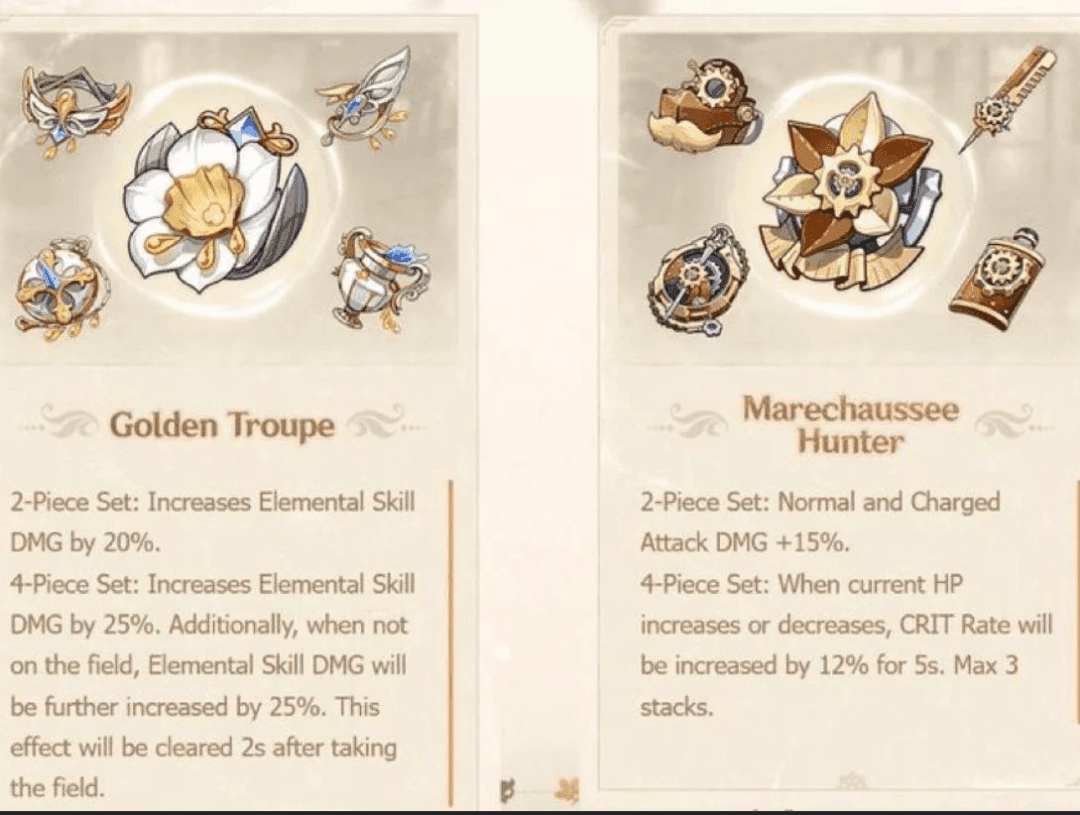
The Denouement of Sin domain’s pairing with Marechaussee Hunter creates exceptional farming efficiency – you’re essentially guaranteed useful pieces regardless of which set drops.
Marechaussee Hunter Versatility
This is where things get really interesting. Marechaussee Hunter’s 36% CRIT Rate has revolutionized character building through unprecedented stat flexibility. Neuvillette and Gaming can focus entirely on CRIT DMG while maintaining optimal ratios – it’s the kind of build freedom we’ve never had before.
Furina’s team-wide HP drain enables characters like Diluc and Keqing to achieve optimal CRIT ratios without requiring specific team compositions. That flexibility alone makes this set incredibly valuable for account progression.
A-Tier Artifact Sets: Role-Specific Excellence
Crimson Witch for Pyro DPS
Crimson Witch delivers 37.5% Pyro damage bonus and 15% Vaporize/Melt increase for reaction teams. The stacking mechanic (7.5% per Skill use, 3 stacks max) rewards sustained combat, which aligns perfectly with current Abyss design philosophy.
Still best-in-slot for Hu Tao and Diluc in reaction teams, though it loses significant value in non-reaction compositions. Worth noting – the set’s value has actually increased with the meta shift toward longer fights.
Blizzard Strayer for Cryo Teams
Blizzard Strayer offers 40% free CRIT Rate against Frozen enemies, enabling some truly aggressive CRIT DMG investment strategies. Ayaka and Ganyu reach their damage ceiling in proper Freeze teams.
However – and this is important – recent Abyss rotations have favored Freeze-immune enemies, reducing overall value despite the set’s unmatched potential when applicable. It’s frustrating, but something to consider for farming priorities.
Viridescent Venerer for Anemo Support
VV’s 40% Elemental RES shred remains one of the game’s most powerful damage multipliers for Pyro/Hydro/Electro/Cryo elements. The 60% Swirl damage increase allows characters like Kazuha and Sucrose to deal significant personal damage while providing team buffs.
The catch? Requires on-field trigger for RES shred, creating rotation constraints that can feel clunky with certain team compositions.
Character Role Artifact Recommendations
Main DPS Artifact Priorities
Marechaussee Hunter serves as the default choice for HP fluctuation characters – that 36% CRIT Rate enables some seriously aggressive CRIT DMG stacking. Crimson Witch remains optimal for Pyro DPS in reaction teams, while Blizzard Strayer dominates for Cryo DPS in Freeze compositions.
Character-specific sets like Fragment of Harmonic Whimsy for Arlecchino often outperform universal options, which is a trend I expect to continue.
Stat priorities follow a clear hierarchy: CRIT Rate/DMG > ATK% > Elemental Mastery (for reaction DPS) > Energy Recharge. Target that classic 1:2 CRIT ratio (75% Rate, 150% DMG) for maximum average damage, adjusting for sets that provide free CRIT Rate.
Sub-DPS and Burst Support Sets
Emblem of Severed Fate remains optimal for dual ER/damage scaling needs. Golden Troupe serves off-field Skill damage dealers beautifully.
Energy requirements typically fall between 160-220% ER, varying significantly based on particle generation and team composition. Characters like Xiangling need anywhere from 160-220% ER depending on whether you’re pairing with Bennett, Raiden, or running solo Pyro.
Utility Support Artifact Choices
Noblesse Oblige provides that universal 20% ATK buff for 12 seconds post-Burst – still incredibly valuable for team damage. Tenacity of the Millelith offers 20% ATK buff and 30% Shield Strength from persistent Skills. Archaic Petra delivers 35% Elemental DMG bonus for mono-element teams through Crystallize shard pickup mechanics, though the execution can be finicky.
New and Updated Artifact Sets in 6.0
Recently Released Sets Performance
Obsidian Codex provides an unprecedented 40% CRIT Rate for Natlan DPS in Nightsoul’s Blessing (Mavuika, Kinich, Chasca). It’s genuinely game-changing for these characters. Scroll of the Hero of Cinder City rivals Viridescent Venerer with 40% Elemental DMG bonus (12% base + 28% in Nightsoul’s Blessing) for reaction teams.
The Nod-Krai sets scale through Moonsign mechanics: Nascent Gleam (1 character) and Ascendant Gleam (2+ characters). Silken Moon’s Serenade and Night of the Sky’s Unveiling reward specific team compositions with genuinely powerful bonuses that make mono-region teams viable.
Meta Displacement Analysis
Lauma’s release has created direct Nahida competition in Bloom teams, which shifts artifact allocation between signature sets and essential Deepwood Memories. It’s the kind of meta shake-up that forces you to reconsider established team compositions.
Nilou’s S-tier elevation through Lunar-Bloom synergy has increased Elemental Mastery build demand across the board. Even Thoma’s enhanced Burgeon trigger value affects farming priorities – characters you might have ignored are suddenly relevant again.
For secure Genshin payment checkout, BitTopup ensures reliable resource access with multiple payment options and instant delivery, enabling consistent Resin refreshes for optimal artifact farming efficiency.
Domain Farming Priority and Efficiency
High-Value Domain Rankings
Here’s my current ranking based on pure efficiency:
Momiji-Dyed Court: Emblem’s universal applicability paired with Shimenawa’s valuable 2-piece bonus makes this a no-brainer
Denouement of Sin: Marechaussee Hunter + Golden Troupe pairing serves both DPS and Sub-DPS roles efficiently
Spire of Solitary Enlightenment: Essential Deepwood Memories + Gilded Dreams for Dendro reactions
Resin Efficiency Calculations
AR45+ guarantees one 5-star artifact per 20 Resin. Pre-AR45 farming results in significantly lower 5-star rates – seriously, don’t farm artifacts before AR45 unless you enjoy disappointment.
Domains pairing two widely useful sets maximize value. The Artifact Strongbox provides an alternative for targeting specific sets without farming inefficient domains, which has become increasingly valuable.
Strongbox vs Direct Farming Strategy
Strongbox is optimal for inefficient domains (Viridescent Venerer, Noblesse Oblige) or when targeting specific main stats. Direct farming works best for high-efficiency domains where both sets provide genuine value.
Pro tip: Use Level +0 artifacts as fodder. Leveled artifacts only recover 80% enhancement EXP, which adds up to significant waste over time.
Artifact Building Guidelines and Substat Priorities
Crit Ratio Optimization
That optimal 1:2 CRIT Rate to CRIT DMG ratio (75% Rate, 150% DMG) maximizes average damage output. The CRIT Value formula – (CRIT Rate × 2) + CRIT DMG – accounts for the 2:1 roll value ratio.
Characters with built-in CRIT sources adjust ratios accordingly. Neuvillette with Marechaussee can focus heavily on CRIT DMG since he’s getting that massive CRIT Rate boost from the set.
Energy Recharge Thresholds
ER requirements take absolute priority over offensive stats for Burst-reliant characters. There’s no point in having massive damage if you can’t cast your Burst consistently.
Requirements vary from 160-220% based on team composition and particle generation. Emblem of Severed Fate makes high ER builds offensively viable through ER-to-damage conversion, which is why it’s so universally valuable.
Elemental Mastery vs ATK% Decisions
Elemental Mastery takes priority for transformative reaction triggers (Hyperbloom, Bloom, Burgeon, Swirl). Kuki Shinobu in Hyperbloom teams needs EM main stats on Sands/Goblet/Circlet plus Level 90 for maximum effectiveness.
ATK% remains optimal for direct damage dealers and amplifying reactions (Vaporize, Melt). The distinction matters more than you might think for optimization.
Team Composition Artifact Synergies
Elemental Reaction Team Builds
Hyperbloom: Your Electro trigger (Kuki/Raiden) stacks maximum EM with Flower of Paradise Lost or Gilded Dreams Vaporize: Pyro DPS uses Crimson Witch while Hydro support runs Emblem (Xingqiu being the classic example) Freeze: Cryo DPS with Blizzard Strayer paired with Hydro supports using Tenacity or Noblesse
Mono-Element Team Artifacts
Archaic Petra’s 35% Elemental DMG bonus surpasses most support options for mono-element teams with a Geo character. Requires careful Crystallize shard pickup, which can be finicky but incredibly rewarding.
Geo Resonance teams can utilize multiple Husk users (Itto, Albedo) while maintaining team buffs – it’s one of the few scenarios where mono-element actually outperforms mixed teams.
Common Mistakes and Optimization Tips
Overvaluing Set Bonuses vs Substats
This is probably the biggest mistake I see players make. Broken sets with superior substats often outperform complete sets with poor substats. Set bonus value varies significantly by character role – DPS benefits more from offensive bonuses, while supports prioritize utility.
Use Genshin Optimizer to determine optimal combinations mathematically. Trust the numbers, not the set completion.
Neglecting Support Character Artifacts
Support optimization significantly impacts team performance through Noblesse/Tenacity buffs. ER requirements are often underestimated, leading to inconsistent rotations that tank your DPS.
Don’t sleep on 4-star Instructor set – it provides a valuable 120 EM team buff for utility-focused characters.
Inefficient Farming Routes
Avoid domains with poor set pairings. Peak of Vindagnyr versus Momiji-Dyed Court efficiency isn’t even close. Echoes of an Offering performs inconsistently with high ping (>100ms), making it unreliable for many players.
Always prioritize artifacts to +16 before any +20 upgrades. The cost from +16 to +20 equals +0 to +16, so you get much better value spreading upgrades across multiple pieces first.
Future-Proofing Your Artifact Investments
Upcoming Character Synergies
Universal sets (Emblem, Marechaussee) provide long-term value regardless of future releases. The character-specific set trend suggests tailored options will continue outperforming universal sets for their intended users.
Regional mechanics (Nightsoul, Moonsign) indicate future region-specific synergies that could reshape the meta again. It’s worth keeping this in mind for long-term planning.
Anticipated Meta Shifts
The sustained damage trend favors Golden Troupe and Marechaussee over burst-focused options. Expanding elemental reactions maintain EM and reaction damage set relevance.
Team synergy emphasis suggests team-wide benefit sets (Noblesse, Tenacity) offer solid investment security moving forward.
Long-term Farming Strategies
Prioritize high-efficiency domains for broad coverage. Build a diverse artifact inventory for flexible team building – you never know when a character will suddenly become meta-relevant.
Artifact Strongbox expansion will likely include newer sets eventually, making current investments more flexible over time.
Frequently Asked Questions
Which artifact sets should I prioritize farming as a new player reaching AR45? Start with Momiji-Dyed Court for Emblem of Severed Fate and Shimenawa’s 2-piece bonuses. Follow with Denouement of Sin for Marechaussee Hunter and Golden Troupe. These two domains cover most of your needs efficiently.
How do I decide between completing a 4-piece set or using better individual pieces? Use damage calculators like Genshin Optimizer for mathematical comparison. 4-piece bonuses typically provide 15-25% damage increase, so broken sets with significantly better substats often outperform complete sets with poor rolls.
Are the new 6.0 artifact sets worth farming over established options? New Natlan/Nod-Krai sets are best-in-slot for their intended characters but have limited universal applicability. Only farm them if you’re building specific characters they’re designed for.
What’s the optimal CRIT ratio for characters using Marechaussee Hunter? Aim for 40-50% CRIT Rate from substats and 200%+ CRIT DMG with Marechaussee’s 36% bonus. This creates an effective 76-86% CRIT Rate while maximizing damage output.
Should I use the Artifact Strongbox or farm domains directly? Use Strongbox for inefficient domains or when targeting specific main stats. Farm directly from high-efficiency domains where both sets provide value. Strongbox is excellent for off-set Elemental DMG Goblets.
How much Energy Recharge do different character roles typically need? Main DPS: 110-130% ER, Sub-DPS: 160-200% ER, Burst supports: 180-220% ER. These numbers vary significantly based on team composition and particle generation – same-element batteries reduce requirements considerably.


