Building powerful characters in Genshin Impact isn’t just about throwing resources at your favorites and hoping for the best. Trust me—I’ve seen too many players dump everything into a single character only to wonder why their damage feels lackluster. The truth? It’s all about understanding how these interconnected systems actually work together.
After analyzing community data and testing countless builds, artifacts consistently rank as the highest impact factor for character performance. But here’s the thing—achieving optimal strength requires a strategic approach across multiple upgrade paths, not just artifact gambling.
Understanding Character Strength Fundamentals
Let’s start with something that trips up a lot of players: character strength stems from multiplicative relationships, not additive ones. This means a well-built 4-star character can absolutely demolish a poorly invested 5-star unit in practice.
Every damage calculation begins with base ATK—that’s your character level plus weapon base ATK combined. Simple, right? Well, not quite. Characters like Hu Tao and Yelan throw this out the window by scaling with HP instead, while Itto and Noelle use DEF scaling. This fundamentally changes everything about how you should build them.
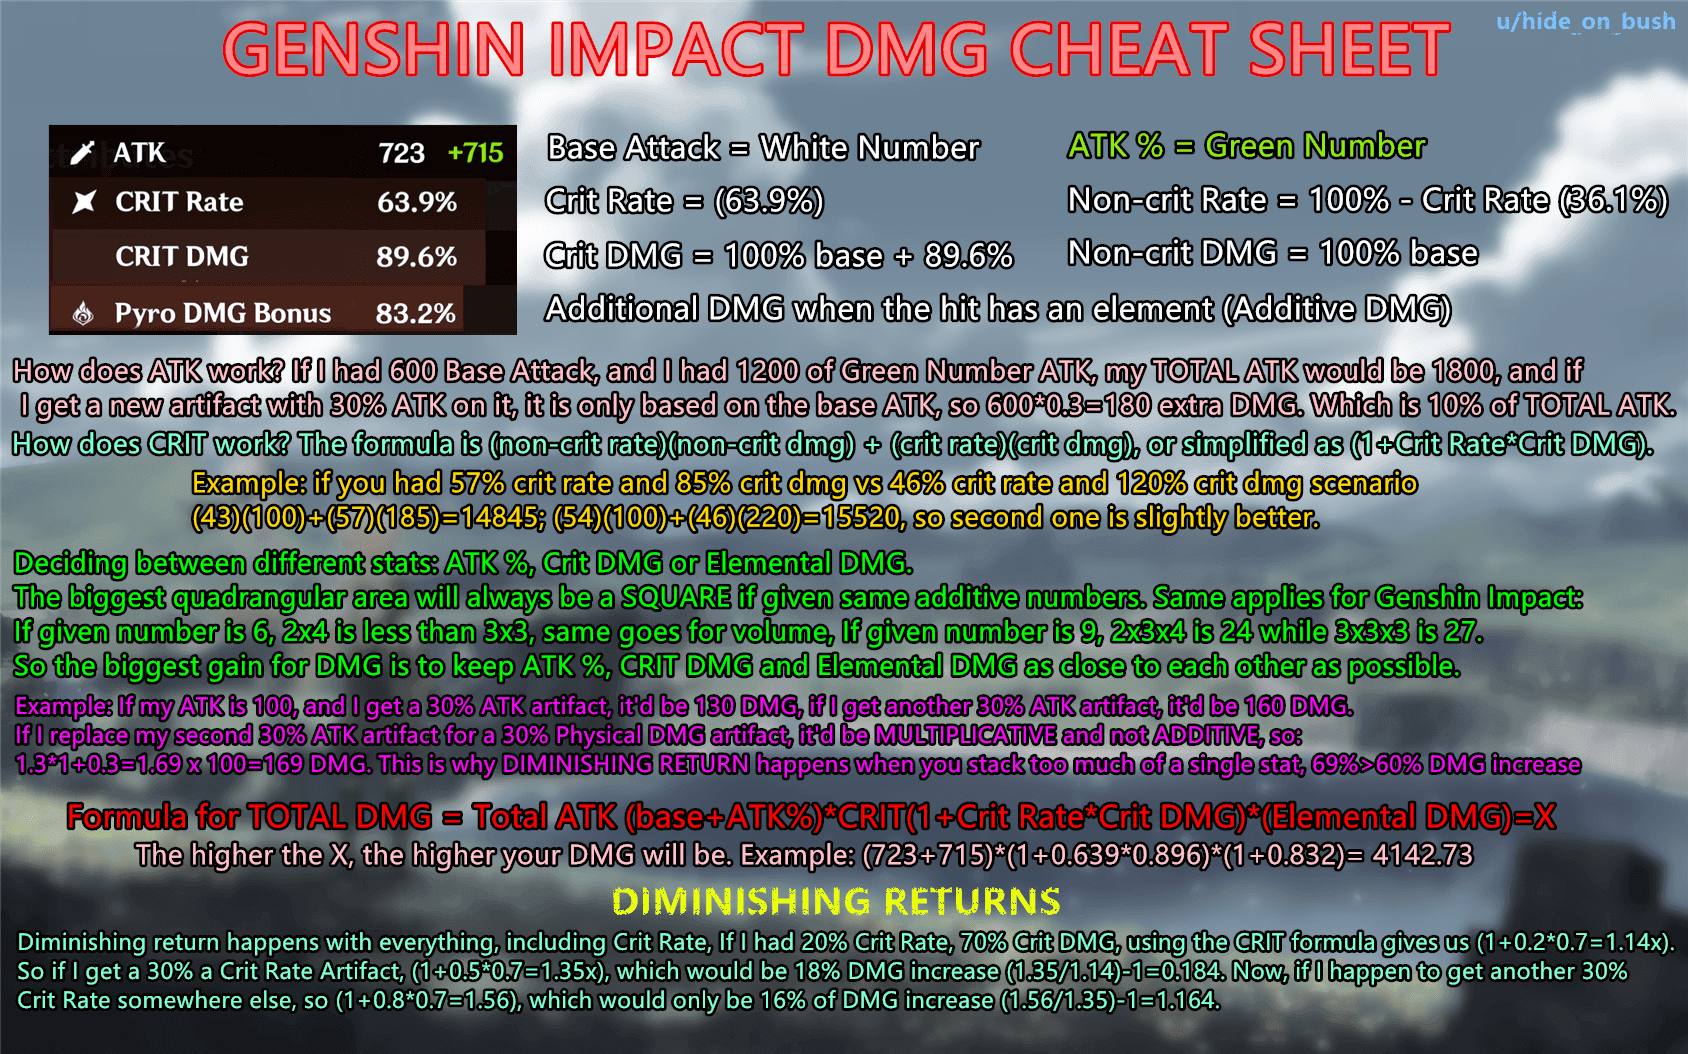
Here’s where it gets interesting: the damage formula multiplies your base stats by percentage bonuses from artifacts, weapons, and buffs. A character with 2000 base ATK and 100% ATK bonus actually deals more damage than one with 1500 base ATK and 150% ATK bonus. The math matters more than you’d think.
Modern Genshin has shifted heavily toward elemental reactions as primary damage sources. Transformative reactions like Hyperbloom and Swirl? They completely ignore ATK and CRIT stats, scaling exclusively with character level and Elemental Mastery. It’s a whole different game within the game.
Team roles determine everything about optimization priorities. Main DPS characters need maximum field time efficiency, while sub-DPS units focus on those crucial burst windows. The most effective teams—and this is where strategy really shines—compress multiple roles into individual characters. Raiden Shogun is the perfect example: energy generation, off-field damage, and burst DPS phases all rolled into one.
Artifact Optimization Priority System
Okay, let’s talk about the elephant in the room. Artifacts. Community polling shows they account for 51% of perceived character strength—more than triple any other factor. But here’s my honest take: they’re also the most frustrating part of character building.
Artifact main stats provide the largest individual stat contributions, so get these right first. Sands priorities depend entirely on your character’s scaling: ATK% for traditional DPS units, HP% for HP-scaling characters like Yelan and Neuvillette, DEF% for DEF-scaling units like Itto and Albedo. Energy Recharge% becomes crucial when burst uptime matters more than raw damage.
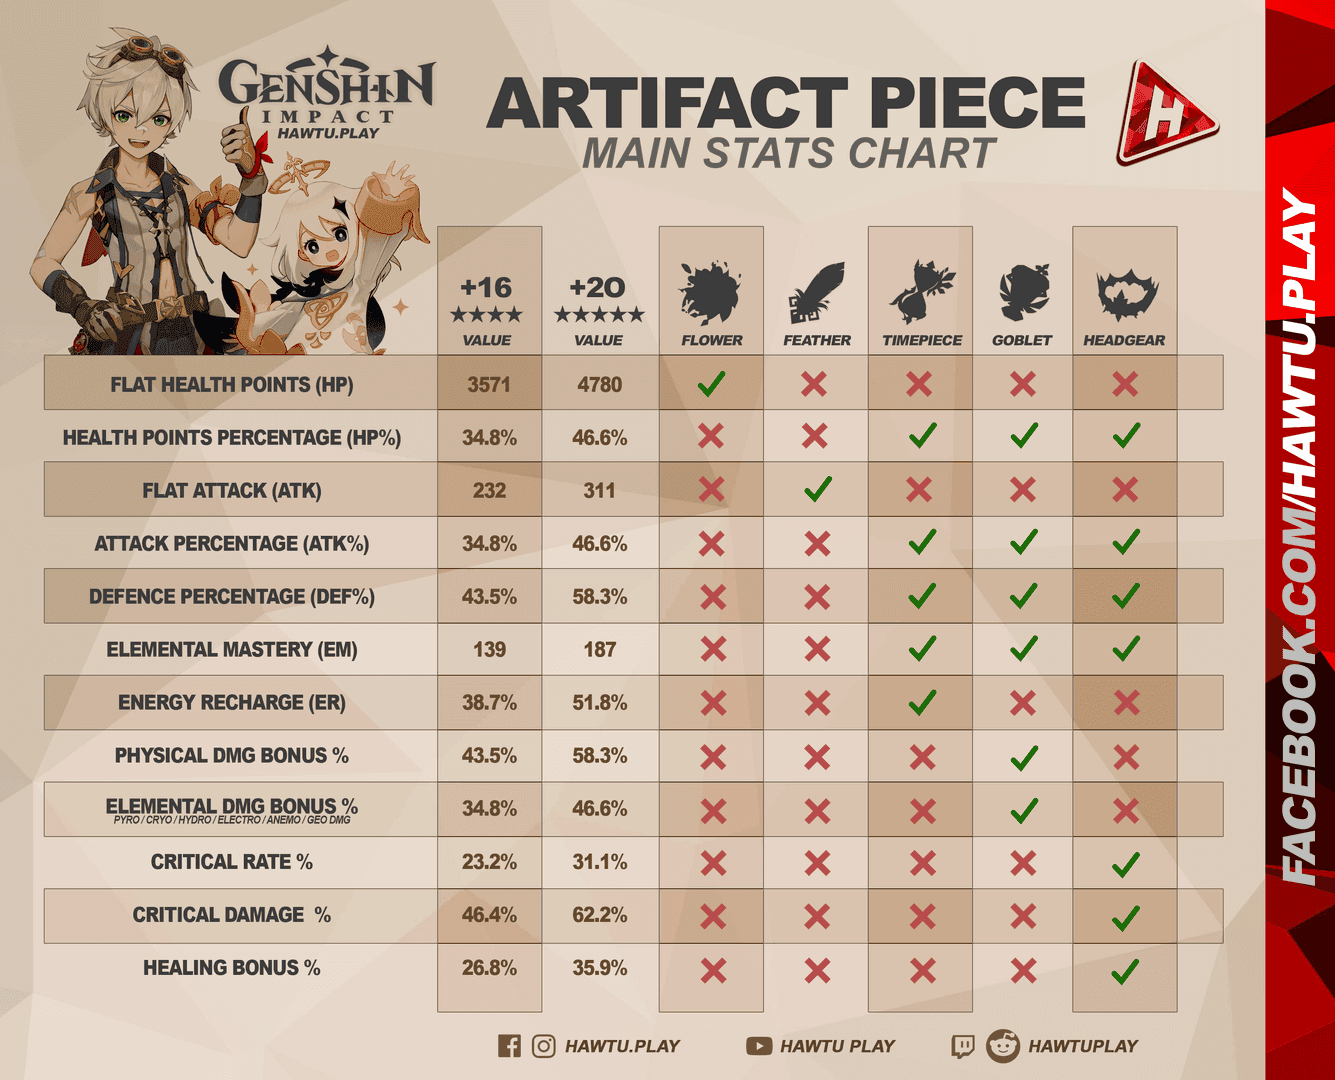
Goblets should match your damage type—Elemental DMG Bonus for the character’s element (46.6% max), Physical DMG Bonus for physical DPS builds. Pretty straightforward, though finding the right goblet can be… well, let’s just say it tests your patience.
The community uses CRIT Value (CV) to evaluate artifact quality: CV = (CRIT Rate × 2) + CRIT DMG. Benchmarks include 21-30 CV (decent), 31-40 CV (good), and 41+ CV (excellent). But here’s something a lot of guides miss—CV ignores other valuable substats like Energy Recharge and HP%. Don’t get too caught up in CV tunnel vision.
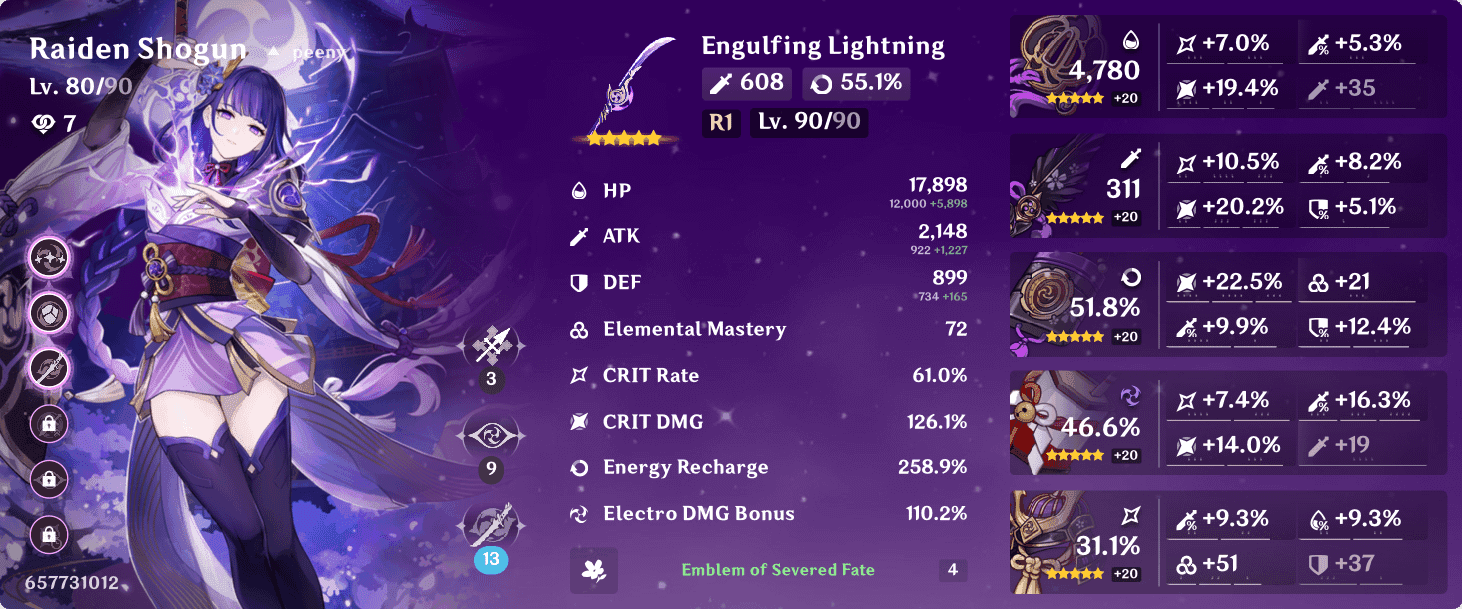
Certain artifact sets provide universal value across multiple characters. Emblem of Severed Fate offers Energy Recharge and Burst DMG scaling, making it best-in-slot for energy-hungry sub-DPS units like Xiangling, Xingqiu, and Raiden Shogun. Viridescent Venerer remains essential for Anemo supports with that 40% elemental resistance reduction to swirled elements.
Weapon Selection and Refinement Strategy
Weapons provide the second-largest impact on character strength through base ATK scaling and passive effects. The difference is pretty dramatic—5-star weapons typically provide 600-700 base ATK at level 90, while 3-star weapons offer only 350-400.
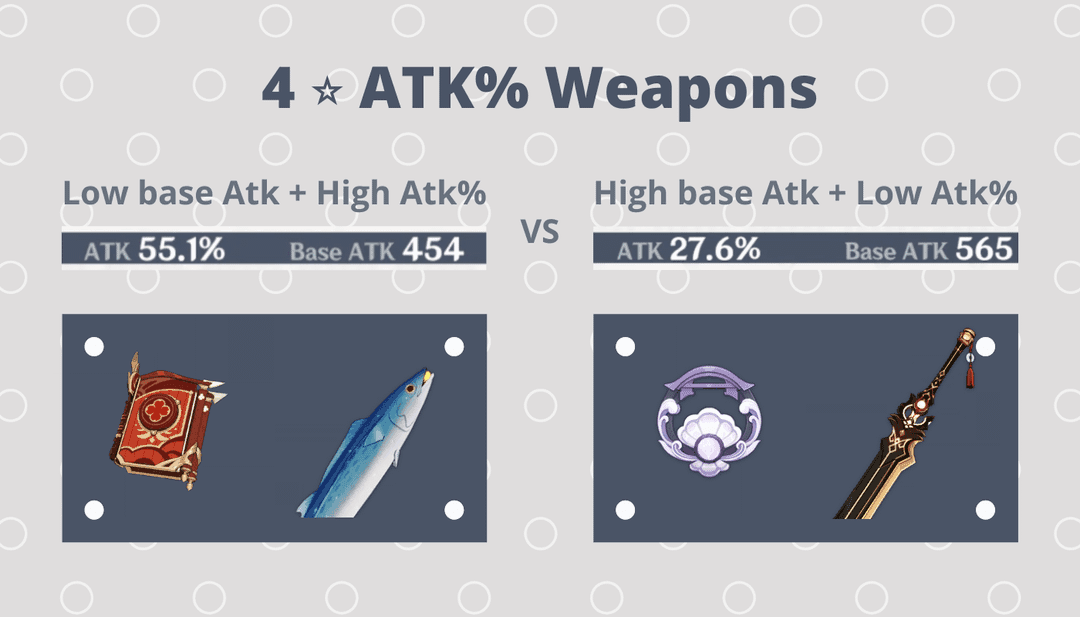
For characters scaling with base ATK (like Bennett’s buff), weapon base ATK matters more than secondary stats or passives. Bennett’s ATK buff scales exclusively from his base ATK plus weapon base ATK—no exceptions. Conversely, characters with HP or DEF scaling benefit more from matching secondary stats. Hu Tao gains significantly more from HP% secondary stats than from higher base ATK.
Weapon passives can completely change how a character performs. The Catch provides Energy Recharge and increases Elemental Burst CRIT Rate by 12% and damage by 32%—that’s massive for burst-focused characters. Sacrificial weapons reset Elemental Skill cooldowns, solving energy generation issues for characters like Xingqiu and Sucrose.
Here’s a refinement reality check: R1 to R2 typically provides the largest improvement, while R4 to R5 offers minimal gains. Don’t feel pressured to max refine everything.
Several 4-star weapons compete with 5-star alternatives for specific characters. Iron Sting provides Elemental Mastery secondary stats perfect for Anemo supports like Kazuha. Event weapons often provide unique effects unavailable elsewhere—Cinnabar Spindle perfectly matches Albedo’s DEF scaling with CRIT DMG and skill damage bonuses.
Genshin Impact Top Up services enable consistent weapon banner access for optimal character builds. BitTopup offers competitive pricing and fast delivery for Genesis Crystal purchases, supporting long-term account development.
Talent Investment Framework
Talents provide guaranteed damage increases through multiplier scaling—no RNG involved. Main DPS characters typically prioritize their primary damage source first. Hu Tao’s Elemental Skill provides Pyro infusion and massive ATK scaling, while Ayaka’s Elemental Burst delivers her primary damage output. Multi-scaling characters like Alhaitham require balanced talent investment between Normal Attacks and Elemental Skill projections.
Support characters should prioritize talents matching their team role. Bennett’s Elemental Burst provides ATK buffing and healing—both effects scale with talent level, making it his only essential upgrade. Anemo supports like Kazuha and Sucrose gain minimal personal damage from talent levels since Swirl damage scales with character level and Elemental Mastery only.
Let’s talk numbers: leveling a single talent from 1 to 10 requires 1,652,500 Mora, specific talent books, enemy materials, and one Crown of Insight. That’s a massive investment. Talent levels 8-9 provide excellent value without Crown investment. Level 10 offers minimal improvement for massive resource cost—save your crowns for characters you truly love.
Weekly boss materials gate talent progression beyond level 6, creating bottlenecks for newly released units. Plan accordingly.
Team Synergy and Elemental Reactions
Individual character strength means absolutely nothing without proper team composition. I can’t stress this enough. Meta teams like National, Hyperbloom, and Freeze leverage elemental reactions and character synergies to achieve performance exceeding the sum of individual parts.
Amplifying reactions (Vaporize and Melt) multiply the triggering attack’s damage by 1.5x or 2x based on element order. Forward Vaporize (Pyro on Hydro) provides 1.5x multiplier, while reverse Vaporize (Hydro on Pyro) gives 2x. Transformative reactions deal fixed damage based on character level and Elemental Mastery—Hyperbloom cores at level 90 with 1000 EM deal approximately 30,000 damage per reaction.
Quicken reactions (Aggravate and Spread) add flat damage to attacks rather than multiplying them, scaling with both reaction stats and traditional damage stats. This makes them incredibly flexible for hybrid builds.
Energy Recharge enables consistent Elemental Burst usage—the primary damage source for most characters. Same-element characters generate more energy for each other through elemental resonance and particle mechanics. Raiden Shogun’s Elemental Skill generates energy for all team members, reducing individual ER requirements across the board.
Optimal rotations maximize buff uptime and reaction triggers within specific time windows. Bennett’s Elemental Burst provides ATK buffs for 12 seconds, requiring precise timing. Snapshot mechanics preserve buffs for the entire duration of persistent abilities—Xiangling’s Elemental Burst snapshots Bennett’s ATK buff, which is why their synergy is so powerful.
Resource Management and Investment Planning
Efficient resource allocation accelerates account progression more than individual character optimization. This is where strategic thinking really pays off.
Weekly bosses should be prioritized for their reduced resin cost (30 for first three) and exclusive talent materials. Character and weapon ascension materials offer guaranteed progression without RNG elements. Artifact farming should begin only after reaching Adventure Rank 45, when domains guarantee 5-star drops—I cannot emphasize this enough.
Enemy material farming varies significantly in efficiency. Specters received 65.59% of votes as the most annoying material to farm due to their mobility and explosion mechanics (and honestly, I agree completely). Local specialties require real-time respawn cycles, typically 48-72 hours. Condensed Resin doubles domain rewards for 40 resin, saving time without efficiency loss.
Account progression follows predictable phases. Early game focuses on leveling core team members to 60/70 with level 6 talents. Mid-game emphasizes reaching 80/90 with level 8 talents and basic artifact sets. End-game pursues perfect artifacts and level 9-10 talents—this is where the real grind begins.
Constellation planning requires extreme patience for 5-star characters. C0 to C1 costs approximately 160 pulls on average, while C0 to C6 requires nearly 1000 pulls. Plan your finances accordingly.
Buy Genesis Crystals through reliable platforms supports consistent progression toward character goals. BitTopup’s secure payment processing and instant delivery enable strategic pulling during limited banners.
Common Character Building Mistakes
Let me save you some heartache by highlighting the biggest mistakes I see repeatedly.
Farming artifacts before AR45 represents the most common early-game mistake due to poor 5-star drop rates. Just don’t do it. Spreading resources across too many characters simultaneously slows overall progression—building 4-8 core characters to high investment levels provides better account strength than partially building 15+ characters.
Crown usage on non-essential talents wastes irreplaceable resources. Be selective.
Ignoring character scaling types leads to fundamental building errors. Building ATK% on DEF-scaling characters like Itto provides minimal benefit compared to DEF% investment. CRIT ratio imbalance reduces damage output significantly—the optimal ratio approaches 1:2 CRIT Rate to CRIT DMG. Extreme ratios like 40% rate with 250% damage provide lower average damage than balanced 70%/140% distributions.
Building characters in isolation ignores the team-based nature of Genshin combat. A perfectly built Ayaka provides minimal value without Hydro application for Freeze reactions. Redundant role assignment wastes team slots—running two main DPS characters reduces field time efficiency.
Meta Character Build Examples
Raiden Shogun exemplifies modern DPS design with multiple build paths. Her traditional build uses Emblem of Severed Fate with Energy Recharge/Electro DMG/CRIT main stats, targeting 250-270% ER for maximum burst damage. Her Hyperbloom build uses Flower of Paradise Lost with full Elemental Mastery main stats, ignoring traditional DPS stats entirely for reaction damage scaling. Two completely different approaches, both viable.
Alhaitham represents on-field Dendro DPS optimization. Gilded Dreams provides EM scaling for Spread reactions while maintaining CRIT ratios for direct damage. His build balances 300-400 EM with 70%/140% CRIT ratios, demonstrating hybrid scaling optimization perfectly.
Bennett’s build prioritizes base ATK for his buff scaling. Weapons with highest base ATK take priority regardless of secondary stats—this is non-negotiable. Noblesse Oblige 4-piece provides team-wide ATK buffs, making Bennett a double buffer. Energy Recharge requirements typically target 200%+ for consistent burst uptime.
Kazuha builds pure Elemental Mastery for maximum team buffing. His passive converts EM into elemental damage bonuses for swirled elements, making 1000+ EM the primary goal. Viridescent Venerer 4-piece provides additional resistance reduction, creating multiplicative team damage increases.
Measuring and Testing Character Performance
Genshin Optimizer provides comprehensive damage calculations incorporating all character stats, weapon effects, and artifact bonuses. The tool calculates effective DPS across full rotations, accounting for energy requirements, buff durations, and reaction triggers. Damage per screenshot comparisons can be misleading without considering practical factors like setup requirements and rotation complexity.
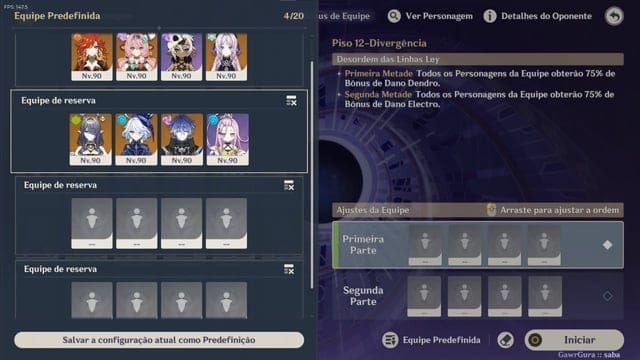
Spiral Abyss represents the primary DPS check content, with clear time requirements for maximum rewards. Floor 12 typically requires teams capable of dealing 40,000+ DPS to achieve 36-star clears within time limits. Main DPS characters typically need level 80/90 with level 8+ talents and decent artifact sets for consistent clears.
Frame data analysis reveals optimal animation canceling and swap timing for maximum DPS rotations—though honestly, this level of optimization is more for theorycrafters than casual players. Energy particle generation follows specific rules based on skill types and enemy interactions.
Genshin Impact Recharge options through BitTopup support consistent character development and testing. Reliable Genesis Crystal access enables pulling for optimal weapons and constellations needed for advanced character optimization.
Frequently Asked Questions
What should I prioritize first when building a new character? Start with weapon level to 90, then character level to 80/90, followed by key talents to level 8. These provide guaranteed stat increases without RNG. Only farm artifacts seriously after reaching AR45 when domains guarantee 5-star drops.
How important are artifacts compared to weapons for character strength? Community polls show artifacts account for 51% of perceived character impact, while weapons contribute 15%. However, weapons provide guaranteed upgrades while artifacts involve heavy RNG. Prioritize weapon upgrades first for reliable progression.
Which talents should I level first for DPS characters? Level the talent corresponding to your character’s primary damage source. For on-field DPS using normal attacks, prioritize Normal Attack talent. For burst-window DPS like Ayaka, focus on Elemental Burst first.
What artifact main stats are most important for damage? Use ATK% or character-specific scaling stat on Sands, Elemental DMG Bonus on Goblet, and CRIT Rate or CRIT DMG on Circlet. Maintain 1:2 CRIT Rate to CRIT DMG ratio for optimal damage.
Ready to optimize your character builds and dominate the Spiral Abyss? Visit BitTopup for secure, fast Genesis Crystal top-ups to support your character development goals. With competitive pricing and instant delivery, you can focus on perfecting your team compositions while we handle your recharge needs efficiently and safely.


