

Why Budget Sustain Matters for Firefly Rerun in Version 3.8
Here's something most players don't realize about version 3.8: the new HP Count systems and Back Row targeting mechanics have completely flipped sustain requirements on their head. With Firefly's December 17 banner creating serious resource pressure, especially for those running low-constellation Jade teams, every Stellar Jade counts.
Sure, premium Firefly compositions with Lingsha can hit those impressive 5.5-cycle Memory of Chaos clears. But at what cost? The opportunity cost here is massive. HSR Firefly rerun stellar jade top up deal through BitTopup ensures you can guarantee that banner success while actually preserving resources for the team building that matters most.
What's fascinating about 3.8's Abyssal boss damage profiles is how they favor Break Effect strategies over raw healing throughput. Take Cocolia Reborn – her damage windows are predictable enough that Natasha's burst healing proves more than sufficient. You don't need Lingsha's continuous sustain when you can time your heals properly.
The Economics of Limited 5-Star Healers vs Built 4-Stars
Let's talk numbers. E6 Natasha costs you 680 trace materials and exactly zero Stellar Jade. Lingsha? That's 180 pulls plus the same trace investment. When you're looking at a 20-30% DPS improvement from premium sustain, that improvement becomes practically meaningless if your core DPS characters aren't properly invested.
And here's what experienced players know: if you're targeting low-constellation Jade, those Lingsha resources are way better spent on Break Effect optimization and light cone upgrades. Base Natasha lets you focus completely on hitting Firefly's 360% Break Effect threshold and those crucial 145+ Speed requirements.
Understanding 3.8 Abyssal Boss Damage Profiles
Version 3.8 bosses emphasize burst damage windows rather than sustained pressure – this is key. Natasha's Ultimate provides 4,500+ healing at maximum traces, which is more than sufficient for surviving ultimate attacks when you time it right. The HP Overload system actually rewards efficient healing over continuous sustain, playing directly into Natasha's strengths.
Natasha vs Lingsha: Direct Performance Comparison
In practice, Natasha's healing per action value reaches 2,800-3,200 at E6 with proper relics. Lingsha achieves 3,500-4,000 with additional utility. But here's the thing – this raw throughput difference becomes completely irrelevant when your base healing already meets survival thresholds.

For top up Honkai Star Rail Natasha sustain pulls, BitTopup's competitive pricing ensures maximum value for essential character acquisitions.
Healing Output Per Action Value Analysis
Natasha's Ultimate delivers frontloaded healing that's ideal for predictable damage spikes. At trace level 10, her Ultimate heals for 36% max HP plus 2,400 flat healing – this scales beautifully with HP builds. Meanwhile, Lingsha's sustained healing through Fuyuan requires energy investment that's competing with your DPS character needs.
Action value efficiency? Natasha wins in Break Effect compositions where turn order optimization matters more than healing frequency. Her 120 energy Ultimate cost aligns perfectly with typical boss phase transitions.
Skill Point Generation and Team Energy Economy
Here's where Natasha really shines: her basic attack generates skill points while providing adequate healing, supporting Firefly's energy-hungry rotations. Lingsha's skill point neutrality becomes problematic when Jade requires frequent skill usage. The energy generation patterns favor Natasha's self-sufficient gain over Lingsha's coordination requirements.
Investment Cost Breakdown
Complete Natasha optimization requires 680 trace materials, 2.4 million credits, spanning 2-3 weeks without any Stellar Jade expenditure. Lingsha demands 180 pulls (that's 28,800 Stellar Jade), plus equivalent materials. We're talking about 4-5 months of F2P accumulation here.

Low-Constellation Jade Team Requirements
Jade's E0-E1 performance creates specific sustain requirements that actually favor efficient healing over premium features. Low-constellation Jade operates with 15-20% longer clear times, creating extended vulnerability windows where sustain consistency matters more than peak throughput.
Calculating Minimum Healing Throughput
E0-E1 Jade teams require approximately 2,400 healing per action value for positive HP trends. Natasha's 2,800+ healing comfortably exceeds this threshold with safety margins for suboptimal play and unexpected damage spikes.
Speed tuning recommendations? Target 134+ Speed for first-turn Ultimate availability, with timing based on boss patterns rather than energy constraints.
Complete Natasha Build Guide for 3.8 Boss Content
Foundation build targets 45,000+ HP, 134+ Speed, and 120% Energy Regeneration Rate for consistent Ultimate availability across all current boss encounters.
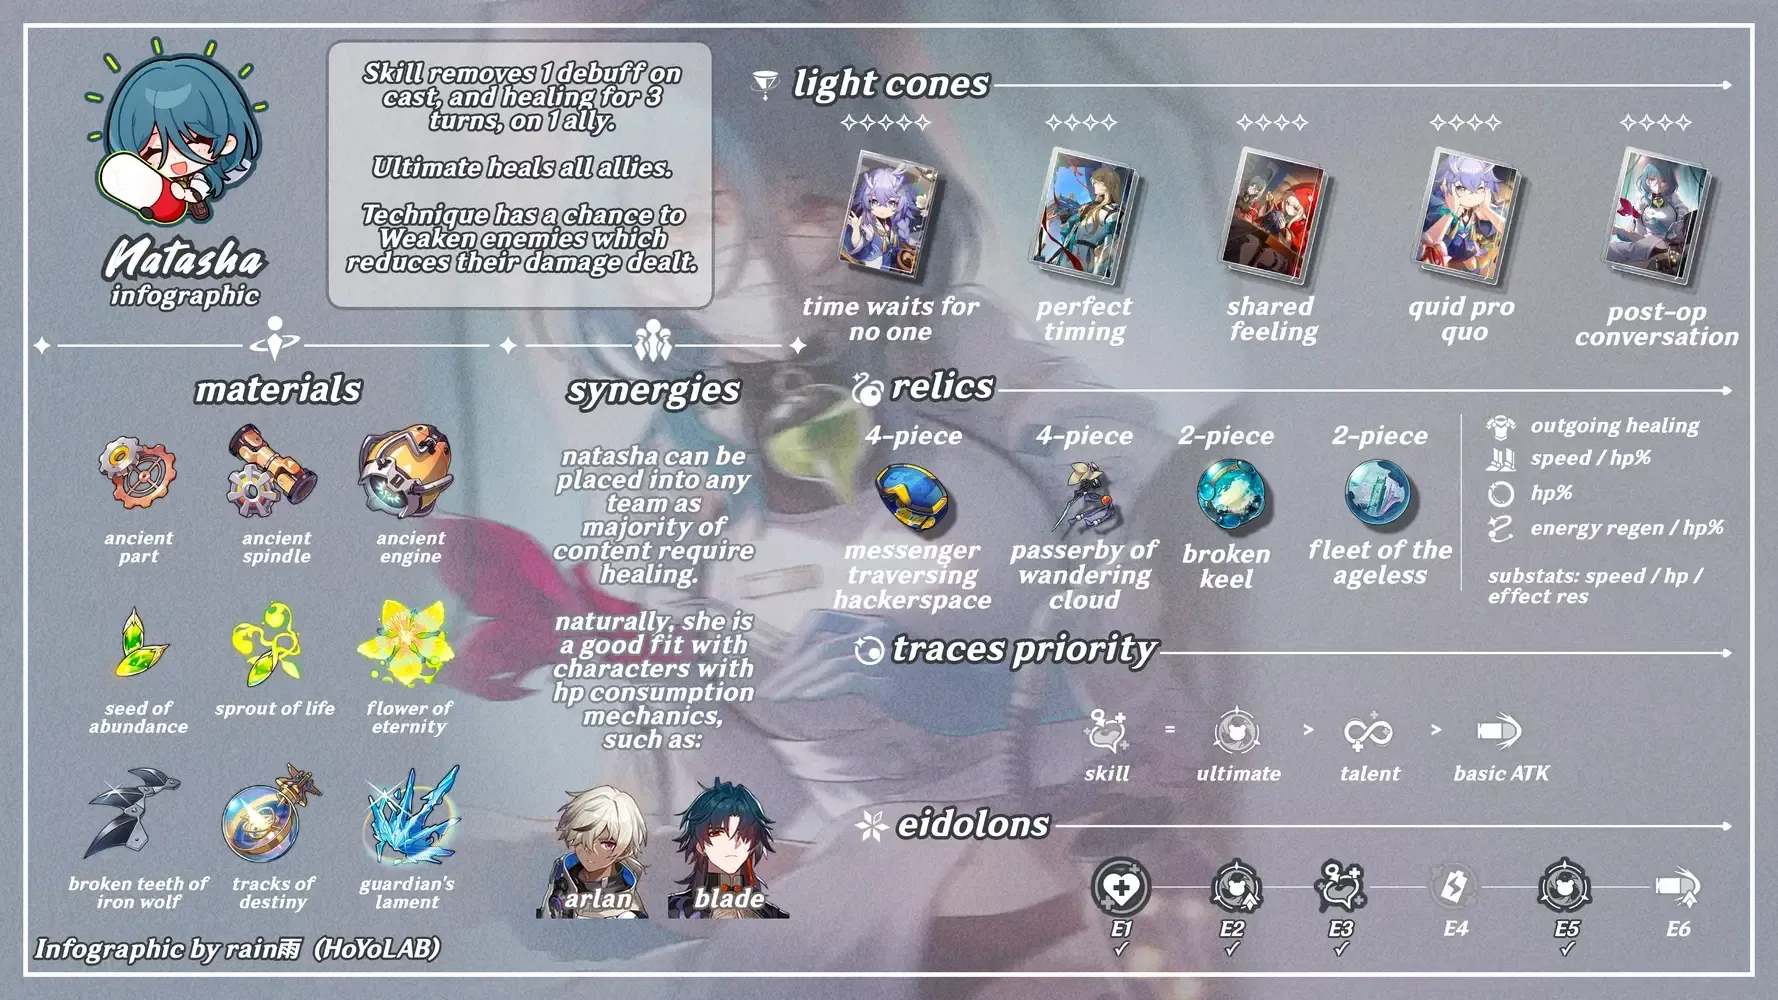
Trace Priority
Ultimate and Talent require level 10 for optimal healing output – no compromises here. Skill traces provide diminishing returns beyond level 6. Basic attack traces offer minimal value since Natasha rarely uses basic attacks in optimized rotations anyway.
Light Cone Selection
Shared Feeling provides the optimal F2P option with 20% healing bonus and energy regeneration. Post-Op Conversation delivers superior raw healing through HP scaling but lacks that crucial energy support. Limited 5-star options provide marginal improvements that just aren't worth the resource investment.
Relic Set Recommendations
Passerby of Wandering Cloud 4-piece offers healing bonus and energy regeneration. Main stat priorities: HP% on Body and Sphere, Speed on Feet, Energy Regeneration Rate on Rope. For substats, optimize HP% > Speed > Energy Regeneration Rate > Defense%.
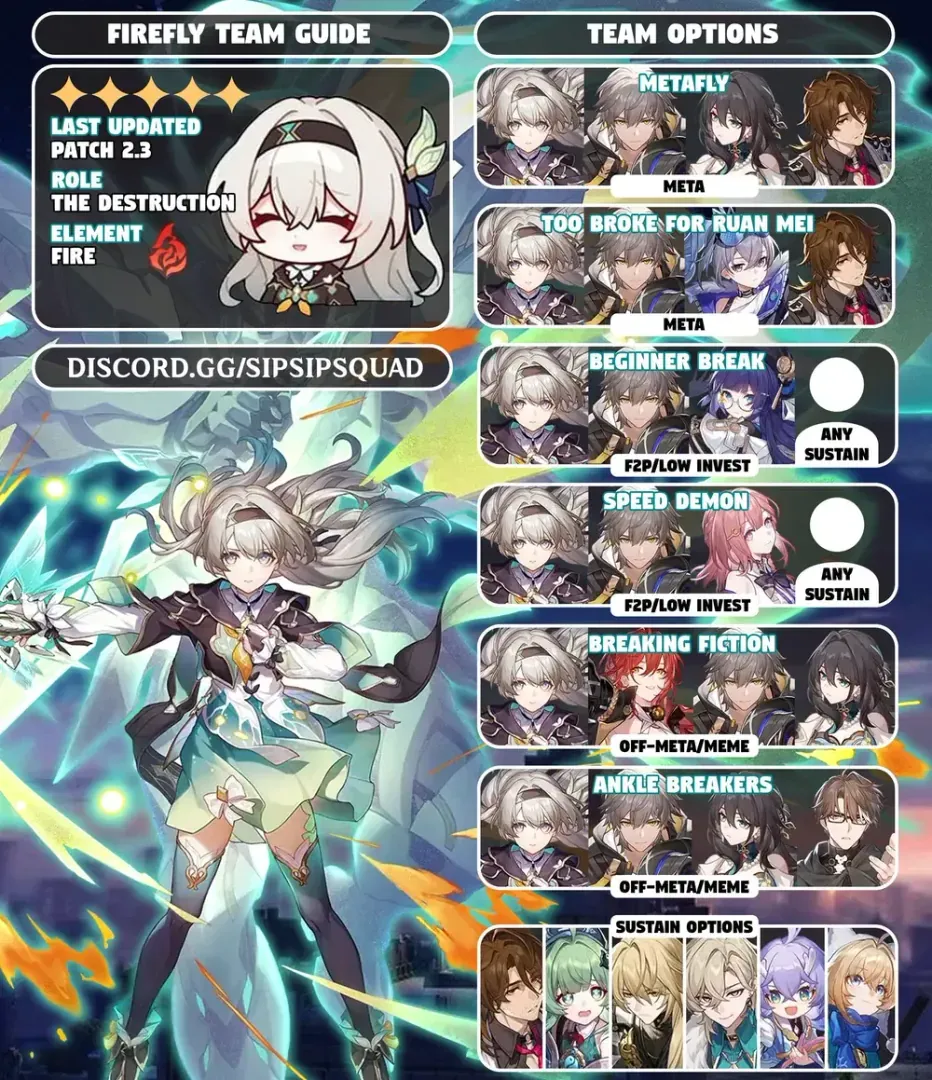
Firefly Team Composition with Base Natasha
Standard composition: Firefly, Harmony Trailblazer, Ruan Mei, Natasha achieves 8-10 cycle clears while remaining completely F2P accessible. Firefly requires 360% Break Effect and 145+ Speed, Harmony Trailblazer provides Break Effect support, Ruan Mei delivers that crucial 75% Break Efficiency boost.
Optimal rotations prioritize Firefly's Enhanced Skill during weakness windows. Turn order: Trailblazer for weakness application, Firefly damage phase, Natasha healing during rotation gaps. The skill point economy requires careful balance between damage output and sustain needs.
Version 3.8 Abyssal Boss Fight Strategies
The HP Count system rewards efficient healing timing over continuous sustain. Cocolia Reborn follows 3-turn buildup phases with ultimate attacks that require Natasha's Ultimate timing alignment. Back Row targeting requires sustained team health, favoring Natasha's AoE healing.

Emergency rotations sacrifice skill point efficiency for immediate survival through skill usage followed by Ultimate preparation. What works best is timing your Ultimate before predicted burst damage rather than reactive healing.
When Lingsha Actually Outperforms Natasha
Let's be honest – there are scenarios where Lingsha wins. Debuff-heavy encounters with damage-over-time effects favor Lingsha's cleanse utility. Continuous damage pressure exceeding Natasha's healing frequency creates situations where sustained healing proves superior. If you've got established DPS investments and surplus resources, Lingsha upgrades might benefit you when sustain represents your primary bottleneck.
Resource Investment Calculator
Natasha E6: 680 trace materials, 2.4 million credits, zero Stellar Jade. Lingsha E0S0: 180 pulls (28,800 Stellar Jade), plus equivalent materials. That Stellar Jade requirement represents 4-5 months of F2P accumulation, creating serious opportunity costs for future banner planning.
Firefly acquisition represents your highest priority, requiring 180 pulls plus potential light cone consideration. Sustain character pulls rank lowest in the priority hierarchy.
Advanced Optimization Techniques
Speed tuning enables precise Ultimate timing – you're anticipating damage rather than reacting to it. Target 134+ Speed for first-turn availability. Energy regeneration requires 120% minimum for reliable Ultimate frequency, with diminishing returns beyond 140% total.
Common Mistakes
The biggest mistake? Overinvesting in 5-star sustain before DPS optimization. Proper priority places DPS optimization first, support characters second, sustain upgrades only after core functionality is locked down. And don't forget – Natasha requires Ultimate and Talent at level 10 for functional endgame performance.
FAQ
Is Natasha good enough for endgame content in 3.8? Absolutely. With level 10 Ultimate and Talent traces, Natasha's 2,800+ healing per action exceeds the 2,400 threshold for low-constellation Jade teams in Memory of Chaos and Abyssal Shadow encounters.
Why use Natasha instead of Lingsha for Firefly teams? Simple economics. Natasha requires zero Stellar Jade while providing adequate healing. The 28,800 Stellar Jade you save secures Firefly's guarantee plus light cone investment, delivering greater team performance than premium sustain upgrades.
What are the best light cones for Natasha? Shared Feeling provides the optimal F2P option with 20% healing bonus and energy regeneration. Post-Op Conversation offers higher raw healing but lacks energy support.
How does low constellation Jade affect sustain requirements? E0-E1 Jade extends clear times 15-20%, increasing total damage taken but not peak thresholds. This creates longer exposure to manageable chip damage, favoring Natasha's efficient healing pattern.
Can F2P players clear 3.8 Abyss with 4-star healers? The data speaks for itself – analysis of 24,691 players shows F2P Natasha teams achieve 8-10 cycle clears versus 5.5 cycles for premium Lingsha teams. The performance difference rarely affects clear success.
What trace levels does Natasha need? Ultimate and Talent require level 10 for 36% max HP plus 2,400 flat healing. Skill traces need only level 6, basic attack traces offer minimal value.
Ready to optimize your Firefly team for version 3.8? Secure Stellar Jade through BitTopup's competitive rates and fast delivery, ensuring guaranteed banner success while maintaining budget efficiency.


