

Look, I’ve been using the Parametric Transformer since it dropped in Version 1.3, and honestly? It’s one of those gadgets that seems underwhelming at first but becomes absolutely essential once you understand how to work it properly. This thing converts your surplus junk into legitimate progression materials – and I mean good stuff.
Let me walk you through everything you need to know.
What is the Parametric Transformer in Genshin Impact
Basic Mechanics and Function
Here’s the deal: this device takes materials worth exactly 150 quality points and spits out 5-10 random reward bundles. We’re talking Mora, Character EXP materials, Talent books, weapon enhancement ore – the works.
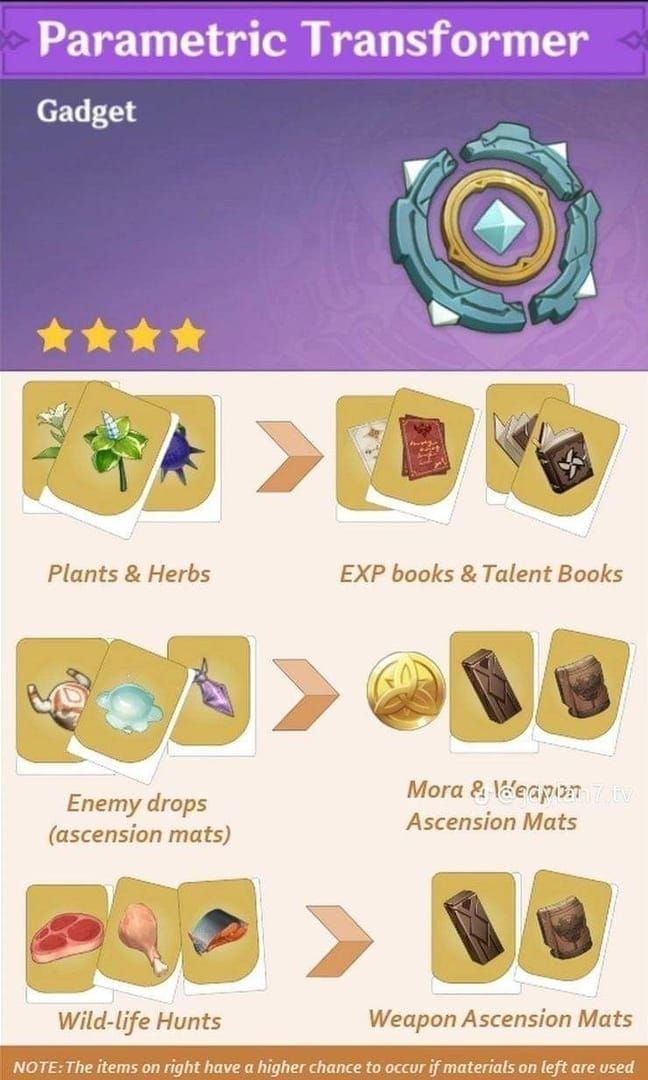
The point system is straightforward. Gray items (Common) = 1 point each. Green items (Uncommon) = 2 points. Blue items (Rare) = 4 points. You can mix and match however you want to hit that 150-point target. Going over? Waste of materials – the excess does nothing.
For charging solutions and account support, Genesis Crystals troubleshooting help through BitTopup provides comprehensive Genshin Impact transaction support with competitive pricing and instant delivery.
Getting Your Hands on It
You’ll need Adventure Rank 31 and completion of the Tianqiu Treasure Trail World Quest. Find Lan hanging out next to the Adventurers’ Guild in Liyue Harbor – she’ll point you toward Tianqiu Valley for some combat encounters, then send you treasure hunting in Danyu Ruins. Pretty standard quest stuff, nothing too demanding.
How It’s Evolved
Since launch, this thing’s gotten better with almost every major update. Version 1.4 added ore compatibility (thank god), 1.6 removed that annoying pressure plate activation requirement. Each new region – Inazuma, Sumeru, you name it – has expanded both the fuel options and reward pools. It’s actually kept pace with the game’s progression, which… doesn’t always happen with older gadgets.
Complete Parametric Transformer Usage Guide
The Five-Step Process
Here’s how it works:
Drop it somewhere safe – Pull it from your Gadget inventory, find a spot away from enemies
Feed it materials – Select items until you hit exactly 150 points (the interface shows values)
Confirm and commit – Hit that button knowing these materials are gone forever
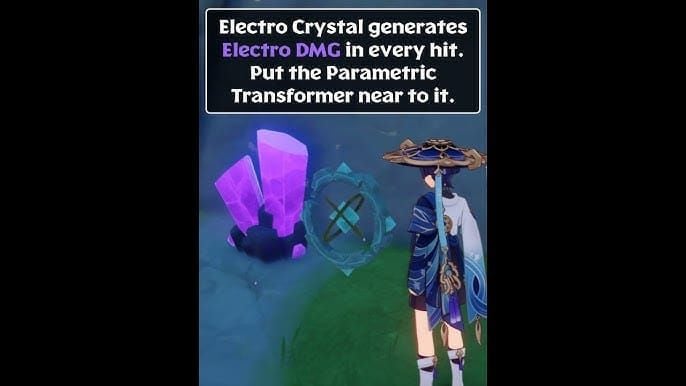
Charge it up – 18 elemental attacks to fill the energy meter completely
Collect your loot – Device vanishes, rewards appear in your inventory automatically
The interface organizes everything by category and rarity, with point values clearly displayed. You can bulk-select common items, which saves time when you’re dumping 150 Mint or whatever. Pro tip: environmental elemental sources count for charging – Electro Crystals, burning grass, that sort of thing.
Understanding the 6d22h Cooldown System
The Real Timer (Not What the Game Shows)
Okay, this is where it gets interesting. The game says 7 days but it’s actually 166 hours – that’s 6 days and 22 hours exactly. This isn’t a bug; it’s intentional design that lets you gradually shift your usage timing.
The cooldown starts the moment you claim rewards, completely independent of Monday server resets or any other weekly cycle. That 2-hour weekly shift? You can use it strategically.
Timing It Right
I personally run mine on Sundays. Finish up weekly bosses, assess what materials I’m short on, then transform accordingly before the Monday reset. But you could just as easily do Wednesday for mid-week resource boosts, or Friday to prep for weekend farming sessions.
The key is consistency. Pick a schedule and stick with it – predictable resource generation is better than optimal timing you’ll forget about.
For comprehensive optimization guidance, Genshin recharge FAQ answers through BitTopup’s 24/7 support system offer competitive rates and secure transaction processing.
Best 150 Items for Parametric Transformer
Tier 1: The Obvious Choices
Plants (1 point each):
Mint – Over 200 daily collection points across all regions. This is the gold standard.
Sweet Flower – 150+ spawns in Mondstadt/Liyue alone
Sunsettia – Concentrated in specific areas with reliable 48-hour respawns
Pinecone – Minimal cooking uses, abundant supply
Common Enemy Drops (1 point each):
Slime Condensate – You’ll have hundreds of these
Damaged Mask – Regular Hilichurl encounters generate tons
Firm Arrowhead – Unless you’re building every bow user simultaneously
Tier 2: Decent Options
Uncommon Drops (2 points each):
Stained Mask – Good value if you’ve got surplus beyond character needs
Sharp Arrowhead – Acceptable in larger quantities
Heavy Horn – Solid choice if you’re not planning Geo character builds
You can also buy basic materials from General Goods stores if you’d rather trade Mora for farming time. Sometimes worth it, honestly.
What NOT to Use
Never, ever feed this thing boss materials. Those cost 40 Resin each – you’re essentially gambling premium currency for random rewards. Same goes for limited availability items like Crystal Chunks or regional specialties needed for character ascension.
Purple rarity materials might seem efficient at 4 points each, but they’re usually harder to farm than just collecting 4x the common alternatives.
Reward Analysis and Expected Returns
What You’ll Actually Get
Six main categories of rewards:
Mora: 20,000-40,000+ per transformation
Character EXP: Usually 2 Hero’s Wit plus 3-4 Adventurer’s Experience per bundle
Weapon Enhancement: 4 Mystic + 9 Fine Enhancement Ore per bundle
Ascension Gems: 1-2 Slivers or 1 Fragment per bundle
Talent Materials: 1-4 Teachings or 1-2 Guide books per bundle
Weapon Ascension: 1-6 domain/elite enemy materials per bundle
The Numbers Game
Most transformations give you 5-7 reward bundles (about 70% of the time). Getting 8-10 bundles happens roughly 20% of the time – nice when it does.
There seems to be some correlation between input types and output categories. Plant-heavy inputs tend toward EXP and Talent materials; enemy drops lean toward Mora and weapon enhancement stuff. Could be confirmation bias on my part, but I’ve noticed the pattern.
Value-wise? You’re consistently getting 40-60 Resin worth of materials for zero Resin investment. That’s a no-brainer.
Fodder Farming Strategies
Efficient Routes
Mondstadt Circuit: Start at the city walls (Sweet Flowers and Mint everywhere), hit Springvale for more Mint and Sunsettia, then loop around Windrise.

Liyue Route: Harbor outskirts have decent density, then work the surrounding hills and nearby Sunsettia groves.
Don’t try to be comprehensive – focus on high-density areas rather than covering every possible spawn point. Teleport waypoints are your friend.
Making It Part of Your Routine
Passive collection works best for most people. Just grab stuff while you’re traveling between commissions, domains, whatever.
If you prefer dedicated farming sessions, 10-15 minutes twice a week on focused routes will keep you well-stocked.
Use characters with movement speed passives, enable minimap tracking for materials, and keep inventory space clear. Nothing worse than missing spawns because your bags are full.
Advanced Optimization Techniques
Tailoring to Your Account
Early game (AR 20-45)? Focus on plant fodder for Mora and EXP rewards – you need rapid leveling support.
Mid-game (AR 45-55)? Balance talent materials and enhancement resources based on your current building priorities.
Late game (AR 55+)? Target specific material types for integrating new characters into your roster.
Resource Management Philosophy
I maintain 50+ quantities of any material before considering it fodder material. Establish a priority system: surplus materials (200+ quantities) first, then low-utility items, then easily replaceable resources.
Adjust based on upcoming character builds. Planning to build a new Pyro DPS? Maybe hold onto those Agnidus gems for a few weeks.
Frequently Asked Questions
How does the Parametric Transformer work? Drop it, feed it 150 quality points worth of materials, charge it with 18 elemental attacks, collect rewards. Rinse and repeat every 6d22h.
What are the best fodder items? Mint, Sunsettia, Sweet Flower, or Slime Condensate. High availability, minimal alternative uses, respawn daily or near-daily.
How long is the cooldown exactly? 166 hours – that’s 6 days and 22 hours, not the 7 days shown in-game. This lets you gradually shift timing by 2 hours each week.
Is it actually worth using? Absolutely. You’re getting 40-60 Resin equivalent rewards for maybe 20 minutes of material collection time. Zero Resin cost.
What should I never use as fodder? Boss drops, limited materials, ascension materials you’ll need, purple rarity items. The random nature means you can’t guarantee equivalent value return.
Can I just use any 150 items? No – you need 150 quality points. Common items = 1 point, Uncommon = 2 points, Rare = 4 points. Mix and match to hit the target.


