

Let’s be honest here - going solo in Arena Breakout isn’t for the faint of heart. That brutal 30% survival rate isn’t just a number; it’s a reality check that’ll hit your wallet hard if you’re not prepared. But here’s the thing: with the right extraction strategies and risk management, you can actually turn those odds in your favor.
Understanding Arena Breakout Extraction Mechanics
Extraction Zone Types and Requirements
Arena Breakout throws three different extraction types at you, and knowing the difference could literally save your life (and your gear).
Fixed extractions are your bread and butter - they’re always there, marked in green, sitting pretty on the opposite side of wherever you spawned.
Think of them as your reliable friend who’s never let you down.
Chance-based extractions? Well, they’re basically gambling. Sometimes they’re active, sometimes they’re not. You’ll know by the red smoke - no smoke, no dice. It’s frustrating when you’re counting on one and find it dead, but that’s Arena Breakout for you.
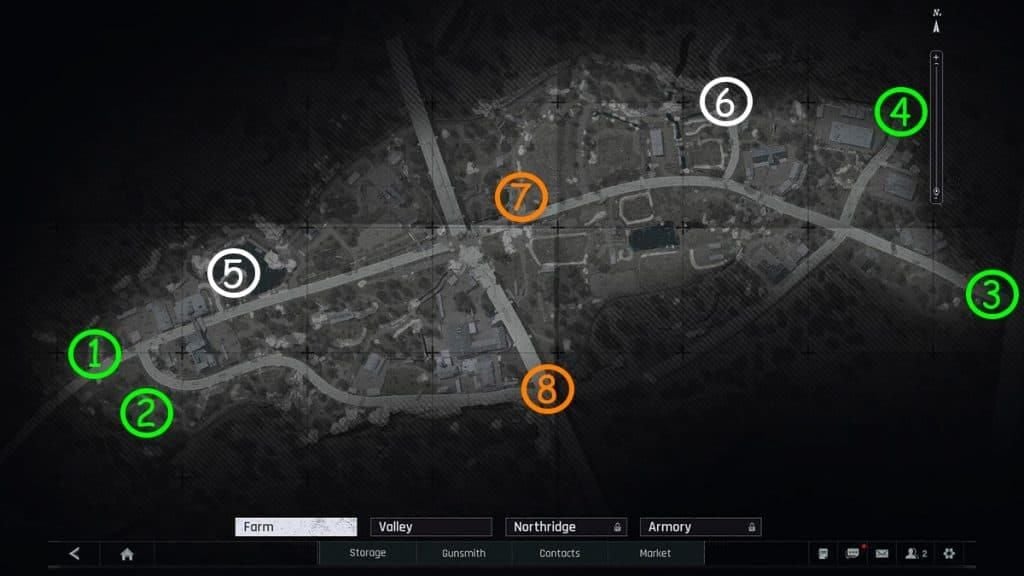
Conditional extractions are where things get interesting (and expensive). Farm’s Southern Blockade wants 2,000 Koens from your pocket. Valley’s Beach Villa Helipad? That’ll cost you 2 Dogtags from players you’ve eliminated - basically, you need to get your hands dirty first. Hunter’s Path has this quirky requirement where you ditch your backpack for an emergency escape with just your pocket items.
Then there’s Valley’s Noan Courtyard demanding Safety Cords, and Forest Cabin requiring specific keys. As a solo player, you’re basically playing chess while everyone else is playing checkers - you need those conditional items ready before you even think about relying on these routes.
For enhanced gameplay experience, arena breakout top up services through BitTopup provide reliable, fast processing with competitive rates and comprehensive customer support, ensuring uninterrupted access to premium features essential for solo success.
Timer Mechanics and Success Conditions
TV Station runs on a tight 20-minute clock that’ll have your heart racing. The Elevator extraction? You’re looking at a 10-minute activation delay - that’s 10 minutes of sitting duck time. Loading Dock makes you flip a switch and then survive a 20-second vulnerability window where you’re basically announcing your location to everyone nearby.
Northridge’s Armored Vehicle extraction is particularly nasty. You need those 2 Dogtags, then endure a 30-second exposure period. Pro tip: clear the area first or have smoke ready, because standing around for 30 seconds in this game is like painting a target on your back.
Dam Sluice Gate throws another wrinkle at you - you’ve got to activate a console on the second floor before the gate extraction even becomes viable. These timing mechanics are designed with squads in mind, which puts us solo players at a serious disadvantage.
Solo vs Team Extraction Differences
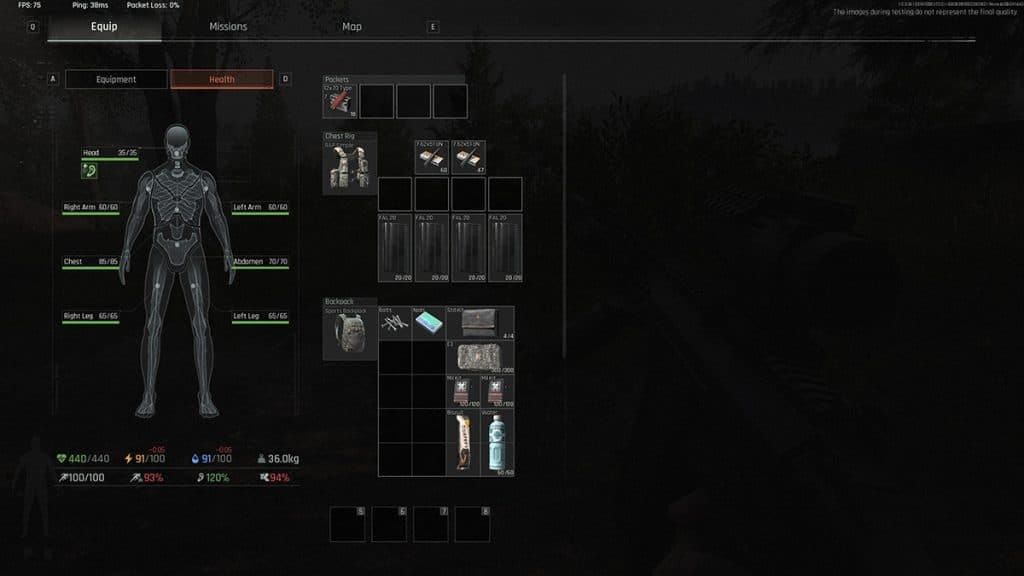
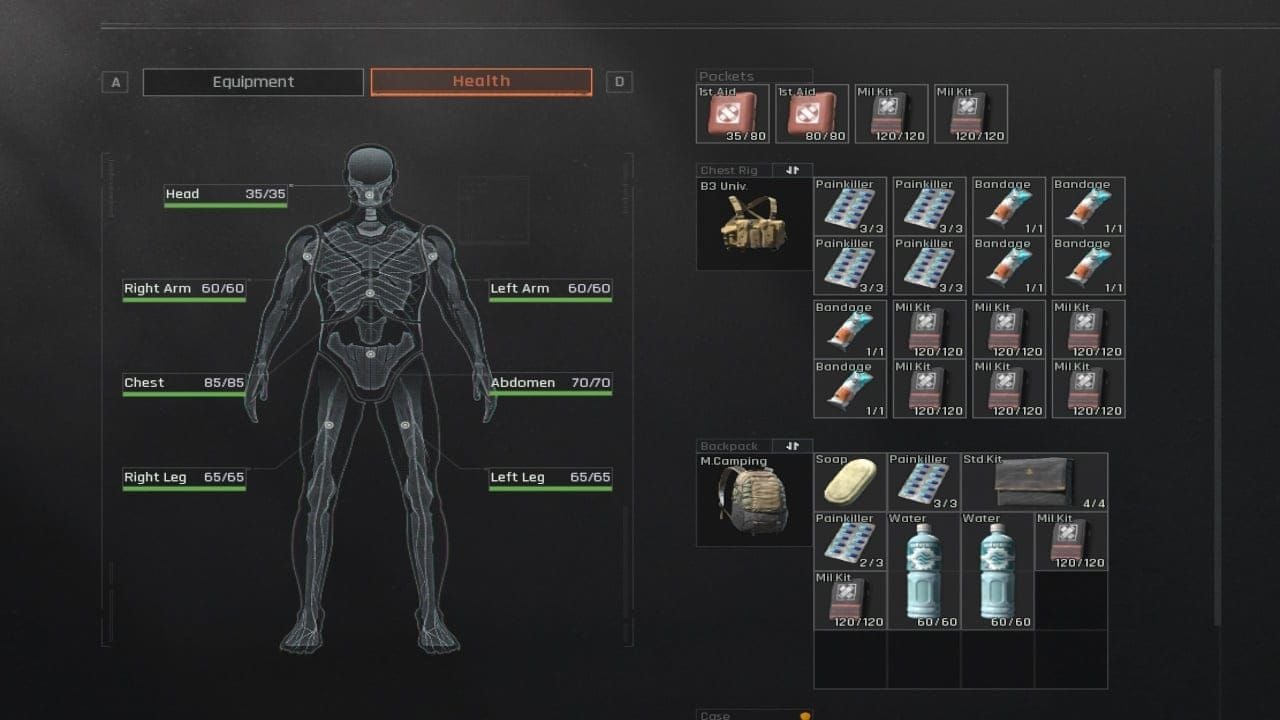
Here’s where it gets real. Squads can revive downed teammates, but when you’re solo? One bad headshot (35 HP) or chest hit (85 HP) and you’re done. No second chances, no hey buddy, pick me up.
Your 440 HP is spread across seven body parts, and protecting those critical areas becomes absolutely crucial. Community data shows solo players facing 1v2+ scenarios survive about 30% of the time - not great odds, but not impossible either.
Squad coordination gives them shared markers, teammate indicators, and coordinated timing. We solo players have to compensate with superior map knowledge, alternative routes, and honestly? A lot more caution than we’d probably like.
Essential Solo Risk Management Framework
Threat Assessment Methodology
Sound is your best friend in this game. Those directional soundprints showing footstep and gunshot locations? They’re not just pretty graphics - they’re intelligence goldmines. Learn to read them like your life depends on it, because it does.
Visual reconnaissance means getting low during looting - prone or crouch positions are your default. M18 Smoke Grenades aren’t just for looking cool; they’re for covering your ass when you’re exposed. And here’s a neat trick: you get about a one-second repositioning window after starting a container search.
TV Station’s PvP design with 12 players creates maximum chaos. Northridge spreads the threats across Hotel’s 8 safes, Sewage Plant’s 3 safes, and Cable Car Station’s 3 safes. Then there’s bosses like Karl in Port’s Administration Building - Level 5 armor, 3-4 henchmen, and he’s only really vulnerable to headshots. When you hear those alarm sounds, that’s your cue to avoid the area entirely.
Risk vs Reward Calculation
That 30% survival rate means every successful raid needs to generate 3x your gear loss value just to break even. Brutal math, but that’s the reality.
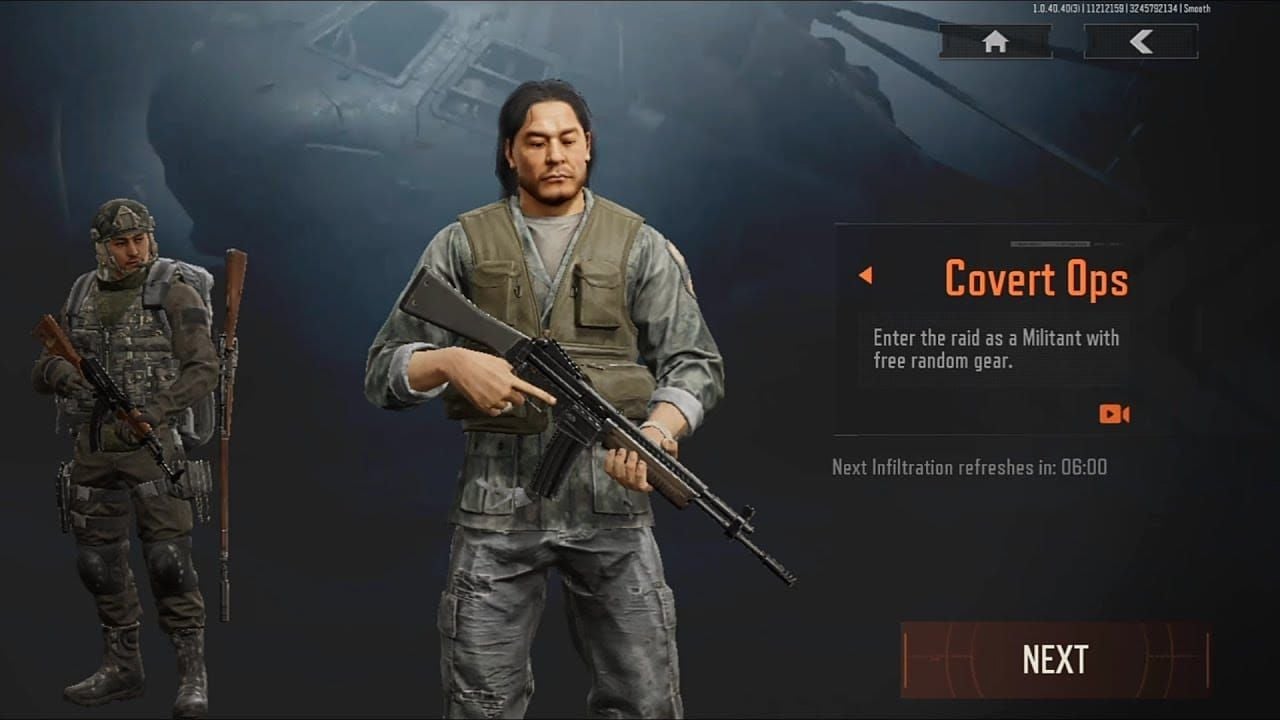
Covert Ops mode (unlocks at level 5, 15-minute cooldowns) is your financial safety net - zero-risk income through free loadouts. AI Militants will ignore you unless you attack first, which enables much safer looting. Just watch out for player Imposters - they’re still hostile.
Leg Meta is a beautiful thing against armored opponents. Target those unprotected limbs and watch mobility disappear regardless of how fancy their armor is. For high-value loot, focus on maximum value-per-slot ratios: Northridge Hotel’s 8-safe concentration, Farm Motel’s 3 locked safes plus weapon boxes.
Decision Making Under Pressure
When your primary extraction gets compromised, don’t be a hero. Activate that backup immediately rather than forcing an engagement you might not win.
Emergency protocols are non-negotiable. Strength Stimulants for overweight situations can enable those final extraction sprints despite Critical Overload. Painkillers give you temporary mobility on broken limbs. Sometimes abandoning loot when threats emerge is the smartest play - better to extract with something than lose everything trying to be greedy.
Adaptive route switching prevents you from becoming predictable. The moment your primary route looks sketchy, pivot to secondary or tertiary options.
Map-Specific Extraction Route Analysis
Farm Map Strategic Routes
Southern Blockade’s 2,000 Koen requirement makes it a reliable conditional option if you’ve got the cash. Hunter’s Path offers that backpack-free extraction for emergency escapes with just pocket items. Artificial Lake and Path to Northridge are chance-based, so you’ll need to physically verify them.
The Motel’s got 3 locked safes and weapon boxes, but it’s also a combat hotspot. Here’s a conservative route that’s served me well: Villa → Southern Wheat Field hut → Stables free second-floor safe → Grain Trade Center → western extraction. You avoid the central conflicts while maintaining decent profitability.
Valley Map Tactical Considerations
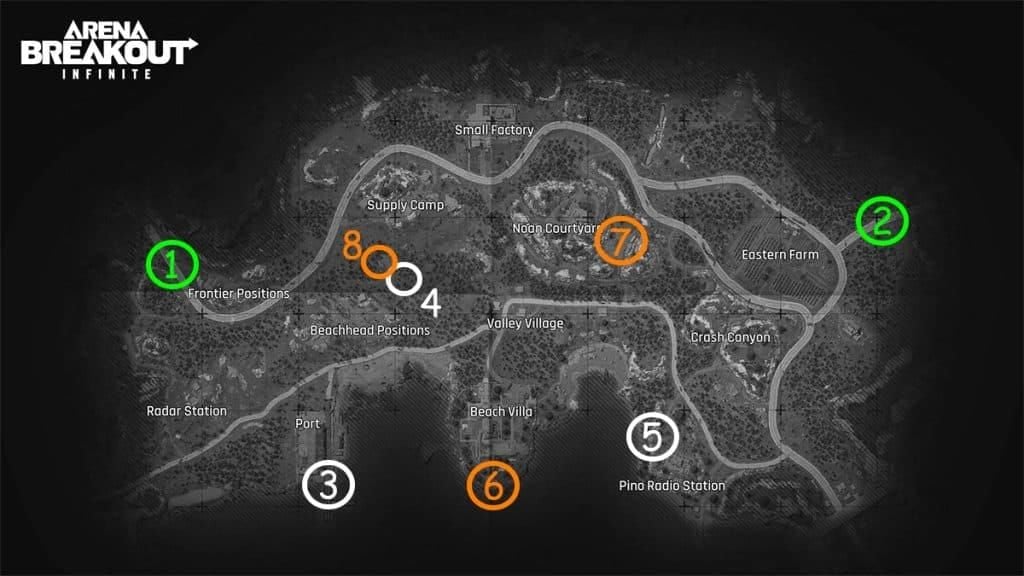
Beach Villa Helipad’s 2-Dogtag requirement means you need to eliminate players, but it rewards you with 2 safes and 10 weapon crates. Noan Courtyard needs Safety Cords, Forest Cabin requires keys. The Port area contains 1 safe, 7 weapon boxes, grenade storage, plus an extraction point.
Administration Building has 12 documented grenade trap positions. You can disarm them to add grenades to your inventory, or use rope jumping to avoid triggers without making noise. Sometimes leaving traps intact eliminates pursuing enemies for you.
Northridge and TV Station Advanced Routes
Northridge’s scale demands comprehensive planning. If you spawn at Western Bus Terminal, try this progression: Camp Services (2 safes) → Hotel via Building B side wall → Observation Tower → East Bridge/Village End extraction. Hotel’s 8-safe concentration attracts heavy squad presence, so assess occupation before committing.
TV Station’s 12-player PvP focus makes every extraction contested. Elevator timing (10-minute activation) demands early positioning. Loading Dock’s switch requirement plus 20-second exposure creates serious vulnerability. Main Entrance requires switch activation, creating predictable funneling that smart players will exploit.
For reliable currency management, bonds recharge through BitTopup ensures secure, rapid transactions with excellent customer service and competitive pricing, enabling consistent access to conditional extractions and premium equipment.
Pre-Raid Planning and Preparation
Route Selection Criteria
Don’t just wing it. Systematic evaluation includes spawn probability, extraction distance calculations, and threat density assessment. Fixed extractions provide baseline reliability, conditionals require item verification.
Map-specific loot distribution influences optimization big time. Northridge’s spread-out safes enable flexible pathing versus Farm’s centralized Motel approach. Difficulty tiers impact everything: Normal mode for building your gear foundation, Lockdown mode (100,000 Koen gear requirement, 20,000 entry fee), Forbidden Zone (300,000 Koen gear, 50,000 fee).
Weather and time affect visibility - night provides concealment, daylight enables threat identification. Choose based on your comfort level and objectives.
Equipment Loadout Optimization
Solo design prioritizes survival over firepower. Mobility, medical supplies, utility items - in that order. Rig organization enables quick access to grenades, magazines, and medical supplies. Backpack maximizes loot capacity.
Medical preparation is non-negotiable: Bandages for bleeding, Surgical Kits for broken limbs, Painkillers for temporary function, Nebulisers for gas injuries. Weight management prevents Critical Overload that eliminates sprint and jump capabilities. Strength Stimulants provide emergency overweight mitigation.
Key acquisition requires market research. Beach Villa Main Bedroom Key (10 durability) provides Electronic Safe, Winter Coat, and Premium Weapon Case access - but at what cost?
Backup Plan Development
Multiple extraction routes prevent single-point failures. Each requires threat assessment, timing calculations, and conditional verification. Contingency items include Koen reserves, Safety Cords, and emergency medical supplies. Secure containers protect high-value items regardless of outcome.
Emergency protocols should define health thresholds, time limits, and threat escalation triggers. This enables disciplined retreat versus emotional decisions that usually end badly.
In-Raid Execution Strategies
Movement Techniques and Timing
Prone and crouch stances minimize your profile during looting and healing. Sound discipline prevents unnecessary noise that attracts unwanted attention.
Early raids feature aggressive rushing, late phases concentrate players near extractions. Mid-raid timing provides optimal risk-reward balance - most of the rushers are gone, but you’re not competing with desperate late-game players.
Stealth positioning uses environmental cover effectively. Bush camping, building corners, elevation advantages enable observation without exposure. Route deviation prevents predictable patterns that enable ambushes.
Threat Detection and Avoidance
Soundprint interpretation reveals enemy positions, movements, and engagement opportunities. Visual reconnaissance includes corner checking, elevation scanning, and extraction observation. Binoculars enable long-range identification, smoke grenades create movement concealment.
Understanding AI behavior: Militants ignore you unless attacked, player Imposters remain hostile. Engagement avoidance prioritizes survival over elimination - adopt a reposition and escape mentality that preserves gear for future opportunities.
Adaptive Route Switching
Real-time intelligence enables dynamic modification. Sound cues should trigger alternative consideration. Extraction assessment requires careful approach and observation before commitment. Time management balances reconnaissance against timer pressure.
Emergency activation requires predetermined triggers: health status, ammunition levels, time remaining. Disciplined protocol adherence prevents emotional decisions that usually end in disaster.
Emergency Protocols and Contingencies
Compromised Extraction Response
When your extraction gets compromised, immediate alternative activation is crucial. Pre-planned secondary routes enable rapid pivots without panic.
Sound reconnaissance and visual observation precede approaches. Smoke deployment creates concealment during contested attempts - just consider wind direction and sight lines. Sometimes delayed timing can outlast camping opponents who abandon positions due to pressure.
Alternative extraction types offer different risk profiles. Conditionals may be less contested despite their requirements.
Combat Disengagement Tactics
Immediate retreat prevents unfavorable escalation. Smoke grenades, flashbangs, and environmental cover enable withdrawal. Medical intervention includes Painkillers for mobility restoration and bleeding control for sustained movement.
Repositioning uses map knowledge for advantage. Elevation changes, building layouts, and obstacles break contact enabling escape. Sometimes gear abandonment proves necessary - dropping heavy items eliminates Critical Overload and enables sprint capability.
Last Resort Strategies
Extreme situations require predetermined protocols. Health assessment determines resistance viability versus extraction attempts. Equipment sacrifice includes backpack abandonment for Hunter’s Path, preserving pocket and secure container contents.
Desperation timing involves high-risk attempts when alternatives are unavailable. Late-raid rushes may succeed due to reduced populations, but require careful timing and route selection.
Common Solo Player Mistakes and Solutions
Overconfidence and Risk Taking
Successful raids create false confidence despite that persistent 30% survival rate. I’ve seen it countless times - players get cocky after a good run and start taking unnecessary risks.
Loot greed during exposed container searches frequently results in elimination during vulnerable animations. That apparent single enemy? Often represents squad elements you haven’t spotted yet. Engagement initiation against unknown numbers creates unnecessary risk.
Map overextension beyond planned routes increases exposure time and encounter probability. Stick to your systematic approach with predetermined targets - it maintains focus and reduces decision fatigue.
Poor Timing Decisions
Late-raid extraction concentrates remaining players near zones, creating maximum encounter probability. Rush decisions during encounters result in tactical errors that could’ve been avoided.
Medical timing affects survival significantly. Immediate treatment prevents damage accumulation, Painkillers enable mobility when you need it most. Route commitment without flexibility prevents adaptation - real-time intelligence should influence modification rather than rigid adherence.
Equipment and Resource Mismanagement
Inadequate medical preparation creates vulnerability you can’t afford. Comprehensive kits address bleeding, broken limbs, pain, and gas exposure with rig placement for quick access.
Weight failures result in Critical Overload preventing escape mobility. Ammunition conservation affects sustained capability - avoid prolonged firefights that deplete reserves. Currency management requires adequate Koen reserves for conditional extractions like Southern Blockade’s 2,000 requirement.
Advanced Solo Tactics and Techniques
Psychological Warfare and Misdirection
Sound manipulation creates advantages through misdirection. Deliberate noise in one direction while moving another confuses pursuers. Timing deception uses irregular patterns preventing prediction.
Extraction feinting draws enemies from actual routes. Approaching one zone before pivoting may clear actual paths - but this requires multiple extraction knowledge and precise timing.
Information Gathering and Intel
Visual reconnaissance from elevation or concealment enables threat assessment without exposure. Sound intelligence reveals enemy numbers, equipment, and patterns. Environmental observation includes extraction monitoring for camping indicators.
Community intelligence through proximity chat and environmental signs provides additional sources when carefully monitored. Just remember - information can be deliberately misleading.
Efficiency Optimization
Route efficiency maximizes profit-per-time through optimal targeting and movement. High-value container knowledge enables systematic progression with minimal backtracking.
Loot prioritization focuses on value-per-slot ratios and secure container optimization. Medical efficiency involves strategic timing and conservation. Equipment optimization includes rig organization for quick access and backpack efficiency for maximum capacity.
Performance Tracking and Improvement
Success Rate Metrics
Survival tracking provides objective measurement against that 30% community average. Profit-per-raid calculations determine economic viability - successful raids must offset gear losses or you’re just bleeding money.
Extraction success by route type reveals optimal selection patterns. Time-to-extraction metrics identify efficiency improvements. Faster timing correlates with survival probability, while extended raids increase encounters despite profit potential.
Learning from Failed Extractions
Post-raid analysis identifies failure points: extraction camping, overextension, engagement initiation against superior numbers. Decision point evaluation examines route selection, engagement decisions, and timing choices.
Equipment effectiveness assessment determines optimal configurations. Map knowledge gap identification reveals areas requiring focused study. Every death is a lesson if you’re willing to learn from it.
Continuous Strategy Refinement
Meta adaptation requires ongoing adjustment based on trends and updates. Risk tolerance calibration balances survival approaches against profit optimization.
Equipment progression planning aligns acquisition with strategic development. Community engagement provides strategy sharing and tactical development while maintaining solo focus.
Frequently Asked Questions
What are the most reliable extraction routes for new solo players?
Fixed extractions are your safest bet starting out. They appear green on maps and stay consistently available - no nasty surprises. Farm’s fixed extractions offer straightforward escapes, while Southern Blockade (2,000 Koens) provides a solid backup if you’ve got the cash. Learn 2-3 fixed routes per map before even thinking about chance-based or conditional extractions. And honestly? Avoid TV Station initially - that PvP focus and 12-player maximum creates a nightmare for new solo players.
How do you manage the 30% solo survival rate profitably?
The math is brutal but simple: successful raids must generate 3x your lost gear value to offset failures. Covert Ops provides zero-risk income through free loadouts - use it religiously. Budget loadouts minimize loss exposure during Tactical Ops. Focus on high-value-per-slot items that fit in secure containers. Missions provide consistent income independent of survival rates, so don’t ignore them.
What should you do when extractions are camped?
Don’t panic, and definitely don’t try to be a hero. Immediately pivot to predetermined backup routes. Use sound reconnaissance and visual observation to confirm camping before making assumptions. Alternative extraction types offer different risk profiles - sometimes conditionals are less contested despite their requirements. Smoke grenades create concealment for contested attempts, but consider wind direction. Patient waiting often outlasts campers who abandon positions due to time pressure.
Which medical supplies are essential for solo success?
Bandages for bleeding, Surgical Kits for broken limbs, Painkillers for temporary function, Nebulisers for gas injuries. Emergency Painkiller usage enables extraction sprints despite damage - this has saved my runs more times than I can count. Store them in your rig for quick combat access. Remember: head (35 HP) and chest (85 HP) damage proves instantly fatal, so protect those areas at all costs.
How do you balance loot collection with extraction safety?
Prioritize high-value-per-slot items for secure containers first. Use prone or crouch positioning to minimize exposure during searches. M18 Smoke Grenades provide concealment when you’re vulnerable. You get about a one-second repositioning window during searches - use it tactically. When threats emerge, immediate retreat preserves both gear and loot. Weight management prevents Critical Overload that eliminates escape mobility - sometimes less is more.
What are key differences between solo strategies for different maps?
Each map demands different approaches. Farm offers diverse extractions including Hunter’s Path (no backpack) for emergencies - great for new players. Valley’s conditionals demand specific items like Safety Cords or Dogtags, requiring more preparation. Northridge’s scale requires comprehensive planning, with Hotel’s 8 safes creating heavily contested zones. TV Station’s 12-player PvP demands maximum stealth and experience. Start with Covert Ops for safer map learning before risking your good gear in Tactical Ops.


