

Understanding Controller-Like HUD Presets
What Actually Makes a HUD ‘Controller-Like’
The controller-like touch interface revolves around claw grip technique using 3-4 fingers – and honestly, once you get the hang of it, there’s no going back. Your thumbs handle movement and camera control (just like thumbsticks), while your index fingers become your new best friends for firing, aiming, peeking, and jumping.
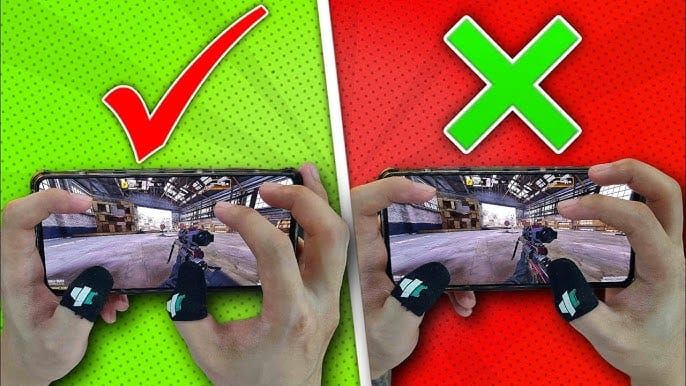
This setup directly mimics a physical controller’s thumbsticks and shoulder buttons. The result? Simultaneous action execution that’s absolutely crucial for competitive play.
Here’s the core advantage that changes everything: you can move, aim, and shoot simultaneously. Period. This becomes especially important when you Buy PUBG UC Online to unlock those premium items that give you a competitive edge – because what’s the point of having great gear if your controls are holding you back?
Why RPG Players Actually Need This
Look, if you’ve spent years on console games, you know the deal. Multiple abilities need to be immediately accessible via your controller’s face and shoulder buttons. That standard two-thumb mobile layout? It feels restrictive as hell compared to what you’re used to.
The controller-like 4-finger claw HUD fixes this by creating additional input points:
Left and right index fingers become your shoulder buttons for core skills (Fire, Scope, Peek)
Thumbs handle thumbstick functions (Move, Look) – exactly what they’re designed for
Separation of movement and action mirrors physical controller ergonomics
Complete skill kit accessibility gives you that entire arsenal at your fingertips again
The Philosophy Behind Touch vs Controller Layouts
Here’s something that catches a lot of players off guard: PUBG Mobile doesn’t have official Bluetooth controller support. The only officially sanctioned controller play happens via PC emulators like Gameloop, where you’re matched against other emulator users.
This limitation has driven the development of increasingly sophisticated touch HUD layouts that prioritize skill-first design over automated convenience. It’s all about manual control and predictability – essential for building that muscle memory you rely on.
Why RPG Players Need Specialized HUD Layouts (And I Mean Really Need Them)
Your RPG Muscle Memory Is Actually an Asset
Think about it – console RPG players have developed specific muscle memory patterns over years. You instinctively reach for shoulder buttons during combat, expect face buttons for abilities, and rely on thumbsticks for precise movement. A controller-like HUD leverages this existing muscle memory by mapping familiar actions to similar finger positions.
That’s years of training you don’t want to throw away.
The Skill Transfer Challenge Is Real
Traditional mobile layouts force you to choose between moving, aiming, or acting at any given moment. This completely contradicts years of training where simultaneous actions formed the foundation of advanced gameplay.
The most common challenges I see:
Right thumb overload – default layouts require your right thumb to handle both aiming AND action buttons
Limited simultaneous actions – you literally cannot move, aim, and shoot at the same time
Unfamiliar button clustering – actions are scattered rather than grouped logically
Zero muscle memory transfer – there’s no correlation between your console experience and mobile positions
Realistic Adaptation Timeline
Most RPG players need about 2-3 weeks of consistent practice to develop real comfort with a controller-like HUD setup. Pro players recommend 30-45 minutes daily in Training Ground to build that necessary muscle memory.
Trust me, this investment pays serious dividends when you’re ready to PUBG UC Top Up and compete at higher levels.
Essential HUD Elements for Controller-Style Setup
Movement Controls Positioning (The Foundation)
Your virtual joystick is the foundation of everything – and it requires careful attention to size and placement for precise movement control.
Here’s what actually works:
Size range 90-120 (most professionals prefer 116)
Position near bottom screen where your thumb naturally rests
Distance from edge sufficient to prevent those annoying input errors
Transparency set to semi-transparent for screen clarity while maintaining visibility
Action Button Clustering (Where the Magic Happens)
Critical action buttons must be positioned in screen areas accessible by your index fingers. This frees your right thumb exclusively for aiming and camera control – which is exactly how it should be.
Primary placement that works:
Fire button in top-left corner (left index finger access)
Aim Down Sights in top-right corner (right index finger)
Peek Left/Right near that top-right corner
Jump, Crouch, Prone in the top-right area for easy access
This configuration feels intuitive for RPG players who are accustomed to shoulder buttons for primary abilities, and it minimizes that right thumb workload.
Step-by-Step HUD Customization Guide
Actually Accessing HUD Settings
The complete customization process:
Access settings during a match or from the lobby via that Settings gear icon
Navigate to the ‘Customize Buttons’ tab
Select a base layout as your starting point
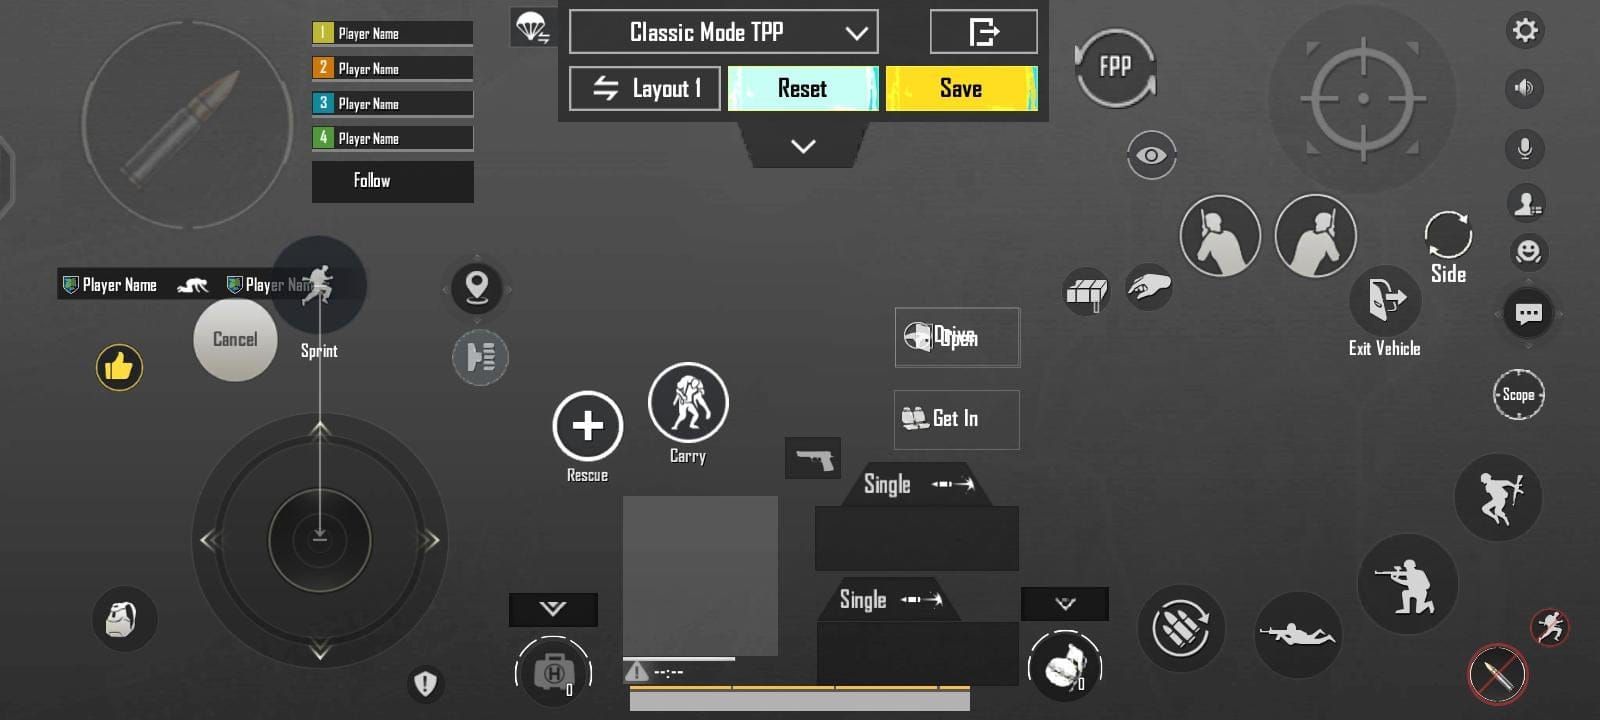
Enter edit mode by tapping ‘Customize’
Drag and position buttons to new screen positions
Adjust size and transparency using the sliders
Save your configuration by applying changes
Exit the editor and return to gameplay
Basic Layout Configuration (Start Here)
Focus on essential combat buttons before adding secondary functions. You want a comfortable claw grip foundation that supports simultaneous movement, aiming, and shooting.
Priority arrangement:
Movement joystick bottom-left, sized for thumb comfort
Fire button top-left for left index finger
Scope button top-right for right index finger
Camera control area on the right side, clear of action buttons
Jump/Crouch in a top-right cluster for right index finger
Fine-Tuning and Testing (This Is Where Most People Mess Up)
Training Ground is your primary testing environment for layout refinement. Here’s a systematic methodology that actually works:
Adjust one element at a time – avoid making simultaneous changes
Make small 2-5% increments rather than drastic changes
Test under pressure in Team Deathmatch or Arena modes
Build muscle memory by sticking with comfortable settings
Document successful configurations before experimenting further
Optimal Button Placement for RPG Migrants
Primary Action Buttons (Get These Right First)
Fire button optimization:
Position in top-left corner for left index finger access
Size it large enough for reliable hits under pressure
Transparency visible enough for instinctive location
Adjacent spacing with clear area preventing accidental touches
Scope button configuration:
Position in top-right corner for right index finger
Diagonal positioning allowing simultaneous use with fire button
Size consistency matching fire button dimensions for uniform muscle memory
Secondary Skills Layout
Peek button arrangement:
Peek Left near top-right, accessible by right index finger
Peek Right adjacent to Peek Left for consistent positioning
Size smaller than primary buttons but large enough for accurate targeting
Movement enhancement:
Jump in top-right cluster for parkour and evasion
Crouch near jump button for stance changes
Prone accessible but separated to prevent accidental activation
When you’re ready to enhance your gameplay with premium items, Cheap PUBG Mobile Top Up options through BitTopup provide excellent value with fast delivery and secure transactions.
Device-Specific Configuration Tips
Tablet vs Smartphone Layouts (The Differences Matter
Tablet advantages:
Larger target areas reducing missed inputs
Extended reach zones providing more positioning options
Enhanced visibility with larger screen real estate
Comfortable spacing reducing accidental presses
Smartphone considerations:
Compact efficiency requiring smaller but strategically placed buttons
Thumb reach limitations with shorter distances for secondary functions
Screen obstruction – minimize HUD elements blocking game view
Precision requirements needing higher accuracy for smaller targets
Performance Impact Analysis
HUD complexity affects device performance, particularly on older hardware. You need to balance functionality with system capabilities while maintaining smooth gameplay.
Performance factors to consider:
Button quantity – fewer elements reduce processing overhead
Transparency effects may impact frame rates
Animation settings – disable unnecessary visual effects
Background processes – close other apps during gameplay
Common Setup Mistakes and Solutions (Learn From Others’ Pain)
Overcrowded Interface Issues
Common symptoms:
Too many visible buttons filling the screen with rarely-used functions
Overlapping elements with buttons interfering with each other
Reduced game visibility with HUD blocking important information
Accidental activations from buttons placed too close together
Solutions that actually work:
Prioritize essential functions – display only frequently-used buttons
Use contextual menus to hide secondary functions until needed
Implement transparency to make less-critical buttons semi-transparent
Group related functions by clustering similar actions logically
Accidental Touch Problems (The Bane of Mobile Gaming)
Prevention strategies:
Palm rejection zones – keep buttons away from natural contact areas
Adequate spacing providing buffer zones between frequently-used buttons
Size optimization – buttons large enough for intentional hits but not accidental
Edge positioning – avoid critical buttons near screen edges where cases interfere
Ergonomic Pain Points
Optimization tips:
Natural finger positioning – place buttons where fingers naturally rest
Minimize stretching by keeping frequently-used buttons within comfortable reach
Balanced workload – distribute actions across multiple fingers
Regular breaks – take periodic rests regardless of layout quality
Physical alternatives worth considering: Mechanical trigger attachments that clip onto phones provide a legitimate controller-like feel using conductive pads that tap the screen when pressed. Since they’re purely hardware solutions, they’re undetectable and don’t violate terms of service.
Pro Player HUD Analysis
Tournament-Tested Configurations
Professional players have refined their HUD layouts through thousands of competitive hours, prioritizing functionality over aesthetics for those split-second responses.
Common characteristics across pro setups:
Minimalist approach with only essential buttons visible during combat
Consistent sizing with primary buttons maintaining uniform dimensions
Strategic positioning with critical actions clustered for finger efficiency
Performance priority with graphics optimized for frame rate over visuals
Camera sensitivity sweet spot: Recommended range 100-120% for quick environmental scanning. The purpose is rapid threat assessment without character movement – fast enough for awareness, controlled enough for precision.
Regional Variations (Interesting Patterns)
Asian player characteristics:
Higher sensitivity settings for faster close-range reactions
Aggressive button placement with fire and hip-fire prominent
Quick-scope optimization for rapid transitions supporting rushing tactics
Western player preferences:
Balanced sensitivity profiles effective across multiple engagement ranges
Precision-focused layouts emphasizing accurate long-range shooting
Tactical positioning with buttons supporting cover-based gameplay
Performance Optimization and Testing
Measuring Improvement Metrics (Data That Matters)
Key indicators to track:
Kill/Death ratio improvement comparing pre and post-layout statistics
Accuracy percentages monitoring hit rates across weapon types
Reaction time consistency measuring response speed to threats
Survival duration tracking average match longevity
Rank progression monitoring competitive improvements
Testing environments:
Training Ground for controlled technical skill development
Team Deathmatch for fast-paced reaction testing
Classic matches for real-world application
Arena mode for intense short-duration scenarios
Training Drills That Actually Work
Essential exercises:
Figure-8 patterns for smooth joystick control while maintaining aim
Strafe shooting – moving sideways while engaging targets
Jump shots – firing while airborne using index finger controls
Peek practice for quick cover engagement
Combat scenarios:
Target switching for rapid engagement of multiple Training Ground targets
Scope transitions for quick switching between magnification levels
Recoil control for sustained fire accuracy
Emergency maneuvers for panic sequences under pressure
Realistic adaptation timeline:
Week 1: Basic button familiarization and finger positioning
Week 2: Smooth movement integration with basic combat
Week 3: Complex maneuver execution and advanced techniques
Month 2+: Instinctive responses and competitive performance
Sensitivity Settings Optimization
Camera and ADS Configuration (The Technical Stuff)
Camera sensitivity:
Range 100-120% for environmental scanning
Purpose: Quick threat assessment without character movement
Testing method: Practice rapid 360-degree scans in Training Ground
Recommended ADS starting values:
3rd Person (No Scope): 100-130%
Red Dot/Holographic: 50-70%
2x Scope: 35-45%
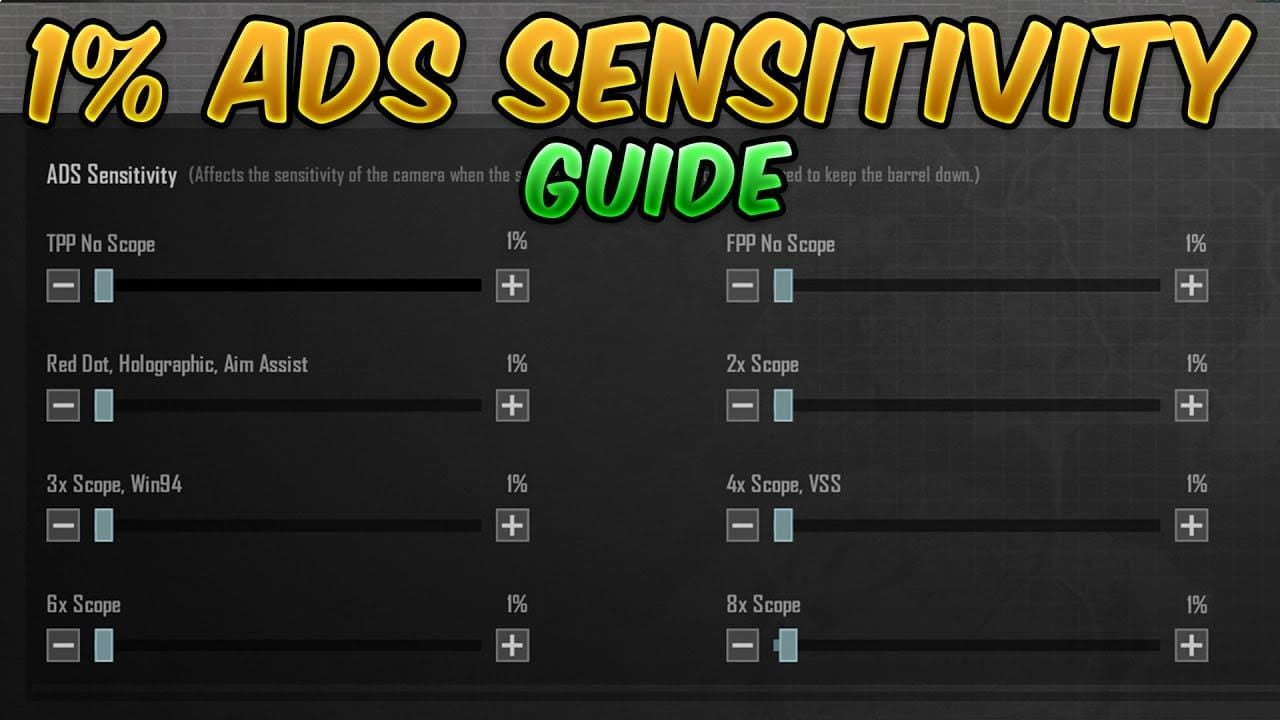
3x Scope: 25-40%
4x Scope: 20-30%
6x Scope: 15-23%
8x Scope: 10-15%
Adjustment methodology: If your weapon kicks up excessively during sustained fire, increase ADS sensitivity for that specific scope. If your aim feels jittery or pulls down too far, decrease the setting incrementally.
Gyroscope Integration (Game Changer for Many)
Gyroscope provides fine-aim adjustments through device tilting. Professional players combine finger swipes for large movements with gyro for micro-adjustments and spray control.
Sensitivity ranges that work:
3rd Person (No Scope): 300-400%
Red Dot/Holographic: 300-400%
2x Scope: 270-400%
3x Scope: 180-250%
4x Scope: 160-220%
6x Scope: 100-150%
8x Scope: 50-100%
Usage technique: Gyroscope excels at controlling vertical recoil during sustained fire. After initiating shooting, slight downward device tilting maintains crosshair stability while your fingers handle horizontal adjustments.
Advanced Control Settings
Essential configurations:
Camera Rotation while ADS/Leaning: Disabled (prevents accidental aim disruption)
Merge Crouch and Prone: Disabled (for separate dedicated buttons)
Separate Jump & Climb: Enabled (prevents accidental wall climbing)
Quick Throw: Enabled (for fluid deployment)
Peak & Open Scope: Disabled (for independent controls)
Sprint sensitivity tip: Lower this from default 100 to approximately 65. This prevents accidental sprinting during small movements, allowing controlled positioning without exposing yourself to enemy fire.
Graphics and Performance Settings
Competitive Configuration
Optimal settings for performance:
Graphics Quality: Smooth (lowest detail, highest performance)
Frame Rate: Highest available (Ultra/Extreme/90fps)
Style: Classic or Colorful for enemy contrast
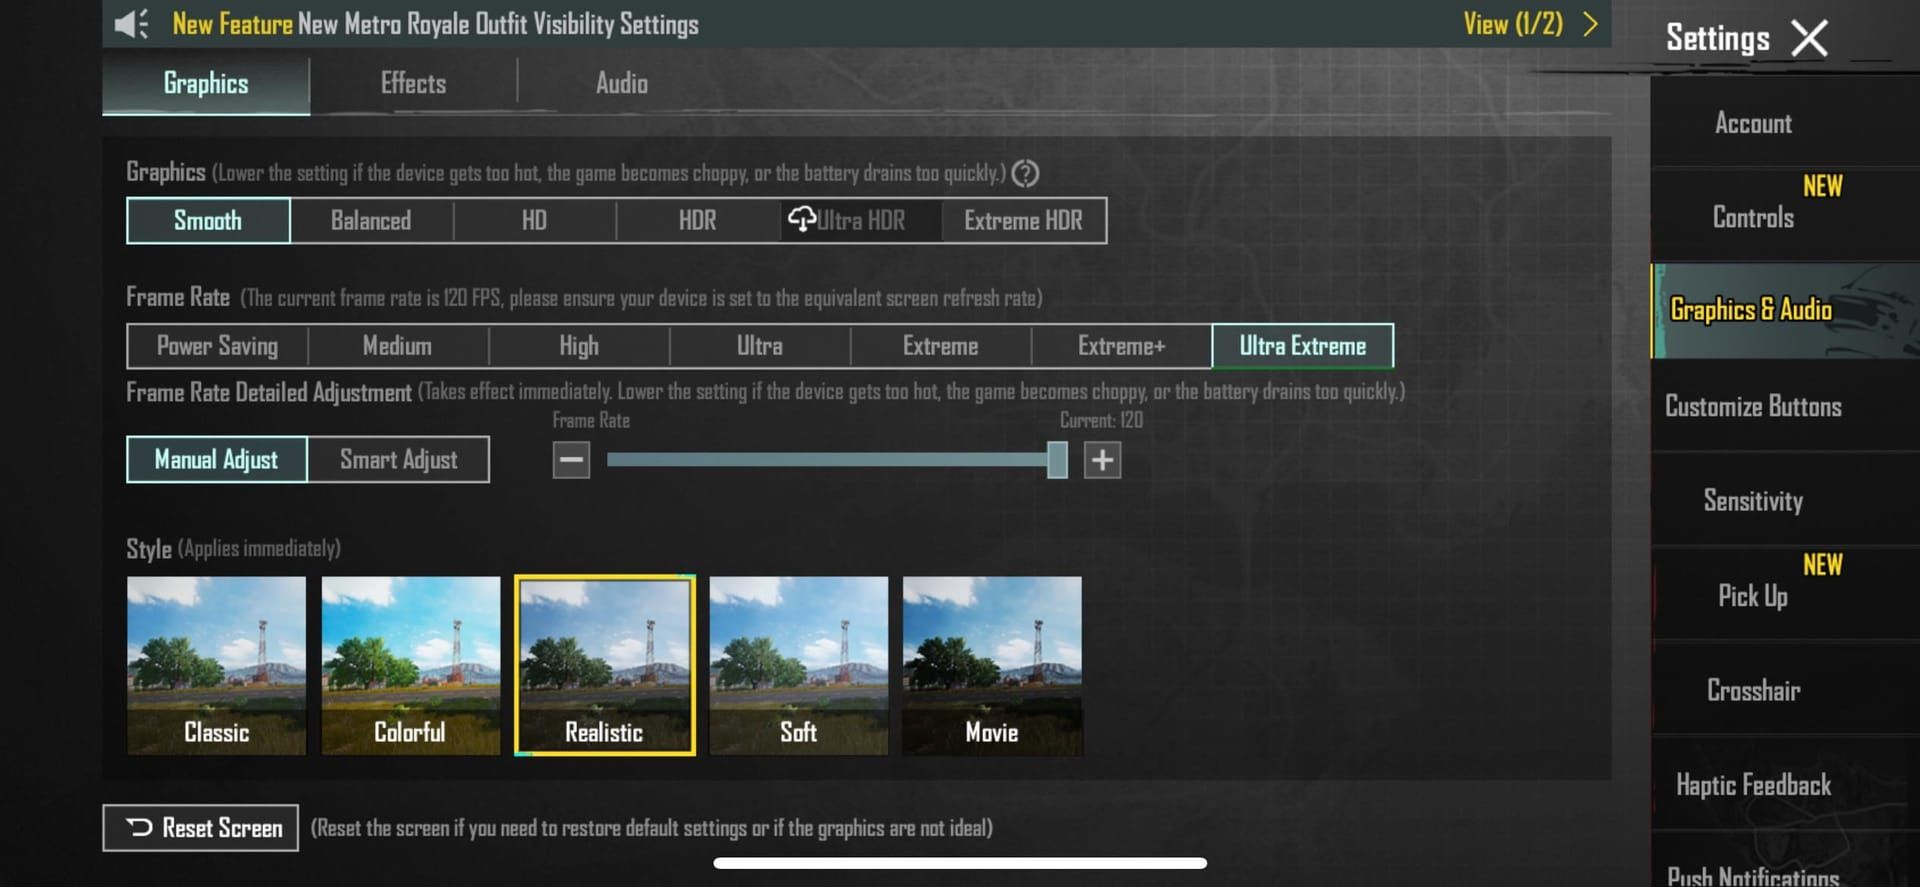
Shadows: Disabled for performance and visibility
Auto-adjust graphics: Disabled (prevents mid-combat changes)
Visibility enhancements:
Brightness: 125-150% for spotting enemies in shadows
Anti-aliasing: Disabled for performance
Bloom effects: Minimized to reduce distractions
Device Performance Considerations
Performance indicators to monitor:
Frame rate stability maintaining consistent 60+ FPS
Input responsiveness with no delay between touch and action
Temperature management preventing overheating
Battery optimization balancing performance with consumption
Low-performance device adaptations: If your device struggles maintaining stable rates, use slightly lower sensitivity to ensure smooth input processing. Always prioritize graphics optimization before finalizing sensitivity configurations.
Community Resources
Sensitivity Code System (Sharing Made Easy)
Import process:
Access Settings > Sensitivity
Find layout management by tapping the cloud/search icon
Enter shared code by pasting into the field
Preview configuration before applying
Apply layout by confirming implementation
Sharing process:
Open layout management by accessing sensitivity menu
Generate code by tapping ‘Share’ to create unique code
Copy and distribute by sharing with other players
Important reminder: Treat shared codes as starting points for personal customization rather than final solutions. Professional settings are highly personalized to specific devices, hand sizes, and playstyles.
Manual Transfer Between Games
Settings cannot be directly imported between PUBG variants (PUBG Mobile, BGMI, PUBG New State). Here’s the transfer methodology:
Document current settings by screenshotting all pages
Record specific numerical values for each category
Map button positions by documenting precise locations
Recreate systematically by inputting values manually
Test and adjust by fine-tuning based on differences
BitTopup provides reliable UC top-up services to support your competitive journey, offering competitive prices, fast delivery, and secure transactions for all your PUBG Mobile enhancement needs.
Frequently Asked Questions
How long does it actually take to adapt to a controller-like HUD layout?
Most RPG players need about 2-3 weeks of consistent daily practice. Week 1 focuses on button familiarization, Week 2 integrates movement with combat, and Week 3 enables complex maneuvers. Full competitive performance typically develops after 1-2 months of regular use with 30-45 minutes of daily Training Ground sessions.
What’s the biggest mistake RPG players make when setting up their HUD?
Attempting to recreate their entire console interface on a mobile screen, which results in overcrowded layouts. Common issues include too many simultaneous buttons, overlapping elements, and copying professional settings without device adaptation. The solution: prioritize essential functions only and use contextual menus for secondary actions.
Can I use physical accessories to achieve a controller-like feel?
Yes, mechanical trigger attachments that clip onto phones provide a legitimate controller experience. These hardware devices use conductive pads that tap the screen when pressed, creating L1/R1 shoulder buttons. Since they’re purely mechanical with no software component, they’re undetectable and don’t violate terms of service.
How do I optimize sensitivity settings for different playstyles?
Aggressive players need higher sensitivity for close-range (Red Dot: 50-55%, TPP: 95-100%) to enable quick reactions. Sniper-focused players benefit from lower sensitivity for high-magnification scopes (6x: 10-13%, 8x: 10-13%) to ensure precision. All-rounders require balanced mid-range profiles (3x: 20-25%, 4x: 15-18%).
What graphics settings work best with controller-like HUD layouts?
Prioritize performance: Graphics Quality on Smooth, Frame Rate at highest available, Style set to Classic/Colorful for contrast. Disable Shadows and Auto-adjust graphics to maintain consistent performance. Use brightness at 125-150% for visibility. These settings ensure smooth HUD operation without input lag or frame drops.
How do I prevent accidental button presses with my new layout?
Implement palm rejection zones by keeping buttons away from natural contact areas, provide adequate spacing between frequently-used buttons, and optimize sizes for intentional hits but not accidental activation. Avoid placing critical buttons near screen edges where cases might interfere, and use transparency to reduce clutter while maintaining visibility.


