

Sakura Bloom Overview: Ayaka’s Essential Ascension Material
What are Sakura Blooms
Here’s the thing about Sakura Blooms—they’re these gorgeous floating pink-purple petal clusters scattered across Narukami Island, but there’s a catch. They’re completely intangible until you zap them with Electro damage.
Any Electro ability works. Lisa’s basic attacks, Fischl’s Oz, even a quick tap of an elemental skill. This mechanic makes bringing an Electro character absolutely non-negotiable for farming runs.

For efficient Genesis Crystal purchases during your Ayaka farming journey, BitTopup offers competitive pricing and instant delivery with real-time order tracking Genesis Crystals updates.
Ayaka’s Material Requirements
Let’s break down what you’re actually farming for. Ayaka demands exactly 168 Sakura Blooms to reach Level 90—that’s spread across six ascension phases: 3 blooms for the first jump (Level 20→40), then 10, 20, 30, 45, and finally 60 for that last push to 80→90.
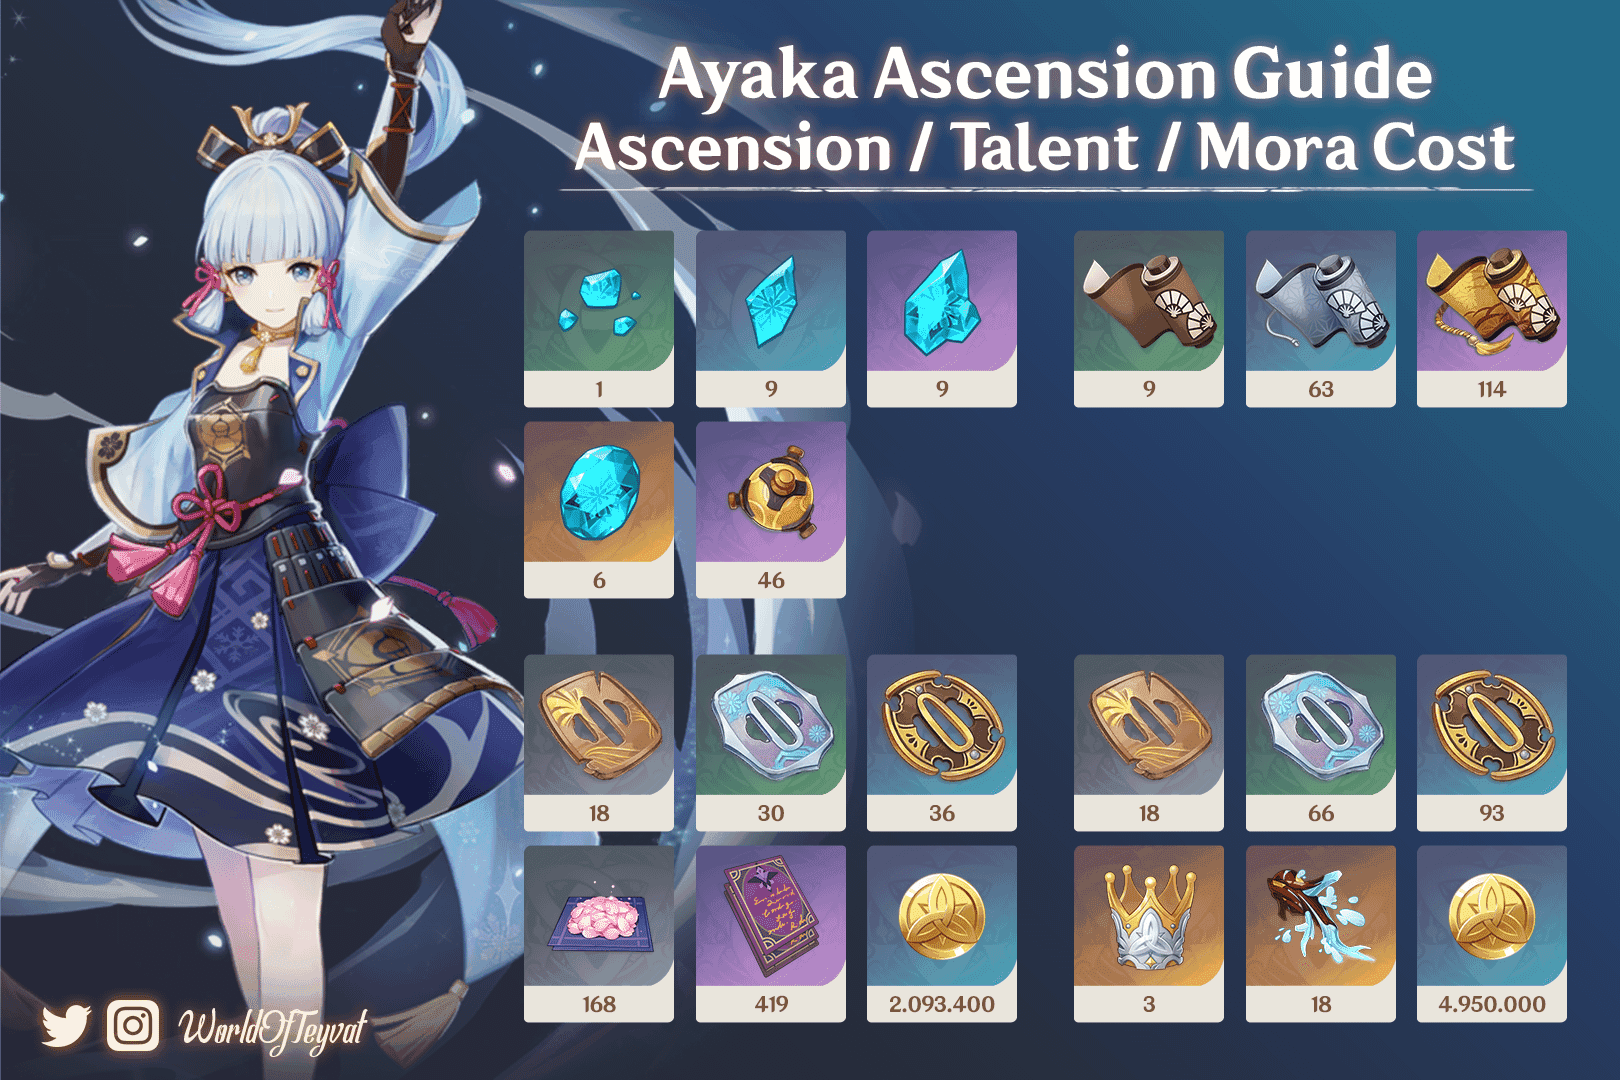
Of course, she’s not satisfied with just blooms. You’ll also need 46 Perpetual Hearts (hello, Perpetual Mechanical Array), various Shivada Jade gems, a mountain of Handguard materials, and 420,000 Mora. But we’re focusing on those elusive pink petals today.
Pro tip: If you’ve got Gorou, his passive talent Seeker of Shinies is a game-changer—it’ll mark all nearby Inazuma specialties on your mini-map. Trust me, this saves so much time squinting at bushes.
Complete Sakura Bloom Location Map & Coordinates
Narukami Island Distribution
All 75 Sakura Blooms live exclusively on Narukami Island. No exceptions. They’re clustered in five main zones, with Grand Narukami Shrine hoarding the biggest stash—30 blooms, which is 40% of your total haul.
The breakdown looks like this: Grand Narukami Shrine Area (30 blooms), Araumi Region (12 blooms), Inazuma City Vicinity (13 blooms), Kamisato Estate Surroundings (11 blooms), and Chinju Forest (9 blooms).
Here’s something that tripped me up initially—about 10 blooms are tucked away in underground caverns. You can’t access these until you’ve completed the Sacred Sakura Cleansing Ritual world quest series. Yeah, it’s a bit of a commitment, but essential for maximum efficiency.
GPS Coordinates List
Araumi Cluster (12 blooms, roughly 1 minute 40 seconds): The underground chamber near the Electro Hypostasis holds 5 blooms, surface mechanism puzzles have 4 more, and there are 3 scattered around the coastal shoreline teleporter.
Grand Narukami Shrine Complex (30 blooms, about 4 minutes 30 seconds): This is your bread and butter. Main shrine elevated platforms pack 15 blooms, Sacred Sakura vicinity has 8, and mountain trail connections offer 7 more.
Inazuma City Perimeter (13 blooms, 1 minute 50 seconds): Northern city gates (6 blooms), eastern residential gardens (4 blooms), southern crafting station outskirts (3 blooms).
Optimal Farming Routes: 3 Proven Paths
Northern Route (Grand Narukami Shrine)
This is my go-to route when I’m feeling efficient. Start at the shrine teleporter, grab those 8 blooms around Sacred Sakura—ranged Electro attacks work best here to avoid the awkward climbing. Descend to the main platform for 15 more, then follow those winding mountain trails for 7 additional blooms.
From there, take the northeastern path to Araumi. The underground chamber requires activating those Electro mechanisms first (you know the ones), then finish with the coastal Araumi blooms.
Total haul: 42 blooms in 6 minutes 10 seconds. That’s 56% of your total supply in one sweep.
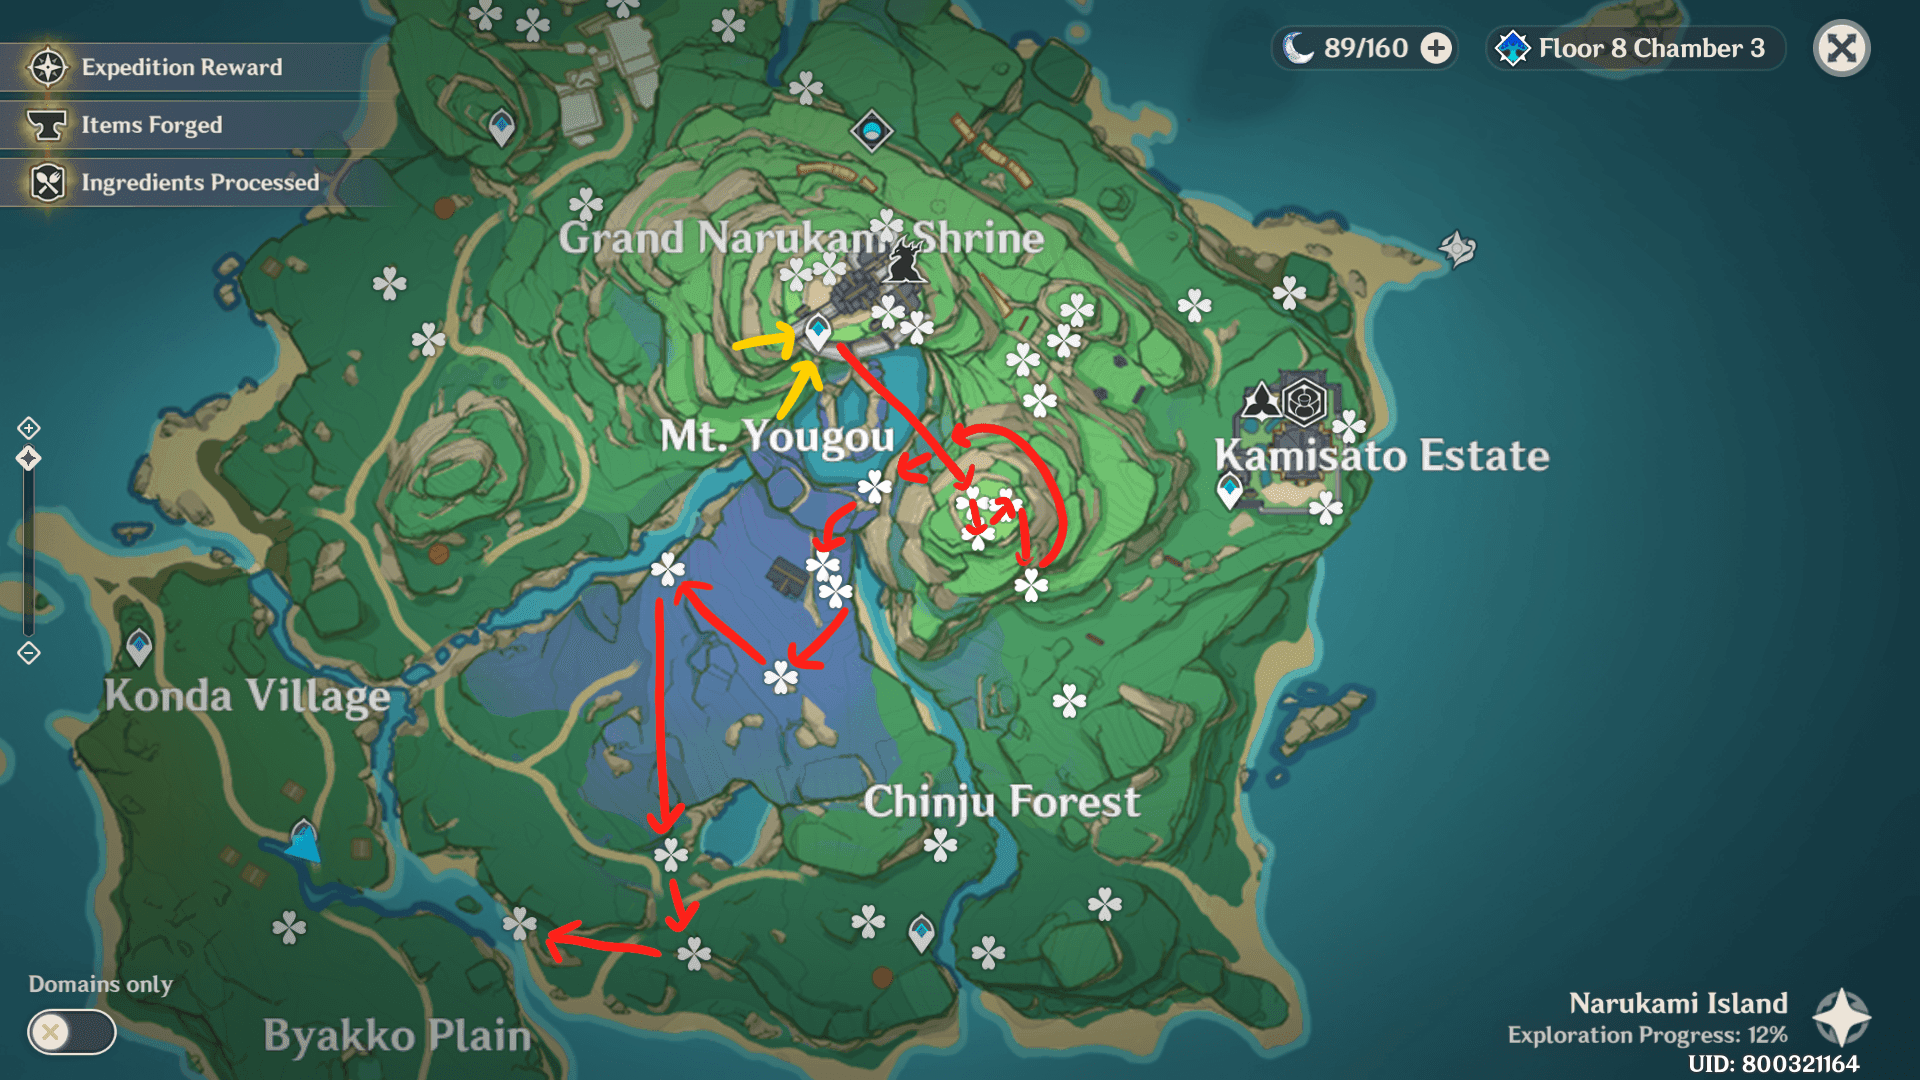
Central Route (Mt. Yougou)
Fair warning—this route absolutely requires completing the Sacred Sakura Cleansing Ritual. No shortcuts here.
Start at Mt. Yougou base teleporter and dive into that underground cavern system. Catalyst Electro users shine here since you can spam normal attacks without cooldowns. Collect those 10 cavern blooms, surface near Chinju Forest, clear the 9 forest blooms, then move south to Kamisato Estate for the final 11.
It’s 30 blooms in 4 minutes 45 seconds—not the highest yield, but incredibly smooth once you know the path.
Southern Route (Chinju Forest)
Perfect for beginners or anyone who wants to avoid underground shenanigans. Teleport to Chinju Forest and systematically clear it using Electro bow users—they’re fantastic for those annoying canopy blooms.
Transition to Byakko Plain via the roads, approach Inazuma City from the south, collect from urban gardens and residential zones, then wrap up at Kamisato Estate.
You’re looking at 33 blooms in 5 minutes 15 seconds. It’s 44% of total supply, but zero stress.
Respawn Timers & Reset Mechanics
48-Hour Respawn Cycle
Here’s where it gets precise: Sakura Blooms respawn exactly 48 hours after collection based on real-world time. Not server resets, not daily commissions—actual time.
Collect blooms Monday at 3:00 PM? They’re back Wednesday at 3:00 PM. Each location tracks independently too, so if you grab 50 blooms on Day 1 and 25 on Day 2, you’ve created separate respawn schedules for each group.
Server maintenance pauses timers but doesn’t reset them. Cross-server farming resets your personal collection status, while co-op collection only affects the host world’s timers.
Tracking Your Progress
Document everything. Collection session timestamps, bloom quantities per route, next farming windows, remaining ascension needs. It sounds tedious, but trust me—nothing’s worse than running a route only to find empty spawn points.
BitTopup’s Genshin recharge instant email confirmation system provides immediate transaction verification for uninterrupted farming focus.
Farming Efficiency Tips & Strategies
Time-Saving Techniques
Electro catalyst users are your best friends here. Lisa, Yae Miko—anyone who can spam normal attacks without cooldowns. My optimal team setup: Electro catalyst (primary collector), Anemo character (stamina reduction), Gorou (bloom detection), and a healer or shielder for safety.
When you approach bloom clusters, position yourself centrally. You can often activate multiple specimens simultaneously with one attack.
Teleport Waypoint Optimization
Strategic waypoint usage cuts farming time by 25-30%. Here’s my priority ranking: Grand Narukami Shrine (highest density), Araumi (underground access), Chinju Forest (central transitions), Inazuma City (urban connections), Kamisato Estate (route completion).
Plan circular routes that return to starting teleporters. Makes area transitions seamless.
Co-op Farming Guide & Etiquette
Joining Other Worlds
Co-op lets you collect beyond that 75-bloom single-world limit within 48-hour periods. But please—message hosts before joining with specific farming requests. Offer reciprocal world access, bring efficient farming characters to minimize waiting time.
Always get explicit permission for specific quantities rather than vague can I farm? requests.
Maintain those positive community relationships. Respect no responses, offer assistance with host goals, thank hosts regardless of collection success. The Genshin community is generally fantastic, but courtesy goes a long way.
Common Farming Mistakes to Avoid
Route Planning Errors
Don’t start from low-density areas when high-yield zones are available. Don’t ignore elevation changes in your movement paths—those mountain trails can be deceptive. And please, don’t forget about underground access requirements for quest-locked areas.
Plan complete routes before starting collection sessions. Account for your character abilities and available waypoints.
Timing Mistakes
That 48-hour timer is absolute. You can’t accelerate it, you can’t trick it. Don’t confuse server reset with bloom respawn schedules, don’t attempt collection before timer completion, and definitely don’t forget your individual collection timestamps.
Keep accurate records. Seriously.
Integration with Daily Routine
Commission Route Synergy
Set Inazuma as your commission region—you’ll naturally encounter bloom locations during routine quests. Combine farming with commission travel, use quest downtime for nearby collection, plan routes that incorporate both activities efficiently.
That 12-minute complete farming route? It fits perfectly between resin expenditure sessions.
Weekly Planning
The 48-hour respawn cycle allows 3-4 complete farming sessions per week. My framework: Monday/Wednesday/Friday for complete bloom routes, Tuesday/Thursday for resin-dependent materials, weekends for co-op farming or catch-up sessions.
Adjust based on character priority and available gaming time, obviously.
Frequently Asked Questions
How many Sakura Blooms does Ayaka need for full ascension? Exactly 168 Sakura Blooms across six ascension phases: 3, 10, 20, 30, 45, and 60 respectively. With 75 blooms per 48-hour cycle, you’re looking at three full farming sessions over one week.
What’s the respawn time for Sakura Blooms? 48 hours after collection, tied to real-world time. Each location has independent timers—partial farming doesn’t affect uncollected specimens.
Where can I find the most Sakura Blooms in one area? Grand Narukami Shrine area. 30 blooms (40% of total supply) around Sacred Sakura tree, shrine platforms, and mountain trails. Clear efficiently in 4 minutes 30 seconds from the shrine teleporter.
Can you buy Sakura Blooms from shops? Nope. Can’t be purchased from NPCs, Paimon’s Bargains, or grown in Serenitea Pot. Wild collection from Narukami Island is your only option.
What’s the fastest route for all 75 Sakura Blooms? Complete route takes 11 minutes 50 seconds: Araumi (12 blooms, 1m 40s), Inazuma City (13 blooms, 1m 50s), Chinju Forest (9 blooms, 1m 25s), Kamisato Estate (11 blooms, 2m 25s), Grand Narukami Shrine (30 blooms, 4m 30s).
Can I farm Sakura Blooms in co-op mode? Yes, with host permission. It’s the only method to gather more than 75 blooms within 48 hours. Request specific quantities, offer reciprocal access, and respect host resource management plans.


