

Secret Source Automaton Overseer Device Overview
Enemy Classification and Characteristics
Here’s the thing about Natlan’s newest mechanical nightmare – the Secret Source Automaton: Overseer Device isn’t your typical hit it until it dies World Boss. this Hydro-affiliated menace completely flips the script on traditional boss encounters.
What makes this thing genuinely terrifying? Its ‘Flow Momentum’ gauge system. You can’t just brute force your way through this – it only responds to continuous Cryo damage. I’ve watched too many players bang their heads against this boss for twenty minutes because they thought their usual DPS rotation would work. It won’t.

The engineering behind this boss is honestly impressive (from a lore perspective, anyway). Those spinning laser mechanisms aren’t just for show – they represent some serious predecessor civilization tech that adapts to how you fight. And here’s a counterintuitive tip that’ll save you hours of frustration: don’t use Natlan’s ‘Nightsoul’ mechanic. I know, I know – it’s the region’s signature feature. But trust me, it just makes this boss angrier and more aggressive.
For players looking to optimize their runs, secure payment Genshin Impact resources through BitTopup can help you get those essential Cryo characters built properly. Their verification systems are solid, and honestly, you’ll want every advantage you can get for this fight.
Combat Difficulty Rating
Let me be blunt – this boss has the most unforgiving difficulty curve I’ve encountered in Genshin. Come prepared with proper Cryo characters? You’ll clear it in under two minutes. Show up unprepared?
You’re looking at a ten-minute slog that’ll drain your patience faster than your Original Resin.
The 40 Resin cost reflects this reality. When ‘Sweeper Mode’ kicks in and you can’t counter it properly, the intensity just keeps ramping up. It’s not about skill at that point – it’s about having the right tools for the job.
Complete Location Guide
Primary Spawn Location
Finding this boss is actually the easy part. It’s parked on an unnamed island roughly 500 meters southwest of Atocpan’s main chunk of land. The arena itself is this perfectly circular platform surrounded by ancient mechanical structures – you can’t miss it once you’re there.
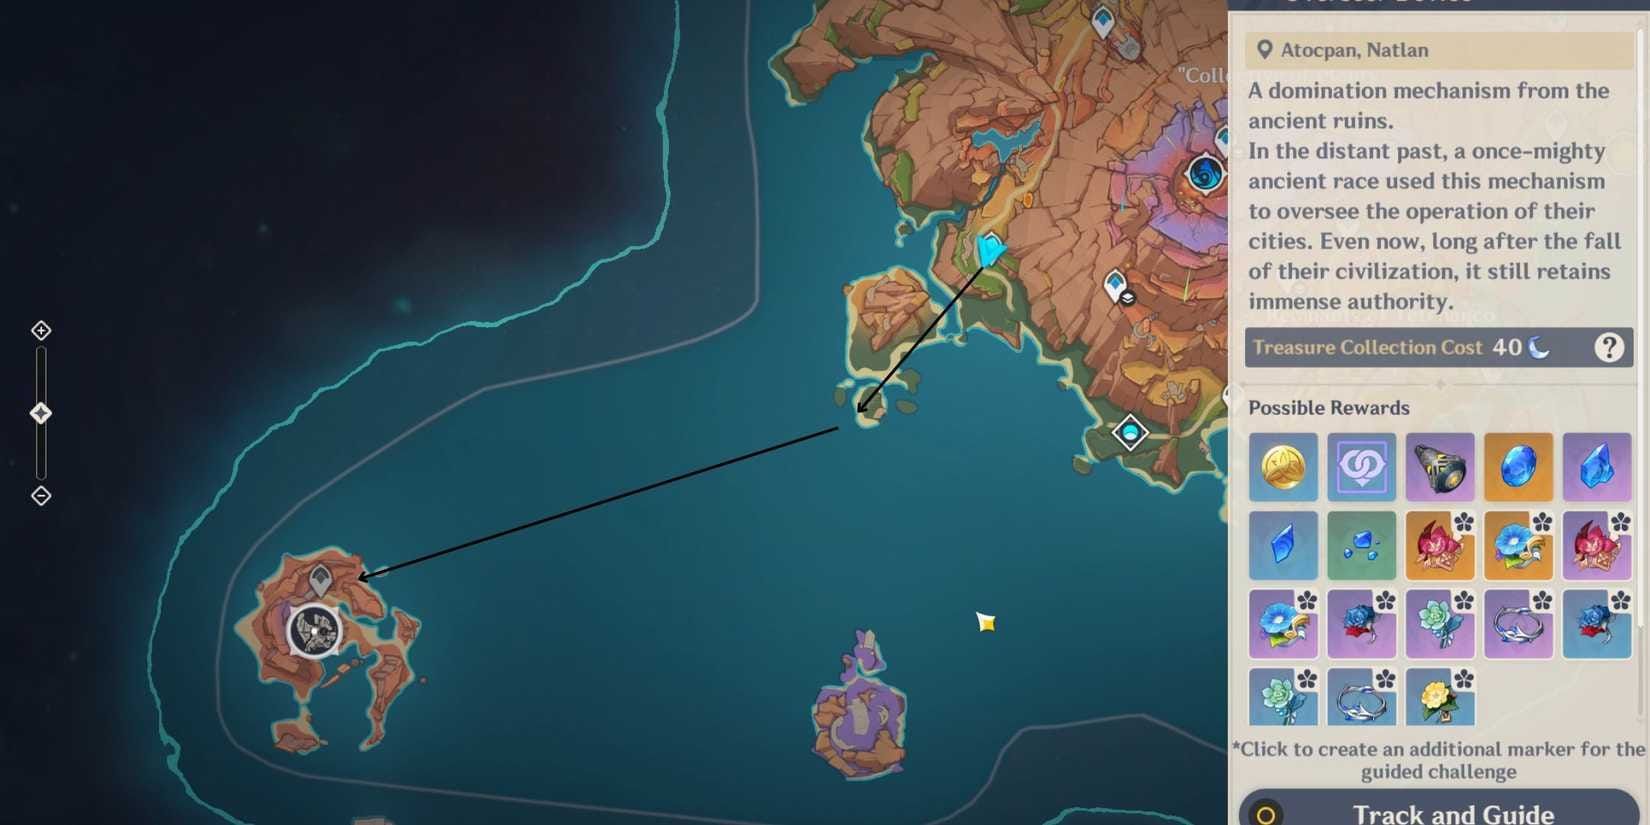
Good news: there’s a Teleport Waypoint that unlocks after your first visit, so you’ll never have to make this journey twice.
Navigation Steps
Here’s your step-by-step route:
Starting Point: Hit up the waypoint near the ‘Derelict Masonry’ artifact domain (or grab the westernmost Atocpan mountain waypoint if that’s closer)
Coastal Access: Head down to the shoreline – look for the Dragon Idol marking your departure point
Aquatic Traversal: Indwell a nearby Koholasaurus for swimming capabilities (you’ll need the speed boost)
Island Approach: Swim toward the target island, grabbing Phlogiston particles along the way for sprint abilities
Alternative Method: Got Furina? Her water-walking makes this a breeze
The initial journey takes about 2-3 minutes, but once that waypoint’s unlocked, you’re golden. Pro tip: track the boss location through your Adventurer’s Book under the ‘Bosses’ tab if you ever lose track.
Attack Patterns and Behavior Analysis
Phase 1 Attack Sequences
The Overseer Device starts relatively tame with three main attacks you’ll need to recognize. Charged Attack happens when you’re playing keep-away – watch for the wing-flapping animation, then dodge the high-speed charge along the marked path.
Whirlpool Formation is nastier than it sounds. These aren’t just visual effects – they’ll pull you toward the center while dealing continuous Hydro damage for a solid 8-10 seconds. Waterbomb Deployment gives you about two seconds to react when those circular water barriers form around your character.
Phase 2 Enraged Mechanics
This is where things get spicy. ‘Sweeper Mode’ kicks in around 75% health (or after a timer, depending on your DPS). The boss relocates to center stage and starts building that dreaded ‘Flow Momentum’ while spinning like a mechanical tornado.
Here’s the critical part – that Flow Momentum gauge only responds to Cryo damage. Not Pyro, not Electro, not your perfectly built Neuvillette. Cryo. Period.
Fail to break it? The spinning accelerates and those lasers start firing in all directions. Successfully deplete the gauge? You get 8-12 seconds of free damage while it’s stunned. That’s your window.
Elemental Weaknesses and Counter Strategies
Elemental Damage Effectiveness
Let’s talk numbers because they matter here. Cryo damage to the Flow Momentum gauge has 200% effectiveness – it’s literally designed to be the counter. Freeze reactions give you 3-4 seconds of control, which is huge for positioning.
Everything else? You’re looking at 10-15% normal effectiveness against the gauge. Hydro damage is actually counterproductive due to the boss’s innate resistance.
Optimal Breaking Sequence
Here’s your playbook:
Get your melee Cryo character within that spinning radius (I know it looks scary)
Apply continuous Cryo through normal attacks and skills – don’t save them
Watch that Flow Momentum gauge like a hawk
Have your burst rotations ready for when it breaks
Rinse and repeat for subsequent Sweeper activations
Wriothesley and Kaeya excel at close-range application, while Ayaka’s dash gives you positioning advantages. Catalyst users like Escoffier work too, but the timing’s trickier.
For building these characters properly, Genesis Crystals safe seller verified platforms like BitTopup offer reliable purchasing with competitive pricing. Trust me, having properly built Cryo characters makes this fight night and day.
Master Rotation Framework
Pre-Sweeper (0-5 seconds): Shields up, buffs active, positioning locked
Gauge Breaking (5-15 seconds): All Cryo, all the time
Vulnerability Window (15-25 seconds): Unleash everything you’ve got
Recovery Phase (25-30 seconds): Reset and prep for round two
Best Team Compositions
DPS-focused Teams
The gold standard? ‘Ayaka, Shenhe, Kazuha, Diona.’ You get Cryo resonance, resistance shredding, elemental absorption, and defensive utility all in one package.

Prefer melee? Try ‘Wriothesley, Mavuika, Furina, Citlali.’ Want to stay at range? ‘Escoffier, Neuvillette, Furina, Citlali’ works beautifully.
F2P Friendly Alternatives
Don’t have the premium units? No problem. ‘Traveler (Pyro), Xiangling, Barbara, Kaeya’ gets the job done. Focus your investment on Kaeya’s Cryo application consistency rather than trying to maximize his damage output.
Basic artifact sets and weapon upgrades provide sufficient performance. You’re not trying to set speed records here – you just need to break that gauge reliably.
Pre-Battle Preparation
Recommended Adventure Rank
Technically accessible at AR 30, but you’ll want AR 45+ for the good stuff. That’s when 5-star artifact domains unlock and you can properly ascend your characters.
Reality check: AR 30-40 means longer fights but it’s doable. AR 40-50 gives you better artifacts. AR 50+ is where this fight becomes genuinely enjoyable instead of a slog.
Essential Items and Consumables
Priority shopping list:
Cryo Damage Bonus food (this actually matters for gauge-breaking)
Attack boost consumables for vulnerability windows
Healing items for emergencies
Stamina food for better dodging
Offensive buffs beat defensive ones here because the boss deals mixed damage types anyway.
Build Priority Framework
Cryo Units: Energy Recharge > Cryo DMG > Crit Rate/DMG
Main DPS: Standard damage optimization (ATK/Crit/DMG)
Support Units: HP/DEF > Energy Recharge > Elemental Mastery
Step-by-Step Combat Strategy
Opening Phase Tactics
Start with your main DPS and get a feel for the arena. You’ve got about 30-45 seconds before the first Sweeper Mode kicks in, so use this time wisely.
Your checklist: Deploy main DPS and supports for standard damage, stay at medium range (close enough to react, far enough to avoid charges), build energy for your Cryo characters, dodge those Whirlpools and Waterbombs, and mentally prep for the gauge phase.
Sweeper Mode Response Protocol
When that Flow Momentum gauge appears, everything changes:
Immediate Switch: Get your primary Cryo character out now
Positioning Adjustment: Move within effective range – don’t try to snipe from across the arena
Gauge Focus: Every attack goes toward depleting that meter
Timing Awareness: Watch the progress and prep your big damage for the stun
Burst Preparation: Have those high-damage abilities ready to go
Vulnerability Window Maximization
This is where you make your money. When the boss is stunned, coordinate those burst rotations for maximum damage.
The sequence: Pop all your prepared elemental bursts, apply damage amplification effects, execute your optimal rotation, maintain energy for the next cycle, and reset positioning.
Advanced players consistently hit sub-two-minute clears by nailing this phase.
Rewards and Farming Efficiency
Guaranteed Drop Materials
The big prize here is ‘Secret Source Airflow Accumulator’ – exclusive ascension material for Dahlia, Escoffier, and Ineffa.

Per character breakdown: Level 40 needs 2, Level 50 needs 4, Level 60 needs 8, Level 70 needs 12, Level 80 needs 20. That’s 46 total per character you want to max out.
Yeah, it’s a significant Resin investment.
Secondary Drops
You’ll also get Varunada Lazurite gems following standard distribution patterns. Slivers drop at any level, Fragments at 40+, Chunks at 60+, and Gemstones at 75+.
Artifact-wise, expect Gladiator’s Finale and Wanderer’s Troupe alongside the usual suspects.
Optimization Framework
Waypoint Utilization: Use that island teleport for instant access
Team Preparation: Keep your optimized comp ready to go
Resin Management: Plan your sessions around regeneration
Co-op Consideration: Don’t be afraid to team up for tough encounters
Resource Tracking: Monitor progress through the Adventurer’s Book
Common Mistakes and Pro Tips
Critical Positioning Mistakes
The biggest newbie trap? Staying too far away during Sweeper Mode. You can’t break that gauge from across the arena, and the longer you wait, the worse it gets.
Common errors: Maintaining long range during gauge-breaking, failing to reposition when Sweeper activates, ignoring environmental hazards, poor spacing during regular attacks, and not using the arena boundaries effectively.
Professional Timing Strategies
Want to cut your clear times by 30-50%? Master these transitions:
Advanced techniques: Pre-position Cryo characters before activation, build energy during safe phases, time support buffs with damage windows, coordinate rotations with boss cycles, and optimize skill cooldowns for consistent application.
Master-Level Techniques
Expert players exploit Freeze reactions for additional control beyond the standard mechanics. Animation canceling during vulnerability phases, optimal burst sequencing, environmental hazard utilization, and co-op coordination for simultaneous gauge depletion all separate the pros from the amateurs.
Comparison with Other Natlan Enemies
Difficulty Scaling Analysis
This represents the pinnacle of Natlan’s mechanical enemy design. It’s got more complex mechanics than any other automaton variant, and unlike most bosses where Cryo is optional, here it’s mandatory.
The metrics: Highest mechanical complexity among automatons, steep learning curve that plateaus after mastery, standard costs but specialized prep requirements. The unique counter-mechanic system sets it apart from traditional DPS-check encounters.
Strategic Priority Ranking
Bottom line classification: Essential if you’re building Dahlia, Escoffier, or Ineffa. Moderate priority for Hydro character materials. Optional for general progression. Situational for practicing advanced mechanics.
Its specialized nature makes it less universally valuable than region-agnostic bosses, but absolutely essential for compatible character builds.
Frequently Asked Questions
Where exactly can I find the Secret Source Automaton Overseer Device in Natlan?
It’s chilling on an isolated island southwest of Atocpan’s main landmass. Teleport to the waypoint near ‘Derelict Masonry’ domain, head to the shoreline with the Dragon Idol, grab a Koholasaurus, and swim over. Furina users can just water-walk there. Once you unlock the island’s Teleport Waypoint, you’re set for instant access.
What are the most effective counter strategies for Sweeper Mode?
Continuous Cryo damage is the only way to deplete that ‘Flow Momentum’ gauge. Switch to your Cryo character the moment the gauge appears, get within range, and focus everything on the boss. Ayaka, Wriothesley, Kaeya, and Escoffier all work great. Breaking the gauge stuns the boss for 8-12 seconds. And seriously – avoid Nightsoul abilities. They just make it angrier.
Which team compositions work best?
For premium setups, try ‘Ayaka, Shenhe, Kazuha, Diona’ for that Cryo resonance synergy. Alternatives include ‘Wriothesley, Mavuika, Furina, Citlali’ for melee focus, or ‘Escoffier, Neuvillette, Furina, Citlali’ for ranged play. F2P players can make ‘Traveler (Pyro), Xiangling, Barbara, Kaeya’ work just fine. The key requirement is having a rapid Cryo-applying character for that Flow Momentum mechanic.
What materials does it drop and how many do I need?
The exclusive drop is ‘Secret Source Airflow Accumulator’ for Dahlia, Escoffier, and Ineffa. Each character needs 46 total (2+4+8+12+20 for levels 40-80). You’ll also get Varunada Lazurite gems and artifacts like Gladiator’s Finale and Wanderer’s Troupe.
What are common mistakes when fighting this boss?
The biggest mistake? Ignoring Sweeper Mode by either not bringing Cryo or failing to break the gauge properly. Other common errors include staying too far away during gauge-breaking, using Nightsoul abilities (they backfire here), poor positioning during attacks, and inadequate energy management. Always prioritize that Flow Momentum gauge over raw damage during Sweeper Mode.
How does this compare to other Natlan mechanical enemies?
It’s the most mechanically complex Automaton, requiring mandatory counter-mechanics rather than flexible approaches. You need specific Cryo team planning, unlike other variants. There’s a steep learning curve, but it plateaus once you master the Flow Momentum system. Unlike the Hunter-Seeker which benefits from Nightsoul abilities, the Overseer Device actually punishes you for using them.


