

Shouki no Kami Weekly Boss Overview & Unlock Requirements
Quest Prerequisites and Story Gate
Here’s the thing about Shouki no Kami – you can’t just waltz in and fight him. This boss unlocks only after you’ve completed Archon Quest Chapter III: Act V Akasha Pulses, the Kalpa Flame Rises, specifically the quest Where the Boat of Consciousness Lies.
You’ll need Adventure Rank 35 minimum, but honestly, that’s the least of your worries. The real gate here is the story progression. Weekly farming? That only becomes available after you’ve defeated him once during the mandatory story encounter. Fair warning: this boss was introduced back in Version 3.2 on November 2, 2022, so if you’re just getting to Sumeru now, you’ve got some catching up to do.
Location and Domain Access
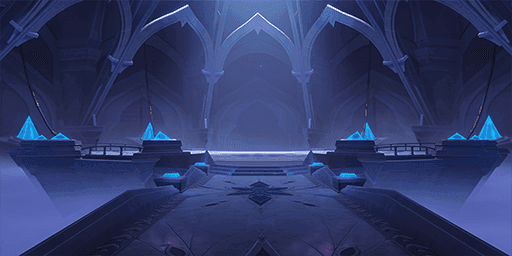
The boss fight takes place in the Joururi Workshop Trounce Domain – sounds fancy, right? You’ll find it tucked away in Chinvat Ravine, Avidya Forest, Sumeru. Once you’ve cleared the story, there’s a direct teleport available (thank the Archons for that).
For those looking to enhance their character builds for this challenging encounter, pull fund top up Genshin through BitTopup offers competitive pricing and instant delivery. Trust me, you’ll want every advantage you can get when tackling weekly bosses efficiently.
Complete Phase Mechanics Breakdown
Phase 1: Elemental Matrix System
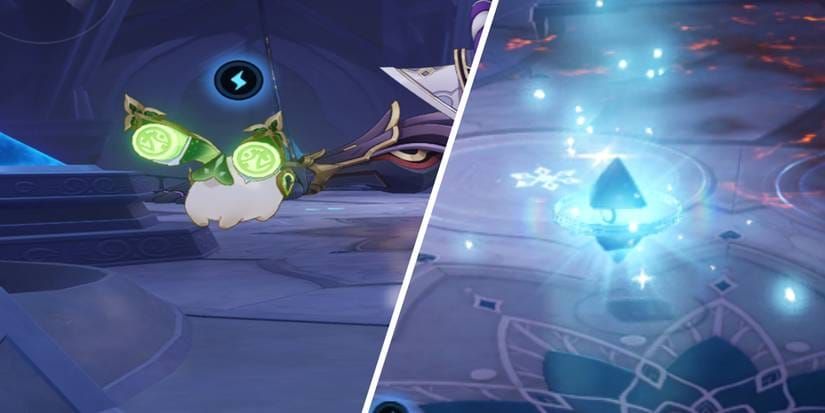
Phase 1 is where things get interesting – and by interesting, I mean potentially frustrating if you don’t understand the mechanics. Everything revolves around the Neo Akasha Terminal (NAT) and six Elemental Matrices scattered around the arena.
The NAT charges by collecting Energy Blocks – those blue-green crystals that drop after the boss attacks. Think of them as your lifeline. Each matrix does something different:
Pyro Matrix: Clears those annoying Cryo ground hazards
Cryo Matrix: Removes Pyro ground effects (seeing a pattern here?)
Anemo Matrix: Creates wind currents for aerial dodging – absolute lifesaver
Hydro Matrix: Generates a continuous healing aura
Electro Matrices (there are two): The first one partially stuns the boss, the second completely paralyzes him for a massive damage window
The matrices are positioned strategically – left side has Pyro, Anemo, and one Electro, while the right side houses Cryo, Hydro, and the other Electro. Pro tip from someone who’s wiped more times than I care to admit: activate both Electro matrices in succession for that sweet paralysis state.
Phase 2: Shield Breaking and Targeted Blasts
Phase 2 is where Shouki no Kami gets serious. He gains this powerful shield that requires a specific breaking strategy – no more button mashing your way through. The NAT will auto-attack the shield while you’re busy collecting Energy Blocks (now conveniently equipped with Four-Leaf Sigils) for Targeted Blast attacks.
When fully charged, your Elemental Skill gets replaced with this targeting mechanism. Each successful blast deals roughly 20% shield damage. Miss? Don’t panic – you keep your charge without penalty, which is more forgiving than some other mechanics in this game.
Watch out for those elemental bombs he scatters around: Pyro bombs are vulnerable to Hydro, Cryo to Pyro, Hydro to Dendro. Destroying them prevents damage and generates more Energy Blocks. It’s like a deadly game of rock-paper-scissors.
Ultimate Attack: Setsuna Shoumetsu Counter
After you’ve depleted his shield, the boss charges up Setsuna Shoumetsu – and let me be crystal clear about this: it’s a guaranteed one-hit KO that ignores all defenses. No exceptions.
You’ve got exactly 40 seconds to destroy four Nirvana Engines: one at ground level, three floating around like they own the place. These engines resist Electro and Hydro but are vulnerable to Pyro, Cryo, and Dendro. This is why ranged characters aren’t just recommended – they’re essential for those floating targets.
Success gives you Energy Blocks for NAT charge. Fire that Targeted Blast at the boss’s chest before he completes his casting, and you’ll paralyze him while recharging all your Elemental Bursts. Timing is everything here.
Elemental Resistances & Damage Calculations
Resistance Chart by Phase
Let’s talk numbers – because in Genshin, numbers don’t lie:
Phase 1: Electro 50%, Everything else 10%
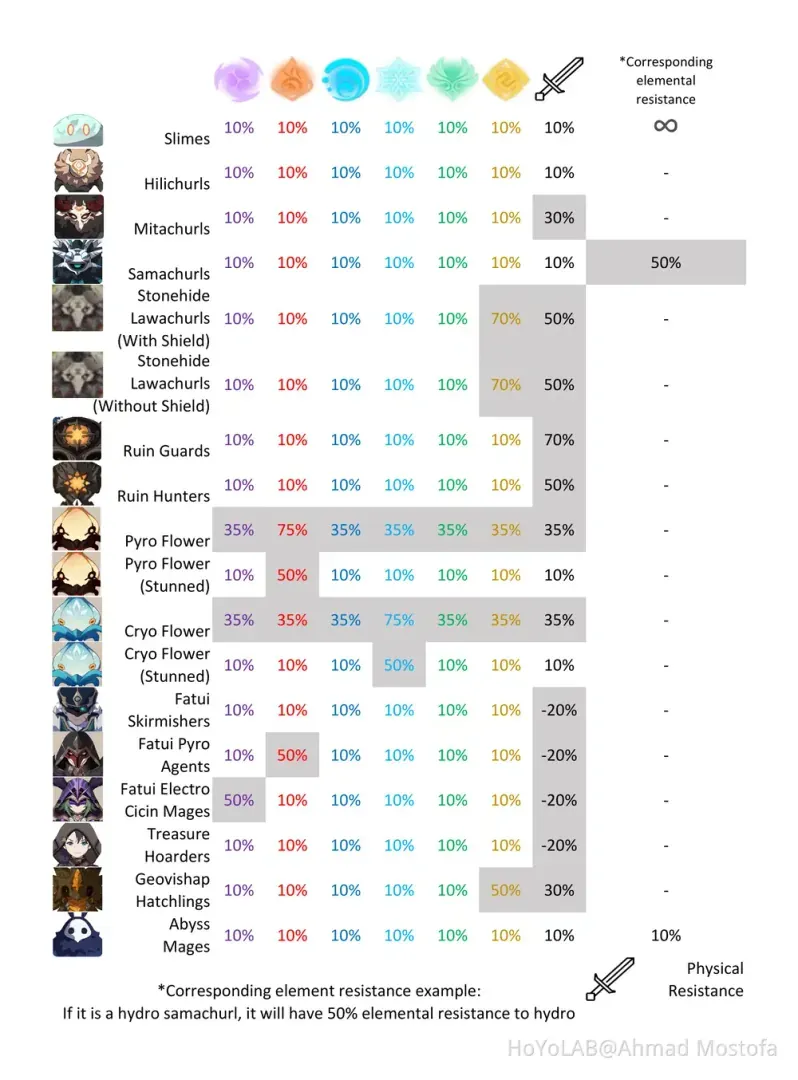
Phase 2: Electro 90%, Everything else 30%
Phase 2 (Shield): Electro 290%, Everything else 230%
Stunned/Paralyzed: Electro -80%, Everything else -140%
Bottom line? Avoid Electro DPS characters like the plague. Those consistently high resistance values will make your life miserable. But those paralyzed states? That’s where the magic happens – negative resistance values create massive damage windows perfect for your burst rotations.
Best Team Compositions & Character Recommendations
Essential Roles and Meta Builds
You need four key roles covered: Ranged DPS (bow or catalyst users), a solid shielder, elemental coverage (specifically Pyro, Cryo, and Dendro), and utility support.
Premium Teams (if you’ve got the characters):

Ganyu, Nahida, Bennett, Zhongli: Ranged Cryo DPS with Dendro application, healing/buffs, and the strongest shielding in the game
Yoimiya, Xingqiu, Ayaka, Bennett: Ranged Pyro DPS with Hydro support and Cryo coverage
Tighnari, Collei, Xiangling, Zhongli: Dendro-focused team with reliable Pyro support
F2P Option: Amber, Collei, Xiangling, Bennett. Yes, Amber. I know what you’re thinking, but this covers all mechanics with story-available characters.
For optimal builds, Genesis Crystal packs best value through BitTopup provides cost-effective weapon and constellation upgrades with competitive pricing and secure processing. Sometimes you need that extra edge.
Top Character Picks: Ganyu (those charged shots are perfect for engines), Tighnari (ranged Dendro king), Yoimiya (consistent Pyro application), Zhongli (strongest shield, period), Bennett (healing and buffs – what more do you want?).
Attack Patterns & Survival Guide
Phase 1 Attack Recognition
Learning to recognize his attacks by voice cues will save your life:
Arm Slams (Insignificant Pest!): Creates those Pyro/Cryo hazards I mentioned
Chest Laser: Arena-wide Electro blast with a charging animation
Waterspouts (Churn!): Anemo/Hydro tornadoes that’ll toss you around
Laser Array: Rotating beams with projection lines – at least he gives you a warning
Use those Anemo Matrix wind currents for aerial dodging. Seriously, they’re not just for show. Clear ground hazards immediately with the corresponding matrices – don’t try to tank through them.
Phase 2 Mobility and Defense
Phase 2 gets aggressive. Really aggressive. Strong shielding isn’t optional here:
Triple Earthshock: Three-hit combo with expanding damage zones
Thunder Lance (Kneel!): Four Electro spears with ground indicators
Cosmic Bombardment (Reality is pain!): Portal projectiles plus laser sweeps
Double Charge: Rapid dashes that leave elemental trails
Zhongli, Layla, or Diona become essential for damage mitigation during these intense sequences. Don’t try to face-tank this stuff – even well-built characters will struggle.
Rewards Analysis & Drop Rates
Weekly Boss Materials
Each clear drops one random talent material:
Puppet Strings: For Nahida, Dehya, Faruzan
Mirror of Mushin: For Alhaitham, Layla, Mika
Daka’s Bell: For Wanderer, Yaoyao, Sethos
You’ll also get ascension gems, Dream Solvent (33% chance), Midlander Billets (33% chance), and artifact sets.
Resin Costs: Your first three weekly bosses each week cost 30 resin, additional claims jump to 60 resin. Weekly reset happens Monday at 4:00 AM Server Time. Level 90 is optimal for maximum yields – don’t shortchange yourself here.
Advanced Strategies & Achievement Guide
Achievement Unlocks (5 Primogems each)
It All Comes Tumbling Down: Paralyze the boss in Phase 1 using those Electro matrices
Causality of Birth and Extinction: Die to Setsuna Shoumetsu (easiest achievement ever?)
Like Hopscotch?: Activate all six matrix types in Phase 1
…It’s Payback Time: Destroy his shield during Galactic Barrage
Dance Like You Want to Win!: Defeat the boss in co-op
Fun easter egg: if you’re using Raiden Shogun and she gets defeated by Shouki no Kami, it triggers a special Beelzebul voice line. Nice touch, HoYoverse.
Co-op Considerations
Co-op allows simultaneous Electro matrix activation, which is pretty neat, but the boss gains HP and ATK scaling. Without character swapping as a safety net, you’ll need better coordination.
Nahida’s charged attacks become the only reliable method for floating engines in co-op. Venti’s held skill creates extended wind currents that benefit the whole team.
FAQ
How do you unlock Shouki no Kami weekly boss? Complete Archon Quest Chapter III: Act V Where the Boat of Consciousness Lies with Adventure Rank 35 minimum. You’ll need to defeat him once during the story for weekly access.
What are Shouki no Kami’s elemental resistances? Phase 1: 50% Electro, 10% others. Phase 2: 90% Electro, 30% others. Shield phase: 290% Electro, 230% others. When stunned: -80% Electro, -140% others. Seriously, avoid Electro DPS.
Which characters work best against Scaramouche? Ranged DPS like Ganyu, Tighnari, or Yoimiya for those floating engines. Strong shielders like Zhongli or Layla for damage mitigation. Pyro, Cryo, or Dendro characters for engine destruction. Did I mention avoiding Electro DPS?
How do you counter Setsuna Shoumetsu? Destroy four Nirvana Engines within 40 seconds using Pyro, Cryo, or Dendro attacks. Collect Energy Blocks, charge your NAT, then fire a Targeted Blast at his chest. Success paralyzes him and recharges all your Bursts.
What rewards does the boss drop? One random weekly talent material, ascension gems, 33% chance for Dream Solvent or Midlander Billets, plus artifact sets. Costs 30 resin for your first three weekly bosses, 60 resin after that.
Can you fight this boss in co-op? Absolutely. Simultaneous Electro matrix activation becomes easier, but the boss gets HP and ATK buffs. Without character swapping as backup, you’ll need better coordination and individual skill from each player.


