

Blood Strike RPK Meta Analysis: Current Season Overview
The RPK landed in the Squad Fight store during Season 13 alongside a whole arsenal—M1887, Uzi, UMP45, FN2000, Galil, QBZ95, and SVD. And look, this LMG absolutely shreds when you're holding defensive positions with sustained suppressive fire. But here's the thing: it's got some glaring weaknesses that aggressive F2P players can exploit. We're talking slower mobility, painfully long reload times, and serious vulnerability when you need to reposition.
The May 2025 updates changed everything. Assault rifles got more versatile, SMGs tightened up their hip-fire accuracy, and snipers became noticeably more stable. Tournament weapon variety jumped 40% by October—that's not a coincidence. Then September's balance patch hit: Vector upper chest damage dropped from 19 to 17, KAG-6 headshot damage bumped up from 26 to 28, and AK-47 upper chest damage got boosted from 30 to 32.
For accelerated weapon progression and attachment unlocking, secure Blood Strike golds top up through BitTopup's platform offering competitive pricing and instant delivery.
RPK Dominance Statistics
That 100-round magazine? It's what makes the RPK terrifying in extended engagements. No reloads means continuous pressure in squad confrontations—critical when you're trying to hold a position. Competitive data shows RPK users gravitate toward defensive setups on maps where flanking options are limited (because that mobility disadvantage hurts less there). The sweet spot for this weapon is 30-70 meter engagements, which overlaps nicely with assault rifle ranges. But get rushed by SMGs or picked by snipers? You're in trouble.
Meta Shift Factors
Post-May 2025, the meta stopped rewarding one-trick ponies. Versatility became king. FAL hit 70% pro adoption with its 705 RPM and exceptional mid-range control—that's not just popularity, that's dominance. KAG-6 actually dethroned the AK-47 with the same 70% pro adoption rate, offering balanced damage, fire rate, and recoil across all distances.
And the P90? Despite Vector nerfs in September, it captured 60% of close-quarters engagements. What works best is high-mobility weapons that can counter static sustained-fire positions—the meta's basically telling us that movement beats standing still.
Player Usage Trends
In Diamond+ ranked matches, you'll see the S-tier trinity (KAG-6, FAL, P90) dominating loadouts. RPK usage actually increases in Platinum and below where positional discipline gets... let's say inconsistent. But Legend-tier players (top 250) who do run RPK? They exploit it through superior positioning, pre-aiming defensive angles, and rotating early—we're talking 30-40 seconds before zone closures. They deny opponents the static positioning RPK needs to perform optimally.
Top 5 F2P RPK Counter Weapons Tier List
S-Tier Counter Weapons
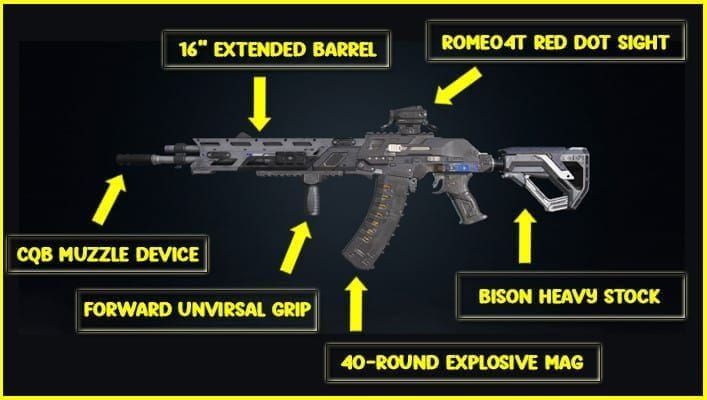
KAG-6 Assault Rifle: This is your premier F2P counter, hands down. With 18 base damage, 63 fire rate, and 46 recoil control, it's forgiving and deadly. Optimal setup: CQB Muzzle, Extended Barrel Level 16, Forward Universal Grip, Romeo4T Red Dot, 40-Round Explosive Magazine. That 70% pro adoption rate maintains itself through superior mobility for aggressive repositioning—exactly what you need against RPK.
FAL Assault Rifle: Mid-range dominance personified. 705 RPM with manageable recoil means you're effective from 50-100 meters using 3-5 round bursts. You'll outduel RPK through superior burst damage and faster target acquisition. Loadout: Compensator, 4x optic, vertical grip, tactical stock, extended magazine. Simple, effective, proven.
P90 SMG: This thing exploits RPK's close-range vulnerability like nothing else. Exceptional hip-fire accuracy paired with 78 fire rate means you're a nightmare in tight spaces. The mobility advantage lets you reposition rapidly between cover, denying the stationary targets RPK requires for effective suppression.
AK-47 Assault Rifle: Post-September buffs brought this classic back hard. 32 upper chest damage with improved recoil means you're trading efficiently, especially when you leverage headshot multipliers. Timeless reliability that maintains Legend-tier viability—there's a reason this weapon never goes out of style.
Kala Sniper Rifle: Ultimate range advantage. 125 base damage, 200-meter effective range, 90% headshot lethality. You're eliminating targets from distances where they literally can't return fire. Punish stationary targets and force constant repositioning—RPK users hate this.
A-Tier Alternatives
SCAR Assault Rifle: Accuracy improvements from 28 to 41 with grips make this a solid choice. Optimal setup: CQB Muzzle Level 16, Extended Barrel Level 20 (range bumps to 24), Extended Vertical Grip Level 40, T2 Red Dot Level 13, CTR Stock Level 43, 40-round Explosive Magazine Level 23. You're hitting 48 mobility with lethal accuracy—that's a winning combination.
AR97 Assault Rifle: 28 base recoil, 43-48 accuracy. Loadout: Compensator Level 38, Extended Barrel Level 20 (range jumps from 25 to 33), Extended Vertical Grip Level 40 (recoil drops to 41), Romeo4T Red Dot Level 42, Sniper Stock Level 43, 45-round Magazine Level 29. Achieves 49 mobility, which is impressive for this damage output.
URB SMG: 32 base damage with recoil reduction from 31 to 45 using compensator, accuracy improvements from 42 to 47. It bridges P90's close-range dominance and assault rifle versatility—best of both worlds in certain situations.
Vector SMG: Still dominates close-quarters despite September nerfs (upper chest dropped from 19 to 17). Loadout: CQB Muzzle Level 38, Extended Vertical Grip Level 24, ACRO Reflex Level 2, UBR Stock Level 20, 35-round Magazine Level 3. Don't sleep on this just because of the nerf.
Situational Picks
Dual Uzi: Ranked fifth post-May for close-quarters DPS. That exceptional fire rate absolutely shreds sub-10 meter engagements—ideal for aggressive building pushes when you know exactly where the fight's happening.
Kar98k Sniper: May 2025 stability enhancements enable one-shot eliminations that feel consistent now. Excels on long-sightline maps where RPK positions become predictable.
MP7 SMG: 4.6x30mm ammunition with high fire rate suggests strong close-quarters flanking potential. In practice, it's a solid backup option when your primary picks aren't available.

Weapon Stats Deep Dive: RPK vs Counter Options
Damage Comparison
FAL's 705 RPM delivers superior DPS in controlled bursts—emphasis on controlled. AK-47's 32 upper chest damage enables faster eliminations through headshot combinations (and experienced players know those headshots are what separate good from great). KAG-6's 18 damage with 63 fire rate matches RPK's sustained fire but with superior mobility. P90 and Vector leverage fire rate for faster time-to-kill within their effective ranges.
But Kala? It bypasses damage comparisons entirely through instant eliminations. 125 damage with 200-meter range and 90% headshot lethality means you're not trading shots—you're executing.
Range Analysis
RPK occupies that 30-70 meter optimal zone. Counter strategies exploit everything outside it. FAL's mid-range control with 4x optics and Kala's 200-meter range provide 70+ meter advantages where RPK users are basically helpless. Within 30 meters, SMG mobility and fire rate overwhelm RPK before sustained fire accumulates enough damage to matter.
P90's medium-range viability extends close-quarters dominance to about 40 meters, which is genuinely impressive for an SMG. KAG-6 + URB combinations provide comprehensive coverage across all distances—that's why you see this pairing so often in competitive play.
Mobility Factors
SCAR's 48 mobility enables rapid repositioning, denying the stationary targets RPK needs. AR97's 49 mobility with 43-48 accuracy supports aggressive flanking without sacrificing effectiveness. P90's speed closes distance gaps before RPK accumulates lethal damage, enabling flanking routes that bypass firing lanes entirely.
KAG-6's balanced mobility supports bo
th aggressive and defensive counter-play. That 70% pro adoption rate? It's not just about damage—it's about being able to do everything well.
Optimal Counter Loadouts and Attachments
Close-Range Builds
Vector Room Clearer: CQB Muzzle Level 38, Extended Vertical Grip Level 24, ACRO Reflex Level 2, UBR Stock Level 20, 35-round Magazine Level 3. That magazine capacity ensures multi-target capability without tactical reloads—critical when you're pushing into defended positions.
P90 Aggressive Flanker: Maximize hip-fire accuracy and mobility while maintaining medium-range viability. This setup's for rapid building entries that overwhelm static setups before they can react.
Dual Uzi Rusher: Maximum DPS sub-10 meters for coordinated pushes against entrenched positions in urban environments. It's specialized, but when the situation's right, nothing beats it.
Mid-Range Configurations
FAL Precision Platform: Compensator reduces vertical recoil (making those bursts more consistent), 4x optic enables 50-100 meter precision, vertical grip stabilizes 3-5 round bursts, tactical stock improves ADS speed, extended magazine prevents vulnerable reloads. Every attachment serves a purpose here.
KAG-6 Versatile Workhorse: CQB Muzzle, Extended Barrel Level 16 extends range to overlap RPK's zone with mobility advantages, Forward Universal Grip balances recoil, Romeo4T Red Dot, 40-Round Explosive Magazine. This is the does everything well loadout.
AR97 Balanced Performer: Compensator Level 38 (recoil drops to 41), Extended Barrel Level 20 (range jumps from 25 to 33), Extended Vertical Grip Level 40, Romeo4T Red Dot Level 42, Sniper Stock Level 43, 45-round Magazine Level 29. Solid all-arounder when you need reliability.
Versatile Setups
SCAR All-Rounder: CQB Muzzle Level 16, Extended Barrel Level 20 (range to 24), Extended Vertical Grip Level 40 (accuracy from 28 to 41), T2 Red Dot Level 13, CTR Stock Level 43, 40-round Explosive Magazine Level 23. Effective across all scenarios without major weaknesses.
KAG-6 + URB Combination: Primary handles mid-to-long range, secondary provides close-quarters insurance. Comprehensive coverage means you're engaging RPK at disadvantageous distances with escape options always available.
AK-47 Power Platform: Leverage that 32 upper chest damage with vertical grip and compensator for controlled bursts. High per-shot damage rewards precise aim—if you can
land shots consistently, this hits harder than most alternatives.
For faster attachment unlocking, consider Blood Strike golds instant recharge through BitTopup's secure platform with fast delivery and excellent service.
Positioning Strategies Against RPK Users
Map Control Tactics
Urban maps (sub-30 meters): P90/Vector + KAG-6 with Deagle secondary. HANK turret (15 DPS at 20 meters, Level 5 machine gun adds 33% speed increase) forces RPK users from defensive positions—they can't just sit there anymore.
Long-range maps: Kala + FAL tap-fire. VAL reconnaissance scan (150-meter range for 6 seconds lasting 20 seconds, Level 3 extends to 200 meters, Level 5 adds 12 seconds) reveals RPK positions pre-engagement. You're not guessing—you know where they are.
Mixed environments: KAG-6 + URB. Identify RPK-favorable positions during early rotations, establish counter-positions forcing unfavorable ranges. Elevated terrain provides critical sniper advantages that can't be overstated.
Engagement Distances
Maintain distances outside that 30-70 meter RPK optimal zone. Within this band, prioritize cover-to-cover movement denying sustained fire opportunities. FAL burst-fire delivers damage during brief exposures while minimizing return fire—peek, burst, cover, repeat.
Close gaps rapidly using SMG mobility. P90's medium-range viability enables effective fire during approach, so you're not just running—you're damaging. Within 20 meters, superior fire rate and hip-fire accuracy overwhelm sustained-fire platforms. It's not even close.
Long-range: Kala's one-shot potential rewards careful aim. Establish positions with multiple retreat routes, relocate after 1-2 shots preventing counter-positioning. Don't get greedy.
Cover Utilization
RPK requires extended sight lines—that's fundamental to how it works. Deny this through terrain-based cover breaking line-of-sight during repositioning. Urban environments enable aggressive flanking bypassing firing lanes entirely.
Use cover edges for peek-based engagements minimizing exposure. FAL burst damage excels in peek-shoot-cover sequences. Time peeks between RPK reload cycles (and those cycles are long—use them).
Vertical elements (elevated platforms, multi-story buildings) provide superior angles against ground-level positions. ETHAN's 400 HP one-way barrier (30-second duration, Level 5 doubles length and adds 40% height, Parkour Master adds 25% speed increase) creates temporary superior positions that force unfavorable engagements.
Movement and Timing Techniques
Peek Mechanics
Shoulder-peek baits RPK fire without exposing hitboxes, forcing ammunition expenditure and revealing positions. Follow with immediate wide-angle peeks from different positions catching reload animations—this is where you punish them.
Crouch-peek variations alter expected head positions reducing headshot vulnerability. Combine with strafe movements creating unpredictable patterns. P90's hip-fire accuracy enables effective damage during evasive movements—you're not sacrificing offense for defense.
Jump-peek provides brief aerial sight lines for reconnaissance and burst damage. KAG-6's balanced recoil enables accurate mid-air fire, which feels satisfying when you land it.
Strafe Patterns
A-D strafe with irregular timing complicates tracking. Don't be predictable—vary the rhythm. Incorporate crouch and jump for three-dimensional evasion. Counter-strafe enables instant direction changes breaking tracking momentum. Practice in training modes for muscle memory (seriously, spend time on this).
Effective with FAL burst-fire discipline enabling accurate return fire during evasion. Circular strafe around cover forces continuous tracking adjustments—RPK users struggle with this. P90 mobility enables tight circular movements overwhelming tracking while delivering hip-fire damage.
Escape Routes
Pre-identify multiple escape routes before engaging. Sustained-fire weapons punish linear retreats—perpendicular angles are critical. Use smoke grenades and flashbangs creating visual barriers during withdrawals.
ETHAN Parkour Master (25% speed increase) enables rapid disengagements that feel almost unfair. Combine with terrain knowledge for repositioning to advantageous ranges. Vertical escapes using buildings and elevation break line-of-sight more effectively than horizontal movement—always look up.
Team Coordination Anti-RPK Tactics
Squad Compositions
Balanced composition: one long-range specialist (Kala/Kar98k), two mid-range versatile (KAG-6/FAL), one close-quarters (P90/Vector). This ensures comprehensive coverage with flanking capabilities.
E.M.T. beacon (10 HP/s within 5 meters for 20 seconds, October update added protective field with 30% medical speed increase, Level 5 drone adds 5 armor/s) sustains aggressive advances. EMMA drones (81.5 HP/s at 40 meters, Level 5 revives downed players with 40-second cooldown and halved shield) provide resurrection insurance—don't underestimate this.
JET missiles (7 missiles dealing 150 damage, first 3 pinpoint accurate with 25-meter spread, Level 5 adds 4 missiles) destroy cover forcing repositioning. BLAST drill bombs (penetrating walls under 5.5 meters, 125 damage with 8-meter radius, Color Mark 2 seconds, Level 5 adds 25% damage) flush entrenched defenders. These abilities counter static positioning hard.
Communication Strategies
Establish callout systems using map landmarks and compass bearings for precise RPK location communication. He's over there doesn't cut it—be specific.
Coordinate engagement timing preventing sequential eliminations. Simultaneous pressure from multiple angles forces impossible defensive scenarios. Use countdown systems for synchronized pushes—3, 2, 1, push works.
Share ammunition and health status continuously preventing mid-engagement vulnerabilities. Rotate point positions based on resource availability. Communication wins fights before they start.
Coordinated Pushes
Execute pincer movements attacking from opposite angles simultaneously, forcing impossible defensive choices. Combine long-range suppression with close-quarters flanking—one keeps them pinned, the other finishes.
Use smoke grenades creating visual barriers enabling safe approach. Coordinate deployment timing maintaining continuous obstruction during entire advance—don't let the smoke fade between throws.
Implement bait-and-switch: one player draws fire while teammates flank. Baiting player uses superior cover and movement surviving engagement duration. Rotate baiting responsibilities preventing predictability (nobody wants to be bait every time).
Map-Specific RPK Counter Strategies
Urban Maps
Sub-30 meter environments favor P90 and Vector—this is their playground. Prioritize vertical positioning using multi-story structures for superior angles. HANK turret at chokepoints forces predictable movement.
Position covering flanking routes with crossfire coverage creating kill zones punishing repositioning. Utilize interior spaces where sustained fire becomes impossible due to limited sight lines. Vector room-clearing eliminates RPK before defensive setup completes. Maintain aggressive tempo—don't let them get comfortable.
Open Terrain
Kala's 200-meter range with 90% headshot lethality enables risk-free eliminations from distances where RPK return fire fails completely. Establish elevated positions with 360-degree visibility preventing flanking.
VAL reconnaissance scan (150-200 meters with upgrades) provides continuous intelligence. Pre-aim common positions executing first-shot advantages—you see them before they see you. Combine long-range elimination with FAL tap-fire mid-range suppression preventing comfortable defensive positions.
Mixed Environments
KAG-6 + URB provides necessary flexibility. Adapt weapon selection based on immediate terrain, switching as engagement distances change. Identify terrain transitions where RPK must move between cover—these windows create vulnerability for burst damage advantages.
Pre-aim transition points based on zone rotations and objectives. ETHAN one-way barrier (400 HP, 30-second duration, enhanced dimensions Level 5) creates temporary superior positions at chokepoints forcing unfavorable engagements or time-consuming detours. Either way, you win.
Advanced Tips for Competitive Play
Pro Player Techniques
Exploit RPK reload cycles through precise timing. That extended magazine creates lengthy reload animations providing guaranteed vulnerability windows—track ammunition through audio cues and visual effects identifying optimal engagement timing.
Implement pre-fire at common positions based on map knowledge and zone rotations. FAL burst damage with pre-aimed angles enables instant eliminations at predicted locations. You're not reacting—you're anticipating.
Master recoil patterns through dedicated training. Allocate 50-100 matches to sensitivity testing within 400-600 eDPI range. KAG-6's forgiving pattern is ideal for beginners, AK-47 and SCAR demand extensive practice. There's no shortcut here.
Meta Predictions
Current meta's mobility and burst damage emphasis suggests continued RPK vulnerability. Future patches may address sustained-fire viability, but fundamental mobility disadvantages persist—that's baked into the weapon class.
Invest practice in versatile weapons like KAG-6 maintaining effectiveness across meta shifts. Monitor monthly updates and 3-4 month seasonal changes. September 2025 patch demonstrated significant stat adjustments requiring adaptive strategies—stay informed.
Maintain proficiency with multiple S-tier and A-tier weapons ensuring viability regardless of changes. Participate in Hero's Trial and Match Challenge for free Gold Stash Vouchers accelerating progression. November 15 Boost rewards and Squad Fight optimizations provide F2P resource acquisition—use them.
Continuous Improvement
Optimize settings: 1280x720 resolution, 300-800 eDPI baseline (800 recommended), disabled auto-sprint/acceleration/motion blur. Camera sensitivity 60-80% with lower ADS enables precise tracking. Maintain 60+ FPS through graphics optimization, use 5GHz Wi-Fi, install on SSD. Technical optimization matters more than people think.
Analyze ranked progression across Bronze→Silver→Gold→Platinum→Diamond→Master→Legend tiers (sub-tiers I-IV, 2-month seasonal resets). Focus on consistent performance over kills—survival and strategic positioning outweigh aggressive elimination counts in higher tiers. Kills are nice, but winning is better.
Develop weapon-perk synergy: Damage Optimization enhances accuracy/output for assault rifles/snipers, Mobility Enhancement boosts speed/rotation for SMG playstyles, Utility reduces equipment cooldowns enhancing team support. Match your perks to your playstyle, not the other way around.
FAQ
What weapons counter RPK in Blood Strike? KAG-6 (70% pro adoption, balanced versatility), FAL (705 RPM mid-range dominance), P90 (close-quarters flanking), AK-47 (32 upper chest damage post-buff), and Kala (200-meter range, 90% headshot lethality one-shot eliminations). These five form your core counter arsenal.
How to beat RPK users as F2P player? Exploit mobility disadvantages through P90/Vector aggressive flanking in close quarters, maintain FAL mid-range superiority with burst-fire discipline, or establish Kala long-range dominance. Avoid prolonged engagements within that 30-70 meter optimal zone—force unfavorable close-range or extreme-distance fights instead.
Which F2P weapons have better DPS than RPK? P90, Vector, and Dual Uzi deliver superior DPS under 30 meters through higher fire rates and mobility. FAL achieves better effective DPS at 50-100 meters through controlled bursts concentrating damage more efficiently than RPK's spread patterns. It's about effective DPS, not theoretical.
What are RPK weaknesses in Blood Strike? Slow mobility preventing rapid repositioning, extended reload times creating vulnerability windows, ineffectiveness in close-quarters under 30 meters against high-fire-rate SMGs, difficulty tracking aggressively mobile targets using strafe and peek mechanics. These aren't minor issues—they're fundamental limitations.
How to position against RPK in Blood Strike? Establish positions outside that 30-70 meter optimal zone using extreme long-range sniper positions (100+ meters) or close-quarters angles (under 20 meters). Utilize elevated terrain for superior firing angles, maintain multiple cover-to-cover routes, pre-identify escape paths before engaging. Positioning beats raw skill.
What movement techniques counter RPK? Irregular A-D strafe with crouch/jump variations complicating tracking, counter-strafe for instant direction changes, shoulder-peek baits forcing ammunition expenditure, circular strafe around cover, perpendicular escape angles over linear retreats when disengaging. Movement is your best defense against sustained fire.


