

Understanding the Restore Energy Mechanic
Restore Energy represents Blood Strike's biggest competitive gameplay shift. When you eliminate an enemy, a Restore Energy item appears in their Loot Crate. Picking it up:
- Restores health and armor simultaneously
- Grants Evolution energy for character progression
- Reduces active skill cooldowns
- Healing amount scales with defeated enemy's armor level
The system includes automatic pickup when your health or armor drops below critical thresholds, preventing missed restoration during firefights.
This differs from standard passive regeneration by creating an active, combat-driven resource system. You must engage enemies and secure eliminations to access restoration benefits, rewarding aggressive positioning over passive survival.
For competitive loadout optimization, access premium weapons through Blood Strike Golds recharge on BitTopup for secure transactions and instant delivery.
Why Low-Recoil Weapons Dominate Restore Energy Meta
Sustained Combat Advantage
Low-recoil weapons excel in Restore Energy meta because they maximize elimination consistency. The P90, Bizon, and RPK maintain tight groupings at 15-30m, the most common engagement range in ranked matches. Higher accuracy means more eliminations, triggering more energy pickups, creating a combat sustainability loop.
Key advantages:
- Consistent headshot potential without recoil compensation
- Faster time-to-kill on armored targets
- Reliable performance during energy pickup animations
- Better multi-target engagement capability
P90 SMG Build
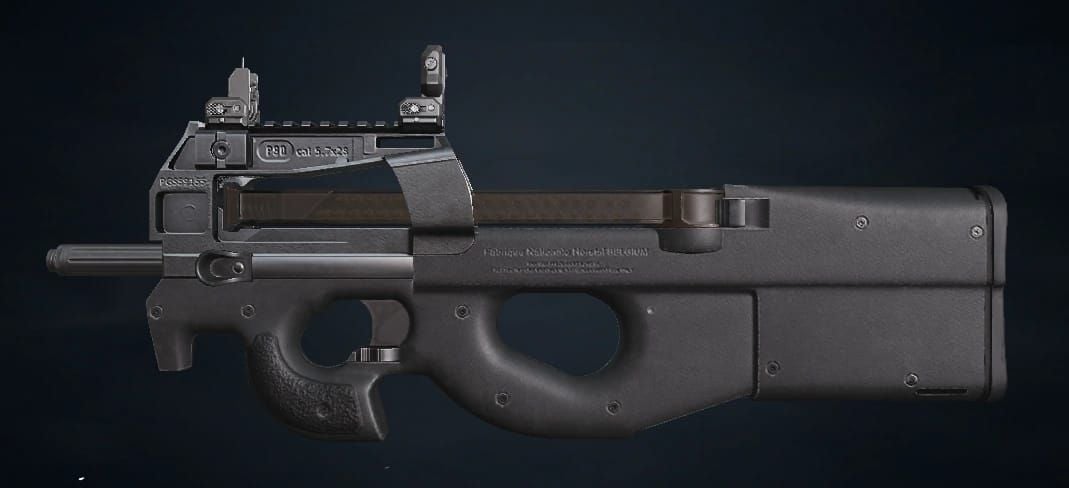
Base Stats:
- Damage: 18 per shot
- Fire Rate: 900 RPM
- Magazine: 50 rounds
- Effective Range: 15-25m
Optimal Attachments:
- Muzzle: Compensator (vertical recoil -15%)
- Barrel: Extended (range +20%)
- Grip: Vertical Foregrip (recoil -12%)
- Stock: Tactical Stock (ADS speed +8%)
- Optic: Red Dot Sight
Combat Strategy: Engage at 15-20m where P90's recoil pattern stays tightest. The 50-round magazine lets you eliminate 2-3 enemies before reloading, maximizing Restore Energy pickups per engagement. Aim center mass and let natural vertical climb drift toward headshots.
Pro tip: After securing first elimination, immediately strafe toward the loot crate while engaging secondary targets. Auto-pickup triggers during combat, maintaining health without disengaging.
Bizon SMG Build
Base Stats:
- Damage: 16 per shot
- Fire Rate: 750 RPM
- Magazine: 64 rounds (highest SMG capacity)
- Effective Range: 12-22m
Optimal Attachments:
- Muzzle: Flash Hider (recoil -10%, concealment)
- Barrel: Lightweight (mobility +15%)
- Grip: Angled Foregrip (horizontal recoil -14%)
- Stock: Skeleton Stock (movement speed +6%)
- Optic: Holographic Sight
Combat Strategy: Bizon's 64-round magazine enables extended firefights without reloading. Ideal for third-partying multi-team engagements where Restore Energy pickups sustain you through consecutive fights. Lower damage per shot compensated by superior ammo capacity and minimal horizontal recoil.
What works: Position at engagement periphery, eliminate weakened enemies first for quick Restore Energy access, then push aggressively with full health/armor advantage.
RPK LMG Build
Base Stats:
- Damage: 24 per shot
- Fire Rate: 600 RPM
- Magazine: 75 rounds
- Effective Range: 20-35m
Optimal Attachments:
- Muzzle: Heavy Compensator (vertical recoil -18%)
- Barrel: Heavy Barrel (damage +8%, range +25%)
- Grip: Bipod (recoil -20% when prone/crouched)
- Stock: Padded Stock (recoil -10%)
- Optic: 2x Scope
Combat Strategy: RPK excels at mid-range suppression and controlled aggression. Higher damage per shot means fewer hits needed for eliminations, critical when engaging armored targets. The 75-round capacity supports sustained fire during multi-team scenarios.
In practice: Pre-fire common angles, use bipod for -20% recoil when holding positions, and leverage 2x optic for 25-30m engagements where SMGs lose effectiveness.
Restore Energy Pickup Optimization
Timing and Positioning
Immediate Pickup (0-2 seconds post-elimination):
- When health <50% or armor broken
- During 1v1 engagements with no third-party threat
- When Evolution energy needed for ability unlock
Delayed Pickup (3-5 seconds):
- Multiple enemies remain in area
- Better cover position available near crate
- Coordinating with teammates for simultaneous pickups
Auto-Pickup Threshold: Triggers automatically when health drops below 30% or armor fully depleted. Don't rely on this—manual pickups give better combat control.
Evolution Energy Priority
Restore Energy grants Evolution points toward character ability upgrades:
- Tier 1 (100 points): Basic ability unlock
- Tier 2 (250 points): Cooldown reduction -15%
- Tier 3 (500 points): Enhanced effect +25%
Prioritize eliminations early-game to reach Tier 2 before final circles. The -15% cooldown reduction synergizes with Restore Energy's cooldown reduction, creating ability spam potential.
Character Synergies with Low-Recoil Builds
Ghost + P90
Ghost's invisibility (8-second duration, 25-second cooldown) pairs perfectly with P90's close-range dominance. Approach undetected, eliminate target at 15m, collect Restore Energy, re-engage with cooldown partially restored.
Combo execution:
- Activate invisibility
- Close to 15m
- Eliminate target (P90's 50 rounds ensures kill)
- Pickup reduces cooldown by 8 seconds
- Effective cooldown: 17 seconds instead of 25
Bastion + RPK
Bastion's deployable shield creates the perfect bipod position for RPK. Shield absorbs damage while you maintain sustained fire with -20% recoil from bipod deployment.
Setup:
- Deploy shield at choke point
- Crouch behind shield with RPK bipod active
- Eliminate enemies at 25-30m
- Restore Energy pickups maintain health during shield cooldown
Sparkle + Bizon
Sparkle's healing drone (heals 40 HP over 5 seconds, 30-second cooldown) combined with Bizon's 64-round magazine creates ultimate sustain. Drone heals while you fight, Restore Energy pickups reduce drone cooldown.
Sustain loop:
- Deploy drone before engagement
- Engage with Bizon's full magazine
- Secure 2-3 eliminations
- Restore Energy pickups reduce drone cooldown to ~22 seconds
- Drone available for next engagement
Advanced Techniques
Recoil Control Fundamentals

Vertical Recoil (P90/RPK): Pull mouse down at consistent rate matching weapon's climb. P90 climbs faster (900 RPM) requiring quicker compensation than RPK (600 RPM).
Horizontal Recoil (Bizon): Bizon drifts right after 15 rounds. Compensate by pulling slightly left during extended bursts.
Burst Firing:
- P90: 8-12 round bursts at 25m+
- Bizon: 15-20 round bursts (minimal recoil allows longer bursts)
- RPK: 10-15 round bursts, or full auto with bipod
Energy Pickup Chaining
When multiple enemies die in proximity, chain pickups for maximum efficiency:
- Eliminate first target
- Strafe toward crate while engaging second target
- Auto-pickup triggers during second engagement
- Eliminate second target with restored health
- Manual pickup second crate
- Full health/armor for third engagement
This technique turns 3v1 disadvantages into winnable fights through sustained restoration.
Third-Party Optimization
Restore Energy meta rewards third-partying. When two teams fight:
- Wait until first elimination occurs
- Engage weakened winner immediately
- Secure elimination and both Restore Energy crates
- Full resources for next rotation
Low-recoil weapons excel here because you can accurately eliminate weakened targets at range before they recover.
Ranked Mode Strategy
Early Game (Circles 1-2)
Focus on securing 3-5 eliminations for Evolution Tier 2. Land at contested POIs with your low-recoil weapon, engage aggressively, and chain Restore Energy pickups. The sustain lets you win extended early fights that build Evolution advantage.
Mid Game (Circles 3-4)
Position at circle edge with RPK or rotate aggressively with P90/Bizon. Restore Energy sustain means you can take unfavorable fights and recover, unlike passive players relying on limited healing items.
Late Game (Circles 5-6)
Low-recoil weapons dominate final circles. Limited cover means sustained accurate fire wins fights. Restore Energy pickups from eliminations keep you at full resources while opponents burn through consumables.
Final circle priority:
- Secure high ground with RPK
- Eliminate exposed enemies
- Pickup Restore Energy immediately (auto-pickup unreliable in chaos)
- Use Evolution abilities aggressively (cooldowns restore through pickups)
FAQ
Q: Does Restore Energy work in all game modes? A: Yes, but implementation dates vary. Available in Battle Royale Matchmaking and Room Modes since January 8, 2026. Added to Ranked and Peak modes January 15, 2026.
Q: How much health does Restore Energy give? A: Varies based on eliminated enemy's armor level. Higher armor enemies drop better restoration. Exact values scale dynamically.
Q: Can teammates pick up my Restore Energy crates? A: Yes, Restore Energy crates are shared. Coordinate pickups with teammates to maximize team sustain.
Q: Do low-recoil weapons work in Peak mode? A: Absolutely. Peak mode's higher skill ceiling makes recoil control even more critical. P90, Bizon, and RPK remain top-tier.
Q: What if I can't afford premium weapons? A: These builds use base weapons available to all players. Attachments unlock through gameplay. For faster progression, Blood Strike Golds recharge on BitTopup provides secure access to premium content.
Q: Best weapon for solo vs squad play? A: Solo: P90 for burst damage and quick eliminations. Squad: RPK or Bizon for sustained team fight support and suppression fire.


