

Here's something most players don't realize: E0 Firefly can actually rival premium options when you build her right. The secret lies in understanding Super Break mechanics – and honestly, it's more accessible than you'd think.
You can buy HSR top up for Firefly E0 damage calcs to secure sufficient Stellar Jade for optimal investment decisions, but let's first dive into whether she's actually worth your hard-earned pulls.
E0 Firefly F2P Damage Calculator: Understanding the Fundamentals
Break Effect and Super Break Damage Formula
Firefly's entire kit revolves around one thing: Break Effect scaling through her Module β trace. We're talking about a 35-50% Super Break multiplier that transforms how damage works in this game.
Her Ultimate is where things get interesting. You get 60 SPD (massive for action economy), 50% Weakness Break Efficiency, 20% Break Damage, and 100% Action Advance. That Enhanced Skill? It's dealing 200% ATK Fire damage plus an additional 0.2% + 200% ATK Break damage to primary targets.
But here's the kicker – Module α adds 55% Toughness Reduction in Combustion state. Module γ is the real game-changer though: it converts ATK above 1800 into Break Effect at 0.8% per 10 ATK. This means F2P builds can scale without needing premium investments.
Key Stats for Damage Output
In practice, F2P builds should target 162 SPD and 360% Break Effect. Your main stat priorities are straightforward: Body (ATK%), Feet (SPD), Planar Sphere (ATK%), Link Rope (Break Effect%).
For substats? Break Effect first, always. Then SPD to hit those thresholds, followed by ATK% for that secondary scaling through Module γ.
E0 Competitiveness in 3.8 Meta
HSR 3.8's recycled event modes actually favor consistent damage over those flashy burst characters everyone's chasing. Firefly's sustained Super Break output excels in extended encounters – and that's most of the challenging content right now.
Her Talent provides 40% Max HP damage reduction and 30% Effect RES in Combustion. Translation? You can play aggressively without needing premium sustain units.
Complete E0 Firefly Damage Calculation Breakdown
Calculation Methodology
Want actual numbers? Use the MD✦C Calculator. Load Firefly E0, equip On the Fall of an Aeon, configure 4pc Iron Cavalry + 2pc Forge of Kalpagni, input your stats (162 SPD, 360% Break Effect, 2000+ ATK), then simulate Enhanced Skill against Fire Weakness enemies.
Don't forget to factor in team buffs – they make a bigger difference than most players realize.
Real Combat Performance
Against 200 Toughness enemies, E0 Firefly achieves Weakness Break within 2-3 Enhanced Skills using that 55% Toughness Reduction. Post-break damage benefits from the 35-50% Super Break multiplier, plus Iron Cavalry's DEF shred (10-15%).
Conservative estimates show 80-85% of signature Light Cone performance. That's... actually pretty impressive for F2P.
E0 vs E1 Comparison
E1 removes Skill Point costs and adds 15% DEF shred – roughly a 20-25% damage increase. But it requires 90 additional pulls. For F2P players, that cost-per-damage ratio just doesn't make sense. E2 provides 40% improvement but demands 180 pulls. Team completion offers better returns, trust me on this.
F2P Light Cone Options and Performance Analysis
Best 4-Star Alternatives
On the Fall of an Aeon from Herta's Store is your best friend here. It provides stackable ATK% that converts to Break Effect through Module γ – and it's universally accessible for F2P players.
Other ATK% scaling 4-stars work, but they're heavily dependent on refinement levels.
Performance Comparison
Here's what experienced players know: F2P alternatives achieve 85-90% of signature performance when optimized properly. The damage gap narrows significantly with team buffs from Ruan Mei and Harmony Trailblazer.
For enhanced resource management, instant stellar jade Honkai Star Rail for rerun value ensures optimal banner timing – but only if you're confident in your investment.
Maximizing Break Effect Without 5-Stars
4pc Iron Cavalry provides 16% Break Effect baseline. 2pc Forge of Kalpagni adds 40% on Fire Weakness hits. Target 6-8% Break Effect per relic piece for that 360% total.
Speed tune to 162 for Forge activation while maintaining action economy. It's trickier than it sounds, but doable with patience.
Optimal F2P Team Compositions
Core Structure
Firefly + Harmony Trailblazer + Ruan Mei + Gallagher. This provides all necessary buffs with F2P accessibility (assuming you pulled Ruan Mei during her banner).
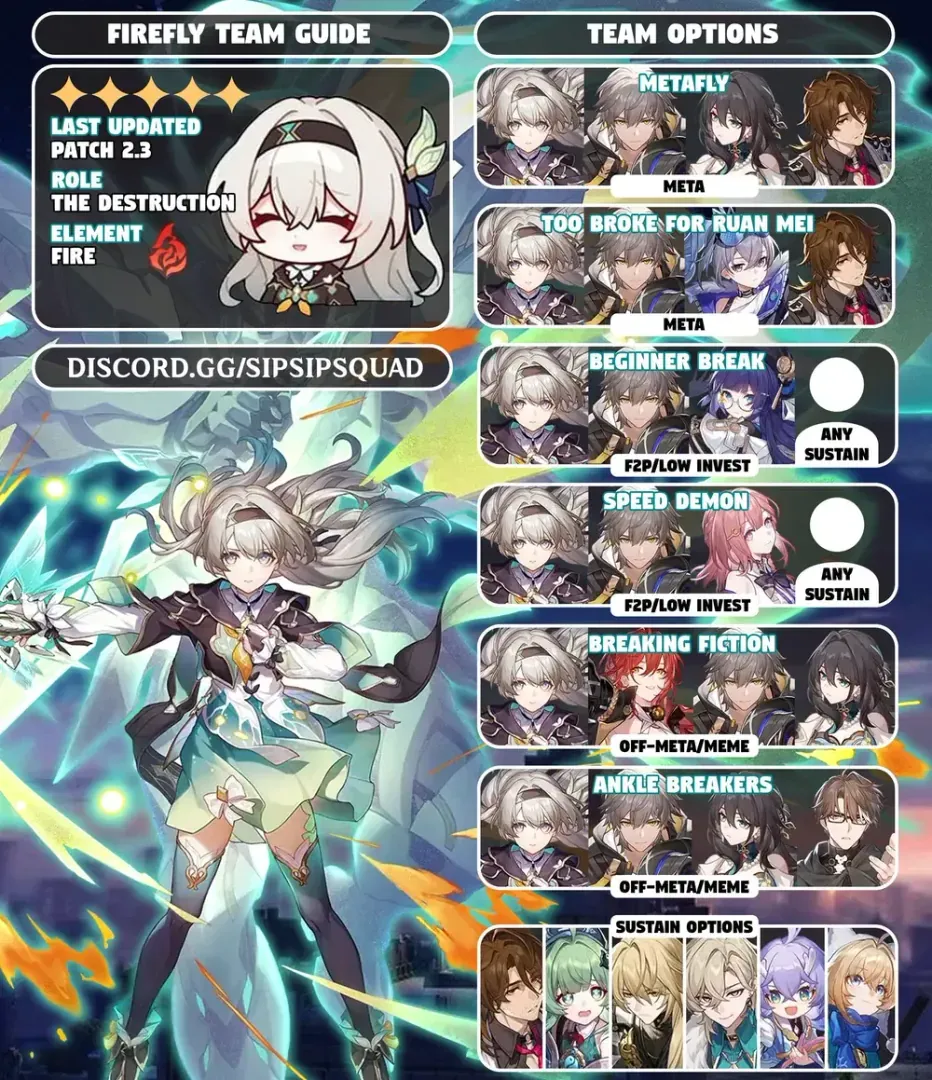
Harmony Trailblazer contributes Break Efficiency and energy support, directly amplifying Toughness damage and Super Break frequency. It's a surprisingly synergistic combination.
Budget Alternatives Without Ruan Mei
Don't have Ruan Mei? Substitute Pela for DEF shred and dispel utility, or Bronya for action advance. The modified team (Firefly + Harmony Trailblazer + Pela + Sustain) maintains viability with only a 15-20% damage decrease.
Sustain Options
Gallagher provides adequate healing while contributing Break damage – and he's accessible through the standard banner. Lingsha offers superior performance but requires limited investment.
Honestly? Gallagher suffices for all content while preserving your DPS resources for other investments.
Firefly Rerun Value Analysis
Investment Return
The December 2025 rerun offers exceptional F2P value. E0 with F2P Light Cone achieves 80-85% of whale performance at a fraction of the resource cost. The cost analysis shows superior damage-per-pull optimization compared to most alternatives.
Comparison to 3.8 Characters
The Dahlia's Fire Nihility support enhances Firefly's value by enabling Super Break without full Toughness depletion – we're talking about a 20-30% damage increase. Firefly's team flexibility provides superior long-term value versus traditional DPS reruns.
Long-Term Viability
Break mechanics are showing increasing prominence in content design. The Super Break archetype resists power creep by bypassing CRIT and ATK inflation entirely.
Ongoing support releases continue enhancing Break teams, positioning Firefly as a stable long-term investment. That's rare in gacha games.
HSR 3.8 Performance Guide
Recycled Event Modes
3.8 introduces Divergent Universe stages, Chrysos Awoo Championship, and Remnants of Twilight. HP Count mechanics favor Break damage dealers that bypass conventional defensive scaling through Toughness manipulation.
Memory of Chaos Strategy
Current configurations favor consistent damage dealers over burst windows. Firefly's Fire weakness application provides universal coverage – something that's become increasingly valuable.
Focus Toughness breaks on priority targets while maintaining Combustion uptime through energy management. It's all about rhythm.
Pure Fiction Optimization
The multi-wave format suits Firefly's sustained damage profile perfectly. Break Effect scaling maintains consistent performance across waves without energy constraints.
Prioritize AoE Enhanced Skill coverage while maintaining support buff uptime. Simple in theory, requires practice to execute smoothly.
E0 Firefly vs Meta DPS
vs Acheron
Acheron requires specific Nihility supports and faces energy constraints without premium teams. Firefly's damage floor significantly exceeds Acheron's F2P ceiling – and that's what matters for most players.
Resource efficiency strongly favors Firefly's accessible Break teams.
vs Feixiao
Feixiao's Hunt archetype requires different support priorities and faces action economy constraints. Her damage ceiling exceeds Firefly's in optimal conditions, but F2P accessibility heavily favors Firefly's Break-focused approach.
Break vs Traditional DPS
3.8 meta favors consistent damage over burst characters. Break DPS benefits from endurance-based content design, while traditional DPS faces scaling challenges as enemy HP increases.
Break damage maintains relevance through percentage-based mechanics. It's future-proof in a way that traditional scaling isn't.
F2P Resource Management
Stellar Jade Income
F2P players accumulate 60-80 pulls per version through dailies, events, and exploration. The December 2025 rerun provides sufficient time for pity thresholds – plan for 75 guaranteed pulls per version with additional anniversary sources.
Optimal Pulling Strategy
Prioritize character acquisition over Light Cone investment. Stop at E0 for maximum efficiency, achieving 80-85% optimal performance.
Manage pity awareness (75+ pulls) and guarantee planning for 50/50 outcomes. It's basic resource management, but crucial for F2P success.
Banner Prioritization
Character banners provide superior F2P value, period. Light Cone investment only makes sense after securing optimal team composition.
Signature damage increase (15-20%) rarely justifies resource cost versus support characters or account diversification. Don't get caught up in the hype.
Relic Builds and Optimization
Best Sets
4pc Iron Cavalry provides 16% Break Effect and 10-15% DEF shred based on thresholds. Alternative 4pc Thief offers 16% Break Effect plus energy regeneration on Weakness Break for better Ultimate uptime.

Both work. Iron Cavalry edges out slightly for pure damage.
Substat Priority
Break Effect > SPD (to 162) > ATK% > everything else. Target 6-8% Break Effect minimum per piece. SPD substats fill gaps to that 162 breakpoint. ATK% provides secondary scaling through Module γ conversion.
Farming Efficiency
Prioritize Penacony domain for Iron Cavalry, with secondary focus on Forge of Kalpagni pieces. Farm during double drop events, utilize overflow resin for enhancement materials when you've got optimal pieces.
Standard farming advice, but worth repeating.
Advanced Optimization
Skill Rotation
Pre-buff before Ultimate activation for maximum damage window utilization. Her Technique (Δ Order Meteoric Incineration) provides Fire Weakness application and 200% ATK damage for combat initiation.
It's a small optimization, but these details add up.
Trace Priority
Prioritize Ultimate and Skill maxing, followed by Talent for defensive utility. Module traces (α, β, γ) provide significant scaling after basic abilities. Basic Attack receives lowest priority since optimal rotations avoid using it entirely.
FAQ
Is E0 Firefly good enough for F2P players in HSR 3.8? E0 Firefly achieves 80-85% optimal performance with F2P teams and Light Cones, making her one of the best F2P investments available. That's competitive with most premium setups.
How much damage does E0 Firefly do compared to E1? E0 deals 75-80% of E1 damage. E1 provides a 20-25% increase, but the resource cost makes E0 more efficient for F2P players. The math just doesn't support going for E1.
Should F2P players pull Firefly rerun or save? Players lacking Break DPS should prioritize Firefly's rerun. Those with established DPS options might save for future supports – it depends on your roster gaps.
What's the best F2P light cone for Firefly? On the Fall of an Aeon from Herta's Store achieves 85-90% of signature performance through ATK% to Break Effect conversion. It's accessible and effective.
Can Firefly clear HSR 3.8 event modes at E0? E0 Firefly excels in 3.8's recycled modes due to sustained damage emphasis over burst performance. She's actually better suited for this content than many premium options.
How do I calculate Break Effect damage? Use the MD✦C Calculator to input specific stats and simulate realistic damage output. It combines base Toughness damage with Super Break multipliers for accurate projections.


