What's Actually New in Erangel Subzero 4.1 (And Why It Matters)
Let's cut through the marketing fluff – the 4.1 update fundamentally changes how you approach Erangel. The visual overhaul isn't just pretty snow effects; it's a complete tactical shift.
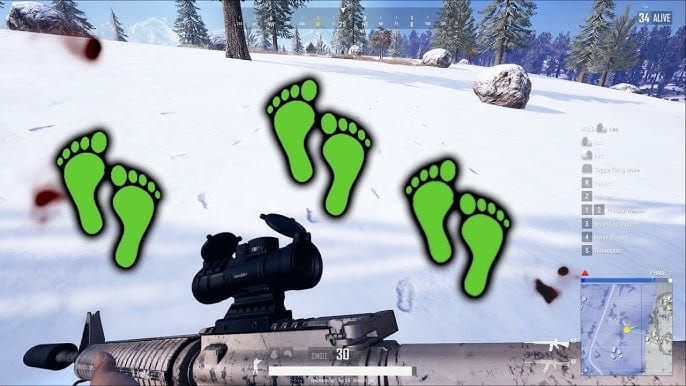
Those footprint trails? They stick around for 45 seconds. That's long enough for a full squad rotation, which means your positioning game just got way more complex. I've seen teams get completely flanked because they didn't account for their own tracks leading enemies right to their compound.
The thermal scope buff is massive – 30% better target acquisition in these conditions. What used to be a nice to have attachment is now absolutely crucial for mid-to-late game survival. And honestly? Most players are still sleeping on this change.
For competitive players looking to maximize their edge with premium gear and battle passes, PUBG Mobile winter event UC buy cheap through BitTopup gets you instant access to exclusive winter items that actually impact gameplay.
The Map Changes That Actually Matter
Pochinki got three new second-story access points in the central buildings. Sounds minor, right? Wrong. This completely changes the compound clearing meta – you can't just watch the main stairs anymore.
Military Base added two warehouse structures with 15% higher level 3 spawn rates. In practice, this means you're almost guaranteed to walk out fully kitted if you survive the initial chaos.
But here's what most guides won't tell you: Georgopol's real advantage isn't the loot – it's the eight guaranteed snowmobile spawns. Vehicle access wins games in Subzero, period.
Snow Terrain: The Details That Win Fights
The 8% movement speed reduction in open fields changes everything about rotations. But the 12-meter reduction in footstep audio range? That's where experienced players gain their edge.
Those periodic snow flurries aren't random weather effects – they hit every 3-5 minutes and drop visibility to 150 meters for 30 seconds. Smart teams use these windows for aggressive repositioning.
The Real Top 5 Loot Spots (Tested in Competitive Play)
#1: Military Base - Still the King, But Different

Military Base maintains its crown with a 78% level 3 equipment spawn rate, but the approach has evolved. The new warehouse structures aren't just bonus loot – they're escape routes when the inevitable third parties show up.
Here's the route that works: Control tower first (scoped weapons are priority), main barracks for armor and meds, then hit the new warehouses if you have time. The whole circuit takes 90 seconds if you're efficient.
What experienced players know: Don't get greedy with the vehicle garage. If you hear more than one squad landing, grab your essentials and rotate. The loot isn't worth dying for.
#2: Pochinki Central - The Balanced Choice

Pochinki's central cluster offers 65% spawn rates for assault rifles and snipers, but the real value is in those new access points. You can now escape vertically from almost any engagement.
The meta has shifted to clearing the north building first – high ground advantage is everything in Subzero's reduced visibility. Each building has 6-8 spawns, with the central structure being your best bet for scoped weapons.
#3: Georgopol Containers - The Rotation Play
Don't come here for the loot (55% level 2 spawn rate is decent, not amazing). Come here for the snowmobiles. Eight guaranteed spawns mean you're never stuck on foot.
The container yard works best for teams prioritizing early rotations to secondary loot spots. Clear fast, grab wheels, and hit two more compounds before the first circle closes.
#4: School Rooftop - High Risk, High Reward
School concentrates everything in one spot – six spawn points with 60% level 3 rates. You can get fully kitted in 45 seconds, but you'll fight for it.
The rooftop approach works best for duos. Solos get overwhelmed too easily, and full squads create too much chaos in the confined space.
#5: Rozhok Three-Story - The Smart Play
Rozhok's central building offers the best risk-reward balance for consistent performance. 50% level 2+ spawn rates across 10 loot points, plus you're perfectly positioned for any circle.
This is where smart players go when they want to avoid the Military Base bloodbath but still need quality gear.
For players seeking premium equipment and seasonal rewards to dominate Subzero mode, top up UC for Erangel Subzero mode through BitTopup provides secure access to exclusive winter gear and battle pass bonuses.
Loot Routes That Actually Work
Solo Strategy: Speed Over Greed
Solo players need to think differently. School rooftop for immediate gear, hit one nearby compound for meds and ammo, then secure a vehicle. Spending more than two minutes anywhere is asking for trouble.
The key insight most solos miss: Your second compound matters more than your first. That's where you get the healing items that keep you alive through mid-game rotations.
Squad Coordination: Systematic Clearing
Coordinated squads clear compounds 40% faster when they assign specific areas and maintain overwatch. One player watches for third parties while three loot systematically.
Equipment sharing agreements matter. Decide who gets what before you land, not while you're looting under pressure.
Blue Zone Changes: The New Meta
Damage Scaling That Eliminates Old Strategies
Phase 1: 2% per second over 5 minutes (manageable)

Phase 2: 5% per second over 3 minutes (plan your rotations) Phase 3: 10% per second (blue zone fighting is suicide) Phases 4-6: 15-25% per second (instant death)
Blue zone camping is dead. The damage scaling makes it impossible to survive extended exposure past phase 2.
Timing Changes That Force Faster Decisions
First zone closes in 4 minutes instead of 5. Mid-game zones create higher player density with smaller safe areas. Final circles close in 90 seconds – that's 30 seconds less to make your final positioning decisions.
What this means in practice: You need to start rotating earlier and commit to positions faster. Indecision kills in 4.1.
Advanced Grenade Tactics for Blue Zone Pressure
Frag Grenades: Timing Is Everything
Throwing frags from safe zone edges into blue areas forces predictable enemy movement. The 4-second fuse timer syncs perfectly with enemies taking blue damage (they move 15% slower).
Bridge crossings and chokepoints become frag magnets. One well-timed grenade can eliminate an entire squad caught between blue zone damage and explosive damage.
Smoke Grenades: Rotation Lifelines
Overlapping smoke clouds provide 15-20 seconds of concealment. Start deploying 50 meters before contested areas – entering smoke under fire is too late.
The advanced technique: Use smoke to mask direction changes, not just movement. Enemies expect you to move straight through; surprise them with lateral repositioning.
Molotovs: Area Denial Masters
Molotovs excel at controlling building entrances during blue zone pressure. Fire damage plus blue zone damage creates impossible choices for enemies.
Target doorways and stairwells where enemies must choose between burning and blue zone death. It's psychological warfare as much as tactical advantage.
Snow Combat: Visibility and Positioning
Camouflage and Detection
White clothing reduces detection range by 20% in open terrain, but muzzle flash becomes more visible against snow backgrounds. Suppressors aren't just nice to have anymore – they're essential.
Scope glint is more pronounced against snow. High-magnification optics require careful positioning to avoid giving away your location.
Footprint Tracking: The New Information Game

Fresh tracks mean enemies within the last minute. Experienced players read footprints like a tactical map – squad size, direction, timing.
Counter-tracking works: Follow existing trails to mask your direction, use vehicle tracks to hide foot traffic. It's a chess game most players don't even know they're playing.
Thermal Scopes: The 30% Advantage
Thermal scopes highlight targets with 30% better clarity against cold backgrounds. But they're not magic – vehicle exhaust, fire sources, and smoke grenades all create interference.
Smart positioning near heat sources can mask your signature. It's not about avoiding thermal scopes; it's about understanding their limitations.
Vehicle Strategy: Snowmobiles vs. Traditional
The Snowmobile Trade-off

25% faster acceleration and better slope handling, but minimal protection and two-passenger limit. They're perfect for duo rotations and solo flanking maneuvers.
Traditional vehicles maintain protection and four-passenger capacity but suffer 15% speed reduction on snow. Choose based on your team composition and strategy.
Route Planning in High-Traffic Areas
Main roads see 40% more traffic due to concentrated rotation paths. Bridge crossings become death traps where teams set up ambushes.
Off-road routing requires terrain knowledge and fuel management. But it's often the difference between reaching your destination and becoming someone else's kill feed.
Common Mistakes (And How to Actually Avoid Them)
The 3-Minute Rule
Spending more than three minutes looting creates zone pressure that forces bad rotations. Set equipment thresholds that trigger immediate movement regardless of available loot.
Essential items only: Primary weapon, armor, healing, ammo. Everything else is luxury that can get you killed.
Blue Zone Respect
Enhanced damage eliminates traditional positioning strategies. Healing can't keep up with phase 3+ damage rates. Blue zone combat should be avoided entirely after phase 4.
Resource conservation becomes critical. Manage ammunition, ration healing items, time your throwables carefully.
Final Circle Positioning
Proactive movement beats reactive positioning every time. Secure terrain advantages before zone closure, not during.
High ground is valuable, but cover availability matters more. Elevation without protection is just a better view of your death.
Equipment Management: What Actually Matters
Priority Lists That Work
Assault rifles provide optimal versatility for Subzero conditions. Sniper rifles excel in the open terrain engagements common in winter maps.
Healing distribution: 4+ first aid kits and 6+ bandages per player during mid-game. This isn't negotiable with the enhanced blue zone damage.
Inventory Optimization
Maintain 40% inventory space for upgrades and enemy loot. Throwable allocation: 2 frags, 2 smokes, 1 molotov when space permits.
Ammunition requirements: 180 rounds for ARs, 60 for snipers, 120 for SMGs. Adjust based on your playstyle, but these numbers work for most situations.
FAQ: The Questions That Actually Matter
What are the best loot spots in PUBG Mobile Erangel Subzero? Military Base (78% level 3 rates), Pochinki central (65%), School rooftop (60%), Georgopol containers (55%), and Rozhok three-story (50%). But remember – the best spot is the one you can survive.
How does blue zone damage work in 4.1? It escalates from 2% per second in phase 1 to 25% in final phases. The 4.1 update increased damage rates by 15% and reduced closure times. Blue zone camping strategies are dead.
What changed in Erangel Subzero after 4.1? Enhanced blue zone damage, modified loot spawns, 30% better thermal scope effectiveness, and increased snowmobile availability. The footprint tracking system is the biggest tactical change.
How do I use grenades effectively in blue zone? Frags force rotations into predictable paths. Smokes provide 15-20 second concealment windows. Molotovs create area denial that combines with blue zone damage for lethal positioning control.
Where's the highest loot density in Subzero? Military Base maintains the crown with 12 high-tier spawns in the main barracks alone. But density doesn't matter if you can't survive to use the loot.
What's different between classic Erangel and Subzero? Snow terrain reduces movement speed 8%, creates 45-second tracking trails, boosts thermal scope effectiveness 30%, and reduces footstep audio range by 12 meters. It's not just a visual change – it's a complete tactical overhaul.


