

Why F2P Durin Freeze Teams Work So Well in Version 6.2
Look, I've been testing freeze comps since the early days, and Durin changes everything. You're getting traditional freeze mechanics—that reliable crowd control we all love—but now with Durin's 40% Melt enhancement when he's in Dark Decay form.
The math here is pretty straightforward. Freeze duration follows this formula: 2√[5 × Gauge_Freeze Aura × (1 - Freeze RES)] + 4 seconds. What this means in practice? Enemies stay locked down long enough for you to position Durin perfectly and trigger those enhanced reverse Melt reactions.
But here's where it gets really good for F2P players. Blizzard Strayer's 4-piece gives you +40% CRIT Rate against frozen enemies. Add Cryo Resonance for another +15% CRIT Rate against Cryo-affected targets, and you're looking at 55% bonus CRIT Rate. That's how F2P builds hit 60-70% total CRIT Rate without breaking the bank on artifacts.
For those looking to maximize their December farming window, Secure genshin top up to exploit 6.2 weakness rotations through BitTopup's reliable platform—especially useful for efficient resin refresh during the December 10-20, 2025 Disturbance Outbreak period.
What Makes Durin Perfect for Freeze Teams
Durin earned that SS-tier rating for good reason. His dual-form versatility is incredible, but it's that 40% Melt enhancement in Dark Decay form that really shines in freeze setups.
Energy requirements sit at 140-160% ER, which honestly isn't bad when you've got Cryo battery characters feeding him particles. His Pyro Sword classification means consistent reverse Melt reactions as long as you maintain that Cryo aura through freeze—and that's exactly what this team comp excels at.
Why Stygian Onslaught Waves 6-8 Favor Freeze Teams
December's Stygian Onslaught cycle throws some nasty stuff at you. Battle Hardened Iktomisaurus comes with 70% all RES and 110% Cryo RES—brutal numbers that demand smart crowd control for shield breaking.
Here's the thing: freeze immobilization lets you precisely target those 8U Cryo Gadgets that deal 9.6U shield damage when destroyed. And with the Experimental Field Generator creating Gravity Reduction Fields that boost enemy mobility, freeze crowd control becomes absolutely essential for maintaining DPS windows.
You're looking at 23,020,735 HP pools on Dire difficulty with a 180-second timer. Without proper crowd control, you're just not going to make it.
Breaking Down Stygian Onslaught Waves 6-8
The December 10, 2025 to January 13, 2026 cycle introduces enemy configurations that'll test your team building skills.
Wave 6: Dealing with Iniquitous Baptist

This guy's a real pain. Iniquitous Baptist: Resonant Watch generates consecutive shields—Electro (12U), Pyro (18U), and Hydro (18U)—all at 150% overworld strength. When you destroy a shield, you take 50% of that shield's damage as true damage, capped at 12.5% max HP per shield.
Base HP sits at 5,213,725 (jumping to 10,902,915 on Dire). That's a lot of sustained DPS needed. Freeze prevents him from repositioning during shield phases while keeping you at safe distance for Barbara's healing. Smart positioning is everything here.
Wave 7: Juggling Multiple Threats
Multiple spawns with overlapping threat ranges—this is where positioning management while maintaining freeze uptime becomes critical. Sucrose provides that Viridescent Venerer resistance shred (-40% elemental RES) while grouping enemies together.
Energy management gets tricky with no starting Burst energy. Rosaria needs 120-150% ER for consistent Burst uptime, and you'll feel it if you skimp on this investment.
Wave 8: Boss Fight Mechanics
Battle Hardened Iktomisaurus and his levitation mechanics require specific crowd control timing. The trick is destroying those ground Cryo Gadgets while he's frozen—prevents counterattacks during shield-breaking phases.
There's a fall damage mechanic here that deals 10% max HP loss plus 50% shield damage, capped at 35% max HP. When executed properly, this creates significant DPS windows.
Your F2P Team Options
The Gold Standard: Kaeya/Durin/Rosaria/Barbara
This is your optimal composition. You get Cryo Resonance (+15% CRIT Rate), consistent freeze application, and energy sustainability all in one package.
Kaeya serves as your primary on-field DPS with low-cooldown Cryo application. Rosaria brings CRIT Rate sharing, off-field Cryo application, and those crucial energy particles for Durin's 140-160% ER requirements.
Need to stock up for artifact farming? Reliable primogems top up before hydro ascension routes through BitTopup's secure platform ensures you've got sufficient resin during the December 10-20, 2025 bonus period.
Budget Option 1: Durin/Barbara/Sucrose/Kaeya
This setup emphasizes crowd control and elemental resistance shred through Sucrose's Viridescent Venerer set. Sucrose handles enemy grouping, EM sharing, and that crucial 40% elemental resistance reduction.
Thrilling Tales R5 contributes +48% ATK to Durin for enhanced Melt damage. Barbara needs 180-220% ER for consistent Burst availability—don't cut corners here.
Budget Option 2: Durin/Xingqiu/Anemo Traveler/Flex
Xingqiu provides superior off-field Hydro application. Those Rain Swords offer damage reduction and consistent elemental application that's honestly more reliable than Barbara in some situations.
You'll need 200%+ ER on Xingqiu, but the payoff is more reliable freeze uptime. Anemo Traveler serves as your budget Viridescent Venerer carrier with decent crowd control capabilities.
Building Your F2P Characters Right
Durin Build Priorities
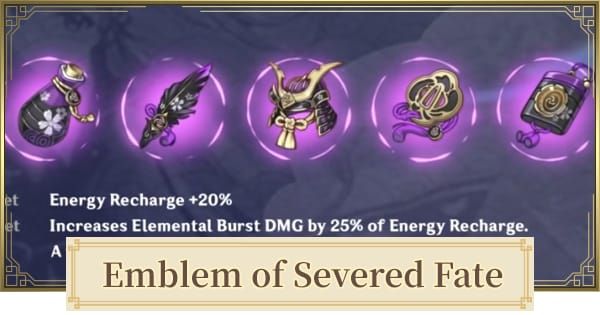
Emblem of Severed Fate is your go-to set—+20% ER and Burst damage scaling that perfectly matches his kit. Target stats: 2000-2500+ ATK, 60-70% CRIT Rate, 150-200% CRIT DMG, 140-160% ER.
F2P weapon options include Freedom-Sworn, Wolf-Fang, or The Catch R5. Talent priority should be 1/8/10 or 1/9/9 for Sub-DPS optimization. Don't waste resources on his normal attack talent.
Support Character Builds That Actually Work
Barbara: Maiden Beloved 4-piece for +15% healing effectiveness and +20% team healing, or Noblesse Oblige for team ATK buffs. That 180-220% ER requirement isn't negotiable.
Xingqiu: Emblem of Severed Fate 4-piece with 200%+ ER requirement. Sacrificial Sword is your optimal F2P weapon—the skill reset is invaluable.
Sucrose: Viridescent Venerer 4-piece for 40% elemental resistance shred. 160-180% ER with Thrilling Tales R5. Simple but effective.
Rosaria: Noblesse Oblige 4-piece with 70%+ CRIT Rate for maximum team sharing benefit. 120-150% ER for consistent Burst uptime.
Kaeya: Blizzard Strayer 4-piece for +40% CRIT Rate against frozen enemies. Target 45-65% base CRIT Rate with 200%+ CRIT DMG.
Rotations That Actually Work in Practice
Your Standard 15-20 Second Cycle
Rosaria Skill/Burst (CRIT share + energy) → Kaeya Skill/Burst (freeze setup) → Barbara Burst (Hydro application + healing) → Durin E+Normal Attack+Burst (Dark Decay Melt).
This maintains freeze uptime while maximizing those enhanced reactions. The timing feels natural once you get used to it.
Energy Management Tips
Rosaria generates 3-4 Cryo particles per Skill use. Funnel these to Durin when his Burst isn't available. Here's a pro tip: switch to energy-hungry characters before particles reach your active character for maximum efficiency.
Favonius weapons provide additional CRIT-based particle generation—don't underestimate their value in F2P builds.
Wave-Specific Adjustments
Wave 6: Extended freeze uptime for safe shield breaking. Emphasize Barbara's Hydro frequency.
Wave 7: Integrate Sucrose for grouping before freeze application. Timing is everything.
Wave 8: Compressed rotation during shield-break phases for maximum damage windows.
Wave Clear Strategies That Work
Wave 6: Smart Shield Management
Use Sucrose grouping to cluster enemies before freeze application. You want to coordinate elemental application carefully to avoid unwanted reactions during shield breaks.
Maintain freeze on primary targets while focusing isolated enemies for shield destruction. It's all about target prioritization.
Wave 7: Survival First, DPS Second
Emphasize freeze crowd control for damage mitigation while maintaining DPS through Durin's enhanced reactions. Positioning is key—maintain grouping for efficient freeze while avoiding enemy AoE attacks.
Wave 8: Burst Timing Mastery
Coordinate freeze application with shield destruction timing for that potential 35% max HP fall damage. Precise Burst timing maximizes damage during vulnerability windows while maintaining safety through crowd control.
Energy and Stat Requirements You Can't Ignore
ER Breakpoints That Matter
- Durin: 140-160% ER for Dark Decay consistency
- Rosaria: 120-150% ER for energy generation
- Barbara: 180-220% ER for freeze maintenance
- Xingqiu: 200%+ ER for reliable Hydro application
CRIT Rate Optimization Strategy
Blizzard Strayer (+40% vs frozen) + Cryo Resonance (+15% vs Cryo-affected) = 55% bonus CRIT Rate. Target 45-65% base CRIT Rate on your Cryo DPS for 60-70% total effectiveness.
Don't overthink this—the math works in your favor.
ATK vs EM Priority for F2P
F2P freeze teams should prioritize ATK over EM due to limited reaction frequency. Target 2000-2500+ ATK on your main DPS.
Durin benefits from moderate EM (100-200) for Melt enhancement, but ATK/CRIT take priority. Don't chase EM at the expense of core stats.
Common Mistakes (And How to Avoid Them)
Freeze Application Errors
Apply Hydro first through Barbara's abilities, then follow with Cryo for proper freeze triggers. Avoid excessive Hydro application that removes Cryo aura.
Maintain 80%+ freeze uptime through balanced elemental gauge management. It takes practice, but it's achievable.
Energy Management Failures
Insufficient ER investment causes rotation collapse. Test your Burst uptime—it should be at 100% consistency. If it's not, you need more ER.
Switch to energy-hungry characters before particles arrive for maximum efficiency. This small optimization makes a huge difference.
Positioning Issues
Maintain optimal distance for elemental application while avoiding enemy ranges. Use Sucrose grouping with proper timing and positioning for maximum effectiveness.
Advanced Techniques for Experienced Players
Crowd Control Layering
Layer freeze with Anemo grouping for extended immobilization chains. Time your abilities to overlap effects, creating seamless vulnerability windows for enhanced damage.
Iframe Usage
Use Burst animations for invincibility frames during high-damage enemy attacks. Time animations to coincide with dangerous attacks while maintaining DPS through animation canceling.
RNG Adaptation
Develop multiple approach patterns based on enemy positioning and spawn timing. Recognize spawn patterns quickly and adjust rotation timing for consistent performance.
Resource Investment Priority
Character Development Path
Level 90 ascension for main DPS (Kaeya, Durin), Level 80 for supports. Talent priority: Burst abilities for Sub-DPS (1/8/10), primary abilities for supports.
Artifact Farming Strategy
December 10-20, 2025 Disturbance Outbreak provides +1 artifact per 120 Dire Prestige. Peak of Vindagnyr domain (Tuesday/Friday/Sunday) for Blizzard Strayer sets.
120 Resin investment for extra 5-Star artifacts, 1200 Resin yields Dust of Enlightenment. Plan your farming accordingly.
F2P Weapon Hierarchy
Favonius weapons for energy generation, craftable options like Iron Sting for EM. The Catch R5 for Burst-focused builds, Prototype weapons from weekly bosses for main DPS.
Version 6.2 Meta Impact
The December 3, 2025 update introduces enemies that are actually vulnerable to crowd control—finally favoring freeze teams. Battle Hardened Iktomisaurus requires crowd control for optimal shield breaking.
Durin's SS-tier rating reflects future-proof design and meta relevance through dual-form versatility. This isn't a temporary meta pick—it's a long-term investment.
Stygian Onslaught's Exalted Ones buffs (+20% HP/ATK/DEF) enhance performance on difficulties 1-5. Daily refresh at 04:00 server time allows strategic timing for optimal buff utilization within those 180-second constraints.
Your Most Common Questions Answered
What's the absolute best F2P freeze team with Durin for Stygian Onslaught?
Kaeya (Main DPS), Durin (Sub-DPS), Rosaria (Support), Barbara (Healer). You get Cryo Resonance, 55% CRIT Rate bonus, and Durin's 40% Melt enhancement all in one package.
How much energy recharge does Durin actually need for wave content?
140-160% ER for Dark Decay form consistency. This is achievable through ER sands, substats, and Rosaria's battery support without sacrificing too much damage.
Can you realistically clear wave 8 without any 5-star characters?
Absolutely. Level 90 characters, 1/8/10 talents for DPS, appropriate artifact sets, and 140-160% ER on key characters will get you there.
What's the optimal rotation in practice?
Rosaria Skill/Burst → Kaeya Skill/Burst → Barbara Burst → Durin E+Normal+Burst. 15-20 second cycle maintaining freeze uptime. It feels natural once you practice it.
How do you maintain freeze uptime in those extended fights?
Apply Hydro first via Barbara, follow with Cryo from Kaeya/Rosaria. Use 180-220% ER on Barbara, 120-150% ER on Cryo supports. Don't cut corners on ER investment.
Which F2P weapon is actually best for Durin?
Freedom-Sworn or Wolf-Fang for optimal stats, or The Catch R5 for Burst-focused builds. Avoid EM-focused weapons—they're not worth it for this build.


