

Understanding Furina National Team for F2P Players
Here's the thing about Furina National – it's basically the classic National team we all know and love, but with a hydro archon twist that makes everything hit like a truck.
Core Team Composition
Your lineup looks like this: Furina (Sub-DPS/Support), Xiangling (Pyro Sub-DPS), Bennett (Healer/Buffer), Xingqiu (Hydro Support). What makes this work? Furina's absolutely bonkers 75% damage buff through her Fanfare system, while you're still getting all that sweet Vaporize synergy from the original National core.

Furina at Level 90 sits at 15,307 HP, 244 ATK, 696 DEF, with a nice +19.2% CRIT Rate ascension bonus. You'll want to push her to 35,000-40,000 HP for optimal Fanfare buffs and Skill damage. At C0, she caps at 300 Fanfare stacks – that translates to a massive 75% damage bonus for your entire team. Perfect timing, considering Spiral Abyss 6.1 cranked enemy HP up by 375%.
For players looking to optimize their team further, buy genesis crystals for f2p furina national team upgrades through BitTopup's secure platform, which offers competitive pricing and instant delivery to help F2P players make strategic investments.
Why This Team Actually Works for F2P
The numbers don't lie – 53.2% Abyss usage rate speaks volumes about reliability. Best part? Zero 5-star weapons or constellations required to make this thing purr.
Furina's HP fluctuation mechanics play beautifully with Bennett's healing field. When her Ousia Skill drains team HP by 1.6-3.6% per hit, Bennett's healing generates +1 Fanfare point per 1% HP change. It's like they were designed for each other (spoiler: they probably were).
Energy requirements are manageable – Furina needs 180-200% ER as your solo Hydro, Xiangling wants 180-200% ER for consistent Pyronado uptime. Totally achievable through F2P weapons and decent artifact substats.
Expected Performance Metrics
F2P builds consistently push 40,000+ DPS on Floor 12. That's more than enough to meet 36-star clear benchmarks with clear times around 8:30-10:00 minutes across all chambers.
At maximum stacks, Furina's Level 10 Burst provides that juicy 75% damage bonus plus 30% incoming healing bonus. Her A4 passive grants +0.7% Salon damage per 1,000 HP – at 40,000 HP, you're looking at 28% bonus damage.
Meanwhile, Xiangling's Pyronado with proper Vaporize setups hits for 25,000+ single-target damage with a solid 180-200% ER build. The combination of Furina's universal buff and Xingqiu's Hydro application creates those consistent 2x damage multipliers that make everything melt.
Complete Furina F2P Build Guide
Best 4-Star Weapons for Furina
Festering Desire takes the crown here. 45.9% ER, +16% Skill damage, +6% CRIT Rate at R1, plus free refinements from the Dragonspine event.
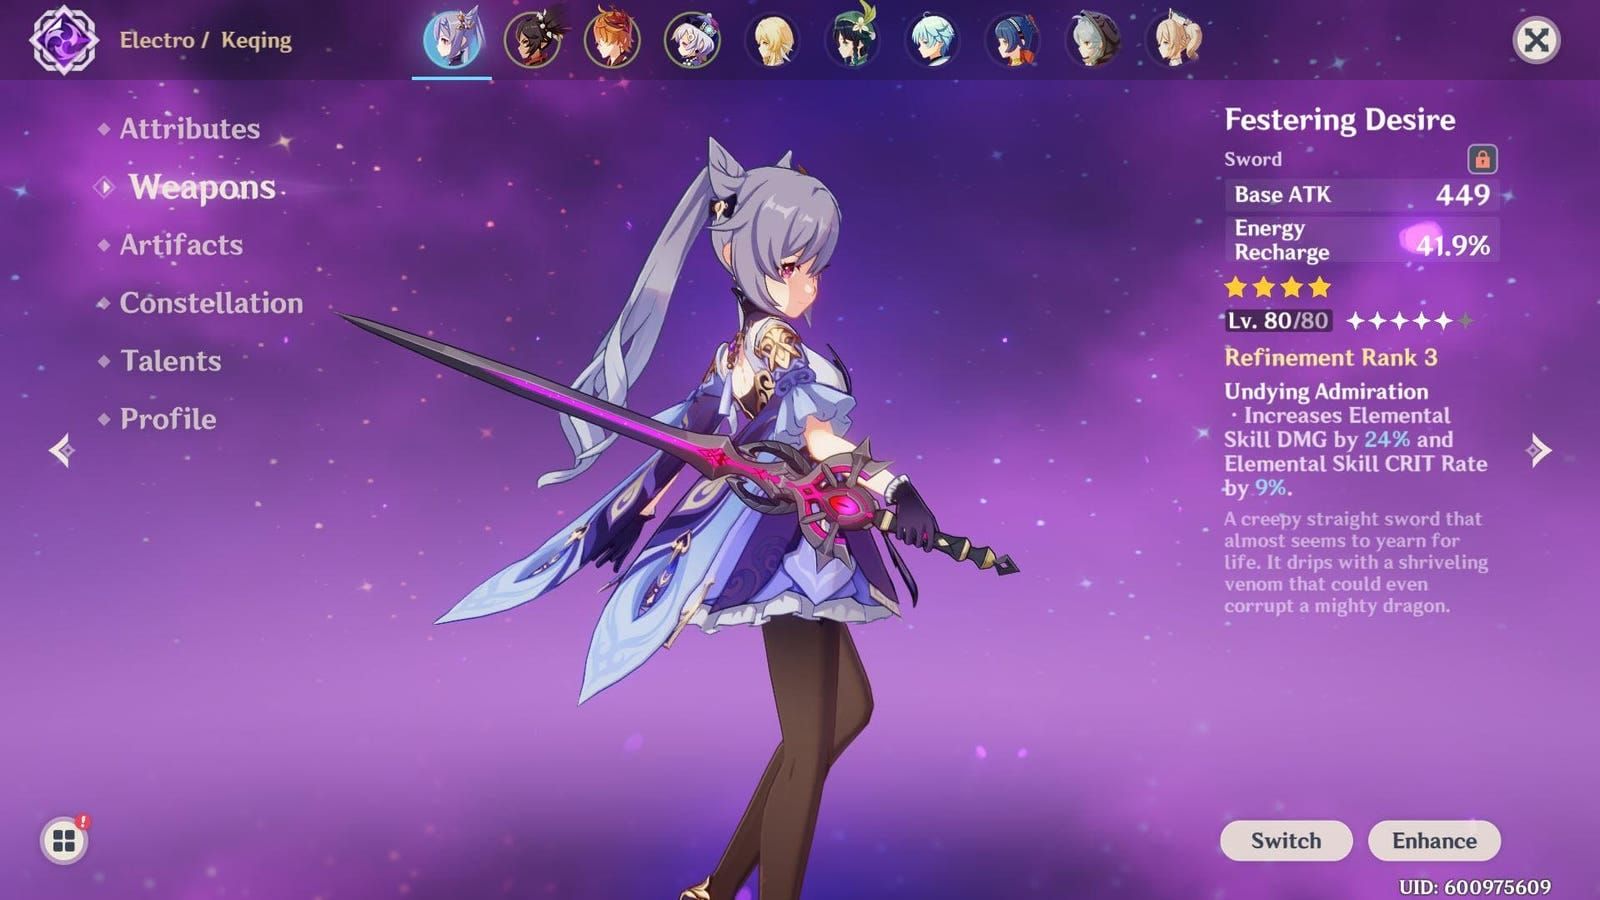
If you missed it, don't panic.
Fleuve Cendre Ferryman comes close with 45.9% ER, +8% Skill CRIT Rate, +16% ER after Elemental Skill. You can snag this through Fontaine's fishing system – tedious but free.
Favonius Sword offers the highest ER at 61.3% and provides particle generation on CRIT hits. Most accessible through standard wishes, though RNG can be cruel.
Prototype Rancour works as a budget option when you've met ER requirements through artifacts.
Optimal Artifact Sets and Substats
4-piece Golden Troupe is your gold standard – +25% off-field Skill damage from the Denouement of Sin domain.

Main stats: ER/HP% Sands, HP% Goblet, CRIT Rate/CRIT Damage Circlet.
Substat priority goes: ER > HP% > CRIT Rate > CRIT Damage. Target 60-80% CRIT Rate, 160-200% CRIT Damage, 35,000-40,000 HP.
Alternatives include 4-piece Gambler (+20% Skill damage), or mix 2-piece Tenacity (+20% HP) with 2-piece Heart of Depth (+15% Hydro damage). Aim for 180%+ ER solo Hydro or 150-160% with Xingqiu. Get all artifacts to +16 minimum – this isn't negotiable.
Talent Priority and Leveling Order
Elemental Skill first – Level 10 bumps Salon member damage scaling from 3.23% to 8.29% Max HP per hit over that 30-second duration. That's where your money is.
Elemental Burst second – Level 9-10 grants 11.4% Max HP AoE damage, enables that 75% damage bonus at maximum stacks, 18-second buff duration.
Normal Attack gets the scraps – Level 6 handles occasional on-field time just fine.
Materials needed: Teachings/Guides/Philosophies of Justice (9/63/114), Lightless Mass from weekly bosses. Total investment: 1.65 million mora. Ouch, but worth it.
Supporting Cast: Bennett, Xiangling, and Xingqiu Builds
Bennett F2P Support Build
4-piece Noblesse Oblige for that +20% team ATK bonus. ER Sands (shoot for 200%+ ER), HP% Goblet, Healing Bonus Circlet. Prototype Rancour gives you high base ATK for buff scaling – alternatives include Favonius Sword or Festering Desire.
Level 90 Bennett for maximum base ATK contribution. Burst to Level 9 for 6,000+ ATK circle healing. Keep him below 70% HP for Fanfare generation. Talent priority: Burst > Skill > Normal Attack.
Xiangling DPS Configuration
4-piece Emblem of Severed Fate is non-negotiable – +20% ER, up to +75% Burst damage based on ER investment. ER Sands, Pyro Damage Goblet, CRIT Circlet. Target 60/120 CRIT ratio minimum, 70/140 if you can swing it. 180-200% ER for consistent Burst uptime.
The Catch R5 is your best friend here – ER substat, +32% Burst CRIT Rate, +20% Burst CRIT Damage. Get it through Inazuma fishing (yes, it's tedious). Level that Burst to 10 for maximum Pyronado damage – it represents 80%+ of your total damage contribution.
Xingqiu Hydro Application Setup
4-piece Heart of Depth gives +15% Hydro damage, +30% damage after Elemental Skill. Sacrificial Sword R5 is optimal – ER substat plus skill reset for enhanced energy generation. Target 180%+ ER, 60/200 CRIT ratio, 20,000+ HP.
For players seeking to enhance Xingqiu's performance, genshin f2p furina team recharge primogems can be efficiently obtained through BitTopup's platform, offering secure transactions and competitive rates for energy management optimization.
ER Sands, Hydro Damage Goblet, CRIT Circlet configuration. Level that Burst to 10 for 300%+ Hydro damage scaling per sword. Essential for off-field Hydro application in National variants.
Team Rotation and Combat Strategy
Optimal Skill Rotation Sequence
Standard rotation looks like: Furina E (Ousia) > Q (dash-cancel) > Bennett N1 > E > Q > Sucrose E > Q > Xiangling N1 > E > Q > repeat. 20-second cycle maintains optimal buff uptime while ensuring energy regeneration.
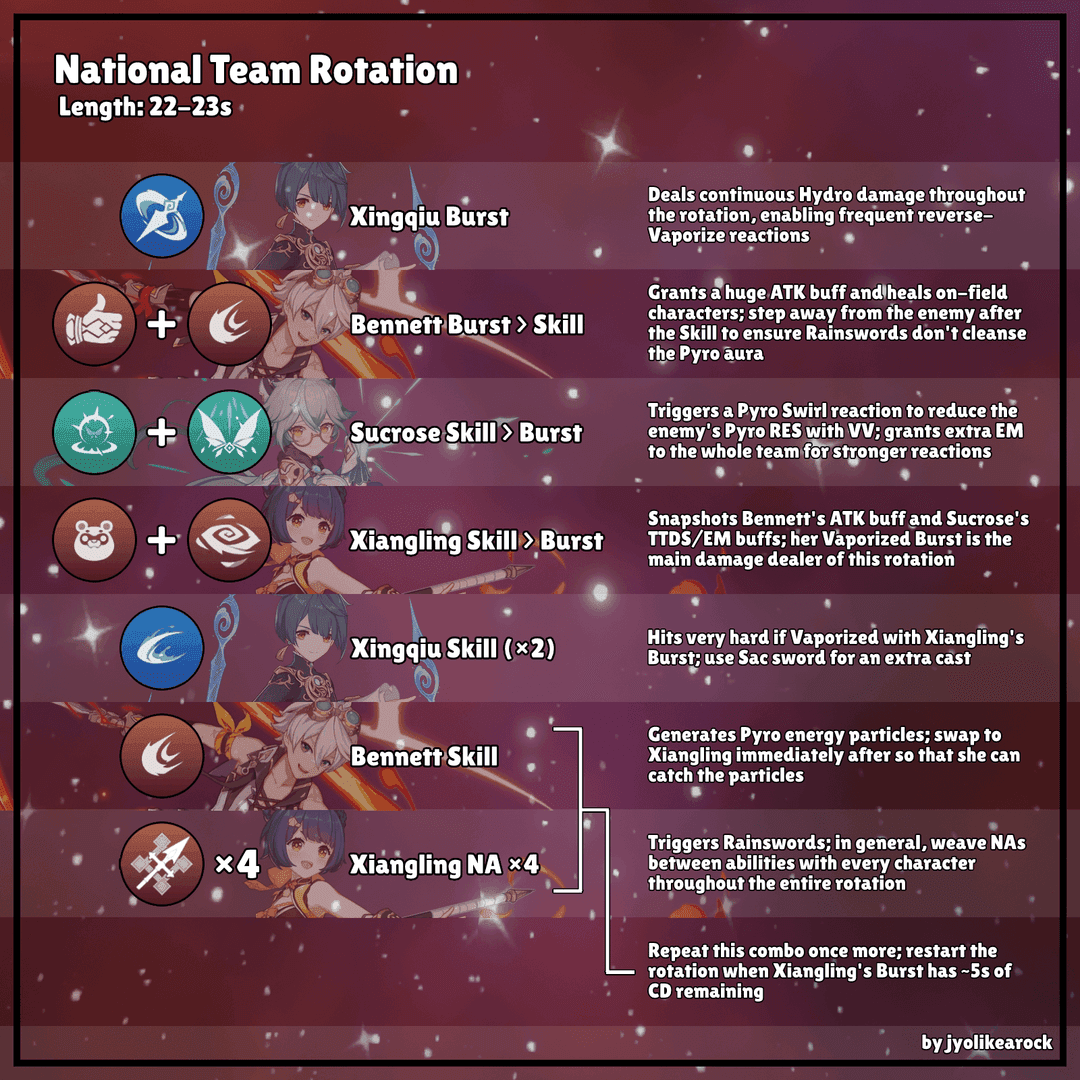
Here's the key – Bennett's healing should activate 5-10 seconds after Furina's HP drain begins for controlled Fanfare generation. Target 150+ stacks within 10 seconds. Xiangling's Pyronado snapshots Bennett's ATK buff and Furina's damage bonus, so make sure all buffs are active before casting that Burst.
Energy Management Tips
Use Sucrose abilities before switching to energy-hungry characters – maximizes particle absorption. Favonius weapon procs can reduce ER requirements by 20-30% with consistent CRIT Rate triggers. Furina generates particles every 2.5 seconds from her Skill.
Pro tip: Pre-cast Furina abilities before boss encounters for early Fanfare generation. Particularly effective in Spiral Abyss with those enemy spawn delays.
Combo Execution Guide
Advanced timing goes: Furina E > Q > Xingqiu E > Q > N1 > Bennett N1 > Q > E > Xiangling N1 > Q > N1 > E > Furina N2 > repeat. This maximizes buff overlap while maintaining energy flow.
Keep team HP above 50% for full Salon damage (140% damage when active character exceeds threshold). Dash-cancel Furina's Burst to 2-3 seconds field time. Refresh summons at 18-second intervals for 100% uptime.
Spiral Abyss 6.1 Floor-by-Floor Strategy
Floors 9-10 Approach
Wave-based encounters with Cryo Slimes and Hilichurl Fighters. Ley Line Disorders provide Burst stacks: +6% ATK/DEF per stack (maximum 10), +30% Normal Attack SPD at 5+ stacks. You want 120+ second clear times for 3-star ratings.
Focus those Cryo Slimes first to prevent Vaporize interference. Use Sucrose grouping for maximum Pyronado hits. Maintain Burst charges between waves – pre-cast during spawn animations.
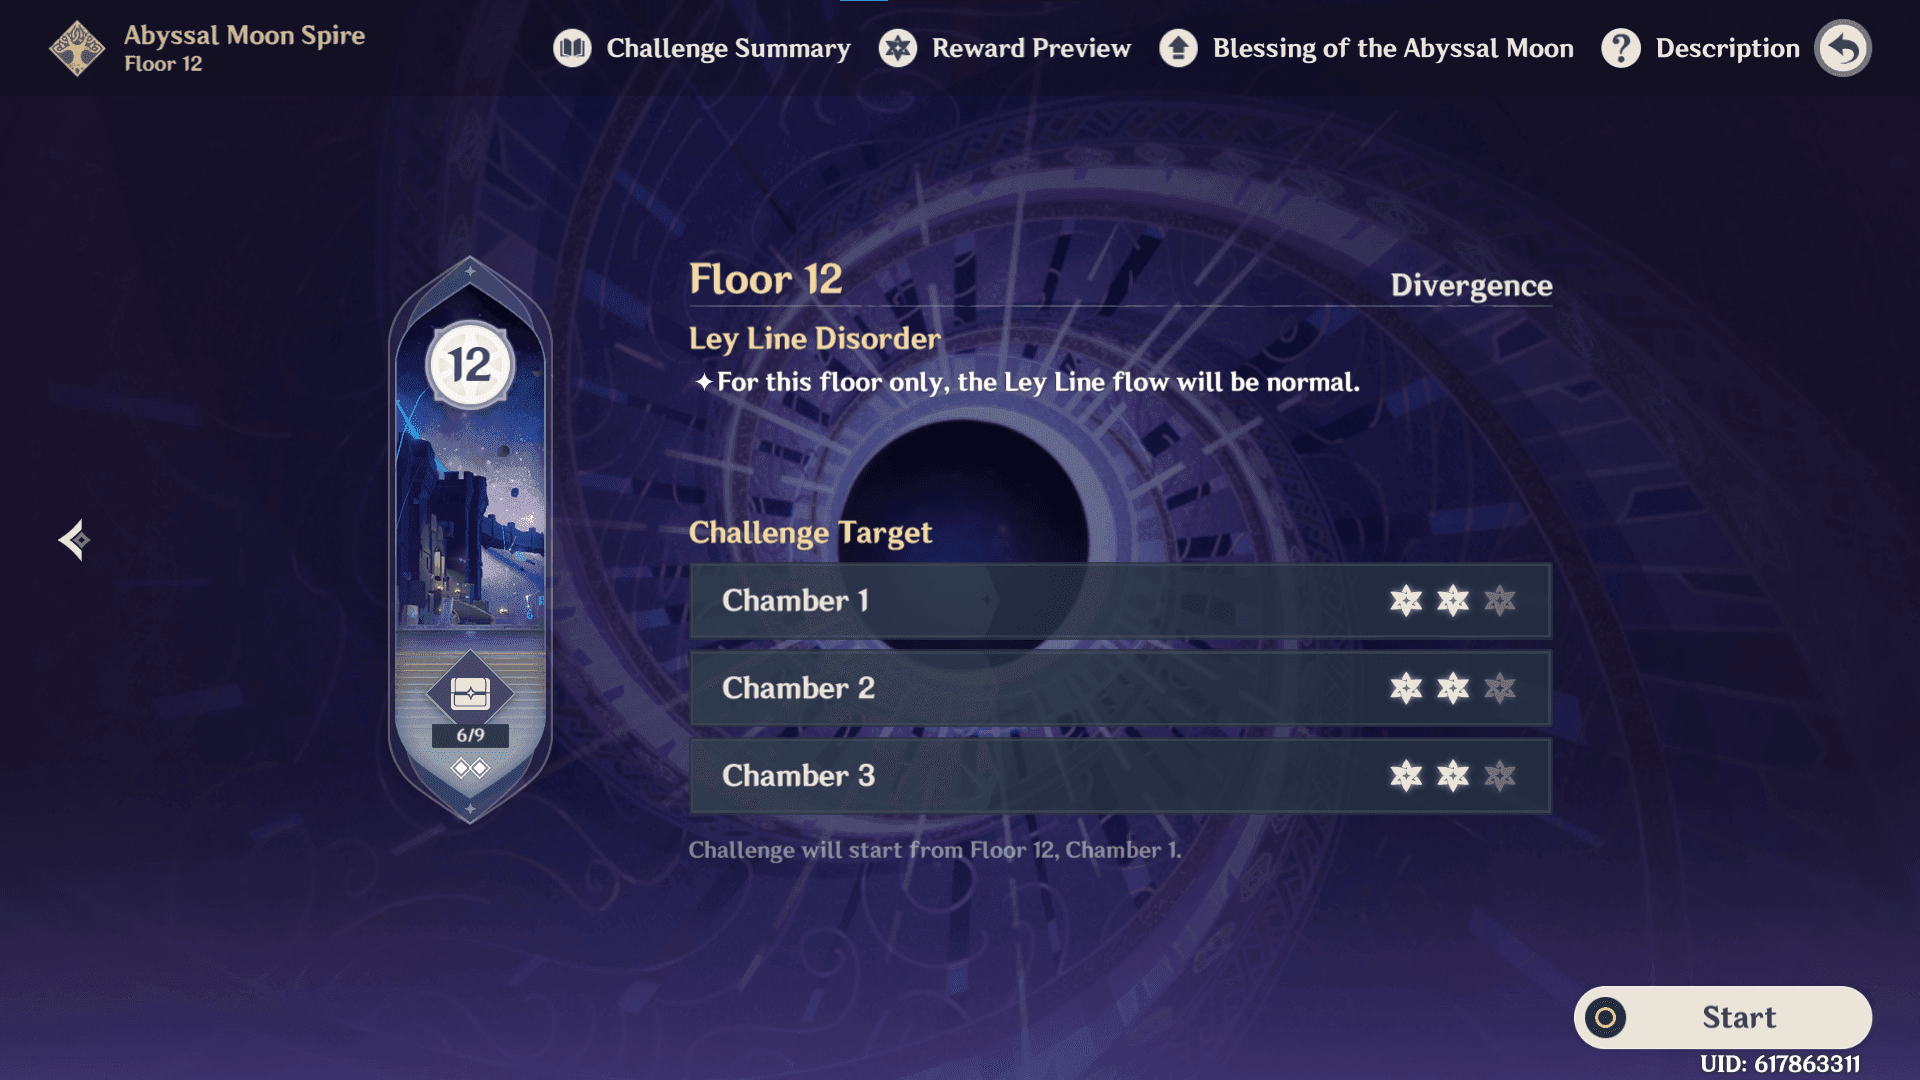
Floors 11-12 Advanced Tactics
Floor 12 is where things get spicy. 375% HP increase on enemies means Battle-Scarred Rock Crabs sitting at 4,409,072 HP. The Blessing provides Abundant Moon effects with True Damage shockwaves every 3 seconds on Dendro reactions.
First Half: Break that Primordial Bathysmal Vishap's Hydro Armor using Bloom cores within 30 seconds. Heal the Radiant Antelope for +15% CRIT Rate and +50% damage bonus lasting 15 seconds. Convert 6 Hermit Seeds through Bloom for -40% RES to the Rock Crab.
Second Half: Break Shock Trooper shields using Electro-Charged reactions. Achieve 600% damage and -50% RES by triggering all reactions within 30 seconds. Sounds complicated? It is, but the payoff is massive.
Enemy-Specific Adaptations
Vishap encounters: Position your team for Bloom core generation near armor segments using Xingqiu's Hydro application.
Whopperflowers: Use Bennett's healing field as a safe zone, time your dodges during Pyronado duration.
Rock Crab phases: Maintain those Fanfare stacks throughout the encounter, use Furina's Pneuma mode for emergency healing.
Shock Trooper shields: Coordinate Xingqiu's Burst with Electro sources for rapid Electro-Charged application.
Alternative Characters and Substitutions
When You Don't Have Furina
Chongyun substitute creates a Freeze variant with Xingqiu's Hydro, enables Melt reactions with Xiangling's Pyro. Sucrose alternative provides enhanced EM sharing that boosts Vaporize damage by 200+ EM, plus crowd control.
Kaeya option offers better energy generation, off-field Cryo application through Burst, lower cooldowns for extended encounters. Barbara works as a pure healer alternative – prioritizing survival over damage output.
4-Star Alternatives
Gaming brings alternative Pyro DPS through Plunge Vaporize mechanics. Yaoyao enables Dendro reactions for 6.1 Abyss Blessing while providing healing capabilities.
Heizou can replace Sucrose with different Swirl mechanics and EM sharing. Noelle offers shield support with healing, defensive utility at the cost of damage amplification.
Flexible Team Variations
Furina + Xiangling + Xingqiu + Bennett removes Sucrose for pure damage focus – sacrifices crowd control for concentrated buffs.
Hybrid Bloom variants incorporate Dendro characters for 6.1 reaction bonuses (target 800+ EM on triggers). Taser variants replace Xiangling with Electro for Electro-Charged focus – suits Floor 12 second half bonuses perfectly.
Freeze variants use Kaeya + Chongyun for crowd control focus over maximum DPS.
Resource Management and Investment Priority
Resin Efficiency Tips
Dedicate 40 resin daily to artifact domains – Emblem of Severed Fate for Xiangling, Golden Troupe for Furina. Weekly boss materials cost 30 resin per week for Water That Failed to Transcend x46.
Character ascension runs 420,000 Mora plus 168 Lakelight Lily from Fontaine (100% spawn rate, thankfully). Talent materials total 4,957,000 Mora – prioritize Skill and Burst development.
Artifact Farming Routes
Hit the Emblem domain for Xiangling, Bennett, and Xingqiu simultaneously – efficiency at its finest. Golden Troupe requires Denouement of Sin domain access through Fontaine quests. Noblesse Oblige through domain farming or strongbox conversion.
Viridescent Venerer for Sucrose: Focus on that 4-piece set bonus over perfect substats. EM main stats take priority over substats here.
Character Upgrade Order
Level 90 priority: Furina and Xiangling for maximum damage scaling, Bennett for base ATK contribution. Sucrose can stay at 80 for experience savings.
Weapon levels trump character levels for DPS characters every time. Max level weapons provide substantial ATK increases with better returns than character investment.
Common Mistakes and Troubleshooting
Build Optimization Errors
Overhealing is the silent killer here – it stalls Fanfare generation at zero stacks, literally halving your damage output. Delay healer activation 5-10 seconds after HP drain starts.
Insufficient ER leads to Burst downtime. Ensure Furina hits 180%+ ER, Xiangling needs 180-200% ER. No exceptions.
Neglecting HP thresholds reduces damage potential. Maintain 35,000-40,000 HP for optimal scaling. Avoid ATK% main stats since her kit scales with HP values.
Rotation Timing Issues
Starting with Bennett instead of Furina results in zero Fanfare stacks – rookie mistake. Always begin with Furina Skill and Burst.
Extended field time on supports reduces DPS. Limit Furina to 2-3 seconds per rotation. Failing to refresh summons at 18-second intervals causes 40% damage loss.
Poor energy funneling leads to Burst downtime. Use Sucrose abilities before switching to energy-hungry characters.
Team Synergy Problems
Elemental application timing affects reaction consistency. Ensure Xingqiu's Hydro precedes Xiangling's Pyro for those Vaporize triggers. Break enemy shields before setting up reactions.
Use Bennett's healing field as your positioning anchor. Make sure Bennett's ATK buff and Furina's Fanfare stacks are active before Xiangling's Burst for optimal snapshot benefits.
Performance Analysis and Benchmarks
Damage Output Expectations
F2P builds consistently achieve 40,000+ DPS on Floor 12 with +16 artifacts and level 90 characters using 4-star weapons. Xiangling's Pyronado reaches 25,000+ single-target damage with proper builds.
Furina contributes 15,000-20,000 DPS through Salon members at 35,000-40,000 HP. Damage distribution typically breaks down: Xiangling 60-65%, Furina 20-25%, Xingqiu 10-15%, Bennett 5%.
Clear Time Comparisons
Spiral Abyss 6.1 clocks in at 8:30-10:00 minutes for 36-star completion. Floor 12 chambers run 90-120 seconds each for 3-star ratings. That's 15-20% faster than standard National variants through that 75% damage buff.
Investment timeline? 2-3 weeks of focused resin allocation for optimal builds.
Investment vs. Return Analysis
Level 90 is justified only for Furina, Xiangling, and Bennett due to scaling mechanics. Weapon investment offers the highest return per resin spent. Artifact +16 enhancement hits that optimal efficiency threshold.
Talent investment: Level 9-10 for Xiangling Burst and Furina Skill, others can stay 6-8 for cost efficiency.
FAQ
Can F2P players realistically clear Spiral Abyss 36 stars with Furina National Team?
Absolutely. This setup achieves 40,000+ DPS benchmarks using only 4-star weapons and characters, with 8:30-10:00 minute clear times. I've seen it done countless times.
What's the minimum investment required for effectiveness?
Level 80+ characters, +16 artifacts, level 90 weapons, 6/8/8 talents minimum. You're looking at 2-3 weeks of focused resin allocation, 420k Mora for ascensions, 1.65M Mora for talents.
Which 4-star weapon is absolutely essential?
Honestly? None are absolutely essential, but Festering Desire for Furina and The Catch for Xiangling provide optimal performance. Alternatives exist through craftable or Favonius series weapons.
How does Furina National compare to other F2P compositions?
It outperforms standard National by 15-20% through that 75% universal damage buff while maintaining similar investment requirements. S-tier for F2P Abyss clearing, no question.
What's the most common performance-reducing mistake?
Overhealing immediately after Furina's HP drain. This prevents Fanfare generation and literally halves your damage. Delay those heals 5-10 seconds for controlled stack accumulation.
Is Furina worth pulling for F2P Abyss clearing?
Yes, absolutely. She provides universal damage amplification that benefits multiple team compositions. C0 performance enables 36-star clears without constellation investment – excellent long-term F2P investment that'll serve you well across multiple Abyss rotations.


