

Understanding F2P Viability in Genshin 6.2 Abyss Floor 12
Floor 12 features level 95-100 enemies testing team composition and execution. 9-star clears reward 100 Primogems and 25,000 Mora bi-weekly—essential for F2P progression.
When needing additional resources, quick primogems recharge through BitTopup provides secure transactions with competitive pricing and instant delivery.
What Defines True F2P Teams
F2P teams use characters from free wishes, events, and standard banner: Xiangling, Xingqiu, Bennett, Sucrose, Fischl, Beidou, Kuki Shinobu, Kaeya, Rosaria, Dendro Traveler. Craftable weapons like The Catch R5 (+32% Burst DMG) and permanent domain artifacts deliver 70-80% meta efficiency.
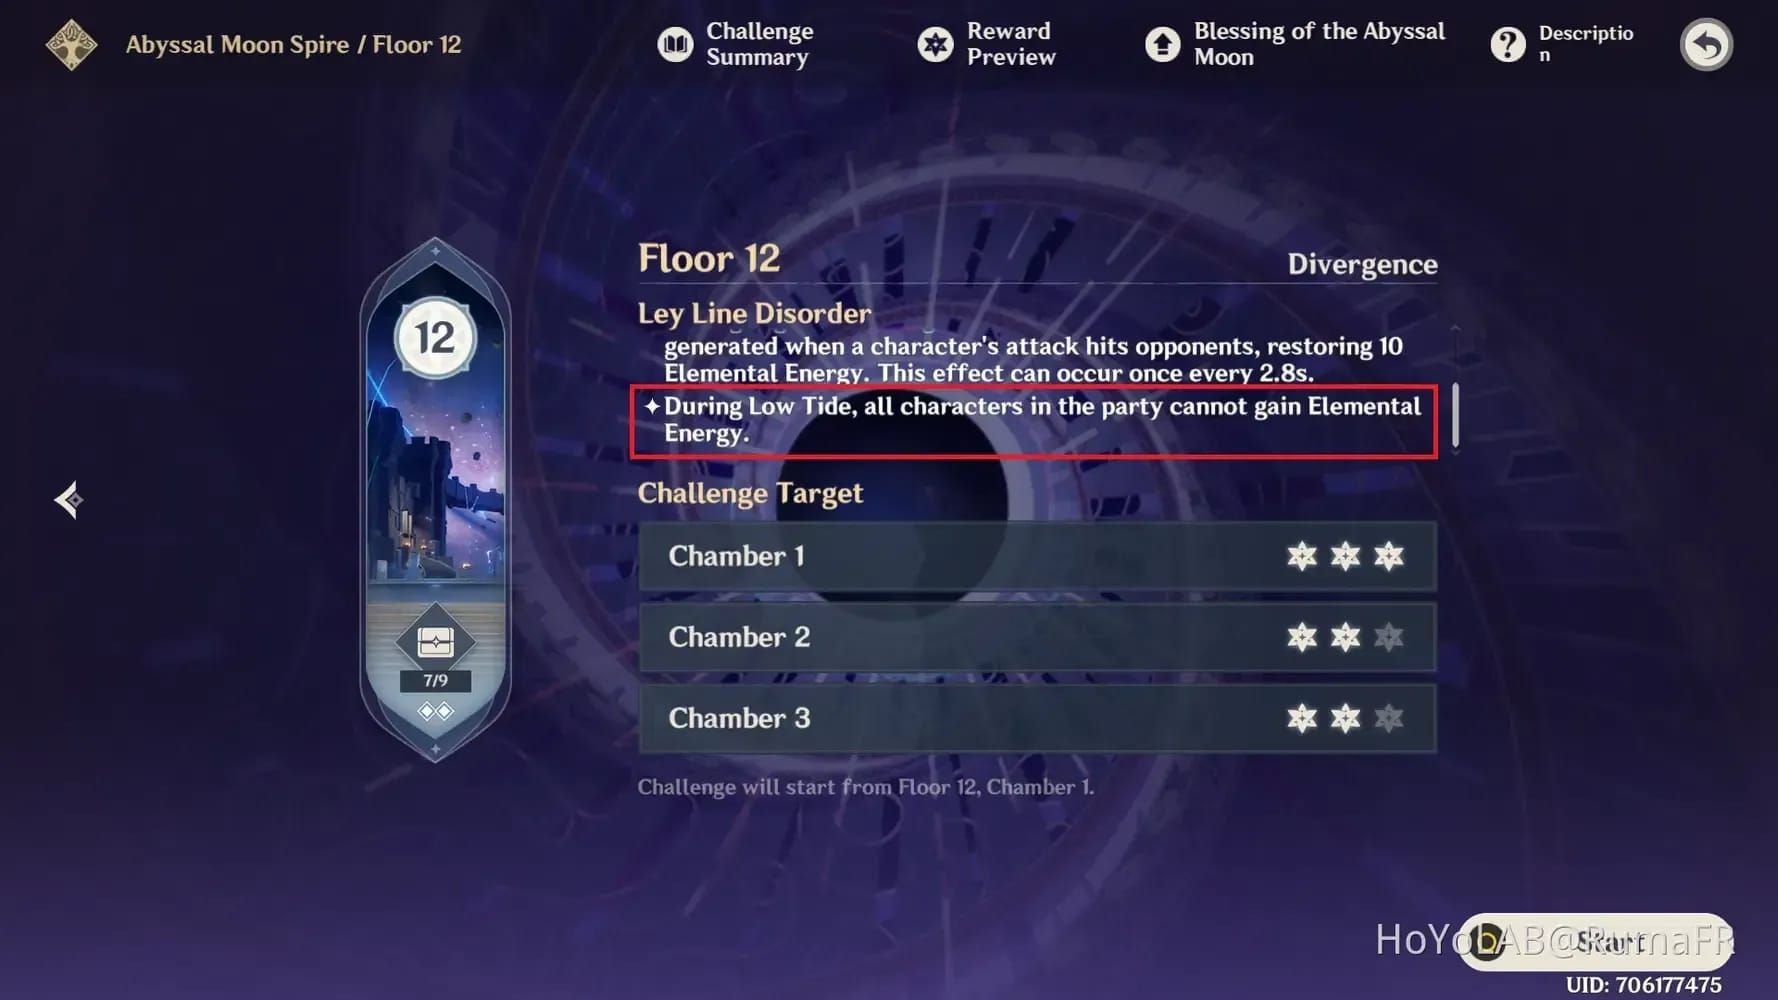
Version 6.2 Floor 12 Overview
Chamber 1: Bloom Seeds vs Rock Crabs—precise elemental timing required
Chamber 2: Electro Shields on Shock Troopers—counter-elements needed
Chamber 3: DPS check with high-HP targets
Each chamber needs 420 seconds remaining for 3-star completion (~3-minute clears).
Why Avoid Nod-Krai Characters
Nod-Krai characters appear on limited banners with no guaranteed F2P acquisition. Excluding them ensures universal applicability and future-proofs against meta shifts.
Primogem Rewards Breakdown
Floor 12 with 9 stars: 100 Primogems + 25,000 Mora per reset. Bi-weekly resets = 200 Primogems monthly (1.25 Intertwined Fates). Additional rewards: 25,000 Mora, 3 Adventurer's Experience, 2 Hero's Wit, 6 Mystic Enhancement Ore per chamber.
Core F2P Team Archetypes
National Team: Xiangling-Bennett-Xingqiu Core
Centers on Xiangling's Pyronado, Xingqiu's Hydro, Bennett's ATK buff, Sucrose's EM sharing. Outputs 40,000+ DPS with 20-second rotations.
Roles:
- Xiangling: Off-field Pyro DPS, snapshots Bennett's buff
- Bennett: Healer, buffer, battery
- Xingqiu: Hydro enabler, damage reduction
- Sucrose: VV shred, EM sharing, crowd control
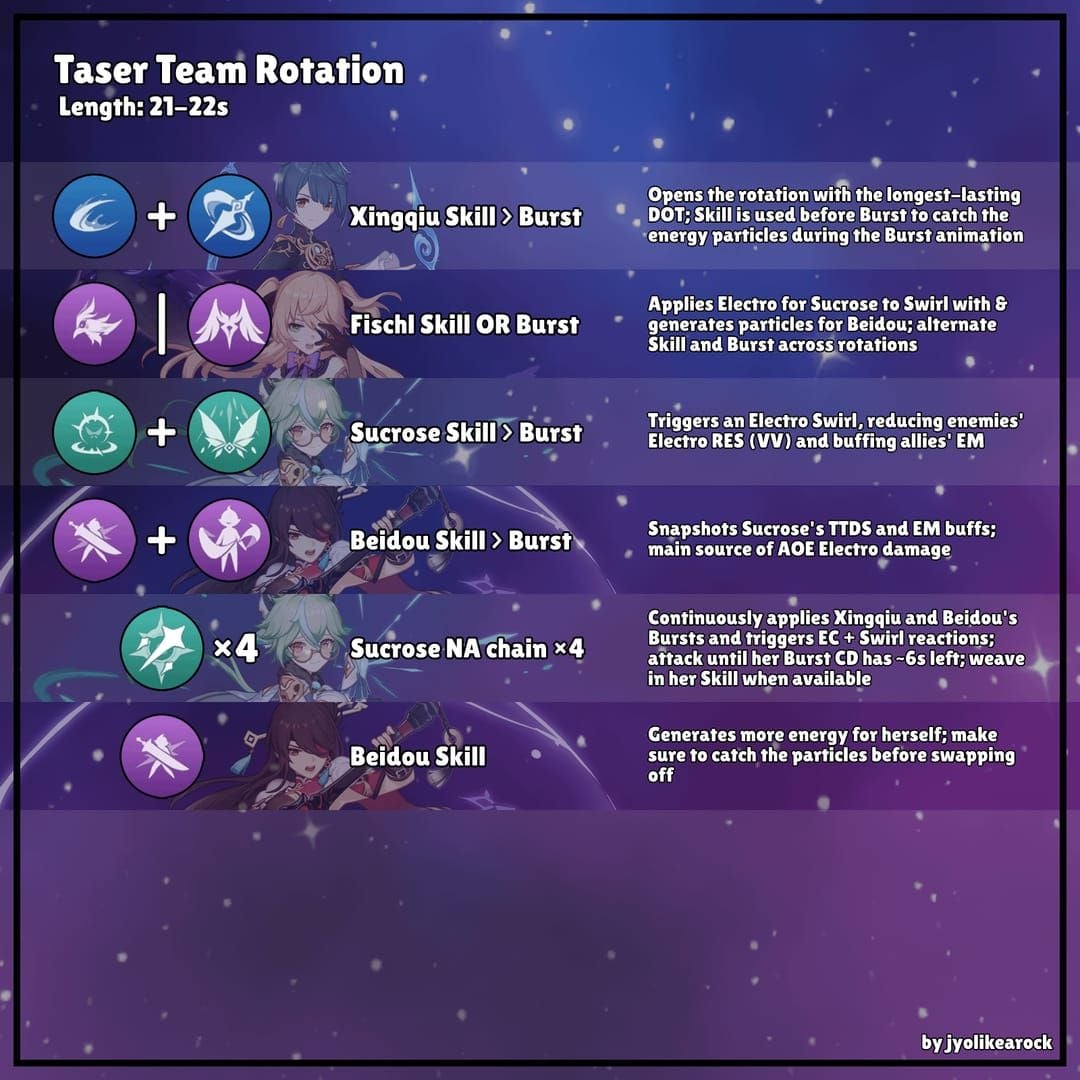
Sucrose Taser: Electro-Charged Dominance
Sucrose drives, Fischl provides single-target Electro, Beidou handles AoE, Xingqiu applies Hydro. Deals 30,000 damage per Electro-Charged trigger with exceptional survivability.
Hyperbloom: Dendro Traveler Core
Dendro Traveler + Xingqiu + Kuki Shinobu + Sucrose. Deals 30,000 per Hyperbloom trigger. Kuki needs 800+ EM to maximize damage.
Freeze: Kaeya-Rosaria
Kaeya (main Cryo DPS) + Rosaria (Cryo support, CRIT share) + Xingqiu + Sucrose. Situational but powerful against freezable enemies.
First Half: National Team Deep Dive
Optimal Rotation (20 seconds)
Bennett Skill → Bennett Burst → Sucrose Skill → Xingqiu Burst → Xingqiu Skill → Xiangling Burst → Xiangling Skill → Sucrose normals
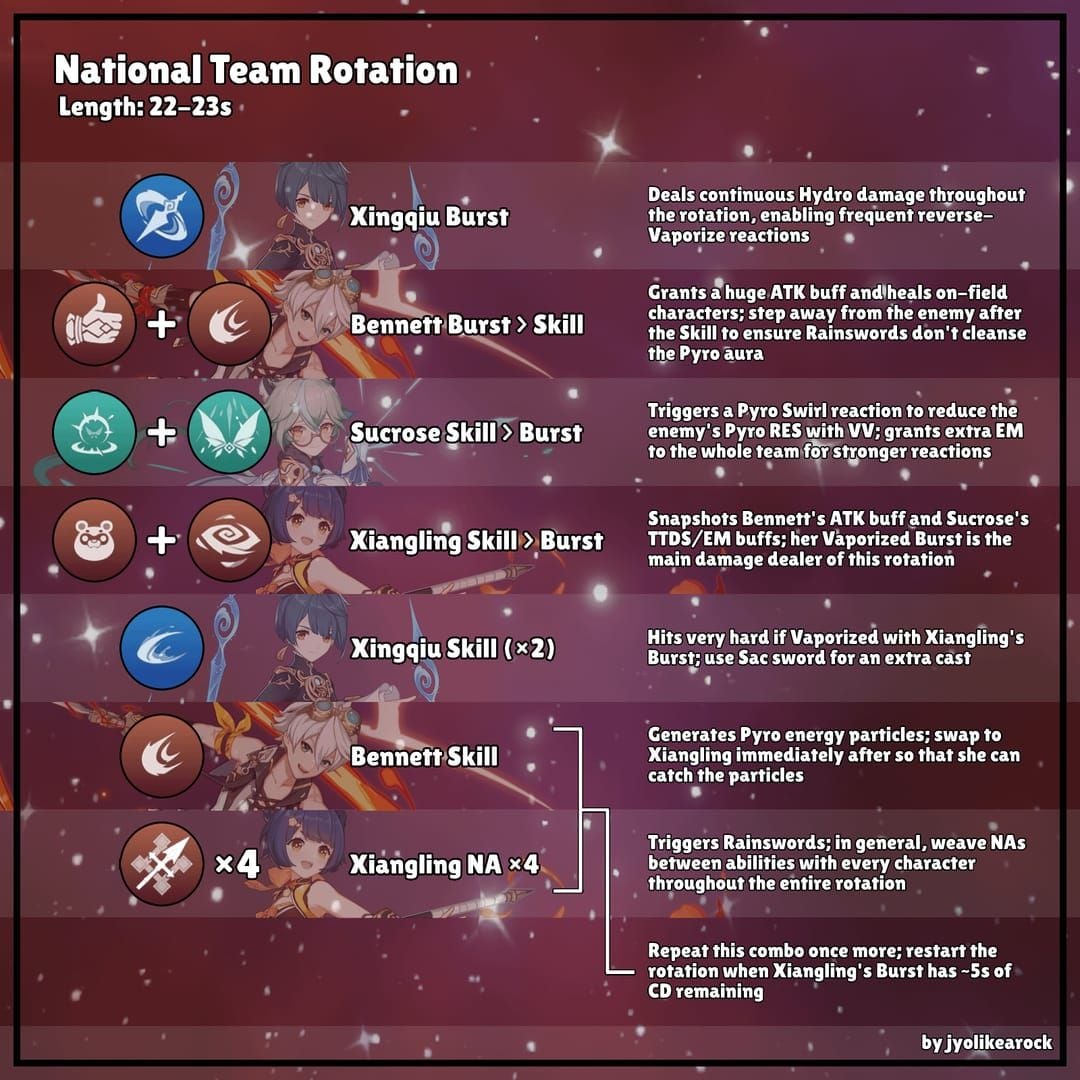
Timing: Xiangling must cast Burst before Bennett's field expires to snapshot buff.
Artifact Builds
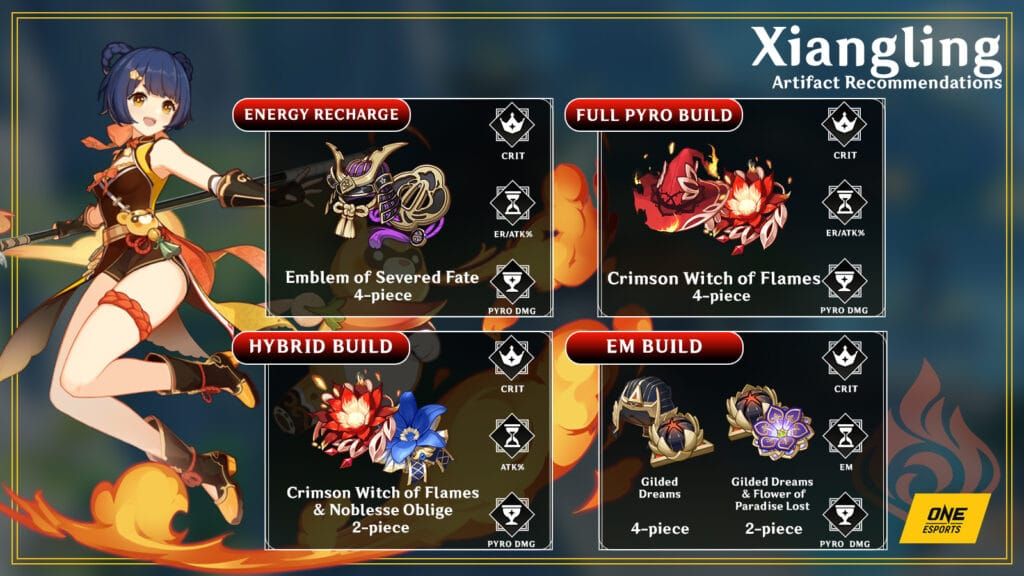
Xiangling: 4pc Emblem | ATK%/Pyro%/CRIT | 160-180% ER, 2000 ATK, 70% CR, 160% CD
Bennett: 4pc Noblesse | ER or HP%/HP%/HP% | 180-200% ER
Xingqiu: 4pc Emblem | ATK%/Hydro%/CRIT | 180-200% ER, 1:2 CRIT ratio
Sucrose: 4pc VV | EM/EM/EM | 180%+ ER from substats
Weapons
Xiangling: The Catch R5 (best F2P), Favonius Lance, Dragon's Bane
Bennett: Prototype Rancour, Favonius Sword (high Base ATK)
Xingqiu: Favonius Sword (team energy), Sacrificial Sword (Skill reset)
Sucrose: Sacrificial Fragments, Iron Sting, Thrilling Tales
Energy Requirements
Xiangling: 160-180% ER. Funnel Bennett's Pyro particles—cast Bennett Skill, switch to Xiangling before particles arrive.
Xingqiu: 180-200% ER depending on Sacrificial Sword
Bennett: 180-200% ER
Sucrose: 180%+ ER
Second Half: Sucrose Taser
For efficient resource management, best genesis crystals recharge through BitTopup offers fast delivery and secure transactions.
Why Electro-Charged Excels
Deals 30,000 per trigger. Unlike Vaporize/Melt, both Hydro and Electro coexist, enabling continuous reactions. AoE component spreads damage to nearby enemies.
Sucrose Driver Mechanics
Performs normals to trigger Xingqiu's Sword Rain, Fischl's Oz, Beidou's Stormbreaker. Swirls spread elements and reduce resistances. A4 passive shares 20% EM after Swirling.
Fischl and Beidou Optimization
Fischl: Consistent single-target Electro via Oz. A4 triggers extra Electro on reactions.
Beidou: AoE chain lightning hits 3 targets. Needs 160-180% ER. 4pc Thundering Fury or 2pc combos.
Rotation
Fischl Skill → Beidou Burst → Beidou Skill (counter) → Xingqiu Burst → Xingqiu Skill → Sucrose normals/Skills (12-15 seconds)
Flexibility: Sucrose regroups scattered enemies. Xingqiu's damage reduction maintains survivability without dedicated healing.
Character Build Specifications
Xiangling: Pyro Powerhouse
Level: 90 (reaction scaling)
Talents: NA 6, Skill/Burst 8+
Stats: 2000 ATK (with Bennett), 70% CR, 160% CD, 160-180% ER
Set: 4pc Emblem (40-45% Burst DMG bonus)
Bennett: Buffer/Healer
Level: 80/90
Talents: Burst 8+ (ATK buff scales from Base ATK only)
Stats: 180-200% ER, stack HP for healing
Set: 4pc Noblesse (+20% ATK to team)
Xingqiu: Hydro Enabler
Level: 80/90
Talents: Skill/Burst 8+
Stats: 180-200% ER, 60% CR, 120% CD minimum
Set: 4pc Emblem (45-50% Burst DMG bonus)
Fischl: Electro Consistency
Level: 80/90
Talents: Skill 8+
Stats: 60% CR, 120% CD
Set: 4pc Thundering Fury or 2pc ATK combos
Weapon: Stringless (best 4-star)
Sucrose: EM Support
Level: 80/90
Talents: Skill 6+
Stats: EM/EM/EM, 180%+ ER from substats
Set: 4pc VV (40% RES shred for 10s)
Beidou: AoE Electro
Level: 80/90
Talents: Burst 8+
Stats: 160-180% ER, 60% CR, 120% CD
Set: 4pc Thundering Fury or 2pc combos
Weapon: Serpent Spine, Prototype Archaic
Floor 12 Chamber Strategies
Chamber 1: Grouping Tactics
Rock Crabs have high physical resistance. Group enemies before Bursts. Sucrose pulls enemies together. Position to bait clusters. Need ~100 seconds per chamber for 3 stars.
Chamber 2: Shield Breaking
Electro Shields on Shock Troopers resist Electro. Use Cryo/Pyro for efficient breaking. National teams (Bennett/Xiangling) break shields fast. Prioritize shield breaking before damage rotations.
Chamber 3: DPS Check
High-HP enemies test raw damage. Minimize Burst downtime. Funnel particles—generate with supports, switch to DPS before particles arrive. Animation cancel to reduce rotation time. Need ~140 seconds.
Team Adaptation
Chamber 2 Electro Shields: Swap Taser to National/Freeze
Chamber 1 Grouping: Prioritize Anemo crowd control
National: Single-target/moderate AoE
Taser: Multi-target dominance
Hyperbloom: Mixed enemy types
Freeze: Freezable enemies only
Investment Priorities
Build Order for Max ROI
- Xiangling, Xingqiu, Bennett: Core of multiple teams. Xiangling to 90, others 80/90.
- Sucrose: VV shred + EM sharing across teams
- Fischl/Beidou: Complete Taser (Fischl single-target, Beidou AoE)
- Kuki Shinobu: Hyperbloom enabler (800+ EM)
7M Mora investment covers leveling, talents, weapons for 70-80% meta efficiency.
Constellation Priority
Most Valuable:
- Xiangling C4: +40% Pyronado duration
- Bennett C1: Removes HP restriction on ATK buff
- Xingqiu C2: Extended duration, Hydro RES shred
- Fischl C6: Additional coordinated attacks
- Beidou C2: Chain lightning hits more targets
C0 remains viable for all. Focus constellations on most-used characters.
Talent Levels
Minimum: NA 6, important Skills/Bursts 8
Optimal: Important abilities 9-10 (5-10% damage per level)
Priority:
- Xiangling: Burst 8+
- Bennett: Burst 8+ (ATK buff %)
- Xingqiu: Burst 8+
- Fischl: Skill 8+
- Beidou: Burst 8+
Cost escalates beyond 8. Target 8/8/8 or 1/8/8 for most characters.
Artifact Farming
Priority Domains:
- Emblem of Severed Fate: Xiangling, Xingqiu, Beidou
- Viridescent Venerer: All Anemo supports
Farm at AR45+ (guaranteed 5-stars). Focus correct main stats before substats. Target 160-200% ER, 60-70% CR, 120-160% CD.
Use strongbox for Emblem/Noblesse conversions.
When to Stop Investing
Stop at functional thresholds:
- Correct main stats
- 160-200% ER
- 60% CR
- Talent 8 on important abilities
Build second team for dual-team requirement before perfecting first team. 70% optimal artifacts > 95% optimal when resources could build new character.
Common Mistakes
Energy Management Failures
Problem: Insufficient ER causes rotation failures, 40% DPS loss
Solution: Prioritize ER substats/Sands until consistent Burst uptime. Funnel particles—cast ability, switch to character needing energy before particles arrive.
Rotation Errors
Problem: Wrong sequence prevents snapshots. Xiangling Burst outside Bennett field = 30-40% damage loss
Solution: Memorize sequences, practice in overworld. Use visual cues (Bennett field) for timing.
Problem: Extended support on-field time wastes DPS
Solution: Execute abilities quickly, switch immediately.
Enemy Mechanics
Problem: Attacking during invulnerability wastes Bursts
Solution: Learn patterns, delay Bursts until vulnerability windows.
Problem: Ignoring shields/resistances extends clears
Solution: Bring counter-elements. Pyro/Cryo break Electro Shields, Hydro breaks Pyro Shields.
Over-Investment
Problem: Building characters without team synergy
Solution: Plan complete teams before heavy investment.
Problem: Refining support weapons (Prototype Rancour on Bennett)
Solution: Refine DPS weapons only (The Catch, Prototype Archaic).
Ignoring Synergy
Problem: Strong individuals without reactions underperform
Solution: Build around reactions first, optimize individuals second.
Problem: Neglecting supports
Solution: Invest proportionally—supports multiply damage, not add to it.
Advanced Tips
Animation Canceling
Dash-cancel after Bursts saves 0.5-1s per rotation. Jump-cancel after normals increases attack speed. Practice in overworld until muscle memory. Don't cancel before damage frames complete.
Elemental Gauge Theory
Strong application (2U) persists longer than weak (1U). Xingqiu applies 1U Hydro per hit, Xiangling 1U Pyro per rotation. Xingqiu applies faster than Xiangling consumes = consistent Vaporize.
Enemy AI Manipulation
Position strategically to bait grouping. Medium range encourages approach without scattering. Use terrain/corners to funnel enemies. Sucrose Skill resets positions for AoE coverage.
Food Buffs
ATK foods (Adeptus' Temptation): +15-20% damage
Elemental DMG foods (Pile 'Em Up): +20-25% specific damage
Use strategically on challenging chambers, not every attempt.
Practice Routines
Practice rotations vs overworld bosses. Record successful runs to analyze timing. Focus on specific weaknesses—energy management, rotation timing. Incremental improvement > repeated Abyss attempts without targeted practice.
Sustaining F2P Accounts
Primogem Income
Sources:
- Daily commissions: 60
- Abyss resets: 600 monthly
- Events: 420+ per event
- Exploration: one-time
Monthly total: 6,000-8,000 primogems
Spending discipline: Prioritize characters enabling new archetypes. Avoid weapon banners. Save for team-completing characters.
Versatile Roster
Maintain 2+ functional teams. Invest in multi-team characters. Prioritize new archetypes (Dendro for Hyperbloom, Cryo DPS for Freeze) over role duplicates.
Artifact Management
One optimized set per primary team character. Prioritize correct main stats > perfect substats. Use strongbox for Emblem/Noblesse. Lock artifacts with correct mains + 2+ useful substats.
Meta Shifts
Core reactions (Vaporize, Electro-Charged, Freeze) maintain viability. Keep multiple elements built to functional thresholds. Monitor announcements for new enemies. Avoid over-committing to temporary trends.
FAQ
Can you 9-star Floor 12 without 5-stars in 6.2?
Yes. F2P teams (Xiangling, Xingqiu, Bennett, Sucrose, Fischl, Beidou) achieve 9-star clears. National/Taser output 40,000+ DPS and 30,000 per Electro-Charged trigger with ~7M Mora investment.
Best F2P teams for Floor 12 v6.2?
National (Xiangling/Bennett/Xingqiu/Sucrose) and Taser (Sucrose/Fischl/Beidou/Xingqiu). Alternatives: Hyperbloom (Dendro Traveler/Xingqiu/Kuki/Sucrose), Freeze (Kaeya/Rosaria/Xingqiu/Sucrose).
Investment needed for Floor 12?
~7M Mora: characters 80/90, talents 6/8/8, weapons 90, artifacts with correct mains. Target 160-200% ER, 60-70% CR, 120-160% CD. Achieves 70-80% meta efficiency.
Best 4-stars for Floor 12?
Core trio: Xiangling, Xingqiu, Bennett. Sucrose (VV shred/EM share). Fischl/Beidou (Taser). Kuki (Hyperbloom). Kaeya/Rosaria (Freeze).
Which artifacts to farm?
Emblem domain (Xiangling/Xingqiu/Beidou) and VV domain (Sucrose). Emblem converts ER to Burst DMG. VV provides 40% RES shred. High resin efficiency.
Primogems from 9-star Floor 12?
100 Primogems + 25,000 Mora per reset. Bi-weekly resets = 200 Primogems monthly. Additional: 25,000 Mora, 3 Adventurer's Experience, 2 Hero's Wit, 6 Mystic Enhancement Ore per chamber.
Ready to dominate Spiral Abyss? Power up faster with BitTopup—trusted platform for secure, instant Genesis Crystal top-ups. Best rates and exclusive bonuses. Visit BitTopup now!


