

Understanding Budget No Nod-Krai Teams for Genshin 6.2 Spiral Abyss
Here's the thing about budget teams that most guides won't tell you upfront: they're not just cheaper versions of meta comps. They're fundamentally different beasts that leverage elemental reaction synergy over raw character power. And honestly? That's exactly what makes them so reliable.
The core of any successful F2P approach centers around four characters you've probably seen everywhere: Xiangling, Xingqiu, Bennett, and Sucrose. These aren't just random picks—they're the backbone of multiple team archetypes precisely because they solve the F2P player's biggest challenge: versatility with limited resources.
What experienced players know is that Nod-Krai exclusion isn't just about availability (though that's certainly part of it). It's about investment efficiency. When you're working with limited resources, every Mora and every artifact roll counts. Premium units often demand specialized supports or specific weapon combinations that can drain your account dry.
For players looking to accelerate their progression strategically, Genshin Impact battle pass gnostic hymn cheap options through BitTopup provide valuable resources for character development at competitive rates—though they're absolutely not required for success.
Budget Team Requirements and Investment Thresholds
Let's talk numbers. Budget teams operate under strict constraints, but they're more forgiving than you might think. We're looking at primarily 4-star characters, accessible weapons (craftable R5 or gacha 4-star), and farmable artifact sets. The magic number? 40,000+ DPS output to meet Floor 12's damage requirements.
But here's where it gets interesting—and where many guides get it wrong. Energy Recharge isn't just important; it's absolutely critical. You need 180%+ ER on burst-dependent characters, period. I've seen too many players chase crit ratios while their rotations fall apart because they can't burst on cooldown.
Investment thresholds are actually quite reasonable: Level 90 ascension for reaction triggers (non-negotiable for transformative reactions), 60-80% Crit Rate with 160-200% Crit Damage ratios, and 4-5 quality substats per artifact piece. Total Mora investment averages around 7 million across a full team—manageable if you plan ahead.
Version 6.2 Endgame Viability
Version 6.2's Spiral Abyss design philosophy favors execution over raw power, which is fantastic news for budget teams. The current Floor 12 features enemies with 375% HP bonus, but—and this is crucial—the mechanics reward sustained DPS and proper elemental application rather than front-loaded burst damage.
Take the Rock Crab encounter: 4.4M HP sounds intimidating until you realize it has 6 Bloom seed vulnerability windows dealing 500% damage per seed (capped at 1.5M total). Suddenly, a well-built Hyperbloom team isn't just viable—it's optimal.
The Battle-Hardened Shock Trooper presents a different challenge with 4.76M HP and 285k shield segments, but Electro-Charged reactions tear through those shields like paper. What works best is understanding that these aren't DPS checks in the traditional sense—they're mechanic checks that budget teams excel at.
Floor 12 6.2 Overview: Enemy Lineups and Mechanics
Floor 12's three chambers each tell a different story, and understanding these narratives is what separates successful clears from frustrating resets. Each chamber demands specific strategies, but the beauty of budget teams lies in their adaptability.
Chamber Analysis and Strategic Requirements

Chamber 1's Rock Crab dominates the conversation with its unique Bloom seed mechanic. Those 6 seeds aren't just a gimmick—they're your primary damage source. Dendro and Hydro application triggers vulnerability windows that make budget Hyperbloom teams absolutely shine here. The supporting cast (2 Ousia Mek units and Dendro/Hydro Vishap) requires 16U Dendro application for armor breaks, which plays perfectly into Hyperbloom's strengths.
Chamber 2 shifts gears entirely. The Battle-Hardened Fireblade Shock Trooper's 4.76M HP and three 285k shield segments respond beautifully to Electro-Charged reactions. This is where Taser compositions prove their worth through consistent Electro and Hydro application. The Fatui supporting units follow classic counter-element rules: Pyro breaks Cryo shields, Cryo counters Electro shields.
Chamber 3 represents the traditional DPS check, but with a twist. The recommended 9-0-3 or 3-3-3 rotation patterns focus maximum damage on priority targets before transitioning. Why? Because HP scaling from multiple active units can turn a manageable fight into a nightmare.
The 6.2 Abyss Blessing deserves special mention—it enhances Bloom reaction damage and provides energy regeneration for Dendro characters. This directly benefits Hyperbloom compositions by reducing Energy Recharge requirements for Dendro Traveler and Collei, letting you go aggressive on Elemental Mastery allocation.
Top Budget Team Composition #1: Enhanced National Team
The Enhanced National Team isn't just accessible—it's the F2P progression gold standard for good reason. Built around Xiangling, Xingqiu, Bennett, and Sucrose, this composition achieves 40,000+ AoE DPS with 70-80% meta efficiency. That's not budget performance; that's competitive performance.
Core Roster and Character Functions
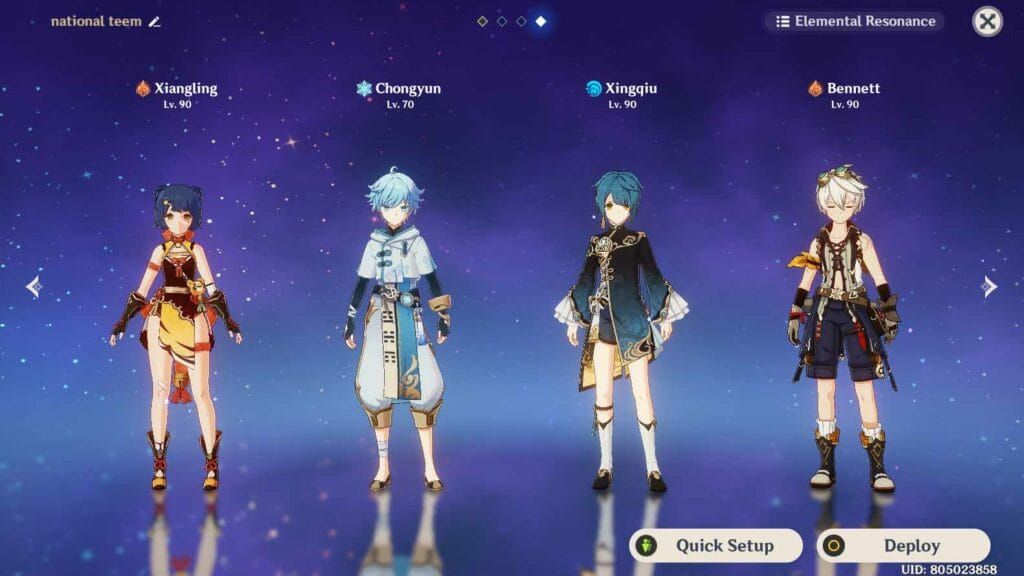
Xiangling serves as your primary DPS through Pyronado's snapshot mechanics. Here's what makes her special: she snapshots Bennett's ATK buff and maintains 100% uptime with proper Energy Recharge investment. Off-field damage scales beautifully with ATK and Elemental Mastery, especially when Vaporize reactions are involved. Constellation 4 extends Pyronado duration—it's the most important breakpoint for this team.
Xingqiu provides the Hydro foundation for Vaporize reactions while contributing substantial off-field damage through Rain Swords. The damage reduction and healing keep your team alive, while that consistent Hydro application enables 2x Pyro damage multipliers. C6 adds energy refund and additional sword waves, though C0 works perfectly fine.
Bennett functions as both healer and primary damage buffer. His flat ATK bonus scales with base ATK and weapon choice, making weapon selection crucial. The burst field enables Pyro resonance and cleanses debuffs—investment priorities focus on Energy Recharge and base ATK over personal damage stats.
Sucrose completes the composition through Viridescent Venerer 4-piece RES shred and Elemental Mastery sharing. Crowd control groups enemies for Pyronado hits while EM transfers amplify Vaporize damage. C6 provides additional elemental damage bonus, but again, not required.
Artifact Sets and Weapon Optimization

Xiangling demands Emblem of Severed Fate 4-piece with ATK%/EM Sands, Pyro DMG Goblet, Crit Circlet. Energy Recharge substats should target 160-180% for consistent burst uptime—don't compromise on this. The Catch R5 represents the optimal F2P weapon, providing ER main stat and burst damage amplification.
Xingqiu utilizes Emblem 4-piece with ATK% Sands, Hydro DMG Goblet, Crit Circlet. ER requirements reach 180-200% depending on weapon choice. Sacrificial Sword offers skill reset potential, while Favonius Sword provides team energy generation—both excellent choices.
Bennett's build focuses on ER and base ATK maximization through Noblesse Oblige 4-piece. HP% Sands provides larger healing, ER% Sands improves burst uptime. Weapon choice significantly impacts team damage through base ATK scaling—Prototype Rancour works as a viable F2P option despite that physical substat.
Sucrose employs Viridescent Venerer 4-piece with EM main stats across Sands/Goblet/Circlet. ER substats should target 160-180% for burst availability. Thrilling Tales R5 provides ATK% buff transfer to Xiangling during rotations—simple but effective.
Rotation Execution and Constellation Impact
The standard rotation follows a 20-second cycle: Bennett Burst → Sucrose Skill → Xingqiu Burst → Xiangling Burst → Sucrose Normal Attacks. This sequence ensures proper buff application, VV shred activation, and Hydro aura establishment before Pyronado deployment.
Constellation progression creates meaningful breakpoints: Xiangling C4 extends Pyronado duration by 40% (absolutely the most important upgrade), Bennett C1 provides unconditional ATK buff, Xingqiu C6 reduces ER requirements through energy refund. Investment priority follows: Xiangling C4 > Bennett C1 > Xingqiu C2 > everything else.
Top Budget Team Composition #2: Hyperbloom Reaction Team
Hyperbloom teams excel in single-target scenarios through consistent 30,000+ damage per trigger—perfect for Floor 12's boss encounters. The core composition of Dendro Traveler, Xingqiu, Kuki Shinobu, and Sucrose provides sustainable reaction damage while maintaining defensive utility.
For players looking to optimize Hyperbloom performance efficiently, Genshin Impact top up for F2P abyss clear resources through BitTopup offer convenient access to materials and weapons needed for character development.
Character Synergy and Elemental Mastery Strategy

Dendro Traveler provides consistent Dendro application through skill/burst abilities while generating energy particles. The burst creates a large AoE field maintaining Dendro aura for extended periods, enabling continuous Bloom seed generation. Investment focuses on Energy Recharge and Elemental Mastery rather than personal damage—this isn't a DPS build.
Kuki Shinobu serves as your Hyperbloom trigger through her Electro ring, applying Electro at regular intervals to detonate Bloom seeds. Her healing capabilities provide team sustenance while EM scaling amplifies Hyperbloom damage. Flower of Paradise Lost 4-piece increases Hyperbloom damage by 80 EM, making her the primary damage dealer despite off-field positioning.
Here's the key insight: Hyperbloom damage scales exclusively with the triggering character's EM and level. This makes Kuki's EM investment your primary damage priority. Target EM values reach 800+ for optimal damage, achievable through EM main stat artifacts and weapon selection.
Rotation and Alternative Substitutions
Hyperbloom rotation follows a 20-second cycle: Dendro Traveler Skill → Xingqiu Burst → Kuki Skill → Sucrose Normal Attacks. This establishes Dendro aura, applies Hydro for Bloom generation, and triggers Electro for Hyperbloom detonation. Advanced techniques include pre-applying Dendro before chamber start and managing Kuki's ring positioning for optimal seed contact.
Collei can replace Dendro Traveler for different application patterns and Dendro damage bonus sharing. Fischl substitutes for Kuki when you want additional Electro damage, though you lose healing and need careful positioning. Barbara replaces Xingqiu in ultra-budget variants, providing Hydro application and healing at the cost of damage reduction.
Top Budget Team Composition #3: Electrocharged Taser Team
Taser teams specialize in multi-target scenarios through Electrocharged reactions and Swirl amplification, achieving 30,000+ DPS per trigger across multiple enemies. The composition of Sucrose, Fischl, Beidou, and Xingqiu provides excellent AoE coverage while maintaining strong single-target performance.
Team Structure and Driver Mechanics
Sucrose functions as your on-field driver, triggering Swirl reactions with absorbed Electro/Hydro elements while providing crowd control and EM sharing. Her normal attack pattern maintains consistent elemental application for Electrocharged reactions while grouping enemies for maximum AoE efficiency. Viridescent Venerer 4-piece provides that crucial 40% Electro RES shred.
Fischl provides consistent single-target Electro application through Oz while contributing substantial personal damage. Energy generation supports Beidou's burst requirements, while her A4 passive triggers additional Electro damage during Electrocharged reactions. C6 significantly amplifies damage through coordinated attacks—it's a game-changer when you get it.
Beidou serves as your primary AoE damage dealer through burst's chain lightning effects. Perfect counter provides additional damage and energy generation, while damage reduction improves survivability. Energy requirements reach 160-180% ER, manageable through Fischl's battery support and Favonius weapons.
Energy Management and Performance Scaling
Beidou's energy requirements represent the primary constraint for Taser rotations. She needs 160-180% ER depending on enemy density and Fischl's constellation level. Her burst provides the majority of team AoE damage, making consistent uptime essential.
Taser teams excel in multi-target scenarios where Beidou's chain lightning and Swirl reactions hit multiple enemies simultaneously. AoE performance scales exponentially with enemy density—positioning and crowd control become crucial. Single-target performance relies on Fischl's personal damage and Xingqiu's sword rain, with Electrocharged providing consistent but moderate amplification.
Top Budget Team Composition #4: Freeze Control Team
Freeze teams provide exceptional crowd control and safety through enemy immobilization, though damage output requires precise execution and favorable enemy matchups. The composition of Kaeya, Rosaria, Xingqiu, and Sucrose offers budget-friendly Freeze mechanics while maintaining reasonable clear times.
Affordable Freeze Core and Optimization
Kaeya serves as primary Cryo DPS through burst's orbital icicles, maintaining consistent Cryo application for Freeze reactions. Energy generation supports team sustainability while personal damage scales with standard DPS stats. C2 extends burst duration, improving DPS windows and Freeze uptime significantly.
Rosaria provides Cryo resonance, Crit Rate sharing, and additional off-field damage through her burst field. Mobility and positioning tools help maintain optimal range while her A4 passive shares Crit Rate with teammates. C6 adds physical RES shred for enhanced damage output.
Frozen enemies provide guaranteed Crit Rate through Blizzard Strayer 4-piece, allowing Cryo DPS characters to prioritize Crit Damage and ATK stats. The artifact set provides 40% Crit Rate in optimal conditions, while Cryo Resonance adds 15% Crit Rate against Cryo-affected enemies.
Limitations and Adaptation Strategies
Freeze teams face significant challenges against large bosses resisting crowd control, enemies with innate Cryo resistance, or chambers with high mobility requirements. Current Floor 12 meta includes several enemies that limit Freeze effectiveness—it's not always the right tool for the job.
Boss encounters often feature Freeze immunity or reduced duration, forcing reliance on raw damage output rather than crowd control advantages. The team's damage ceiling may prove insufficient for tight DPS checks without optimal artifact investment and weapon refinements. Adaptation options include switching to Reverse Melt rotations or incorporating Anemo characters for grouping and RES shred.
Character Investment Priority Guide for F2P Players
Efficient resource allocation requires strategic decisions about character building order, talent priorities, and constellation targets. F2P accounts must maximize return on investment through careful planning—every decision matters when resources are limited.
Essential 4-Star Characters and Investment Order
Bennett represents the highest priority investment, providing universal team support through ATK buffs, healing, and Pyro resonance. His effectiveness scales primarily with weapon base ATK and talent levels rather than artifact quality. Every team composition benefits from Bennett's presence, justifying immediate resource allocation.
Xingqiu ranks second essential, enabling multiple team archetypes through Hydro application and defensive utility. Investment includes moderate Emblem farming and weapon acquisition. His versatility across National, Taser, and Freeze teams makes him invaluable for account progression.
Xiangling provides your primary DPS option through Pyronado's snapshot mechanics and Vaporize scaling. She requires significant investment in artifacts, weapons, and talent levels, but delivers competitive damage comparable to 5-star DPS when properly built.
Talent Priorities and Constellation Targets
Bennett's talent priority focuses entirely on burst (levels 9-12), providing ATK buff and healing effects. Skill and normal attack remain at minimal levels. This talent investment represents the highest return option for F2P accounts—no question.
Xiangling requires burst talent priority for Pyronado damage scaling, with skill secondary for energy generation. Normal attack is irrelevant for off-field builds. Levels 8-10 on burst provide substantial damage increases, justifying Crown usage if you have it.
Constellation targets worth pursuing include Xiangling C4 (40% Pyronado extension—most impactful for budget teams), Bennett C1 (removes HP restrictions on ATK buff), and Xingqiu C2 (extends duration, reduces Hydro RES). These justify targeted Starglitter purchases or banner pulls when available.
Resource Timeline for New Players
Months 1-2 focus on Bennett and Xingqiu development, prioritizing weapon acquisition, basic artifact sets, and talent levels 6-8. These provide immediate team functionality with moderate investment.
Months 3-4 shift to Xiangling development for National Team completion, requiring significant Emblem farming and talent investment. The Catch acquisition through fishing provides your optimal weapon option—don't skip this.
Months 5-6 enable secondary team development through Sucrose, Fischl, and alternative DPS options. Constellation accumulation through events and banner pulls begins impacting performance noticeably.
Long-term (6+ months) involves artifact optimization, weapon refinements, and constellation targeting through strategic allocation. Account maturity enables multiple team compositions and flexible Abyss strategies.
Artifact Farming Strategy for Budget Teams
Efficient artifact farming requires domain prioritization, acceptable quality standards, and long-term progression planning. F2P accounts must balance immediate needs with optimal resource allocation across multiple characters—it's a delicate dance.
Domain Priority and Quality Standards
Emblem of Severed Fate domain takes highest priority, providing optimal sets for Xiangling, Xingqiu, Beidou, and other burst-dependent characters. Domain efficiency stems from universal applicability and Shimenawa's alternative set for certain DPS characters. You'll practically live here for a while.
Viridescent Venerer domain ranks second for Sucrose and future Anemo development. It provides immediate team damage amplification through RES shred while requiring minimal investment. VV pieces need only correct main stats rather than optimal substats—much more forgiving.
Budget teams require 4-5 quality substats per artifact piece for competitive performance, achievable through moderate farming investment. Quality substats include any Crit, ATK%, ER, or EM rolls contributing to character functionality.
Main stat correctness takes absolute priority over substat quality. ATK% Sands, Elemental DMG Goblets, and Crit Circlets provide the foundation for competitive damage output, while substat optimization offers marginal improvements.
Chamber-by-Chamber Execution Strategy
Successful Floor 12 clears require strategic team assignment, execution timing, and adaptive decision-making based on performance metrics. Understanding chamber-specific requirements enables optimal resource allocation and clear time optimization.
Team Assignment and Execution Benchmarks
First half assignment should prioritize AoE capabilities for chambers with multiple enemies, making National or Taser teams optimal choices. These handle enemy groups efficiently while maintaining competitive single-target damage for boss encounters.
Second half assignment often favors single-target specialists like Hyperbloom teams, depending on enemy lineup and elemental resistances. Hyperbloom teams excel against Rock Crab's Bloom seed vulnerability, while Taser teams handle Shock Trooper shields effectively.
First half execution targets 90-120 second clear times, allowing sufficient time for second half completion. Opening strategies include pre-casting abilities before chamber start, positioning for optimal enemy grouping, and prioritizing high-value targets.
Reset Criteria and Performance Optimization
Clear time benchmarks provide objective criteria for reset decisions. First half times exceeding 150 seconds or second half times approaching 270 seconds indicate likely failure and justify immediate resets—don't waste time on doomed runs.
Energy state assessment at chamber transitions influences reset decisions. Teams entering second half with insufficient energy for opening rotations face significant disadvantages preventing successful clears.
Second half teams benefit from first half experience with enemy patterns and positioning requirements. Energy pre-loading through skill usage before chamber transition provides immediate burst availability.
Common Mistakes and How to Avoid Them
Understanding frequent execution errors and their solutions prevents repeated failures and improves clear consistency. These mistakes often stem from misunderstanding game mechanics or inadequate preparation rather than character investment deficiencies.
Critical Errors That Cost Clears
Insufficient Energy Recharge investment represents the most common team building error, leading to inconsistent burst availability and rotation failures. Players often prioritize damage stats over ER requirements, resulting in teams that look good on paper but fail under Abyss conditions.
Buff timing errors result in abilities missing critical damage windows or snapshot opportunities. Understanding buff duration and application timing ensures maximum damage amplification during burst windows. It's not just about using abilities—it's about using them at the right moment.
Character priority errors involve investing heavily in characters with limited team applications or poor scaling. Understanding character roles and team synergy prevents resource waste on suboptimal builds.
Positioning and Execution Improvements
Range management against mobile enemies requires understanding attack patterns and movement prediction. Maintaining optimal distance prevents damage loss from abilities missing moving targets—positioning matters more than most players realize.
Animation lock awareness prevents interruption of critical abilities and maintains rotation flow. Certain abilities have extended animation periods that leave characters vulnerable or delay subsequent actions.
Poor particle management during rotations wastes energy generation opportunities and extends rotation cycles. Proper funneling techniques and skill timing ensure maximum energy efficiency while maintaining damage output.
Enhance Your Genshin Journey with Smart Resource Management
Successful F2P progression requires strategic resource management balancing immediate needs with long-term account development. Understanding efficient spending patterns and resource optimization enables competitive performance without significant monetary investment.
Strategic Resource Allocation
Primogem allocation should prioritize characters enabling multiple team compositions over specialized units with limited applications. Bennett, Xingqiu, and other universal supports provide greater account value than niche DPS characters—it's about versatility over power.
Daily resin allocation should prioritize immediate team needs while maintaining long-term progression goals. Balancing artifact farming, talent materials, and weapon ascension prevents resource bottlenecks limiting team development.
Weekly boss prioritization focuses on characters requiring specific materials while considering long-term roster development. Domain rotation strategies alternate between different farming priorities based on team development needs and resin efficiency.
BitTopup provides convenient access to Genesis Crystals and Battle Pass resources for players seeking to accelerate progression efficiently. The platform offers competitive pricing, secure transactions, and instant delivery for Genshin Impact top-ups, enabling smart resource management for F2P and low-spender accounts.
FAQ
Can you clear Floor 12 without 5-star characters in Genshin 6.2? Absolutely. Floor 12 is completely clearable with 4-star budget teams achieving 70-80% meta efficiency. Teams like National (Xiangling/Xingqiu/Bennett/Sucrose) and Hyperbloom (Dendro Traveler/Xingqiu/Kuki/Sucrose) achieve 36-star clears with proper investment: 160-180% Energy Recharge, 60-80% Crit Rate, and understanding enemy mechanics like Rock Crab's Bloom seed vulnerability. What works best is focusing on execution over raw power.
What are minimum investment requirements for budget Floor 12 teams? Budget teams require approximately 7 million Mora total investment, Level 90 ascension for reaction triggers, 4-5 quality artifact substats per piece, and R3+ refinements on key weapons. Energy Recharge thresholds of 180%+ for DPS characters and 160%+ for supports are essential—don't compromise on this. You'll also need 1:2 Crit ratio and proper talent levels (8-10 on key abilities).
Which team works best for Floor 12 Chamber 1's Rock Crab? Hyperbloom teams excel against Rock Crab due to its Bloom seed mechanic, where 6 seeds take 500% damage each with 1.5M damage cap. Optimal composition uses Dendro Traveler + Xingqiu + Kuki Shinobu + Sucrose, with Kuki at 800+ EM triggering Hyperbloom on generated seeds. This strategy rapidly eliminates the 4.4M HP crab through vulnerability windows—it's incredibly satisfying when executed properly.
How important are character constellations for F2P Abyss success? Key constellations provide significant improvements but aren't mandatory. Xiangling C4 (40% Pyronado extension), Bennett C1 (unconditional ATK buff), and Xingqiu C2 (extended duration/RES shred) represent highest priority targets. C0 functionality suffices for Floor 12 clears with proper builds, while constellations enhance comfort and damage output. In practice, execution matters more than constellations.
What's the DPS requirement for Floor 12 6.2 three-star clears? Floor 12 requires 40,000+ sustained DPS to meet 420-second time limits against enemies with 375% HP bonus. Budget teams achieve this through elemental reactions: National teams reach 40,000+ AoE DPS, Hyperbloom delivers 30,000+ per trigger, Taser provides 30,000+ multi-target damage. Proper rotation execution and buff management maintain these thresholds consistently—it's about sustained output, not burst damage.
How do I manage energy recharge requirements across different teams? Energy management varies by team composition. National needs 160-180% ER on Xiangling, 180-200% on Xingqiu; Hyperbloom requires 160-180% on Dendro Traveler; Taser demands 160-180% on Beidou with Fischl battery support. Use Favonius weapons for team energy generation, practice proper particle funneling, and pre-cast abilities before chamber start to enter with full bursts ready. Experienced players know that energy management often determines success more than raw damage stats.


