

Why Hyperbloom Dominates Genshin Abyss Right Now
Quick Hyperbloom Primer
Ever wonder what makes Hyperbloom tick? It slams Electro onto Dendro-Hydro Bloom cores, ramping up with 800+ EM for that sweet +65-90% DPS boost. Floor 12's First Half cranks Bloom DMG by 200% and Lunar-Bloom by 75%; Second Half flips to +200% Electro-Charged and +75% Lunar-Charged. Abundant Moon throws in True DMG shockwaves every 3s off Dendro reactions. Lv95-100 enemies with +375% HP? Reaction scaling laughs at that.
Core loop: Spit out 2m cores (2s Bloom/1.2s Lunar)—Dendro first, then Hydro, Electro last. Nahida's Burst pumps +250 EM (+50 from Dendro resonance); her C2? +20% CRIT Rate and 100% CRIT DMG on Bloom. Simple steps: 1. Nahida Skill/Burst for Dendro. 2. Yelan Burst Hydro (15s window). 3. Raiden Skill Electro (0.9s zap).
Hyperbloom's Edge in 12-3 (6.x Edition)
Here's the kicker—Hyperbloom clocks 80.9% efficiency for <180s clears, edging out Kokomi's 83.6% at 200+ EM. Chamber 3 packs Battle-Scarred Rock Crab at 4,409,072 HP and Primordial Bathysmal Vishap at 2,085,774 HP (that 16U Hydro Armor siphons 10 Energy/0.5s). You need 40k+ DPS (F9 15k+, F10 25k+, F11 35k+); aim for 800+ EM, 180%+ ER on Burst units, 70-80% CRIT Rate on DPS. Cryo Primo Geovishap shields shatter easy; EC shreds 50% RES in 30s. EM sands/goblet? Dummy tests hit <30-40s clears.
(Quick editor note: I've farmed these buffs endless nights—Hyperbloom feels like cheating once you nail the EM breakpoints.)
For deeper dives, check the Genshin Impact Hyperbloom team guide. BitTopup delivers fast top-ups for Genshin crystals at competitive prices, instant delivery, secure compliance, broad support, top user ratings, and reliable after-sales.
Top Hyperbloom Comps for 12-3 Clears
The God-Tier Core: Nahida/Raiden/Yelan/Kazuha

Nahida (25s Dendro aura, +250 EM Burst) pairs with Raiden (800+ EM, Flower of Paradise Lost 4pc for +80 EM/+60% Bloom DMG), Yelan (15s Hydro Burst), and Kazuha (EM shred/VV). 15-20s cycles pump 2m cores; keep 180%+ ER. Full clears? 8:30-10min.
Run it like this: 1. Nahida Burst/Skill. 2. Yelan Burst. 3. Raiden Skill. 4. Kazuha groups and VV-shreds.
F2P Swaps That Actually Work
No whales? Dendro Traveler + Xingqiu + Kuki (800+ EM) + Fischl (lv90, R5 4★ weapons, 180%+ ER). Favonius particles from Traveler keep it humming. Nails F12 3★; 400+ EM handles F9-11; Collei locks 100% uptime. Subs: Xingqiu/Barbara for Yelan, Sucrose (200+ EM) over Kazuha.
Premium Twists with Raiden or Alhaitham
Alhaitham (Dendro DPS, Gilded Dreams 4pc) + Yelan + Lauma (Lunar support, Deepwood 4pc) + Kuki (Freedom-Sworn, 200+ EM HP%, lv90 C0). Or Nahida + Kokomi (10s Hydro) + Kuki + Kazuha for heals. Rotation: Alhaitham opens 20s Dendro field; Nahida Skill > Lauma Skill > Yelan Burst > Kuki Skill. F2P: Collei/Yaoyao (+30 EM).
Builds and Gear That Deliver
Nahida: Your Dendro Queen
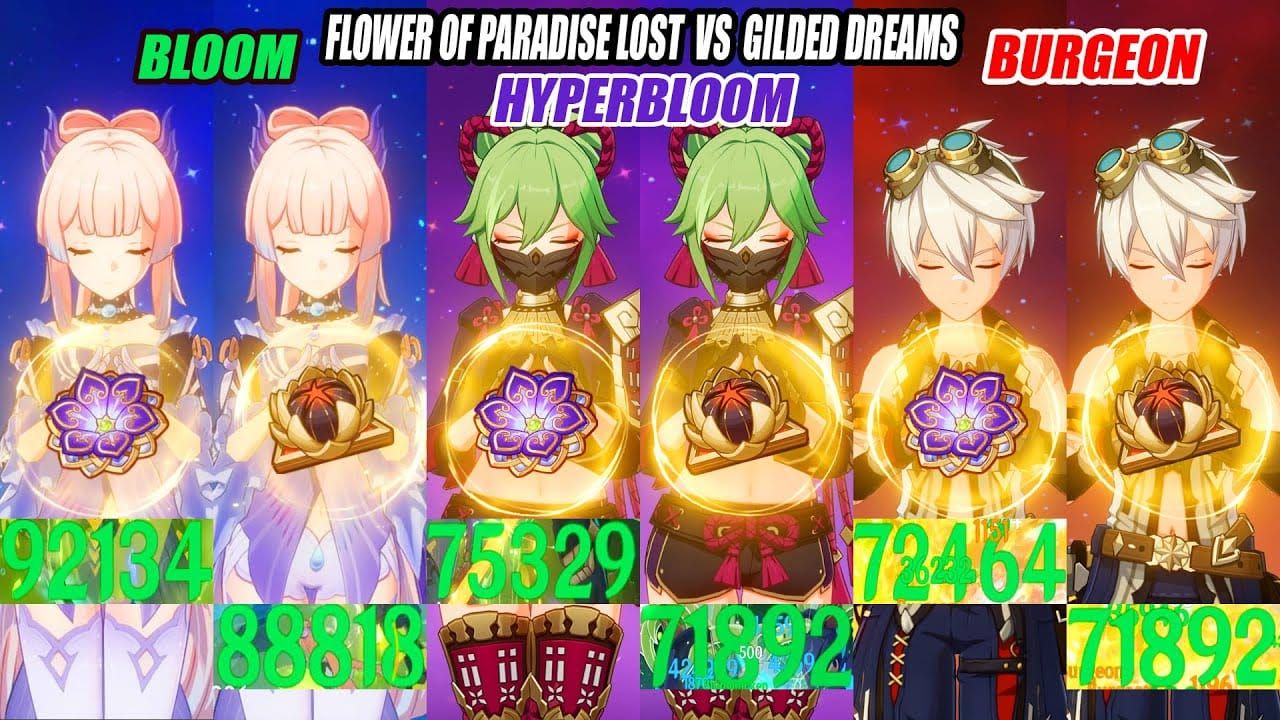
Push 60-80% CRIT Rate, 160-200% CRIT DMG, 180%+ ER (C2 Bloom buffs make it sing). Flower of Paradise Lost 4pc (+80 EM/+60% Bloom), Deepwood Memories 4pc (-30% Dendro RES), or Gilded Dreams 4pc (EM share). Weapons: A Thousand Floating Dreams/Sacrificial Fragments. Talents Lv80+ at 8/8/8; EM sands/goblet first.
Kuki Shinobu: Hyperbloom Healer Extraordinaire
Stack 800+ EM, skip CRIT entirely—lv90, asc'd, 8/8/8 talents. Tenacity 4pc, Freedom-Sworn/Xiphos' Moonlight. 200+ EM HP%, EM goblet for that Hyperbloom heal pop. Skill on, shield up; ER batteries for 10% HP sustain.
Raiden and Yelan Support Specs
Raiden: Flower of Paradise Lost 4pc, 800+ EM. Yelan: ER heavy. Fischl off-field at lv90. ER targets: 180%+ on DPS, 160%+ supports; Favonius for particles.
Your Step-by-Step 12-3 Domination Guide
Nail the Rotation
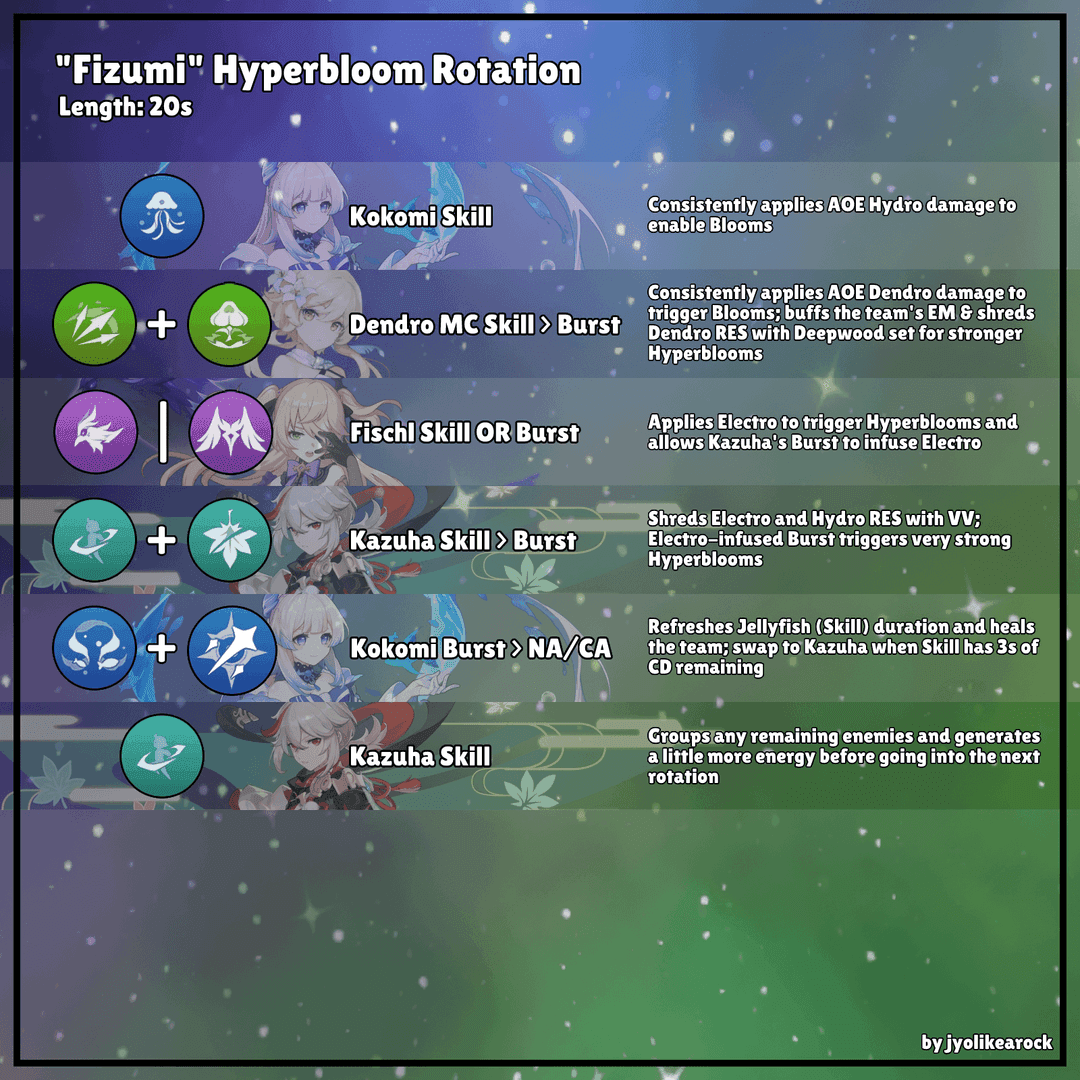
20s cycles: Nahida Burst/Skill → Yelan Burst → Kuki/Raiden Skill → Kazuha. Dendro-Hydro-Electro order; snag post-Skill particles. Dash cancel N5s, skill swap cancels (0.5-1s per cycle). Pre-cast Bursts for iframes. Kazuha 6s grouping. Keep >2m cores—don't over-swap.
Chamber 3 Enemy Breakdown
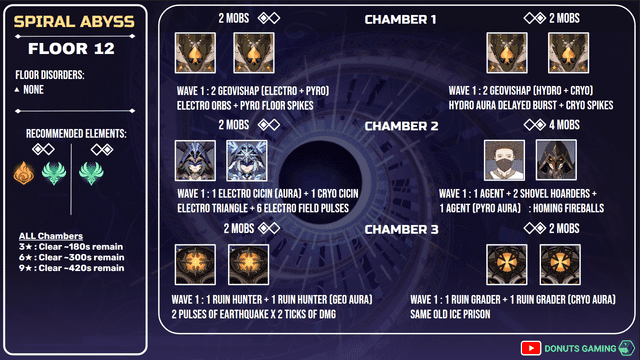
Floor 12-1: Radiant Antelope (1.87M HP) heals—burst it with +15% CRIT/+50% DMG (15s); 16U Dendro breaks Vishap armor in 30s (Kuki's 800+ EM shields clutch). Floor 12-2: Hyperbloom tanks shields (EC -50% RES). Chamber 3: Battle-Hardened Fireblade (4,765,990 HP, +150% buff)—go ranged against Geo/Cryo absorb. Kuki heals/shields; Raiden counters energy drain.
Phase 1? Bloom DMG all day (+200%). Phase 2: Lean Electro-Charged. Targets: ★ <180s, ★★ <300s, ★★★ <420s (600s/chamber); 36★ nets 200 Primogems.
Dive into the Genshin Impact floor 12 Abyss strategy for more. BitTopup instant top-ups ensure safe, compliant crystal deliveries at competitive rates, fast delivery, reliable support, and high user satisfaction ratings.
Artifact and Weapon Must-Haves
Stat Priorities That Matter
EM to 800+ (breakpoints at 200/400/600); 70-80% CRIT Rate DPS, 20k+ HP supports. +16 on DPS artifacts, +12 supports. Sucrose? EM Swirl past 1000. Flower of Paradise Lost 4pc triggers galore, Deepwood 4pc shreds RES.
Top Picks: 5★ and 4★
Nahida: Sacrificial Fragments. Kuki: Xiphos' Moonlight. Kokomi: Everlasting Moonglow/Prototype Amber. Low-investment skills + Favonius.
Farm EM subs hard; Deepwood on Dendro appliers. Test 180-220% ER.
Rotation Hacks for Max DPS
Energy Recharge Real Talk
180%+ ER on DPS/Burst units; Raiden as battery. Pre-particle swaps, animation cancels. Low ER? Favonius with high CR. Tweak to 150-180% loops; time those particle windows.
Alhaitham holds 20s field; Bennett buffs pre-DPS. Hit 40k+ DPS.
AoE? Kazuha/Sucrose 40% RES shred; Kazuha's 95.7% Lunar-Bloom efficiency smokes Tighnari's 76.1%.
Pitfalls and Fixes—Don't Make These
Sequencing Screw-Ups
Electro before Dendro? Blocks Quicken. Fix: Dendro-Hydro first, Electro after cores; cut over-swaps to dodge energy drain.
Energy and Sustain Traps
Vishap's 10 Energy/0.5s drain hurts. ER subs, Kuki/Baizhu/Diona shields, 10% HP sustain.
Trigger smart—CRIT on point, learn patterns. No Nahida? Dendro Traveler + Collei.
Hyperbloom vs. the Competition
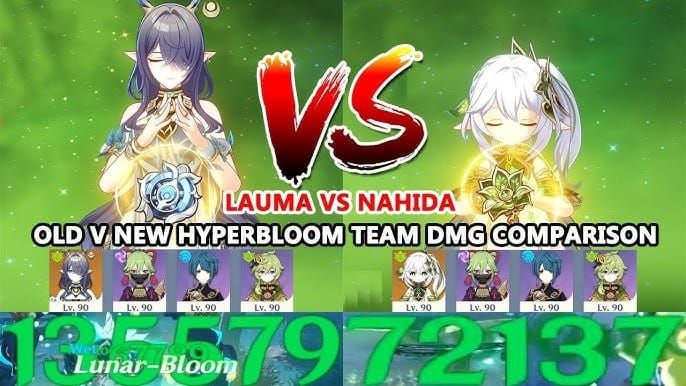
Research shows Hyperbloom topping 12-3 at 80.9% <180s clears (editor's take: it's brutally consistent). Vs. National: Alhaitham-Yelan-Lauma-Kuki pulls ahead (92% Bennett reliance there); +15% CRIT, 83.6% efficiency. Vs. Aggravate: Hyperbloom leads high 9★ F9-12 clears.
Hyperbloom: Faster multi-waves, 80.9% <180s efficiency, high F2P viability (400+ EM). National: 92% Bennett reliant, slower vs. shields, medium F2P.
F2P benchmarks: 8:30-10min; 200% Hydro-Dendro synergy.
Prepping for Future Patches
Hyperbloom's F2P beast mode shines post-4.0, crushes 6.x EM scaling. 6.1 Spiral Abyss Nov 2025; monthly resets 16th (6.1 Phase 1 Oct 22). Farm EM, Lv10 talents; record rotations. Nefer's S-tier Dendro? Boosts it huge.
36★ ready? Top up via BitTopup for competitive rates, instant delivery, full safety/compliance, broad support, top user ratings, and seamless Genshin experience.
FAQ
Best Hyperbloom team for Abyss 12-3?
Nahida/Raiden/Yelan/Kazuha or Alhaitham/Yelan/Lauma/Kuki; 800+ EM, 20s cycles.
How's Hyperbloom work in Genshin?
Electro hits Dendro-Hydro Bloom cores; 800+ EM scales DMG, +200% Floor 12 buff.
Nahida Hyperbloom build for Spiral Abyss?
Flower of Paradise Lost 4pc, 800+ EM, 180%+ ER, Sacrificial Fragments; 60-80% CRIT Rate.
F2P Hyperbloom clear Floor 12-3?
Yep—Dendro Traveler/Xingqiu/Kuki/Fischl does 3★ in 8:30-10min at 400+ EM.
Prime Hyperbloom rotations?
Nahida Burst/Skill → Yelan Burst → Kuki Skill → Kazuha; Dendro-Hydro-Electro, 15-20s.
Kuki Hyperbloom stats?
800+ EM, HP%, Freedom-Sworn; no CRIT, lv90 8/8/8 for heal/trigger.


