

Understanding Heizou’s Driver Role in 2025 Meta
Driver Mechanics Explained
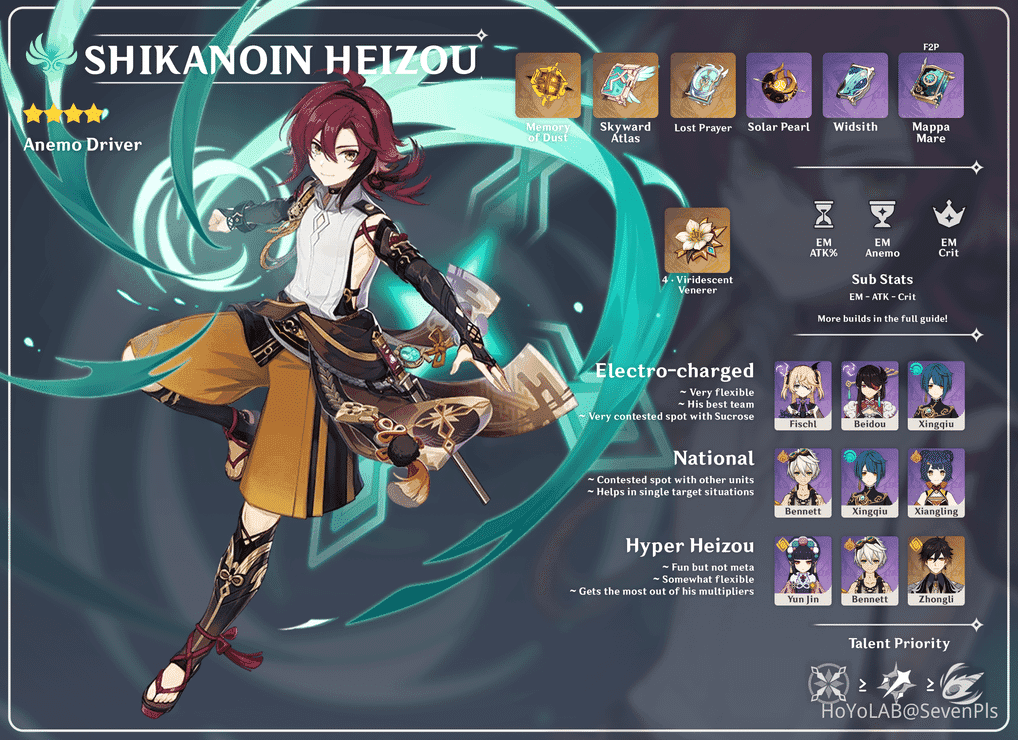
Here’s the thing about Shikanoin Heizou - he’s not your typical DPS carry. This 4-star Anemo Catalyst user specializes in what we call the driver role, staying on-field to enable your off-field teammates through consistent elemental application. Think of him as the conductor of an orchestra.
His fast Anemo-infused Normal Attacks trigger Swirl reactions that activate abilities from characters like Xingqiu’s Rain Swords, Fischl’s Oz, and Xiangling’s Pyronado. But here’s where it gets interesting - his A1 Passive Paradoxical Practice grants 1 Declension stack per Swirl reaction (with a 0.1s cooldown), and hitting that maximum 4 stacks gives you Conviction for significantly boosted Elemental Skill damage and AoE radius.
It’s basically a mini-game within the combat system, and honestly? Pretty satisfying once you get the rhythm down.
For players looking to optimize their roster quickly, instant Genshin crystal recharge through BitTopup ensures you can grab characters and weapons without the usual waiting game. Their competitive pricing and instant delivery beats most alternatives I’ve tested.
Why Heizou Over Other Options
What makes Heizou special isn’t just his on-field presence - it’s how he maintains that crucial 4-piece Viridescent Venerer resistance shred while actually doing something productive on-field. His Normal Attack string applies Anemo rapidly, creating way more Swirl opportunities than those burst-and-swap alternatives.
Compared to Sucrose in driver roles? Heizou brings superior personal damage through his stack mechanic. Plus, his Charged Attack operates on separate Internal Cooldown from Normal Attacks, letting him bypass those annoying ICD limitations that plague other characters.
Meta Position Analysis
In 2025’s meta, Heizou’s carved out a solid niche in reaction-based teams, especially Electro-Charged (Taser) compositions. His effectiveness scales beautifully with enemy count - perfect for current Spiral Abyss floors that love throwing multiple opponents at you.
The 40-energy Burst cost and reasonable Energy Recharge requirements (170-180% for C0-C3 drivers) make him accessible without endless artifact farming. And being 4-star means easier constellation access, with meaningful power spikes at C2 and C6.
Essential Build Components for Driver Heizou
Artifact Sets and Main Stats
4-piece Viridescent Venerer remains the gold standard - no competition here. You get 15% Anemo DMG Bonus, 60% Swirl damage increase, plus that game-changing 40% enemy elemental resistance reduction for 10 seconds.

For driver builds prioritizing team reactions, go full Elemental Mastery: EM Sands, EM Goblet, EM Circlet. Your substat priority should be Energy Recharge (until you hit requirements) > Elemental Mastery > ATK% > CRIT Rate/DMG.
Personal damage builds flip the script: ATK% Sands, Anemo DMG Goblet, CRIT Rate/DMG Circlet. Target over 70% CRIT Rate, 160% CRIT DMG, and at least 120% Energy Recharge for smooth quickswap rotations.
Weapon Recommendations by Budget
Sacrificial Fragments stands as the premier choice for EM builds. High EM substat plus that skill reset passive (R3+ recommended) enables additional Elemental Skill usage per rotation - it’s basically built for Heizou.
Budget options? Mappa Mare (craftable with EM substat) and the humble 3-star Magic Guide often outperform higher-rarity alternatives in Electro-Charged teams. Magic Guide’s EM stat and passive against Electro/Hydro-affected enemies make it surprisingly effective.
For personal damage builds, The Widsith provides exceptional value with massive CRIT DMG substat and those powerful rotating buffs. Premium 5-star options include Skyward Atlas for high base ATK and Kagura’s Verity for CRIT DMG plus Elemental Skill damage amplification.
Stat Priority and Thresholds
Energy Recharge requirements vary by constellation: C0-C3 drivers need 170-180% ER (one Elemental Skill per rotation) or 100-110% ER (two skills per rotation). C4’s energy regeneration passive drops requirements to 130-140% (one skill) or 100% (two skills).
Character level 90 is highly recommended for EM builds. Transformative reaction damage scales directly with level - the damage increase from level 80 to 90 for Swirl reactions approaches 34%. That’s not insignificant.
For premium team building, Genesis Crystals verified seller BitTopup provides secure transactions with competitive rates and 24/7 customer service for those weapon banner pulls.
Mastering VV Usage and Swirl Mechanics
4VV Set Optimization
Here’s where timing becomes crucial. Viridescent Venerer’s resistance shred requires strategic element application - the 4-piece effect triggers when Swirl reactions occur, reducing enemy resistance to the swirled element by 40% for 10 seconds.
In Taser teams, prioritize swirling both Hydro and Electro early in rotations for maximum resistance shred benefits. Multi-element teams require careful swirl prioritization - in National variations, swirl Pyro first to maximize Xiangling’s damage, then maintain consistent Hydro swirls for Vaporize optimization.
Swirl Damage Maximization
Swirl damage uses the triggering character’s level and Elemental Mastery exclusively. At level 90 with 800 EM, Swirl deals approximately 3,500 damage per reaction before resistance calculations, scaling multiplicatively with enemy count.
Heizou’s Normal Attack combo optimization varies by team: N4C (4 Normal Attacks into Charged Attack) maximizes Swirl triggers in Electro-Charged teams, while N2D (2 Normal Attacks into dash) optimally drives Beidou’s Burst. Swirl’s lack of Internal Cooldown on Heizou’s Charged Attack creates additional reaction opportunities.
Element Application Timing
Start rotations by establishing off-field elemental auras through abilities like Fischl’s Oz or Xingqiu’s Burst, then immediately swap to Heizou for Swirl application. This ensures maximum uptime on resistance debuffs.
Don’t hold Heizou’s Elemental Skill to charge Declension stacks manually - this wastes valuable buff duration and reduces overall DPS. The Q > N1 > E sequence (Burst, Normal Attack, Elemental Skill) ensures consistent Swirl procs and maximizes synergy with characters whose abilities trigger on Normal Attacks.
Optimal Quickswap Rotations Guide
Basic Rotation Framework
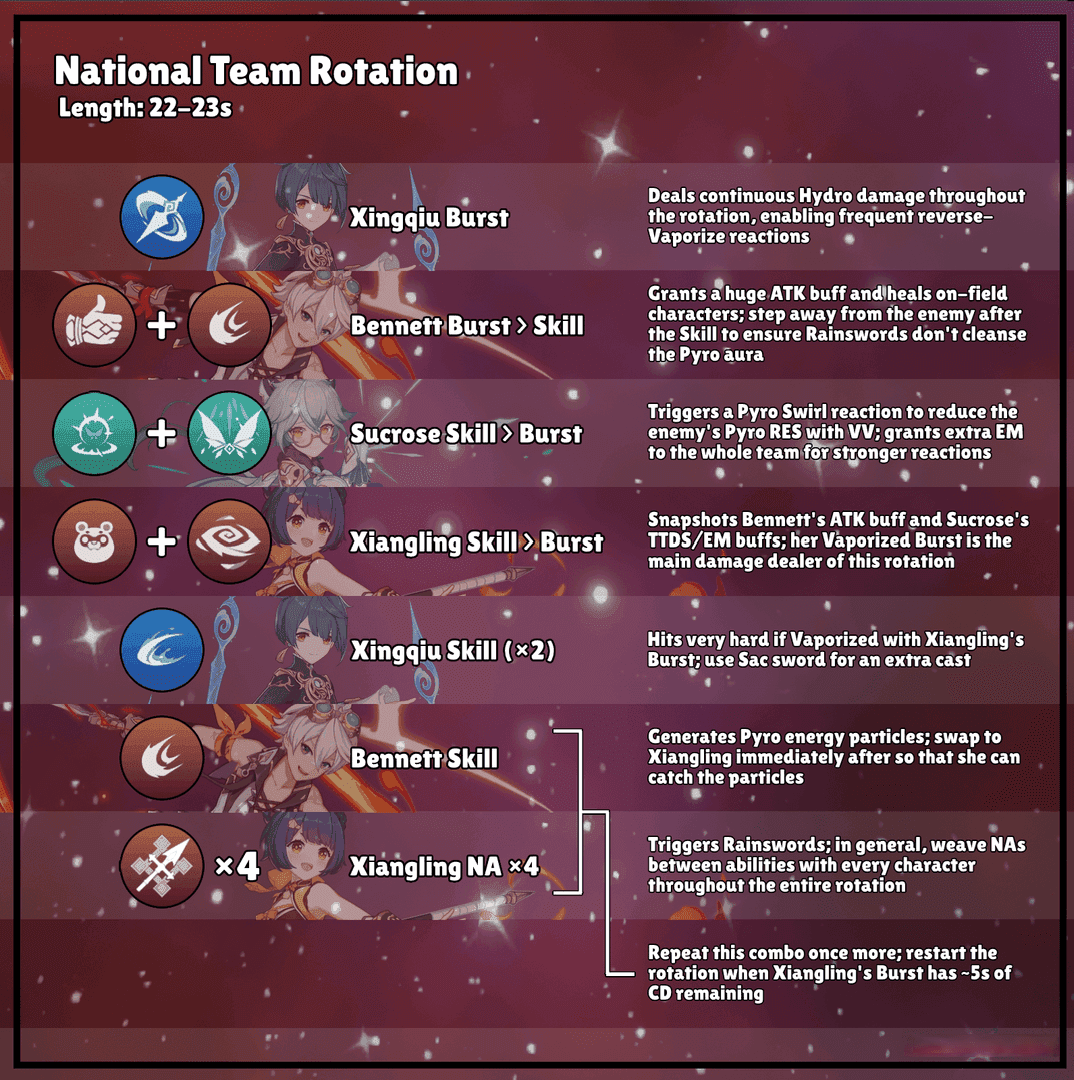
Standard National team rotation flows like this: Furina’s Skill and Burst → Bennett’s Skill and Burst → Xiangling’s Skill and Burst → Heizou Normal Attacks to gain 4 Declension stacks → Elemental Skill and Burst.
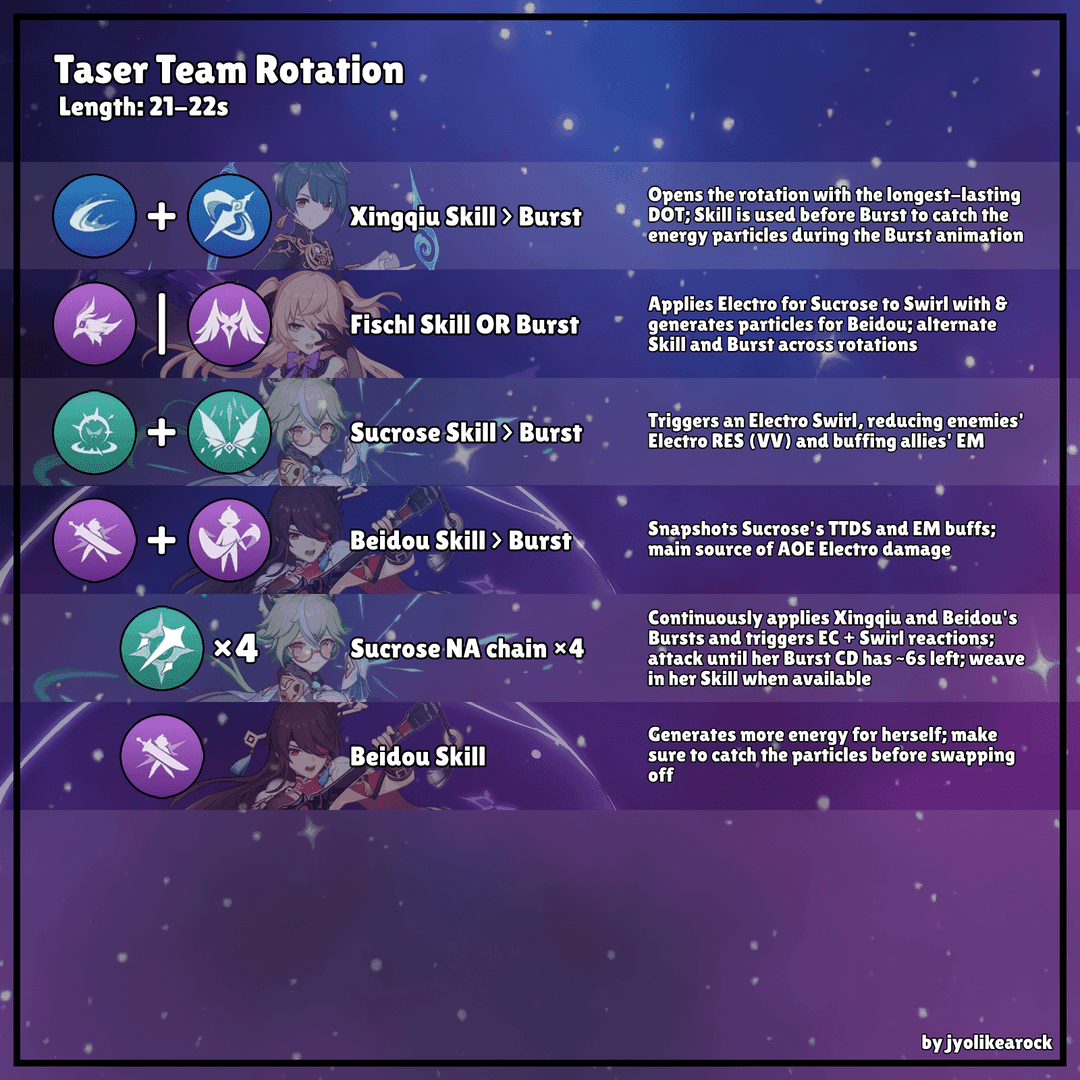
Taser rotations are more straightforward: Fischl’s Skill → Xingqiu’s Burst and Skill → Beidou’s Burst and Skill → Heizou drives reactions through N4C combos. Heizou generates 3-4 particles per Elemental Skill use, with additional generation from Sacrificial Fragments procs.
Advanced Animation Cancels
Dash canceling after Heizou’s Elemental Skill reduces recovery frames, allowing faster transitions to Normal Attacks or teammate swaps. Jump canceling during Normal Attack strings repositions Heizou while maintaining attack rhythm against mobile enemies.
Burst animation canceling through immediate swaps reduces field time while maintaining full damage output - cast Elemental Burst then immediately swap to your next character.
Timing and Energy Management
Bennett’s Burst provides a 12-second ATK buff requiring careful coordination with Heizou’s damage windows. Faruzan’s buffs in Hypercarry teams demand precise timing for maximum overlap with Heizou’s Elemental Skill.
Use Heizou’s Elemental Skill early in rotations when possible, allowing generated particles to benefit teammates. Sacrificial Fragments resets enable double particle generation, substantially improving team energy flow.
Budget Team Compositions Under 50 Wishes
F2P Friendly Options
Core F2P Taser team: Heizou, Fischl, Beidou, Xingqiu - all obtainable through standard wishes and event distributions. Heizou drives reactions while Fischl provides consistent Electro application, Beidou adds AoE damage, and Xingqiu enables Electro-Charged reactions.
Alternative option? Substitute Barbara for Xingqiu when healing’s required, equipping Thrilling Tales for team buffing. Weapon recommendations: Magic Guide or Mappa Mare for Heizou, Stringless/Favonius Warbow for Fischl, Prototype Archaic/Favonius Greatsword for Beidou, Sacrificial/Favonius Sword for Xingqiu.
4-Star Core Teams
National variations work beautifully: Heizou, Xiangling, Xingqiu, Bennett form a potent Vaporize-enabling core. Hyperbloom budget teams leverage Heizou’s grouping capabilities - Heizou, Dendro Traveler, Xingqiu, Kuki Shinobu cluster Dendro Cores while Kuki triggers Hyperbloom reactions.
Artifact farming priorities: 4-piece Viridescent Venerer for Heizou first, followed by Emblem of Severed Fate pieces for Burst-dependent teammates.
Investment Priority Guide
Character level progression: Heizou to level 90 for maximum Swirl damage, teammates to level 70/80 for ascension passives. Talent levels: Heizou’s Elemental Skill first, then Normal Attacks for driver builds.
Weapon investment follows the 80/20 rule - Heizou’s weapon to level 90 for maximum base ATK and substat scaling, support weapons like Thrilling Tales only need level 60. Artifact investment works similarly - correct main stats and set bonuses provide 80% of potential performance.
Premium Team Upgrades and Variations
5-Star Integration Options
Premium Taser teams get serious upgrades: Yelan provides superior off-field Hydro damage plus ramping DMG% buff for Heizou, Yae Miko delivers consistent off-field Electro damage without energy requirements, Zhongli adds universal resistance shred and shields.
Hypercarry compositions shine with: Heizou, C6 Faruzan, Bennett, flex slot (Furina/Zhongli). Faruzan’s C6 provides 40% CRIT DMG for Anemo attacks and solves energy issues completely.
Plunge teams offer something different: Heizou, Xianyun, Furina, Bennett/Faruzan create high-damage composition focused on repeated plunge attacks.
Constellation Impact Analysis
C1 provides faster stack generation and increased Normal Attack speed - nice quality of life. C2 enhances Burst’s grouping capability. C4 represents the major breakpoint, regenerating up to 13.5 energy per Burst cast, dramatically reducing Energy Recharge requirements.
C6 delivers the largest personal damage increase with 16% CRIT Rate and 32% CRIT DMG for fully-charged Elemental Skill, transforming him into a formidable Anemo DPS when supported by C6 Faruzan.
Weapon Upgrade Paths
Premium builds benefit from Skyward Atlas as the best overall weapon for personal damage with high base ATK and ATK% scaling. Kagura’s Verity offers superior CRIT scaling and Elemental Skill damage bonuses.
For EM builds, A Thousand Floating Dreams provides the highest EM stat while offering team-wide EM buffs. Refinement priorities: Sacrificial Fragments benefits significantly from refinements (R3+ enables reliable skill resets), while 5-star weapons provide diminishing returns.
Heizou vs Other Anemo Drivers Comparison
Sucrose Driver Comparison
Sucrose excels in teams requiring Elemental Mastery sharing, particularly National variations where her A4 passive significantly boosts Xiangling’s Vaporize damage. Her crowd control capabilities surpass Heizou’s through superior grouping radius and duration.
Heizou offers superior personal damage potential and more engaging on-field gameplay with his Normal Attack-focused driving style. In pure driver roles without EM sharing requirements, Heizou often achieves higher team DPS through consistent Anemo application.
Kazuha Alternative Analysis
Kazuha’s elemental damage bonus buffs and superior crowd control excel in quickswap compositions - his grouping capabilities and extended elemental infusion remain unmatched. Heizou’s advantage lies in sustained on-field presence and reaction driving.
While Kazuha excels in burst windows, Heizou maintains consistent elemental application throughout extended rotations. Investment requirements differ significantly: Kazuha’s 5-star status demands greater resource commitment while Heizou’s 4-star availability enables easier optimization.
Situational Advantages
Multi-target scenarios heavily favor Heizou’s sustained Anemo application over burst-focused alternatives. Consistent Swirl triggers maximize reaction damage scaling with enemy count.
Single-target situations may favor characters with higher burst damage potential through elemental damage bonuses and EM sharing. Energy requirements and rotation complexity influence character choice - Heizou’s moderate energy needs and straightforward gameplay suit players preferring simpler rotations.
Common Mistakes and Optimization Tips
Rotation Errors to Avoid
Most frequent mistake? Holding Heizou’s Elemental Skill to manually charge Declension stacks. This wastes valuable buff durations and reduces DPS. Rely on his A1 passive to rapidly accumulate stacks through Swirl reactions during Normal Attack sequences.
Improper element application timing reduces Viridescent Venerer effectiveness - always ensure off-field abilities are active before beginning Heizou’s driving phase. Energy management errors include insufficient Energy Recharge investment and poor particle funneling.
Energy Management Issues
Pre-C4 Heizou requires that 170-180% Energy Recharge threshold for driver builds without consistent particle funneling. Sacrificial Fragments helps through additional skill casts and particle generation.
Use Heizou’s Elemental Skill early in rotations, allowing generated particles to benefit teammates before swapping. Battery character integration through Favonius weapon users provides additional neutral particles - focus on team-wide energy solutions.
Team Building Misconceptions
Heizou doesn’t require expensive 5-star teammates. That F2P Taser composition demonstrates effectiveness with entirely 4-star teams. Correct main stats and 4-piece Viridescent Venerer provide the majority of effectiveness before substat optimization.
Weapon choice misconceptions include overvaluing 5-star options - Sacrificial Fragments often outperforms premium alternatives in EM builds due to its skill reset passive.
Practical Applications and Showcases
Spiral Abyss Usage
Current Spiral Abyss floors favor Heizou’s multi-target capabilities and reaction driving. Floor 12’s enemy compositions featuring multiple opponents provide significant advantages where Swirl damage scaling shines.
His modest grouping capabilities require careful enemy positioning to ensure optimal Swirl coverage. Blessing and ley line disorder interactions significantly boost performance through Anemo damage bonuses, Elemental Mastery buffs, and reaction damage amplifiers.
Domain Farming Efficiency
Heizou excels in artifact domains featuring multiple enemies and elemental shields. Consistent Anemo application breaks shields efficiently while Swirl damage handles grouped opponents effectively.
Weekly boss encounters suit his sustained damage profile over burst-focused alternatives with reliable clear times. Energy management becomes crucial in single-target scenarios without abundant particle generation.
Event Optimization
Combat events reward consistent damage output over burst windows, favoring Heizou’s sustained approach. Reaction driving capabilities scale well with event modifiers boosting Elemental Mastery or reaction damage.
Challenge events often feature time constraints where Heizou’s immediate effectiveness proves valuable - unlike characters requiring extensive setup, he begins contributing damage immediately upon deployment.
FAQ
Q: How much Energy Recharge does Heizou need as a driver? For C0-C3: 170-180% ER (one Elemental Skill per rotation) or 100-110% ER (two skills). C4+ reduces to 130-140% (one skill) or 100% (two skills). Sacrificial Fragments helps meet these thresholds.
Q: Is Elemental Mastery or Crit build better for Heizou driver? Full EM excels in multi-target scenarios and Taser teams, maximizing Swirl damage scaling with enemy count. Crit builds (ATK/Anemo/Crit) focus on personal damage for single-target or Hypercarry teams with C6 Faruzan.
Q: What’s the optimal rotation for Heizou in Taser teams? Fischl Skill → Xingqiu Burst/Skill → Beidou Burst/Skill → Heizou N4C combos to gain 4 Declension stacks → empowered Elemental Skill and Burst.
Q: Can F2P players build effective Heizou teams? Absolutely. Core F2P Taser (Heizou, Fischl, Beidou, Xingqiu) requires no 5-stars. Use Magic Guide/Mappa Mare, 4pc VV with EM main stats. Clears all content including Spiral Abyss.
Q: How does Heizou compare to Sucrose as a driver? Heizou offers superior personal damage and more engaging gameplay. Sucrose excels with EM sharing needs and crowd control. For pure driving without EM sharing, Heizou often achieves higher team DPS.
Q: What are the most important constellations for Heizou? C4 provides the biggest improvement by regenerating up to 13.5 energy per Burst, dramatically reducing ER requirements. C6 offers the largest damage increase with 16% Crit Rate and 32% Crit DMG. C0 is perfectly functional though.


