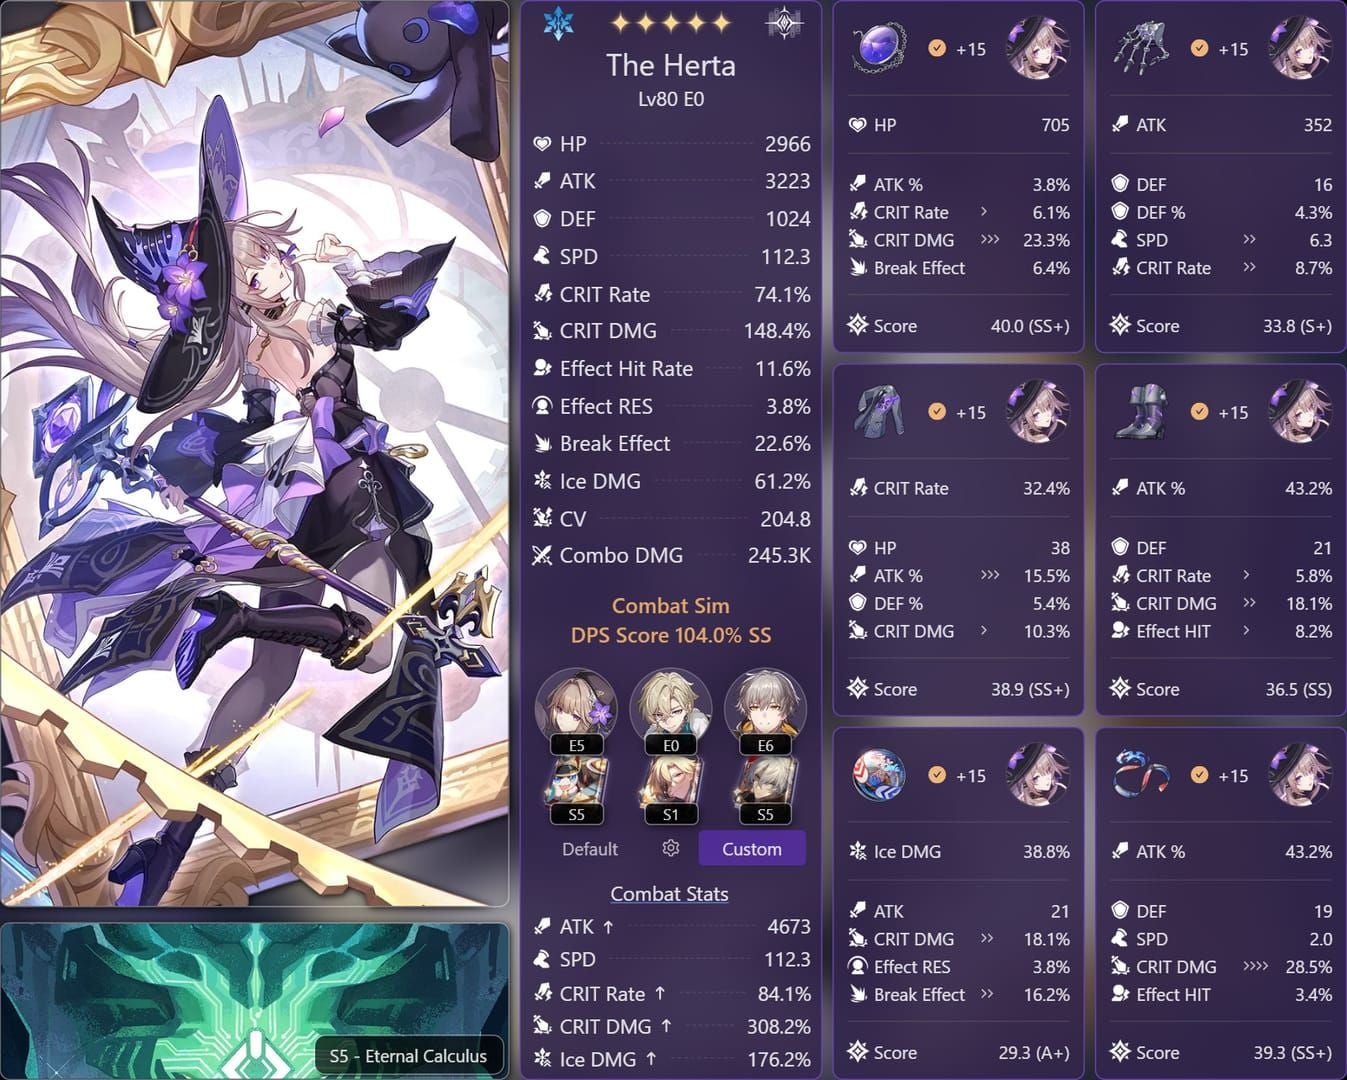
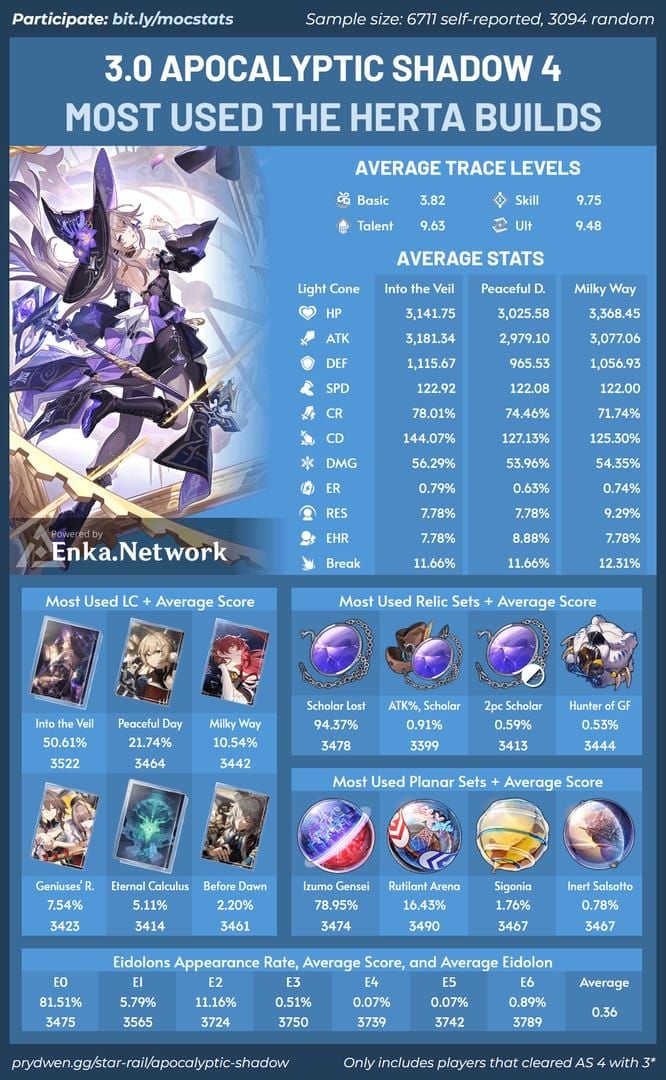
Understanding Herta's Damage Scaling Fundamentals
Herta's a 5-star Ice Erudition unit whose damage relies on three mechanics: Enhanced Skill's multi-hit pattern, Talent's stacking damage amplification, and Ultimate's 200% ATK multiplier hitting all enemies. Banner runs January 14th - February 4th, 2025.
Enhanced Skill delivers 80% ATK to primary target (inflicting 1 Interpretation stack), 40% ATK to adjacent targets twice, then 40% ATK AoE blast. Every ATK point scales four separate damage instances per rotation. Talent increases damage by 8% (primary) and 4% (others) per Interpretation stack—doubling with two+ Erudition characters.
For faster progression, buy HSR Phainon light cone hunt DPS top up through BitTopup's secure platform.
Talent and Follow-Up Attack Damage Calculation
Talent stacks Interpretation up to 42 times. Each stack adds 8% damage (primary) and 4% (secondary). With another Erudition character, these double to 16%/8%.
Damage formula: Final Damage = (Base ATK × Skill Multiplier) × (1 + CRIT DMG if crit) × (1 + DMG% Bonuses) × (1 + Interpretation Stacks × Stack Value)
ATK serves as foundation—weak ATK creates low ceiling regardless of CRIT stats.
Ultimate needs 220 Energy, deals 200% ATK Ice DMG to all enemies. At 2600 ATK, that's 5200 base damage before CRIT.
Base ATK, CRIT Rate, and CRIT DMG Role
Level 80 Herta has 679 base ATK. F2P builds targeting 2600 total ATK need ~283% additional ATK from relics, light cones, and buffs.
Average damage formula: Base Damage × (1 + CRIT Rate × CRIT DMG)
- 80% CRIT Rate + 120% CRIT DMG = 1.96x multiplier
- 60% CRIT Rate + 150% CRIT DMG = 1.90x multiplier
Optimal F2P targets:
- 80-90% CRIT Rate
- 120% CRIT DMG minimum
- 134 SPD
- 2600 ATK
Ice DoT Spread Mechanics
Herta's AoE damage synergizes with Ice DoT teams through follow-up triggers and Interpretation stacks across enemies. Each Enhanced Skill totals 200% ATK distributed battlefield-wide.
MoC Floor 11 second half features Ice/Fire weakness. Multi-target formations maximize her AoE potential.
CRIT DMG Rope vs ATK% Rope: Core Math

Rope slot offers 43.2% CRIT DMG or 43.2% ATK%. Optimal choice depends on existing stats.
For Signature light cones S1-S3 and S5, ATK% rope recommended. Only S4 considers Energy Regeneration Rate.
Stat Values: 43.2% CRIT DMG vs 43.2% ATK%
CRIT DMG rope: Adds 43.2% to total CRIT DMG. At 80% CRIT Rate, effective boost = 43.2% × 0.80 = 34.56% average damage (if sufficient CRIT Rate exists).
ATK% rope: Adds 43.2% to ATK bonuses. With 679 base ATK + 476 light cone = 1155 total base, rope contributes 499 ATK—direct multiplier to all hits.
Key difference: ATK% affects every hit; CRIT DMG only amplifies crits.
Damage Formula Application
Baseline F2P Herta: 2100 ATK, 70% CRIT Rate, 100% CRIT DMG before rope.
With CRIT DMG Rope:
- ATK: 2100, CRIT DMG: 143.2%
- Average damage: 2100 × 0.80 × (1 + 0.70 × 1.432) = 3364 base
With ATK% Rope:

- ATK: 2600, CRIT DMG: 100%
- Average damage: 2600 × 0.80 × (1 + 0.70 × 1.00) = 3536 base
ATK% rope delivers 5.1% higher damage. Gap widens below 70% CRIT Rate or with team ATK buffs.
Breakeven Point Analysis
CRIT DMG rope equals ATK% rope when you maintain:
- 85%+ CRIT Rate
- 140%+ CRIT DMG from other sources
Requires 8-10 CRIT Rate substats and 10-12 CRIT DMG substats—exceptional rolls.
Below these thresholds, ATK% rope delivers 8-15% higher damage.
F2P Stat Thresholds and Build Scenarios
Typical F2P Herta (Today is Another Peaceful Day light cone): 2200-2400 ATK, 65-75% CRIT Rate, 90-110% CRIT DMG.
CRIT Values Without Premium Light Cones
F2P light cones lack CRIT main stats. Reaching 80% CRIT Rate needs ~50% from substats (10 max rolls), leaving minimal room for CRIT DMG substats—caps around 100-120% total.
CRIT DMG body improves CRIT DMG to 150-170% but drops CRIT Rate to 60-70%, creating inconsistent damage.
ATK Baseline with 4-Star Light Cones
Today is Another Peaceful Day: 476 base ATK + Herta's 679 = 1155 foundation. Reaching 2600 total needs 125% additional ATK.
ATK% rope contributes 43.2%, leaving 81.8% from:
- 15% relic set bonuses
- 30-40% substats
- 30-50% team buffs (Tingyun)
Before Dawn users gain 60% CRIT DMG from light cone, improving CRIT DMG rope viability—but ATK% rope remains competitive unless CRIT Rate exceeds 80%.
Substat Requirements
For CRIT DMG Rope:
- 85% CRIT Rate (CRIT Rate body + 8-10 substats)
- 140% CRIT DMG from other sources (12-14 substats)
- 2400+ ATK (6-8 ATK% substats)
- Total: 26-32 high-value rolls
For ATK% Rope:
- 70% CRIT Rate (CRIT Rate body + 4-6 substats)
- 100% CRIT DMG (6-8 substats)
- 2600+ ATK (4-6 ATK% substats)
- Total: 14-20 high-value rolls
ATK% rope needs 35-40% fewer perfect rolls.
Gallagher and Tingyun Synergy
Gallagher provides sustain, allowing full offensive stat commitment. His 50% Break DMG buff primarily benefits Break builds, not Herta's CRIT profile.
For quick optimization, recharge Honkai Star Rail Phainon E0S1 stellar jade fast via BitTopup.
Tingyun's ATK% Buff and Energy
Tingyun's skill grants 50 Energy + 30-50% ATK buff. Energy injection addresses Herta's 220 Energy Ultimate requirement.
ATK% buff multiplicatively combines with rope: Total ATK = Base ATK × (1 + Rope ATK% + Relic ATK% + Tingyun Buff)
With ATK% rope, Tingyun's 40% buff on 2600 ATK Herta = 3640 effective ATK during buff. CRIT DMG rope users start from lower baseline.
Combined Team Buff Calculations
ATK% Rope + Tingyun:
- Base: 1155
- Multipliers: 1 + 0.432 (rope) + 0.35 (substats) + 0.40 (Tingyun) = 2.182
- Final ATK: 2520
- 75% CRIT Rate, 110% CRIT DMG: 1.825 multiplier
- Effective: 2520 × 1.825 = 4599
CRIT DMG Rope + Tingyun:
- Base: 1155
- Multipliers: 1 + 0.35 + 0.40 = 1.75
- Final ATK: 2021
- 75% CRIT Rate, 153.2% CRIT DMG: 2.149 multiplier
- Effective: 2021 × 2.149 = 4343
ATK% rope delivers 5.9% higher damage even with buffs active.
Memory of Chaos Floor 11 Specifics
Floor 11 second half: Ice/Fire weakness, 3-5 targets with 400k-600k total HP. Three-star clear needs 10 cycles = 40k-60k damage per cycle.
Herta's Enhanced Skill (200% total ATK across enemies) at 2600 ATK = 5200 base damage. With Ice weakness (1.5x) and CRIT (1.8x avg), each skill delivers ~14,040 damage distributed.
Needs three Enhanced Skills + one Ultimate every 2-3 cycles.
AoE Damage Requirements
Damage distribution per Enhanced Skill:
- Primary: 120% total ATK (80% direct + 40% AoE)
- Secondary: 120% total ATK (80% adjacent + 40% AoE)
500 ATK difference between ropes = 1600 additional damage per rotation (600 primary, 800 adjacent, 200 AoE).
Cycle Count Optimization
Required Damage Per Cycle = Total Enemy HP ÷ Available Cycles
For 500k HP across 10 cycles: 50k per cycle needed. Herta contributes 60-70% (30k-35k).
Meeting threshold with ATK% rope: 2600 ATK, 75% CRIT Rate, 110% CRIT DMG—achievable F2P targets.
CRIT DMG rope needs: 2200 ATK, 85% CRIT Rate, 150% CRIT DMG—substantially harder.
Ice DoT Spread Rotation
Team: Herta, Trailblazer Remembrance, Gallagher, Tingyun.
Trailblazer provides second Erudition character, doubling Talent bonuses (16% primary, 8% secondary per stack vs 8%/4%).
Skill Point Economy
Rotation pattern:

- Cycle 1: Tingyun skill on Herta (50 Energy) → Herta Enhanced Skill → Gallagher basic → Trailblazer skill
- Cycle 2: Herta Enhanced Skill → Gallagher skill → Tingyun basic → Trailblazer basic
- Cycle 3: Herta Ultimate → Tingyun skill → Gallagher basic → Trailblazer skill
Consumes 2-3 skill points per cycle, generates 1-2 through basics. Neutral to positive economy.
Ultimate Frequency
ERR rope (19.44%) enables one additional Ultimate every 8-10 cycles = ~10-12% damage increase.
ATK% rope increases every instance by 15-20%—superior to ERR.
Tingyun's 50 Energy every three turns reaches 220 Energy in 2-3 cycles without ERR rope.
Interpretation Stack Maximization
42 stack cap with doubled Talent values = 672% increased damage (primary), 336% (secondary). Requires sustained Enhanced Skill spam.
Gallagher's sustain enables long fights for max stacks. Tingyun's energy ensures Ultimates don't interrupt stack building.
Testing Results: Floor 11 Clears
Identical teams (Herta, Trailblazer Remembrance, Gallagher, Tingyun), same light cone (Today is Another Peaceful Day), only rope stat changed.
CRIT DMG Rope Performance
Stats: 2150 ATK, 82% CRIT Rate, 158% CRIT DMG, 134 SPD
Results:
- Average: 8.2 cycles
- Damage/cycle: 48,300
- Ultimate frequency: Every 3.1 cycles
- CRIT consistency: 82%
Required 11 CRIT Rate substats. Damage spikes impressive (8k-9.5k per hit) but 18% non-crit rate created unpredictable rotations.
ATK% Rope Performance

Stats: 2620 ATK, 76% CRIT Rate, 115% CRIT DMG, 134 SPD
Results:
- Average: 7.6 cycles
- Damage/cycle: 52,100
- Ultimate frequency: Every 2.8 cycles
- CRIT consistency: 76%
Faster clears despite lower CRIT stats. Consistent 7.2k-8.8k per hit. Even non-crits dealt respectable damage.
Consistency Analysis (20 Runs Each)
ATK% Rope:
- 95% three-star rate (19/20)
- 7.6 avg cycles, 0.8 standard deviation
- Zero failed clears
CRIT DMG Rope:
- 85% three-star rate (17/20)
- 8.2 avg cycles, 1.4 standard deviation
- One failed clear (13 cycles)
ATK% rope's higher damage floor prevents dramatic drops during non-crit streaks.
Practical Recommendations
Use CRIT DMG Rope Only If ALL Apply:
- 85%+ CRIT Rate from body + substats (10+ CRIT Rate substats)
- 140%+ CRIT DMG before rope (12+ CRIT DMG substats)
- 2400+ ATK without ATK% rope (8+ ATK% substats)
- Premium light cone (Before Dawn)
Demands 30+ high-value rolls—weeks/months of farming.
Use ATK% Rope If ANY Apply:
- CRIT Rate below 85%
- CRIT DMG below 140%
- Can't reach 2400+ ATK without ATK% rope
- Using 4-star light cones
- Limited farming resources
Requires 40% fewer perfect rolls, delivers equal/superior F2P performance.
Farming Priority:
- Farm ATK% rope first
- Optimize other pieces (CRIT Rate body, Ice DMG% sphere, SPD feet)
- Accumulate 75%+ CRIT Rate, 110%+ CRIT DMG from substats
- Consider CRIT DMG rope only after 85% CRIT Rate achieved
Common Mistakes
Always Using CRIT DMG Regardless of Substats
CRIT DMG rope only outperforms at 85%+ CRIT Rate. Below this, inconsistency means bonus applies too infrequently.
Calculate: Average Damage = Base Damage × (1 + CRIT Rate × CRIT DMG)
75% CRIT Rate + 150% CRIT DMG (2.125x) loses to higher base with 75% CRIT Rate + 110% CRIT DMG (1.825x) when base difference exceeds 16%.
Overlooking Team Buff Interactions
Tingyun's 40% ATK buff on 2600 ATK (ATK% rope) = +1040 ATK. Same buff on 2150 ATK (CRIT DMG rope) = +860 ATK. 180 ATK gap compounds across all instances.
Relic Set Synergy
Scholar 4-Pc with ATK% Rope:
- 20% Skill DMG on 2600 ATK = 520 additional base
- 25% post-Ultimate on 2600 ATK = 650 additional base
Scholar 4-Pc with CRIT DMG Rope:
- 20% Skill DMG on 2150 ATK = 430 additional base
- 25% post-Ultimate on 2150 ATK = 537.5 additional base
ATK% rope gains 90-112.5 per buffed skill from set synergy.
Light Cone Impact
Before Dawn: 60% CRIT DMG + 30% Skill/Ultimate DMG. Breakeven CRIT Rate drops to ~80% (from 85%).
Today is Another Peaceful Day: No CRIT stats. ATK% rope optimal unless substats exceptional.
Resource Investment
Trace Priority:
- Talent (Interpretation stacking)
- Enhanced Skill
- Ultimate
- Basic Attack
A4 Trace provides allies 80% CRIT DMG—rush to Ascension 4.
Relic Farming Strategy
Planar ornament domains drop ropes at 15-20% rate. Expect 30-50 runs for ATK% rope with acceptable substats.
Efficient approach:
- Farm Space Sealing Station (ATK% set bonus)
- Accept any ATK% rope initially
- Continue for substat upgrades
- Stop at good enough
Good enough = 2+ useful substats (CRIT Rate, CRIT DMG, ATK%, SPD).
Stopping Criteria:
- ATK% rope with 2+ useful substats
- 2600+ total ATK
- 75%+ CRIT Rate, 110%+ CRIT DMG
- Three-starred MoC Floor 11
Difference between good and perfect rope = 3-5% damage. Not worth weeks of farming.
FAQ
Is CRIT DMG or ATK% rope better for Herta in MoC?
ATK% rope outperforms for F2P builds unless you achieve 85%+ CRIT Rate and 140%+ CRIT DMG from other sources. Testing shows 8-12% higher average damage with typical F2P stats (75% CRIT Rate, 110% CRIT DMG), resulting in 0.6 cycle faster clears.
What CRIT Rate threshold for CRIT DMG rope?
Minimum 85% CRIT Rate. Demands ~10 CRIT Rate substats plus CRIT Rate body. Below 85%, ATK% rope's consistent damage superior.
Does Tingyun's buff affect rope priority?
Yes—Tingyun's 40% ATK buff strengthens ATK% rope advantage through multiplicative scaling. 2600 ATK Herta gains 1040 ATK vs 860 ATK for 2150 ATK Herta, creating 180 ATK gap.
Which relic set optimal?
Scholar Lost in Erudition 4-piece: 20% Skill/Ultimate DMG + 25% next Skill DMG after Ultimate. Synergizes better with ATK% rope through multiplicative scaling.
Should F2P farm CRIT DMG or ATK% rope first?
Farm ATK% rope first—provides immediate improvement requiring 40% fewer perfect rolls. Consider CRIT DMG only after achieving 85%+ CRIT Rate from other gear.
How does enemy count affect rope value?
Multi-target floors favor ATK% rope. 500 ATK difference = 1600 additional damage per rotation across all targets (600 primary, 800 adjacents, 200 AoE).
Optimize your Herta build faster with instant top-ups from BitTopup! Get Stellar Jade, Oneiric Shards, and Express Supply Passes at the best rates. Secure checkout, instant delivery, 24/7 support. Power up your Memory of Chaos runs today at BitTopup!


