

Little Girl's Positioning Role in Season 39
Little Girl's Difficulty 1 rating misleads players. Released November 11, 2021, Alice DeRoss demands positioning mastery for rank viability despite seeming beginner-friendly.
Memory Sync grants 70% decoding speed, 15% vaulting speed, 30% pallet-dropping speed, and 30% rescue speed. These buffs tempt aggressive positioning without escape routes—a fatal assumption.
Season 39's mobility-focused hunter meta (Sculptor, Nightmare, Violinist) punishes static decoder positioning. Memory Sync's 30-second cooldown creates vulnerability windows where positioning is your only defense.
The 3.4-meter range (nerfed from 6.8m) requires precise teammate proximity. Poor positioning beyond this range makes Memory Sync unusable during chases.
For costume unlocks and persona experimentation, identity v echoes top up on BitTopup offers competitive advantages.
Why Positioning Beats Memory Sync Mastery
Hunters tracking the 30-second cooldown target you immediately after Memory Sync expires. If you're in dead zones without pallets/windows, Memory Sync merely delays terror shock by seconds.
Memory Sync requires 3-second activation. Poor positioning in hunter line-of-sight causes interruption, wasting the skill.
The 30% movement speed boost when canceling lasts only 2 seconds. If you're 15+ meters from kiting structures, this boost provides minimal value.
Data shows superior positioning maintains 15-20% higher survival rates despite identical Memory Sync usage. The difference: positioning that maximizes kiting when Memory Sync is on cooldown.
Mistake #1: Over-Relying on Memory Sync as Safety Net
Most common rank-killer: positioning aggressively at isolated ciphers, assuming Memory Sync enables escape regardless of location. This collapses when hunters exploit the 30-second cooldown.
The Cooldown Trap
After using Memory Sync, you face 30 seconds where positioning is your sole defense. Hunters recognize the visual effects, disengage, then re-engage during cooldown. If you're in areas with limited kiting resources, you're an easy target.
Corner-map ciphers seem safe due to distance from hunter spawn, but create maximum distance from teammates—rendering the 3.4-meter range useless.
Real Match Analysis
Arms Factory scenario: You decode at corner cipher, 40+ meters from teammates. Hunter approaches. Memory Sync fails—no teammates within range. Limited structures near corner (one pallet, two windows) mean first-hit within 20 seconds.

Optimal alternative: Mid-factory cipher maintains 3.4-meter proximity to teammate. Memory Sync activates successfully, granting 70% decoding speed to finish cipher before disengaging. Nearby transition area provides multiple pallets/windows.
Correct Approach: Positioning First, Memory Sync as Backup
Before starting any cipher, evaluate:
Escape Route Assessment: Nearest transition area with multiple pallets/windows should be reachable within 5 seconds. If 8+ seconds required, reposition.
Teammate Proximity: Maintain awareness of 3.4-meter range. Mid-map ciphers naturally satisfy this better than corner ciphers.
Memory Fragment Checkpoints: Throw fragments between cipher and likely hunter approach angle. 60-second duration and 7-second cooldown allow multiple checkpoints.
Hunter Prediction
Position at ciphers outside hunter's initial patrol route, maximizing uninterrupted decode time. When hunters approach, your positioning should force extended chase commitment or abandonment.
Reserve Memory Sync's 3-4 match uses for high-value situations: final cipher percentages, rescues with 30% speed boost, or gate opening. Don't waste on early-game poor positioning.
Mistake #2: Decoding Too Far From Transition Areas
Second critical mistake: prioritizing cipher efficiency over positioning safety. Players select ciphers based solely on decode speed without evaluating transition area proximity.
Transition areas contain multiple connected pallets, windows, and line-of-sight blockers. Every map has 3-5 major zones. Optimal positioning maintains constant awareness of nearest transition area.
Each second between cipher and transition area = kiting time lost. If your cipher requires 8 seconds to reach nearest pallet, you've sacrificed 8 seconds before defense begins.
High-mobility hunters close distance rapidly. Ciphers 15+ meters from transitions become death traps—first-hit during transition attempt.
For enhanced capabilities, buy idv echoes cheap on BitTopup with fast, secure delivery.
Identifying Safe Transition Zones
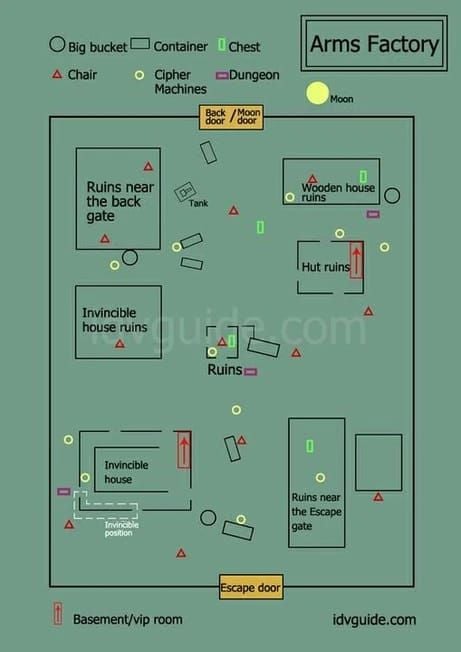
Arms Factory: Central factory building and adjacent shack. Position within 10 meters. Avoid perimeter corners.
Red Church: Church interior and graveyard. Cipher inside church is ideal—strong structures with immediate access.
Hospital: Multi-story building is primary zone. Ground/second-floor ciphers provide immediate building access. Avoid outdoor perimeter ciphers.
Lakeside Village: Central building cluster and boat area. Avoid open field sections.
Balancing Efficiency with Escape Access
Early Game (0-2 ciphers): Aggressive positioning at high-efficiency ciphers acceptable. Hunters can't pressure all survivors simultaneously.
Mid Game (3-4 ciphers): Conservative positioning prioritizing transition proximity. Select ciphers within 8 meters of strong areas.
Late Game (final cipher): Position based on gate locations. Avoid equidistant positioning from both gates. Position near preferred gate.
Map-Specific Positioning
Arms Factory's open layout punishes poor positioning severely. Communicate cipher assignments during loading to ensure someone positions near central factory.
Red Church's compact design is more forgiving. However, basement's central location creates danger zones. Avoid cipher directly above basement unless hunter confirmed elsewhere.
Hospital's vertical layout creates unique considerations. Upper floors offer window drop escapes but vulnerability to stairwell control. Ground-floor perimeter offers safer escapes but less kiting potential.
Mistake #3: Poor Endgame Gate Positioning
Third mistake: completing final cipher without considering position relative to gates. Poor positioning forces maximum distance traversal to either gate, giving hunters ample intercept time.
Memory Sync's 30% movement boost helps, but only if you're within reasonable gate distance. At 50+ meters from nearest gate, even Memory Sync can't compensate.
The Fatal Last Cipher Error
Players focus exclusively on completing final cipher without evaluating escape route position. This creates scenarios where you complete cipher but stand 40+ meters from both gates, trapped in map center while hunter patrols between gates.
Pity's 80-second cooldown means it's rarely available endgame if used earlier. Relying on Pity for endgame escape = poor cooldown management.
Dungeon spawns follow predictable patterns. Position near likely spawn points during final cipher for additional escape options.
Exit Gate Triangle
Optimal strategy: position at location forming triangle with both gates, minimizing maximum distance to either. This provides flexibility to choose safer gate based on hunter location.
At 90% final cipher, evaluate hunter position and gates. If hunter patrols one gate, position to approach opposite gate after completion.
Memory Fragment placement during final cipher creates defensive checkpoints for gate approach. Throw fragments along intended path before completing cipher.
Dungeon Spawn Prediction
Dungeon spawns where final cipher completed, with map-specific points:
- Arms Factory: near central factory building
- Red Church: graveyard section
- Hospital: building perimeter
If last survivor or anticipating becoming last, position near predicted dungeon spawn. Provides immediate access, bypassing gate requirements.
Balance dungeon positioning with gate access based on teammate survival and hunter location.
When to Abandon Cipher
If decoding final cipher 45+ meters from both gates, consider abandoning at 70-80% to reposition. Let better-positioned teammate complete while you transition to optimal gate approach.
Memory Sync's 70% decoding boost enables rapid completion from any percentage. Teammate brings cipher to 90%, you sync for boost and complete while positioned near target gate.
Advanced Positioning Techniques
Memory Fragment checkpoint creation is most underutilized technique. Before committing to cipher, establish 2-3 checkpoints along potential chase routes. 60-second duration ensures activity throughout decode session.
Mirror positioning: position symmetrically opposite hunter relative to map center. Maximizes distance while maintaining central position for Memory Sync range. Adjust as hunter moves.
Hunter-Specific Adjustments
Sculptor: Avoid ciphers near statue placements. Position in statue-free zones, forcing choice between statue control or pursuit.
Nightmare: Position near strong transitions before entering dream state. Upon dream activation, immediately transition to pre-planned kiting zone.
Violinist: Position at ciphers with multiple escape options, not single-path locations. Need flexibility to avoid note placements while transitioning.
Team Coordination
Communicate your position to rescuers for rescue route planning. Use quick messages for cipher location and Memory Sync availability.
20-second Memory Sync restriction after rescue means you can't sync with recently rescued teammates. Position for conventional support (body blocking, pallet assistance).
If 40+ meters from chaired teammate with no Memory Sync, communicate you'll continue decoding while better-positioned teammate rescues.
Pre-Game Analysis
Begin during loading with map analysis and positioning planning. Identify strong transition zones, predict hunter spawn, plan initial cipher target.
Communicate with teammates to coordinate cipher assignments. Ensure someone positions near strong transitions for Memory Sync range support.
Adjust plans based on hunter identity. Against high-mobility hunters, prioritize positioning near transitions even if less efficient ciphers. Against low-mobility, afford more aggressive isolated positioning.
Memory Sync Timing Through Positioning
Optimal positioning makes Memory Sync timing obvious, not reactive. Clear escape routes and teammate proximity enable proactive activation for maximum value.
Track cooldown mentally. When available, afford slightly aggressive positioning. When on cooldown, shift to conservative positioning near strong transitions.
3-second activation requires positioning providing 3 seconds of safety. Use line-of-sight blockers between you and hunter approach angle.
Cooldown Management
After using Memory Sync, immediately reposition to areas with strong kiting resources to survive 30-second cooldown. Don't remain at current cipher assuming hunter disengages.
Memory Sync checkpoints are predetermined positions with optimal conditions: teammate proximity, escape access, Memory Fragment coverage. Identify 3-4 per map during pre-game.
High-traffic areas like central regions and major transitions serve as ideal checkpoints. Naturally attract teammates while providing multiple escapes.
Emergency vs Strategic Usage
Emergency usage: poor positioning forces reactive activation to avoid elimination. Strategic usage: optimal positioning enables proactive activation for specific advantages.
Minimize emergency usage through superior positioning. Each emergency activation = positioning failure. Track emergency vs strategic usage to measure improvement.
Strategic usage preserves Memory Sync for: completing final 30% under pressure with 70% boost, rescuing with 30% speed increase, opening gates with teammate sync.
Common Positioning Misconceptions
Myth: Staying Near Teammates Improves Survival
While proximity enables Memory Sync (3.4-meter range), clustering creates vulnerability. Hunter finding one immediately locates others.
Optimal positioning maintains 3.4-meter range while preserving distance to avoid simultaneous detection. Position at adjacent ciphers, not same cipher.
Exception: endgame clustering near gates for collective defense through body blocking and coordinated opening.
Myth: Basement Proximity Doesn't Matter for Decoders
Hunters prioritize basement control mid-game, patrolling nearby. Decoders near basement become collateral targets. Position away from basement mid-game.
Pity's 80-second cooldown and 5-second location reveal creates risk teleporting to teammates near basement. You teleport into hunter patrol zone.
Myth: Memory Sync Makes Positioning Less Important
Memory Sync's effectiveness depends entirely on positioning quality. 70% decoding boost only matters if positioned to decode safely. 15% vaulting boost only helps if positioned near vaults.
High-tier hunters target Little Girl players with poor positioning, eliminating them during cooldown windows to cripple team decode efficiency.
Practical Training Drills
Map memorization forms positioning foundation. Dedicate practice to exploring each map's transitions, cipher locations, escape routes without hunter pressure.
Record rank matches and review for positioning errors. Categorize by type (isolation, poor escapes, bad endgame) to identify patterns.
Custom Match Practice
Create customs with cooperative hunter to practice positioning scenarios. Request hunter patrol specific routes while you evaluate escape access and transition timing.
Practice Memory Fragment checkpoint creation around ciphers. Experiment with placement angles for maximum coverage. 7-second cooldown allows rapid iteration.
Drill Memory Sync activation timing with hunter approaching at various speeds/angles. Develop muscle memory for safe activation windows.
Map Memorization
Load customs without hunter, spend 10-15 minutes exploring transition routes between ciphers and kiting zones. Identify fastest path from each cipher to nearest strong transition.
Mark mental checkpoints for Memory Fragment placement. Memorize for instant fragment placement during matches.
Practice window/pallet locations within transitions. Memorize structure sequences (window → pallet → window) to plan kiting routes before chases.
Tracking Mistakes
After each match, note positioning mistakes:
- Isolation Errors: Too far from teammates for Memory Sync
- Escape Route Failures: Couldn't reach transitions before first-hit
- Endgame Mistakes: Completed final cipher too far from gates
- Fragment Waste: Lacked defensive fragments due to poor planning
Review weekly to identify most frequent category. Dedicate following week's practice to correcting that specific type.
Season 39 Rank Positioning Checklist
Pre-Match Preparation
Recommended Bans: Lakeside Village (excessive open areas), Moonlit River Park (limited transitions), White Sand Street Asylum (complex vertical layout).
Favorable Maps: Red Church (compact with strong transitions), Hospital (multiple escape options), Sacred Heart Hospital (balanced transitions).
Review hunter if revealed. Against high-mobility, commit to conservative positioning. Against low-mobility, afford aggressive isolated positioning.
In-Match Decision Framework
Cipher Selection:
- Identify nearest strong transition on minimap
- Select cipher within 10 meters of transition
- Verify teammate within 3.4 meters for Memory Sync
- Confirm Memory Fragment checkpoint locations
- Begin with constant minimap awareness
Hunter Approach:
- Evaluate position relative to nearest transition
- Within 8 meters: throw checkpoint, prepare transition
- Beyond 8 meters: abandon cipher, transition to safer position
- Activate Memory Sync only after reaching transition with teammate proximity
- Never activate in isolation or dead zones
Endgame Protocol:
- At 70% fourth cipher: evaluate position relative to gates
- If poorly positioned: communicate and reposition before completion
- Throw checkpoints along gate approach route
- Complete only when within 25 meters of target gate
- Immediately transition to gate, using Memory Sync for speed if available
Post-Match Analysis
Survival: Did I survive? If not, what positioning error caused elimination? Emergency vs strategic Memory Sync usage? Completed ciphers while poorly positioned?
Memory Sync Efficiency: How many times unavailable when needed? Did poor positioning force premature usage? Failed activation due to teammate distance?
Endgame: Positioned optimally when final cipher completed? Excessive gate distance? Could better positioning prevent elimination?
Document mistakes with map locations and context. Creates personalized error database revealing unique weakness patterns.
FAQ
What's optimal distance from ciphers to transitions?
8-10 meters maximum. Allows reaching structures within 5 seconds of hunter detection, preventing first-hit during transition. 15% vaulting boost only helps if you reach vaults before hunter closes distance.
How does 30-second cooldown affect positioning?
Creates vulnerability windows where positioning is only defense. During cooldown, shift to conservative positioning near strong transitions. When available, afford slightly aggressive isolated positioning.
When prioritize repositioning over cipher completion?
Abandon when: (1) decoding beyond 10 meters from transitions with hunter approaching, (2) final cipher nears completion but 30+ meters from gates, or (3) teammates eliminated and poorly positioned for dungeon. Survival > marginal cipher progress.
Most common positioning mistakes?
(1) Over-relying on Memory Sync instead of strong base positioning, (2) decoding too far from transitions forcing vulnerable transitions, (3) poor endgame positioning distant from gates when final cipher completes.
How maintain 3.4-meter range without clustering?
Position at adjacent ciphers, not same cipher. Mid-map ciphers naturally maintain closer proximity than corners. Monitor minimap constantly, adjusting cipher selection to maintain range without clustering.
Which maps require most careful positioning?
Lakeside Village and Moonlit River Park (limited transitions, excessive open areas). Arms Factory demands positioning near central factory—corners create isolation. Hospital's vertical layout requires stairwell control and window drop awareness.


