

Ifa Character Overview & Support Role Analysis
Kit Breakdown and Abilities
Ifa's Elemental Skill, Airborne Disease Prevention, puts him on a 7.5-second cooldown where he literally takes to the skies with Cacucu. While airborne, he fires Anemo bullets that deal Swirl damage and heal your party on hit. The whole thing scales with Elemental Mastery—which means EM builds aren't just recommended, they're essential.
His Elemental Burst costs 60 energy and fires an Anemo bullet that explodes for AoE Swirl damage while yanking enemies together. Pretty standard crowd control stuff, but effective.
Here's where it gets interesting: when you hit enemies affected by Hydro, Pyro, Cryo, or Electro, Sedation Marks explode for additional elemental damage. You can stack up to 4 marks per element per opponent, which creates some serious damage potential in the right setups.
The Field Medic's Vision passive generates 1 Rescue Essentials per party Nightsoul point during Blessing state. Each point boosts Swirl and Electro-Charged damage by 1.5% with a maximum of 150 base stacks. This synergy with Natlan characters like Ororon? Chef's kiss for damage amplification.
Support Role in Team Compositions
Ifa shines as an on-field driver in Electro-Charged teams. His Normal Attacks during Nightsoul's Blessing trigger off-field abilities from characters like Yelan and Fischl—and that hovering capability means you can dodge melee attacks while maintaining consistent elemental application through Tonicshots.
The healing scales with Elemental Mastery too, so you're getting offensive and defensive utility simultaneously. No need to sacrifice damage for sustain.
For players serious about optimizing Ifa builds, you'll need Genesis Crystals for weapon and constellation investments. BitTopup offers competitive pricing and fast delivery for buy genesis crystals for ifa swirl support teams, ensuring you can grab premium catalysts and constellation upgrades without the usual delays.
His kit enables Normal Attack triggers while airborne, creating unique synergies with Hydro sub-DPS characters whose Bursts activate on Normal Attack hits. The on-hit healing provides sustain without requiring dedicated field time from traditional healers—a nice quality-of-life improvement.
Meta Positioning in 2025
Ifa earns a B+ rating for Spiral Abyss performance. He excels in multi-enemy scenarios through grouping capabilities and Swirl damage amplification. His A-tier rating in Imaginarium Theater reflects strong performance in content that demands elemental reaction mastery.
C6 Ifa performs comparably to C0 Sucrose in Electro-Charged setups while offering superior exploration utility through flight mechanics. Not bad for a 4-star, right?
Catalyst Weapon Comparison: Sunny Morning Sleep-In vs 4-Star Options
Sunny Morning Sleep-In Analysis
Sunny Morning Sleep-In delivers 542 Base ATK and 265 Elemental Mastery at level 90. The passive is where things get spicy: +120 EM on Swirl reactions for 6 seconds, +96 EM on Skill hits for 9 seconds, +32 EM on Burst hits for 30 seconds.
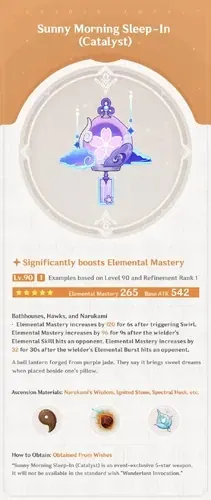
These stacks accumulate to a maximum 504 additional EM. We're talking about dramatically enhanced Swirl damage and healing output here.
The weapon's design perfectly matches Ifa's frequent elemental triggers. Tonicshots and Burst consistently activate passive effects, and in sustained combat rotations, maintaining near-maximum EM stacks becomes totally achievable. You can push total EM values beyond 1000 when combined with optimal artifacts. That 30-second duration on Burst-triggered EM ensures consistent uptime across multiple rotation cycles.
Top 4-Star Catalyst Alternatives
Sacrificial Fragments offers 221 EM with an 80% chance to reset Elemental Skill cooldown every 16 seconds at R5. It improves Skill uptime for frequent Nightsoul's Blessing activation, though it lacks the EM stacking potential of Sunny Morning Sleep-In.
A Thousand Floating Dreams provides 265 EM with party-wide EM sharing capabilities—granting +32 EM for same-element party members or +10% Elemental DMG for different elements, stacking up to 3 times. Team utility focused.
Mappa Mare serves as the premier F2P option with 110 EM and +16% Elemental DMG bonus on reactions at R5. Wandering Evenstar features 165 EM with a passive that converts 24% of EM to ATK for 12 seconds every 10 seconds, sharing 30% of that ATK buff with party members.
Performance comparison breakdown: Sunny Morning Sleep-In achieves maximum EM potential (769 total), A Thousand Floating Dreams focuses on team utility (305 EM with party buffs), Sacrificial Fragments enhances skill uptime (221 EM), and Mappa Mare provides budget efficiency (110 EM).
Optimal Artifact Sets and Substats Priority
Viridescent Venerer 4-Piece Setup
4-piece Viridescent Venerer provides +15% Anemo DMG and +60% Swirl DMG with -40% elemental resistance shred for swirled elements lasting 10 seconds. Main stat priorities follow EM/EM/EM distribution across Sands, Goblet, and Circlet pieces, maximizing Swirl damage scaling and healing effectiveness.

Target ER values of 130-160% to ensure consistent Burst availability—though this can vary based on your team comp.
2-piece Scroll of the Hero of Cinder City combined with 2-piece VV offers +12% team Elemental DMG on reactions for 15 seconds, with +28% personal damage during Nightsoul's Blessing. 2-piece Gilded Dreams + 2-piece Wanderer's Troupe provides +160 EM total as an interim solution while you're farming optimal VV pieces.
For players building Ifa's catalyst arsenal, accessing limited-time weapons requires strategic planning around banner schedules. BitTopup's reliable service ensures you can secure genshin ifa catalyst banner top up resources efficiently, with competitive rates and secure transactions supporting your weapon acquisition goals.
Substats Optimization Guide
Substat priority follows EM > ER > ATK% > CRIT Rate/DMG hierarchy for support-focused builds. Elemental Mastery substats directly enhance Swirl damage and healing output—this is your bread and butter.
Energy Recharge substats should target 130-160% total ER depending on team composition. Teams with Electro resonance can operate with lower ER thresholds, while solo Anemo setups require higher investment.
Talent Priority and Constellation Guide
Talent Leveling Order
Elemental Skill and Elemental Burst share equal priority as your primary damage and utility sources. Both scale with EM for Swirl potency and healing effectiveness, so level these talents to 8-10 for optimal performance.
Normal Attack talent receives lower priority—typically stopping at level 6 is fine. The ascension stat bonus provides +96 EM at maximum ascension, which represents a significant boost to reaction damage and healing.
Constellation Value Analysis
C1: Supporting Fire grants +6 ER every 8 seconds when hitting opponents, providing valuable energy management support (3-star rating—decent but not game-changing).
C2: Guiding Spirit of Ballistic Prayer adds +4 Rescue Essentials per Nightsoul point above 60, with a maximum +50 additional stacks. This 5-star rated constellation significantly amplifies Swirl and Electro-Charged damage and represents the optimal stopping point for most players.
C4: Compound Sedation Field Enhancement extends Burst duration by 3 seconds while granting +100 EM for 15 seconds after Burst use (4-star constellation). C6: Enhanced Tonicshot Delivery provides a 50% chance for additional Tonicshots on Hold Skill use while reducing out-of-combat Nightsoul consumption by 20% (4-star constellation).
For F2P players, stopping at C2 provides optimal value, completing Ifa's support role with maximum Rescue Essentials stacking. Talent investment should prioritize Skill and Burst to level 8 minimum.
Best Team Compositions for Ifa Support
Meta Team Combinations
Electro-Charged Taser Team: Ifa (Driver), Ororon (Sub-DPS), Furina (Hydro Support), Kuki Shinobu (Healer) creates the optimal environment for kit synergy.
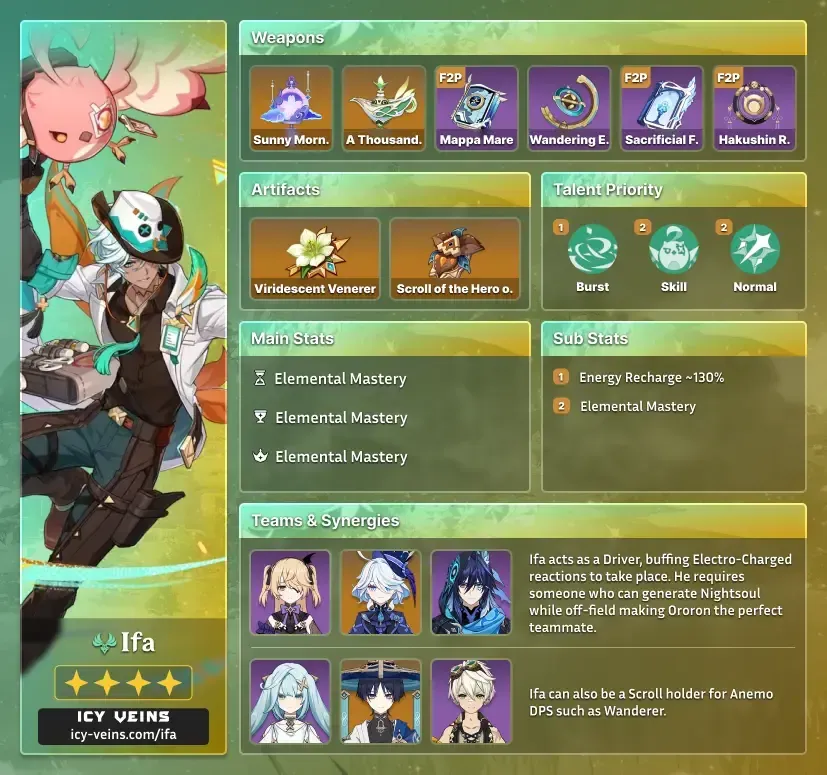
Ororon enables Nightsoul's Blessing while providing Electro application, Furina delivers consistent Hydro for reactions, and Shinobu offers healing plus additional Electro triggers.
The rotation flows like this: Furina Skill/Burst → Kuki Shinobu Skill → Ororon Skill/Burst → Ifa Burst (grouping) → Skill (Nightsoul entry) → Normal Attacks (Tonicshots).
Hyperbloom Variant: Ifa (Driver), Ororon (Sub-DPS), Xingqiu (Hydro), Nahida (Dendro Support) focuses on Dendro Core generation and Hyperbloom triggers.
F2P Taser Alternative: Ifa (Driver), Ororon (Sub-DPS), Xingqiu (Hydro), Fischl (Electro) provides accessible team building using widely available 4-star characters while maintaining core functionality.
Elemental Synergy Analysis
Ifa's Swirl mechanics create powerful synergies with persistent elemental application characters. Xingqiu and Yelan's Burst abilities trigger on Normal Attacks, making Tonicshots during Nightsoul's Blessing ideal for maintaining off-field damage.
Electro-Charged reactions benefit from passive damage amplification, with Rescue Essentials providing up to 1.5% damage increase per stack. VV resistance shred amplifies all elemental damage from swirled elements—it's a beautiful cycle of destruction.
Elemental Mastery vs Energy Recharge Balance
Stat Priority Breakdown
Optimal Ifa builds target 800-1000+ EM for maximum Swirl damage and healing effectiveness, with 130-160% ER ensuring consistent Burst availability. The 1000 EM threshold represents a soft cap where additional investment yields diminishing returns.
Teams with Electro resonance decrease ER requirements to 130-140% due to the +20% ER bonus and increased particle generation. Balance between EM and ER depends on weapon choice and team composition.
Sunny Morning Sleep-In's EM stacking reduces artifact EM requirements, allowing ER Sands usage without sacrificing reaction damage. Swirl damage scales exponentially with EM investment, making early EM prioritization highly efficient.
Gameplay Rotation and Combat Strategies
Optimal Skill Rotation
Effective rotations prioritize Burst usage for crowd control before entering Nightsoul's Blessing through Skill activation. Begin rotations with teammate setup abilities—activate Hydro and Electro sources before Ifa's field time.
Use Burst immediately after enemy grouping becomes available, then transition to Skill for Nightsoul entry. Maintain Normal Attack spam during Blessing for consistent Tonicshot application.
Swirl Reaction Maximization
Maximize Swirl instances by ensuring elemental aura presence before Anemo application. Pre-apply Hydro and Electro through off-field abilities, then use Ifa's attacks to trigger multiple Swirl reactions per enemy.
Sedation Mark explosions provide additional reaction opportunities beyond standard Swirl triggers. Position carefully during Nightsoul's Blessing to maintain optimal range for Tonicshot accuracy while avoiding interruption.
Spiral Abyss and Endgame Performance
Floor 12 Viability
Ifa demonstrates strong performance in Spiral Abyss Floor 12 chambers featuring multiple enemies, where crowd control and Swirl damage provide significant value. VV resistance shred amplifies team damage output while healing sustains your party through sustained encounters.
He excels in chambers with Electro-weak enemies, where Electro-Charged team compositions exploit elemental weaknesses effectively.
Single-target boss encounters present challenges due to limited crowd control effectiveness and reduced Swirl target availability. However, the hovering mechanic provides significant value against ground-based attacks from bosses like Maguu Kenki or Perpetual Mechanical Array.
DPS Contribution Analysis
In optimized team compositions, Ifa contributes approximately 25-35% of total team damage through Swirl reactions and VV amplification of teammate abilities. Damage contribution increases significantly in multi-target scenarios where Swirl can hit multiple enemies simultaneously.
The healing component provides indirect DPS value by reducing interruption and maintaining team survivability without dedicated healer field time.
Common Build Mistakes and Troubleshooting
Frequent Optimization Errors
Over-investing in ATK/CRIT stats represents the most common mistake. His support role prioritizes EM scaling for reactions and healing over personal damage output. Don't fall into the DPS mindset trap.
Ignoring Energy Recharge requirements leads to inconsistent Burst uptime, significantly reducing crowd control availability and Sedation Mark damage. Using non-EM weapons severely limits both Swirl damage and healing effectiveness.
Low healing output typically results from insufficient EM investment or improper team pairing with Furina. Stack 800+ EM through artifacts and weapon choice. Energy problems require ER investment through Sands main stats or weapon choice like Favonius Codex.
FAQ
What's the best catalyst for Ifa support build in 2025? Sunny Morning Sleep-In provides 265 EM base with stacking passive reaching 504 additional EM. For F2P players, Mappa Mare offers 110 EM with consistent damage amplification.
How much Elemental Mastery does Ifa need for optimal performance? Target 800-1000+ EM for optimal Swirl damage and healing. 1000 EM represents a soft cap where additional investment yields diminishing returns.
Which team compositions work best with support Ifa? Electro-Charged teams featuring Ifa, Ororon, Furina, and Kuki Shinobu provide optimal synergy, enabling maximum Rescue Essentials stacking.
What constellation level is recommended for Ifa support? C2 represents the optimal stopping point, providing +50 maximum Rescue Essentials for significant Swirl and Electro-Charged damage amplification.
Should I prioritize Energy Recharge or Elemental Mastery on Ifa? Prioritize EM targeting 800+ first, then invest in ER achieving 130-160% for consistent Burst uptime.
What are the most common mistakes when building support Ifa? Over-investing in ATK/CRIT stats instead of EM, ignoring ER requirements causing Burst downtime, and using non-EM weapons that limit effectiveness.


