

Furina Support Build Overview & Golden Troupe Synergy
Character Kit Analysis
Here's what makes Furina tick as a support powerhouse. She's a 5-star Hydro Sword wielder who operates entirely off-field, scaling everything off HP rather than ATK—which honestly makes building her way more straightforward than most characters.
At Level 90, you're looking at 15,307 base HP, 244 ATK, 696 DEF, and a decent 19.2% CRIT Rate from ascension. Not groundbreaking numbers, but that's not where her strength lies.
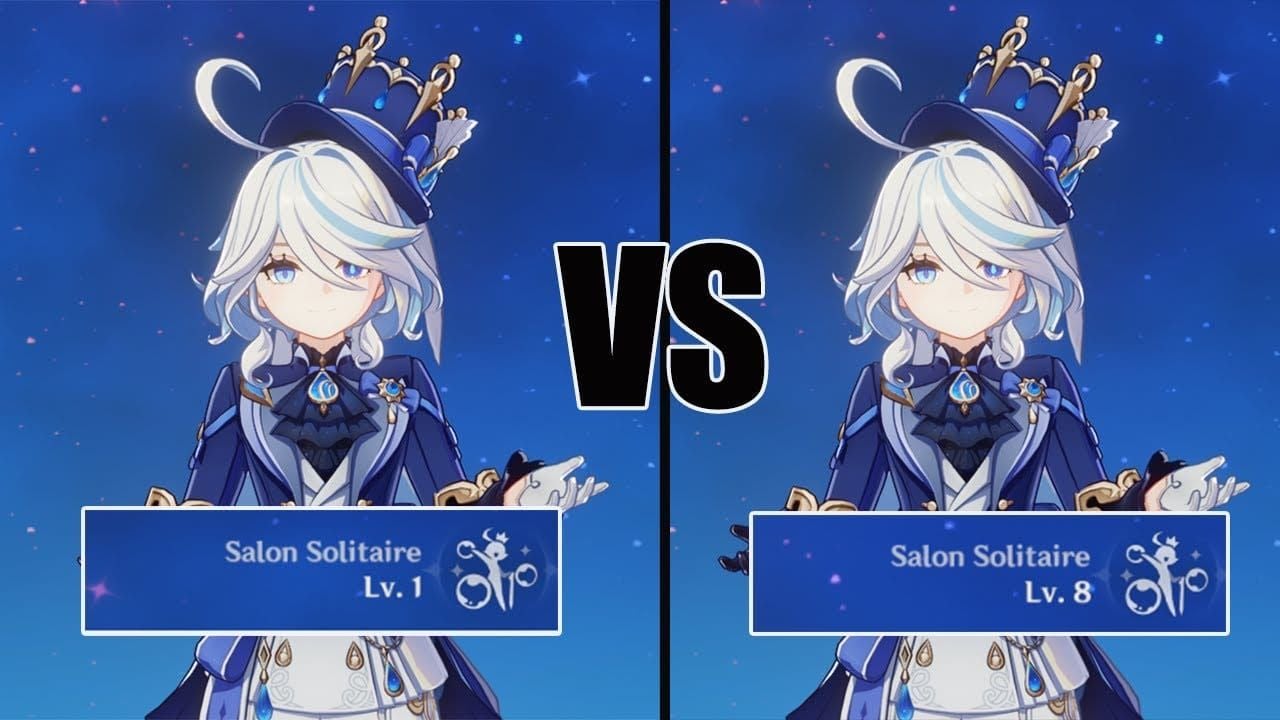
Her Elemental Skill Salon Solitaire is where things get interesting. Three phantoms spawn and deal 3.23-8.29% of her Max HP as damage while simultaneously draining your team's HP by 1.6-3.6%. Sounds counterproductive? That's the genius—this HP drain actually enables her damage amplification of 110-140%.
The real magic happens with her Elemental Burst Let the People Rejoice. This creates an 18-second Universal Revelry state that generates Fanfare stacks from HP changes. Each stack provides 0.25% damage bonus plus 0.1% healing bonus, capping at 300 stacks. Do the math—that's a massive 75% team damage boost when maxed out.
Her Arkhe system lets you switch between Ousia (damage + HP drain) and Pneuma (healing) modes via Charged Attacks. Most of the time, you'll stay in Ousia for combat effectiveness.
For maximizing Furina's potential, securing Genesis Crystals becomes essential. Buy genesis crystals for furina rerun through BitTopup's secure platform with competitive pricing and instant delivery.
Golden Troupe Set Bonus Breakdown
Golden Troupe isn't just good for Furina—it's practically tailor-made for her kit. The 2-piece grants 20% Elemental Skill DMG, which is solid. But the 4-piece? That's where it gets spicy.
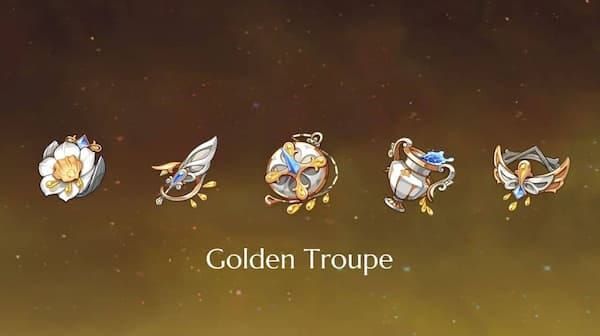
You get 25% base Skill damage plus another 25% when the character's off-field for more than 2 seconds. Since Furina spends 99% of her time off-field with a 30-second Skill duration, you're essentially getting 70% total Skill damage boost consistently.
Compare this to Tenacity of the Millelith (20% HP, team ATK boost) or mixed 2-piece combinations, and Golden Troupe delivers superior personal damage while maintaining all the support utility you need. You can farm it at the Denouement of Sin domain in Fontaine (AR45 required) or use the Artifact Strongbox if you're drowning in fodder artifacts.
Support Role Definition
Furina fills three critical roles simultaneously: off-field Hydro application, universal damage amplification, and HP-fluctuation mechanics. The key insight here—and this trips up a lot of players—is that she requires consistent healing to generate Fanfare stacks effectively.
This creates natural synergy with healers like Xilonen, Baizhu, Charlotte, and Jean. The 75% damage bonus applies additively to all team members except Bloom reactions (because Bloom scaling is weird like that).
Energy requirements vary significantly based on team composition: 200-220% ER when she's your only Hydro character, 180-190% with one Hydro teammate, 150-160% with double Hydro. C4 dramatically reduces these requirements to 140-160%, 130-150%, and 100-120% respectively—making it a surprisingly valuable constellation for resource management.
Optimal Artifact Build: Golden Troupe 4-Piece Setup
Main Stats Priority
HP% Sands and Goblet are non-negotiable. For the Circlet, choose CRIT Rate or CRIT DMG based on your weapon's substats. Here's something that might surprise you—HP% Goblet actually outperforms Hydro DMG% by 2-5% while providing superior team utility through better Fanfare generation.
Use ER% Sands only when you're below 180% total Energy Recharge; otherwise, HP% scales her damage better. Target these benchmarks: 35,000-40,000 HP, 60-80% CRIT Rate, 160-200% CRIT DMG, 180-220% Energy Recharge.
There's a sweet spot at 40,000 HP where her ascension passive caps out, giving you 28% Salon Member damage bonus plus 16% healing interval reduction. Beyond that point, you're getting diminishing returns.
Substat Optimization
Priority goes: Energy Recharge > CRIT Rate/DMG > HP% > Flat HP. Maintain that classic 1:2 CRIT ratio, but remember she starts with 24.2% base CRIT Rate from ascension.
Every 1,000 HP contributes roughly 0.7% Salon Member damage (capping at 28%) while improving Fanfare generation through larger HP pools. It's a beautiful scaling system that rewards HP investment across multiple mechanics.
Alternative Artifact Sets
Tenacity of the Millelith works for team-focused builds—20% HP plus 20% team ATK and 30% Shield Strength when her Skill hits enemies. Marechaussee Hunter becomes viable at C6 for on-field DPS builds (15% Normal/Charged ATK DMG plus up to 36% CRIT Rate).
Mixed 2-piece combinations provide about 60-70% effectiveness during farming transitions. Not optimal, but functional while you're grinding for perfect Golden Troupe pieces.
Best Weapons for Furina Support Build
5-Star Weapon Rankings
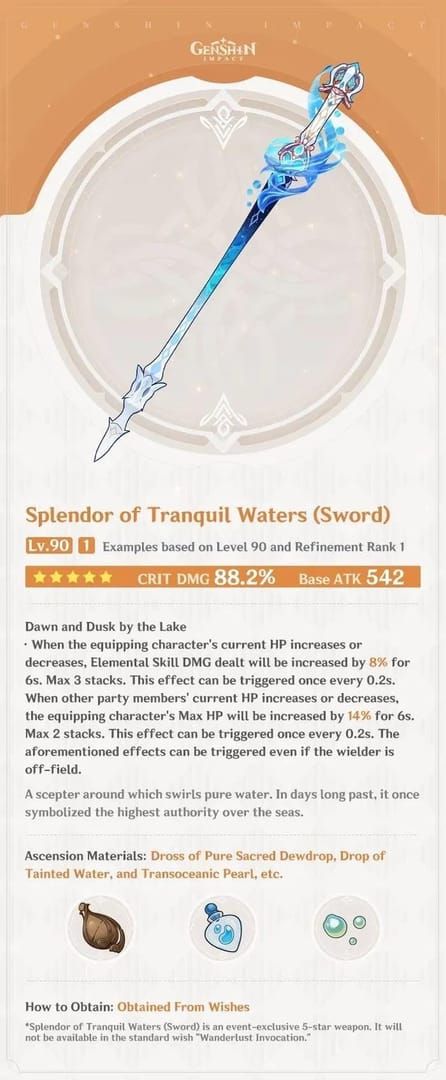
Splendor of Tranquil Waters takes the crown as best-in-slot. 542 ATK and 88.2% CRIT DMG are solid stats, but the passive is what makes it shine—24% Skill DMG plus 28% Max HP through HP fluctuation mechanics. It's literally designed for her kit.
Key of Khaj-Nisut offers 542 ATK and 66.2% HP. The passive provides 20% HP baseline plus Grand Hymn stacks that convert Max HP to EM for the whole party. Excellent for reaction-heavy teams.
Primordial Jade Cutter brings 542 ATK and 44.1% CRIT Rate with a 20% HP increase plus 1.2% ATK per 1% Max HP. Balanced offensive stats make it a strong generalist option.
4-Star Budget Options
Festering Desire at R5 is the premier 4-star choice—510 ATK, 45.9% ER, 32% Skill DMG, and 12% Skill CRIT Rate. Perfect for damage plus energy management. (Sadly, this was a limited event weapon, so newer players are out of luck.)
Wolf-Fang from the Battle Pass provides 510 ATK, 27.6% CRIT Rate, 32% Skill/Burst DMG, and stacking CRIT Rate up to 16%. Excellent offensive stats with reliable accessibility.
Fleuve Cendre Ferryman serves as the best F2P option—510 ATK, 45.9% ER, and at R5 grants 16% Skill CRIT Rate plus 32% ER for 5 seconds after Skill use.
F2P Weapon Alternatives
Favonius Sword might seem boring with 454 ATK and 61.3% ER, but generating 6 Energy particles on CRIT (6s cooldown) significantly reduces artifact ER requirements. Sometimes practical beats flashy.
Iron Sting offers 165 EM for reaction teams. Harbinger of Dawn provides 46.9% CRIT DMG when HP stays above 90%—requires consistent healing support, but the damage boost is substantial.
Team Compositions for Maximum 75% Damage Boost
Meta Team Combinations
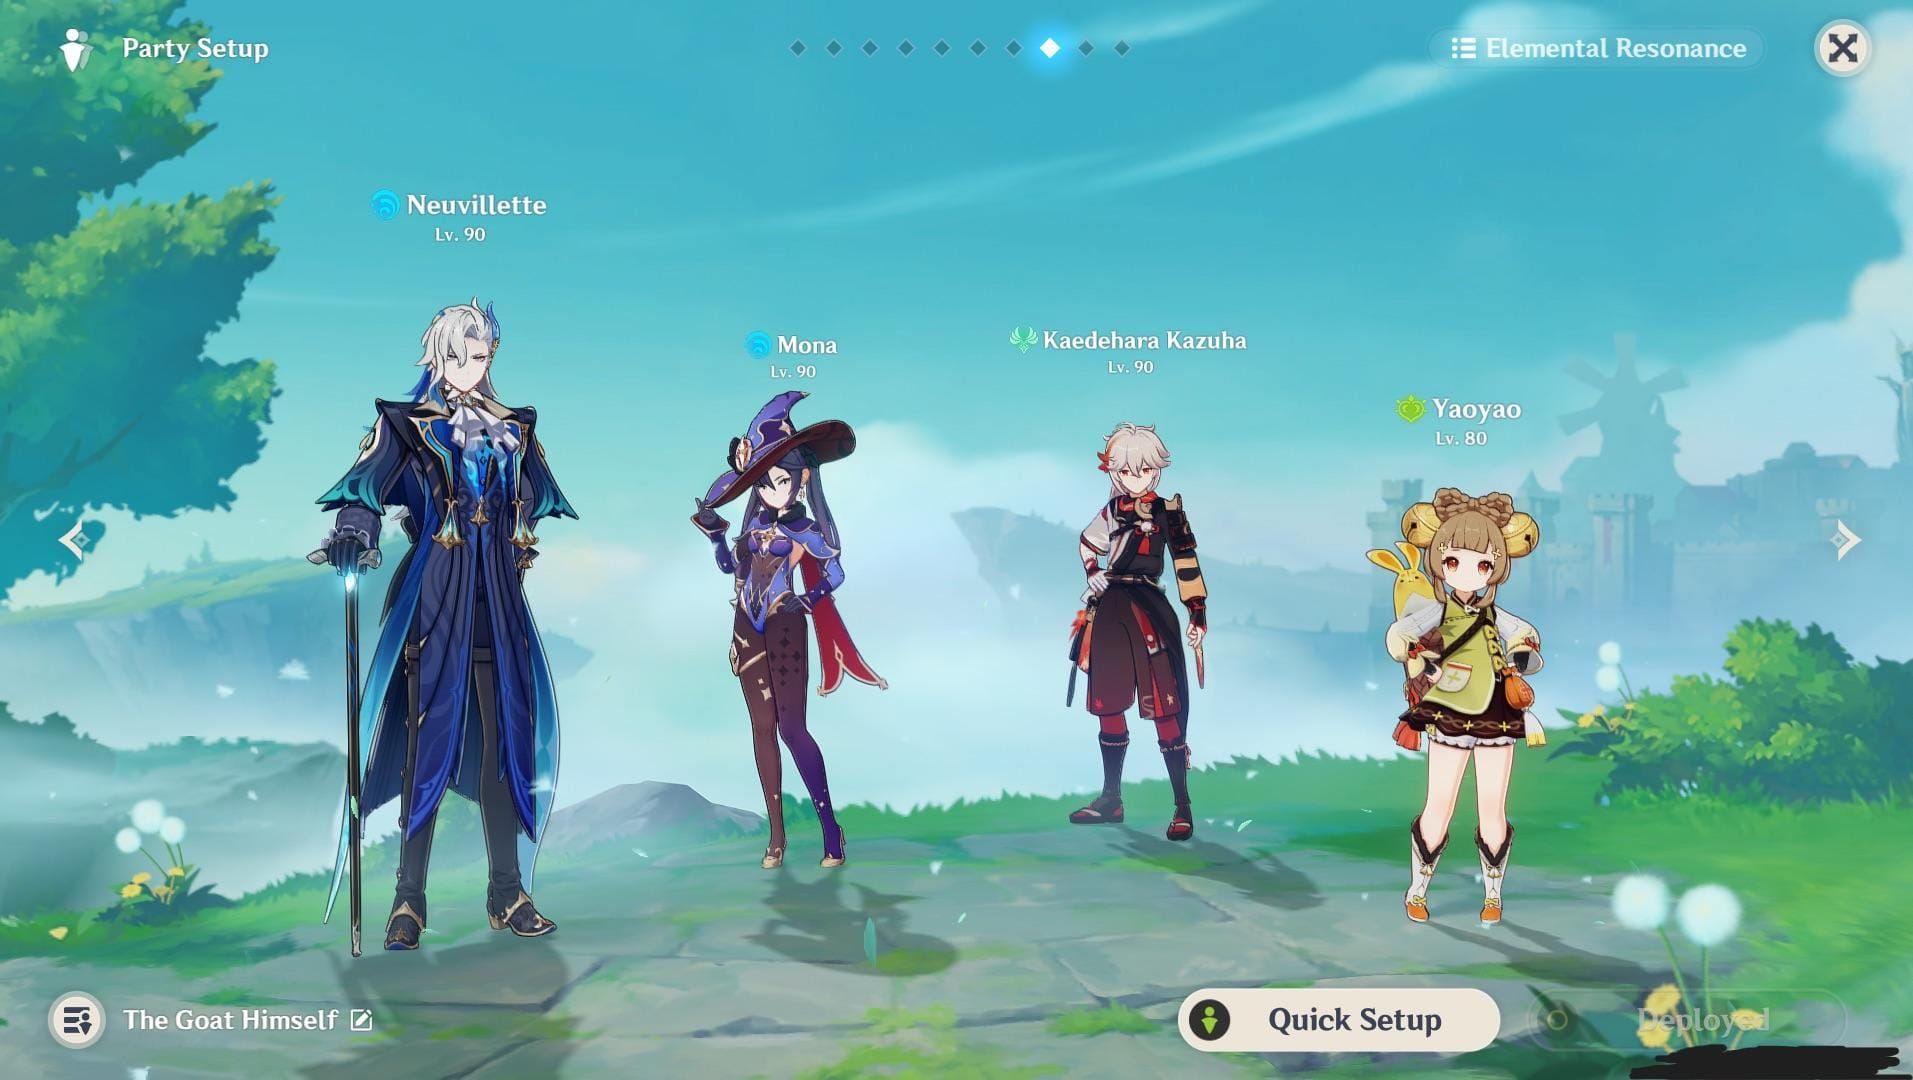
Neuvillette Hypercarry remains the gold standard: Neuvillette/Furina/Kazuha/Xilonen. Hydro Resonance provides 25% HP, and Neuvillette's self-HP manipulation generates Fanfare without needing a dedicated healer. The rotation flows beautifully: Neuvillette E > Furina ED Q > Kazuha tEPQ > Xilonen EQ > Neuvillette charged attacks.
For optimal team performance, sufficient Primogems for character acquisitions becomes crucial. BitTopup offers reliable genshin furina support team recharge primogems with instant delivery and competitive rates.
Hu Tao Vaporize creates an interesting dynamic: Hu Tao/Furina/Yelan/Xianyun. Double Hydro reduces ER requirements, and Hu Tao's HP manipulation maximizes Fanfare generation—even though healing reduces her A4 passive effectiveness. It's a trade-off that usually favors team damage.
Freeze Compositions like Ayaka/Furina/Shenhe/Charlotte maintain consistent Cryo application while benefiting from universal damage buffs. Charlotte provides party-wide healing for efficient Fanfare stacking without disrupting freeze uptime.
Elemental Synergies
Hyperbloom teams (Nahida/Furina/Kuki Shinobu/Alhaitham) work surprisingly well. Furina's irregular Hydro application actually suits Hyperbloom requirements better than consistent application, and the damage buffs enhance both Dendro and Electro components.
Vaporize compositions with Arlecchino or Lyney benefit from consistent Hydro application plus that massive 75% damage bonus. Just requires careful energy and healing coordination to maintain both Fanfare stacks and DPS uptime.
Electro-Charged teams using Raiden Shogun or Yae Miko as drivers generate consistent Fanfare through multi-hit reactions while spreading elemental auras across multiple enemies.
Role Distribution Analysis
Optimal teams need dedicated healers—this isn't negotiable. Xilonen brings healing plus RES shred plus Geo resonance. Baizhu offers party healing plus Dendro application. Jean provides VV shred plus healing. Charlotte works perfectly for Cryo teams plus her photography mechanics are genuinely fun.
Support characters should prioritize off-field capabilities: Kazuha for elemental DMG plus crowd control, Zhongli for shields plus RES shred, Fischl for Electro application plus energy generation.
Constellation Investment Guide
C0 vs C1 Impact
C0 provides full functionality with 300 maximum Fanfare stacks for that coveted 75% team damage bonus. You're not missing core mechanics—just optimization.
C1 grants 150 Fanfare on Burst activation plus raises the cap to 400 stacks. This provides 25% immediate damage bonus and improved early rotation damage. We're talking 15-20% damage improvement in optimal scenarios. Moderate priority upgrade—nice to have, not essential.
C2 Damage Threshold
C2 is where things get serious. It increases Fanfare gain by 250% while converting excess Fanfare to Max HP bonuses (0.35% per point, 140% maximum increase). This reduces required HP fluctuation from 300% to roughly 72% for maximum stacks.
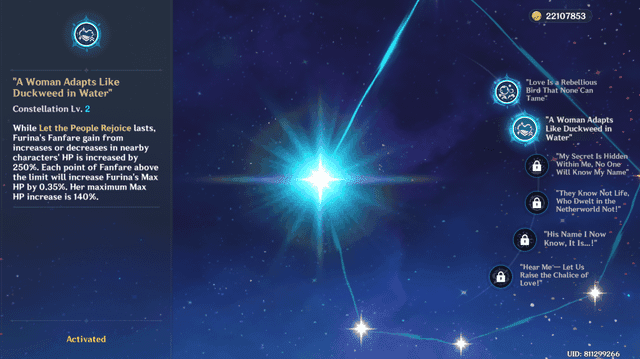
At maximum stacks, you're looking at 140% Max HP increase, pushing well-built Furina beyond 50,000 HP. That translates to 20-30% team DPS improvement through faster buff application. This is her most impactful constellation for most players.
C6 Optimization
C6 transforms her into a viable on-field DPS through Hydro infusion plus 15% Max HP damage on Normal/Charged/Plunging Attacks. Grants 10-second Center of Attention with team healing (Ousia) or enhanced Normal Attack damage (Pneuma).
This enables Marechaussee Hunter builds and lets her compete with dedicated Hydro carries while maintaining full support utility. It's a fun constellation that opens new playstyles, but definitely luxury territory.
Skill Rotation & Energy Management
Optimal Skill Sequences
Standard rotation prioritizes Burst first: Furina Burst > Elemental Skill (Ousia) > healer abilities > main DPS during buff windows.
Here's a practical Neuvillette example: Neuvillette E > Furina ED Q > Kazuha tEPQ > Xilonen EQ N2 > Neuvillette C E C Q. Clean, efficient, maximizes buff uptime.
For Hu Tao teams: Zhongli hED > Furina ED Q > Yelan Q > Hu Tao N3D achieves 100 Fanfare stacks within 10 seconds. The key is coordinating HP drain with healing windows.
Energy Recharge Calculations
C0-C3 requirements depend heavily on team composition: 200-220% for solo Hydro, 180-190% with one Hydro teammate, 150-160% with double Hydro. Favonius weapon procs can reduce these by 20-30%.
C4 provides 4 Energy every 5 seconds, dramatically reducing requirements to 140-160%/130-150%/100-120% respectively. It's a surprisingly valuable quality-of-life improvement that frees up artifact substats for damage.
Pneuma/Ousia Timing
Ousia mode is your default for combat—damage output plus HP drain for Fanfare generation. The three summons target automatically while draining HP above 50% thresholds.
Switch to Pneuma mode only for emergency healing. The stationary Singer provides HP-based healing but no damage or energy particles. You can identify modes visually: black/short hair equals Ousia, white/long hair equals Pneuma.
Damage Calculations & Performance Metrics
DPS Contribution Analysis
Salon Members deal 3.23-8.29% Max HP per hit at talent level 10. With 40,000 HP plus Golden Troupe bonuses, individual hits reach 4,600-5,800 damage before CRIT and elemental bonuses. Her ascension passive adds another 28% damage at 40,000 HP.
Total personal DPS ranges from 15,000-25,000 per second—respectable, but secondary to that 75% team amplification value. She's not competing with main DPS characters for damage; she's making them significantly stronger.
Team Damage Amplification
That 75% additive damage bonus (excluding Bloom reactions) transforms team performance. Teams dealing 100,000 DPS baseline jump to 175,000 DPS. Optimal teams achieve maximum stacks within 5-8 seconds and maintain buffs throughout DPS windows.
The healing bonus component (30% maximum) enhances sustain and enables Marechaussee Hunter builds on DPS characters. It's a comprehensive support package that addresses multiple team needs simultaneously.
Comparison Benchmarks
Versus other Hydro supports: Yelan offers 50% single-target bonus with better energy generation. Kokomi provides on-field healing and driving but no universal buffs. Xingqiu delivers superior single-target application plus damage reduction but limited team buffs.
Furina-enabled compositions achieve 20-35% higher Spiral Abyss clear times, with greatest improvements in AoE scenarios where her universal buffs affect multiple enemies simultaneously.
Common Build Mistakes & Optimization Tips
Artifact Pitfalls
Hydro DMG% vs HP% Goblet confusion trips up many players. HP% provides superior value through Fanfare generation, ascension scaling, and weapon synergies. The damage difference is only 2-5%, but the utility gap is massive.
ER Over-investment is surprisingly common. 250%+ Energy Recharge is unnecessary with proper team building—aim for 180-200% in most scenarios and invest remaining substats in damage.
CRIT Rate Neglect happens because people focus too heavily on HP scaling. Remember, she starts with 24.2% base CRIT Rate but still needs investment to reach 60-70% for reliable performance.
Team Synergy Errors
Insufficient Healing is the biggest mistake I see. HP drain requires consistent healing for both survivability and Fanfare generation. Shielders like Zhongli cannot substitute for actual healing—they serve different functions.
Fanfare Misunderstanding causes rotation issues. Stacks only generate from HP changes during her Burst window, requiring coordination between drain and healing effects. It's not automatic.
Hydro Application Over-reliance creates problems with fast Pyro carries. Her irregular application pattern suits some reactions but struggles with characters who need consistent Hydro aura.
Resource Allocation Issues
Constellation Priority often gets misunderstood. C2 provides the most significant upgrade and better value than signature weapons for most players. C1 and C4 offer moderate improvements, while C6 enables niche builds.
Talent Investment should prioritize Skill > Burst > Normal Attacks. Normal Attacks are irrelevant except at C6, so don't waste resources there.
Weapon Selection should prioritize performance over aesthetics. F2P options often outperform mismatched 5-star weapons—choose based on your specific build needs, not rarity.
Advanced Strategies for 2025 Meta
Spiral Abyss Applications
Current Abyss rotations favor AoE damage and elemental shield breaking—exactly where universal buffs provide maximum value. Floor 12's multiple high-HP enemies benefit from damage amplification across extended encounters.
Her kit enables Marechaussee Hunter builds on DPS characters through consistent HP fluctuation. Energy management becomes crucial in limited particle environments, so prioritize strong batteries or Favonius weapons.
Future-Proofing Builds
The 2025 meta emphasizes HP-scaling mechanics and universal damage buffs, positioning Furina favorably for upcoming content. New character designs show trends supporting her playstyle—she's not going anywhere.
Golden Troupe remains optimal long-term, and flexible substats allow meta adaptation. C2 investment provides future-proofing through enhanced flexibility regardless of how the meta shifts.
Min-Max Techniques
Animation Cancels: Dash-cancel her Skill to reduce field time while maintaining summon deployment. Every second counts in optimal rotations.
Fanfare Management: Maintain HP above 50% for damage bonuses while ensuring sufficient fluctuation for stack generation. It's a delicate balance that improves with practice.
Weapon Passive Optimization: Coordinate HP changes with damage windows. Align Splendor of Tranquil Waters stacks with your main DPS field time for maximum impact.
FAQ
What is the best artifact set for Furina support build? Golden Troupe 4-piece provides 70% total Skill damage boost (20% + 25% + 25% off-field), synergizing perfectly with her off-field playstyle.
How much Energy Recharge does Furina need? 200-220% solo Hydro, 180-190% with one Hydro teammate, 150-160% with double Hydro. C4 reduces these requirements by 40-60 percentage points.
Should I prioritize HP% or Hydro DMG% on Goblet? HP% outperforms Hydro DMG% by 2-5% while providing superior Fanfare generation and ascension scaling benefits.
Which weapon is best for support Furina? Splendor of Tranquil Waters (best-in-slot), Festering Desire R5 (4-star), or Fleuve Cendre Ferryman (F2P option).
What are Furina's constellation priorities? C0 offers full functionality, C1 provides moderate improvement, C2 delivers the most significant upgrade (250% faster stacking), C4 solves energy issues, C6 enables on-field DPS builds.
How do I maximize Fanfare stacks efficiently? Use Furina Burst > Ousia Skill > party healers like Xilonen or Jean. Coordinate HP fluctuations during the 18-second window, aiming for 100+ stacks within 5-8 seconds.


