

Marvel Rivals Controller Support Overview
Here’s something that caught my attention during the first closed Alpha back in May 2024 – NetEase didn’t just tack on controller support as an afterthought. They built it into the foundation of Marvel Rivals from day one, and honestly? It shows.
Platform-Specific Support Matrix:
PC (Steam/Epic): Full controller and mouse/keyboard support with seamless switching
PlayStation 5: Controller mandatory, no official mouse/keyboard support
Xbox Series X/S: Controller mandatory, platform-locked competitive modes
Steam Deck: Native controller support with handheld optimizations
The game’s pretty smart about input detection – it’ll automatically recognize when you plug in a controller and show you those helpful on-screen prompts when you switch between devices. PC players get the best of both worlds here; you can literally grab your mouse mid-match if you need precision, then switch back to controller for movement-heavy heroes like Spider-Man.
Now, if you’re serious about testing different hero configurations (and trust me, you should be), you’ll want access to the full roster. That’s where marvel rivals top up credits become essential. BitTopup’s got competitive pricing and instant delivery, which means you’re not waiting around to test that perfect Venom setup you’ve been theorizing about.
Supported Controller Types:
Xbox Wireless Controllers (Series X/S, One)
PlayStation DualSense and DualShock 4
Steam Controllers and Steam Deck controls
Most third-party controllers with standard layouts
Setting Up Controllers for Marvel Rivals
PC Controller Setup Process: Getting your controller running is refreshingly straightforward. Connect via USB or Bluetooth, launch the game, press any button, and you’re golden. The real magic happens in Settings > Controller where NetEase has built what I’d argue is one of the most comprehensive controller configuration systems in any hero shooter.
One thing that trips up Steam users – make sure controller support is enabled in your Steam settings first. Otherwise, you might find yourself wondering why your perfectly functional controller is being ignored.
Console Configuration Steps: Console players get the royal treatment here. PlayStation 5 users benefit from DualSense haptic feedback that actually feels meaningful (not just generic rumble), while Xbox players get those optimized trigger response curves that make each hero feel distinct.
The New Player Initial Settings Feature is genuinely helpful – it walks newcomers through sensitivity, vibration, and trigger configurations without overwhelming them. Smart design choice.
Default Keybinds and Control Schemes
Standard Control Mapping:
Left Stick: Character movement and navigation
Right Stick: Camera control and aiming
L2/LT: Primary ability or aim down sights
R2/RT: Primary fire/attack
L1/LB: Secondary ability
R1/RB: Secondary fire or ability
Triangle/Y: Ultimate ability (requires L3+R3 confirmation)
Square/X: Reload
X/A: Jump
Circle/B: Crouch/slide
L3: Sprint toggle
R3: Melee attack
D-Pad Functions:
Up: Hero Profile display
Right: Chrono Vision activation
Down: Ping system
Left: Communication wheel (expandable to 8 sections)
Here’s where things get interesting. The game separates hero abilities into distinct categories with customizable ease-in settings: Projectile heroes (80), Hitscan heroes (40), and Melee heroes (0). This isn’t just arbitrary numbers – it’s based on how different weapon types actually behave in combat.
Custom Keybind Configuration
Accessing Keybind Settings: The customization depth here is honestly impressive. Navigate to Settings > Controller > Combat, and you’ll find options that put some dedicated fighting games to shame.
Select All Heroes dropdown at the top
Choose specific hero for individual customization
Use Individual Hero Button Mapping for single character changes
Apply Batch Swapping to exchange button functions across multiple heroes
Got a controller with back paddles? You’re in for a treat. Mapping Jump to a rear paddle is probably the single biggest competitive advantage you can give yourself – maintaining aim control while jumping is game-changing for aerial heroes.
Hero-Specific Optimization Examples:
Spider-Man/Venom: Disable Auto Swing, enable Hold to Swing for movement control
Phoenix: Map L1/R1 to paddles for evasion while firing, use Hold for Dark Ascent
Black Widow: Set zoom ADS sensitivity to 0.80 for 1:1 hipfire matching
Rocket/Wall-crawlers: Configure direction to Advance toward crosshairs
Testing all these configurations properly means having access to every hero, which brings us back to credits. Buy marvel rivals credits through BitTopup and you’ll have the full roster at your fingertips for comprehensive controller testing. Their customer support is solid too, which matters when you’re making purchases for competitive gaming.
Aim Curves and Sensitivity Settings
This is where Marvel Rivals really flexes its technical muscles. Three primary aim curves, each with extensive customization – it’s like having a personal aim coach built into the settings menu.
Aim Curve Types:
Linear Ramp: Your bread and butter 1:1 input-to-movement ratio. Predictable, consistent, and honestly the best starting point for most players. No surprises, no weird acceleration curves to learn.
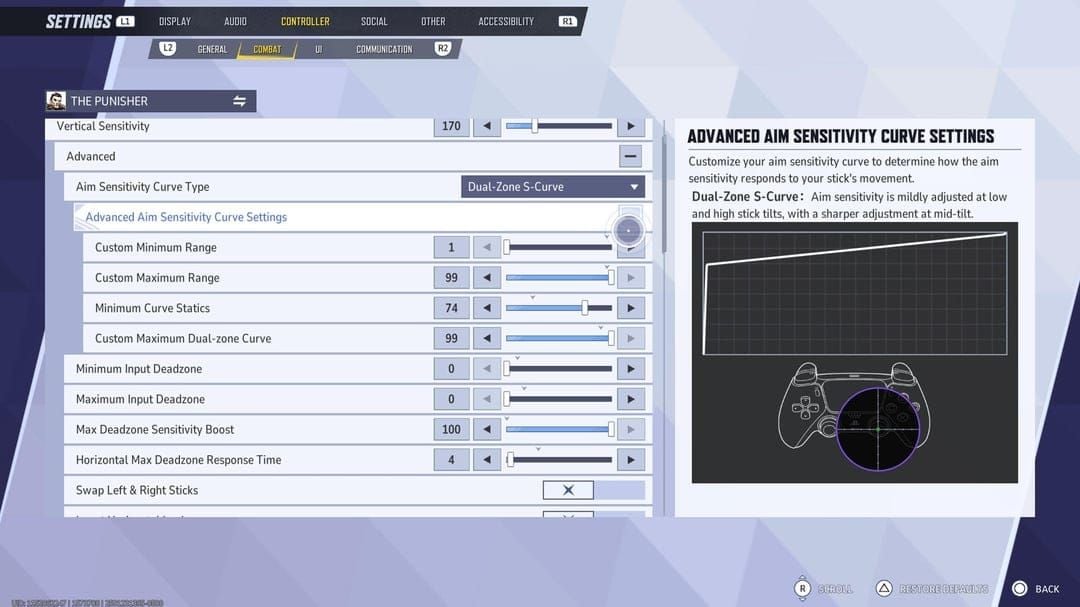
Dual-Zone S-Curve: Now we’re talking. Small inner area for those pixel-perfect headshots, larger outer zones for quick 180s. If you’re coming from Overwatch, this’ll feel familiar and comfortable.
Exponential Ramp: The Call of Duty crowd will recognize this one. Sensitivity ramps up exponentially with stick deflection. Still viable, but requires more muscle memory investment.
Recommended Sensitivity Configurations:
SCUF Competition Settings:
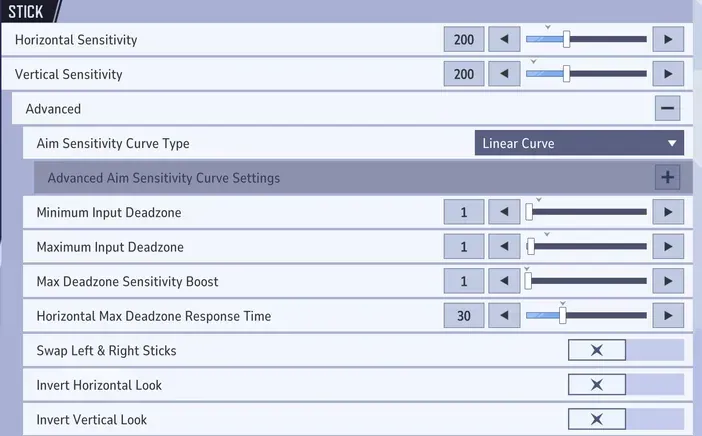
Horizontal/Vertical Sensitivity: 200/200
Aim Curve: Linear
Min/Max Input Deadzone: 1
Max Deadzone Sensitivity Boost: 1
Aim Assist Strength: 90
Dexerto Balanced Settings:
Horizontal Sensitivity: 180
Vertical Sensitivity: 100
Max Deadzone Sensitivity Boost: 4
Aim Assist Strength: 80
Advanced Aim Settings Configuration
Max Deadzone Sensitivity Boost (Aim Acceleration): Here’s where things get spicy. This setting is essentially aim acceleration – it multiplies your turn speed when you max out stick deflection. The community’s split on this one: GameFAQs says crank it to 100, SCUF recommends keeping it minimal at 1, while Dexerto sits comfortably in the middle at 4.
My take? Start low and work your way up. You want to maintain tracking consistency while still being able to whip around for those clutch plays.
Deadzone Optimization Process:

Hit up Practice Range
Turn off Aim Assist and Max Deadzone Sensitivity Boost
Set Minimum Input Deadzone to 0
Watch for stick drift
Bump up Minimum Input Deadzone by 1 until drift disappears
PSA Method for Perfect Sensitivity: This is some next-level optimization stuff. Find a sensitivity that gives you exactly a 360-degree turn in one second, plug it into a PSA calculator, test the results, and repeat. Seven iterations later, you’ll have mathematically optimized sensitivity. Overkill for most players? Maybe. But the pros swear by it.
Platform-Specific Controller Guides
PlayStation 5 DualSense Optimization: The DualSense integration is genuinely impressive – haptic feedback that actually conveys useful information rather than just generic rumble. For competitive play though, you’ll want to disable trigger effects to reduce input delay. Keep tactical vibration on for ultimate notifications; it’s subtle but helpful.
Pro tip: that built-in microphone can mess with your audio settings, so configure voice chat preferences carefully.
Xbox Wireless Controller Setup: Xbox controllers are the Swiss Army knife of gaming peripherals – they just work everywhere. The trigger deadzone improvements in Patch 1.x were substantial, giving you granular control over trigger response. Enable Character Movement Stick Deadzone Settings for enhanced movement precision.
Third-Party Controller Considerations: Most standard-layout controllers play nice with Marvel Rivals. Controllers with back paddles are worth their weight in gold for competitive play – the accessibility improvement is massive.
Aim Assist and Targeting Systems
Marvel Rivals’ aim assist is sophisticated without being hand-holdy. Separate configurations for different hero types mean you can fine-tune based on actual weapon mechanics rather than one-size-fits-all settings.
Aim Assist Components:
Window Size: The targeting bubble around enemies (sweet spot: 30-40, default: 50)
Strength: How much magnetic pull you get (recommended: 80-90)
Ease In: How quickly assist kicks in – Projectile (80), Hitscan (40), Melee (0)
Hero Type Optimization: Different archetypes need different approaches. Hitscan heroes like Hela need instant precision, while projectile heroes like Mantis benefit from predictive assistance. Melee heroes get tracking help during close-range chaos.
Keep Disable Aim Assist at Max Deadzone off – you want assistance during rapid movements. Set Horizontal Max Deadzone Response Time to 0 for minimum input lag.
Advanced Controller Optimization
Input Lag Reduction Techniques: Enable HFR Mode for 120fps on supported displays. The difference is noticeable, especially for fast-paced heroes. Wired connections still edge out wireless for pure response time, though modern wireless controllers are incredibly close.
Driver and Firmware Management: Keep your controller firmware current through manufacturer apps. Graphics driver updates often include controller optimizations too. Steam Input can conflict with native support, so configure carefully.
The Practice Range is your best friend for testing changes. Use it extensively – both stationary and moving targets will help you dial in your settings.
Troubleshooting Common Controller Issues
Controller Detection Problems: Steam controller settings can be finicky. If Marvel Rivals isn’t recognizing your controller, check Steam’s configuration first. Disable conflicting devices in Device Manager – sometimes random peripherals try to emulate controller input.
Mouse Drift and Input Conflicts: PC players sometimes get erratic aim from simultaneous controller and mouse detection. Quick fixes: disable Steam Input for Marvel Rivals, update to the latest patch for improved raw mouse input, or temporarily disconnect unused controllers.
Keybind Reset Issues: Fair warning – the current system has some limitations. You can’t reset individual keybinds without nuking all your settings. Advanced binding options like double-press or hold-to-use aren’t supported yet. Hopefully NetEase addresses this in future updates.
Vibration and Audio Conflicts: Controller vibration can mask important audio cues. Set it to Off for competitive play or Tactical for just ultimate notifications. DualSense microphones can cause feedback issues, so configure voice chat accordingly.
Pro Player Controller Settings and Competitive Optimization
Tournament players prioritize consistency over comfort. Performance optimization trumps fancy features when money’s on the line.
Competitive Standard Settings:
Vibration: Off (eliminates distraction)
Trigger Effects: Off (reduces input delay)
Aim Assist Strength: 80-85 (balanced assistance)
Linear Aim Curve: Consistency is king
Back Paddle Utilization: Jump mapped universally
Hero-Specific Pro Configurations: Strategist players swear by Healing Reticle Feedback for visual confirmation. Adjust Targeting Sensitivity to avoid healing full-health tanks instead of critical damage dealers. DPS players often run higher sensitivity with minimal aim assist for maximum control.
Competitive venues require consistent performance across different setups. Wired connections for stability, backup batteries for wireless – the basics matter when you’re competing.
FAQ
Does Marvel Rivals support PS5 controllers on PC? Absolutely. Full DualSense support through Steam and Epic, including haptic feedback and adaptive triggers. USB or Bluetooth, both work flawlessly.
How do I setup custom keybinds for individual heroes in Marvel Rivals? Settings > Controller > Combat, then use the All Heroes dropdown to select specific characters. Changes only affect that hero. Batch Swapping lets you exchange functions across multiple heroes simultaneously.
What are the best aim curve settings for competitive Marvel Rivals play? Linear Ramp for consistency. Horizontal/Vertical Sensitivity between 180-200, Min/Max Input Deadzone at 1, Aim Assist Strength 80-90. Start there and adjust based on feel.
Can I use Xbox Elite or DualSense Edge controllers with back paddles? Yes, and they’re fantastic for competitive play. Map Jump to a back paddle first – the ability to jump while maintaining aim control is transformative.
How do I fix controller input lag and detection issues? Set Horizontal Max Deadzone Response Time to 0, enable HFR Mode for 120fps, use wired connections when possible. For detection problems, disable conflicting devices in Device Manager and update controller firmware.
What controller settings do Marvel Rivals pros use for different hero types? Linear curves with 80-85 aim assist, vibration disabled. Strategists enable Healing Reticle Feedback and adjust Targeting Sensitivity. DPS players prefer higher sensitivity (200/200) with minimal aim assist for maximum control.


