

Understanding Mualani’s Unique Kit Design
Why HP Scaling Changes Everything
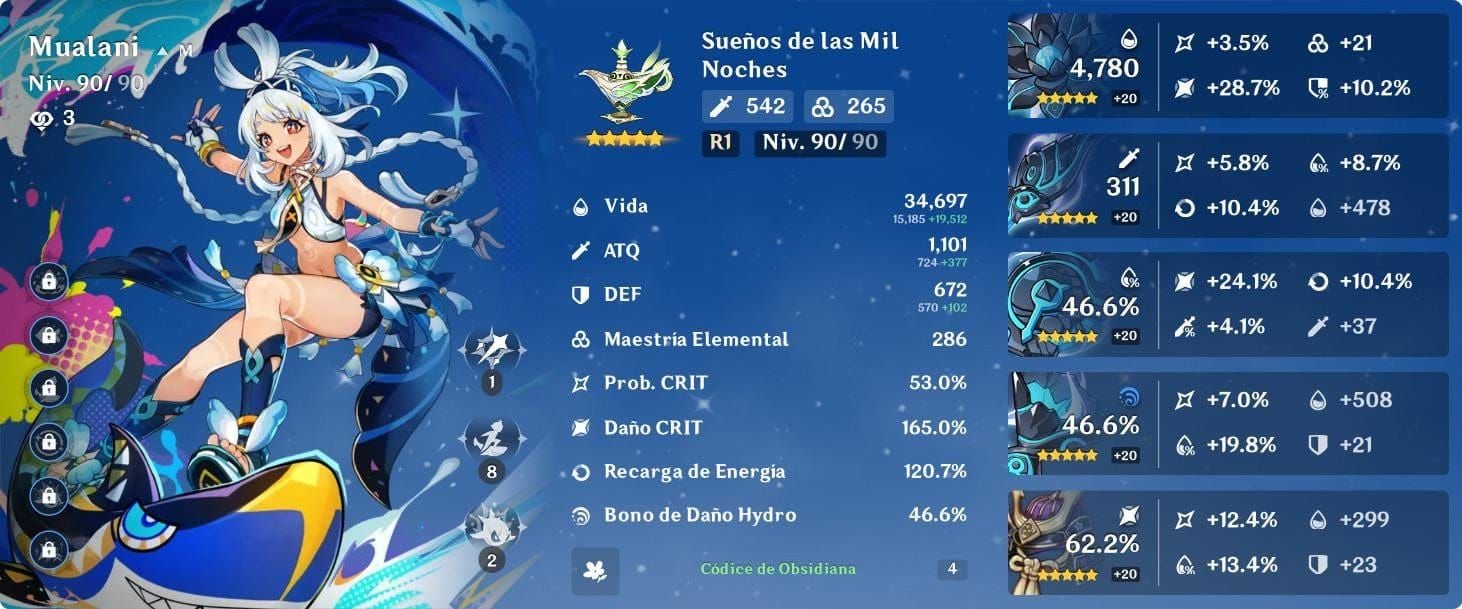
At Level 90, Mualani sits at 15,185 HP, 182 ATK, 570 DEF, with 24.2% CRIT Rate from ascension. Now, here’s where it gets interesting – that seemingly modest ATK stat doesn’t matter one bit. Every single ability in her kit scales from Max HP, which fundamentally changes how we approach her builds.
After testing extensively, I’ve found this creates fascinating synergies with supports like Furina and opens up artifact combinations that would be useless on traditional carries.
The Shark Surfing Mechanics Breakdown
“Surfshark Wavebreaker” grants 60 Nightsoul points and transforms her into what I can only describe as a hydro-powered missile. When you contact enemies, they get “Marked as Prey” status while Mualani gains Wave Momentum stacks – up to 3 maximum with a 0.7-second cooldown per enemy.

Her Normal Attacks become “Sharky’s Bite,” dealing 15.62% Max HP base damage at Talent Level 10. Each Wave Momentum stack adds another 7.81% Max HP. But here’s the kicker – at 3 stacks, “Sharky’s Surging Bite” gets an additional 39.06% Max HP damage bonus. We’re talking about potentially massive single-hit damage here.
The A1 passive creates Puffers when you land Sharky’s Surging Bite, each restoring 20 Nightsoul points (maximum 2 per skill use). This mechanic took me a while to master, but once you get the timing down? Game-changer.
Burst Synergy and Natlan Integration
“Boomsharka-laka” deals 105.2% Max HP AoE damage at Talent Level 10. Pretty straightforward. What’s clever is her A4 passive – Wavechaser’s Exploits stacks when nearby Natlan characters trigger Nightsoul Burst, increasing burst damage by 15%/30%/45% of Max HP based on stacks consumed.
This is clearly miHoYo setting up for future Natlan team compositions, though honestly, the effect feels somewhat niche in current rotations.
Weapon Tier List: From Premium to Budget
The Signature Advantage
Surf’s Up remains her undisputed best-in-slot. 542 base ATK, 88.2% CRIT DMG, 20% Max HP passive – but the real magic happens with those 4 Scorching Summer stacks after Elemental Skill. Each stack increases Normal Attack DMG by 12%, and the stack management through hitting opponents and Vaporize reactions creates perfect synergy with her kit.

Sacrificial Jade offers an interesting alternative with 454 base ATK, 36.8% CRIT Rate, 32% Max HP and 40 EM when switching on-field. One caveat I’ve noticed – it can over-cap CRIT Rate when paired with Obsidian Codex set, so factor that into your artifact planning.
4-Star Options That Actually Work
Ring of Yaxche surprised me as a craftable option. 510 base ATK, 41.3% HP, and it increases Normal Attack DMG by 0.6% per 1,000 Max HP for 10 seconds – capping at 16% damage increase. No CRIT Rate management headaches, just consistent value.
The Widsith brings strong burst damage through those rotating buffs we all know and love. Ash-Graven Drinking Horn benefits from HP scaling, while Prototype Amber serves as your budget HP option with energy restoration.
Artifact Optimization: Sets and Stats That Matter
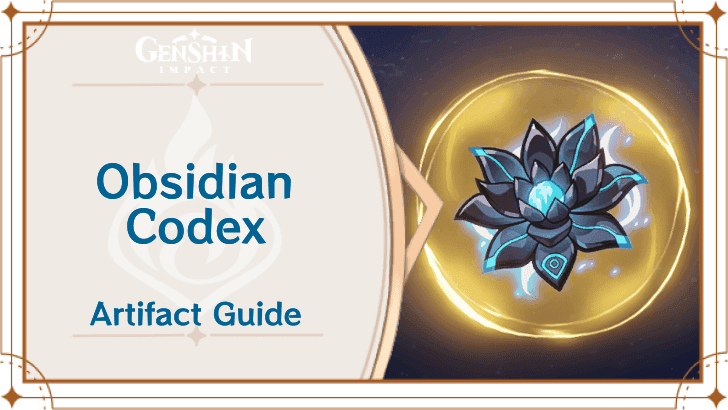
Why Obsidian Codex Dominates
4-piece Obsidian Codex isn’t just best-in-slot – it’s practically tailor-made for Mualani. 15% damage increase in Nightsoul’s Blessing, plus 40% CRIT Rate for 6 seconds after consuming Nightsoul points. That CRIT Rate boost is essentially unconditional given her kit mechanics.
4-piece Heart of Depth provides 30% Normal/Charged Attack damage after Elemental Skill – solid, but less synergistic. 4-piece Marechaussee Hunter works beautifully in Furina teams through HP fluctuations, though it requires more careful team building.
The Numbers Game
Main stats follow a straightforward path: HP% Sands, Hydro DMG Goblet, CRIT DMG Circlet. Vaporize builds can experiment with EM Sands, though I’ve found HP% more consistent in practice.
Substats priority: CRIT DMG > HP% > CRIT Rate > EM > ER. Target benchmarks from my testing: 30,000+ HP, ~80% CRIT Rate, ~150%+ CRIT DMG, ~130% Energy Recharge.
Farming tip: Obsidian Codex drops from Sanctum of Rainbow Spirits in Natlan, Heart of Depth from Peak of Vindagnyr, Marechaussee Hunter from Denouement of Sin.
Team Building: Synergies That Actually Work
Vaporize Compositions
Premium setup: Mualani, Xiangling, Kazuha, Zhongli. Xiangling handles consistent Pyro through Pyronado, Kazuha provides VV resistance shredding, Zhongli ensures you won’t get interrupted mid-combo. Alternative Pyro enablers include Mavuika, Thoma, or Dehya depending on your roster.

Furina variant: Replace one support with Furina for massive damage buffs and Hydro Resonance HP bonuses. Requires careful HP management for optimal buff stacking, but the damage ceiling is impressive.
The Burn-Vape Discovery
Here’s something that’s been gaining traction in my testing: Mualani, Emilie, Nahida, Dehya. Emilie and Nahida establish Dendro application, Dehya provides Pyro for Burning status. This creates more resilient Pyro auras for consistent Vaporize triggers compared to traditional setups.
Easier aura management, though slightly lower damage ceiling than optimal Vaporize teams.
Comfort Zone: Mono Hydro
Sample team: Mualani, Furina, Kazuha, Sigewinne/Kokomi. Hydro Resonance grants 25% HP increase benefiting both Mualani and Furina damage scaling. Lower damage than Vaporize, absolutely – but superior comfort and consistency for players still learning her mechanics.
Talent Investment Strategy
What Actually Matters
Priority order: Elemental Skill > Elemental Burst > Normal Attack. Here’s something that confused me initially – Sharky’s Bite damage scales from Elemental Skill talent levels despite counting as Normal Attack damage. Normal Attack talent contributes minimally and can honestly remain level 1.
Resource reality check: Maximum investment costs 4,957,500 Mora, 3 Crowns, 18 Lightless Mass from All-Devouring Narwhal. Practical stopping points for most players: Level 9 Elemental Skill, Level 8 Elemental Burst.
Material sources: Contention books from Pale Forgotten Glory domain (Monday/Thursday/Sunday), Lightless Mass from weekly Narwhal clears, Sauroform Tribal Warriors in Natlan for whistle materials.
Constellation Value Analysis
Early Investment Sweet Spots
C1 provides 66% Max HP damage increase for first Sharky’s Surging Bite, plus 30% reduced Phlogiston/Nightsoul consumption. Excellent value for both damage and exploration quality of life.
C2 represents the optimal stopping point for most players. Grants 2 immediate Wave Momentum stacks plus additional stack from Puffers, provides 12 extra Nightsoul points when collecting 2 Puffers. This dramatically improves rotation consistency and opening damage – honestly, it feels like how she should work at C0.
Late Game Considerations
C4 makes Puffers regenerate 8 Energy and increases Elemental Burst damage by 75%. Significantly reduces ER requirements while making burst a crucial damage component rather than afterthought.
C6 removes C1’s limitation, applying 66% Max HP bonus to every Sharky’s Surging Bite. Transforms her from front-loaded to sustained high-damage output.
My investment recommendation: C0 > C0+R1 Surf’s Up > C1+R1 > C2+R1. C2 provides optimal gameplay improvement without excessive investment.
Mastering the Rotation
Practical Execution
Setup supports first – Xiangling, Kazuha, Zhongli for their skills/bursts. Activate Mualani Elemental Skill, move through enemies for 3 Wave Momentum stacks, execute Normal Attack for Sharky’s Surging Bite. Collect those Puffers immediately to extend duration, then finish with Elemental Burst before cycling supports.
Energy management reality: 4.5 particles per Sharky’s Surging Bite (once per skill activation). Target 130% ER for consistent burst availability – C4 reduces requirements through Puffer energy generation.
Positioning matters: Practice efficient pathing for Wave Momentum accumulation. There’s damage reduction against multiple enemies (maximum 28% at 3+ targets) affecting AoE scenarios, so position to minimize target count during empowered attacks.
Spiral Abyss Applications
Meta Positioning
Mualani excels in cycles favoring Natlan characters or Hydro/Vaporize damage buffs. Version 5.7 Floor 12 featured 75% Nightsoul-aligned damage increase, which was basically free real estate for her teams.
Her front-loaded damage suits chambers requiring quick elimination, while single-target scenarios maximize her damage potential. The Hydro element provides effective Pyro shield breaking while handling most DPS checks comfortably.
Team flexibility breakdown: Mono Hydro for adaptability, Vaporize for maximum damage, Burn-Vape for specific enemy vulnerabilities.
Common Questions Answered
What makes her damage scaling unique? Every ability scales from Max HP rather than ATK. Sharky’s Surging Bite deals 15.62% + (7.81% × stacks) + 39.06% Max HP at talent 10. This synergizes beautifully with Hydro Resonance and HP supports like Furina.
How do I manage Nightsoul points effectively? Start with 60 points, collect Puffers (restore 20 each, max 2 per skill) for up to 100 total. In Natlan, Phlogiston substitutes with 75% reduced consumption on water. Practice immediate Puffer collection after empowered attacks – timing is everything.
Which constellation offers best value? C2 provides the highest gameplay improvement through 2 immediate Wave Momentum stacks and enhanced Puffer mechanics. It dramatically improves rotation consistency over just fundamental damage increases.
Vaporize vs Burn-Vape differences? Vaporize uses direct Pyro application requiring precise timing. Burn-Vape establishes stable Burning status through Dendro+Pyro for more resilient auras. Vaporize offers higher damage ceiling, Burn-Vape provides easier management for learning players.
Looking to secure Mualani’s constellations and signature weapon? Genshin Crystals can help optimize your pulls for maximum Hydro DPS performance.


