

Understanding Burgeon Self-Damage Mechanics
Burgeon occurs when Pyro hits Dendro Cores (created from Dendro+Hydro). The triggering Pyro character receives AoE Dendro self-damage scaling with Elemental Mastery—the same stat increasing Burgeon's damage output. Higher EM builds deal more damage to enemies and yourself.
Unlike Overload or Electro-Charged, Burgeon self-damage can't be negated through elemental shields or resistance buffs. Only shields and healing work.
For competitive Burgeon teams, Genshin Impact Recharge through BitTopup provides fast, secure Genesis Crystals for constellations and weapons enhancing survivability.
Damage Calculation and Scaling
Burgeon damage scales exclusively with triggering character's level and EM, independent of ATK or CRIT. At level 90 with 800 EM, single Burgeon deals 30,000 damage to enemies—roughly 5% as self-damage (1,500).
Thoma's Burgeon build needs 220-230% Energy Recharge without C4 (which restores 15 Energy). 4pc Flower of Paradise Lost grants +80 EM and +40% Burgeon damage at max stacks—optimal for dedicated triggers.
Reaction sequence: Dendro → Hydro (creates Cores) → Pyro (triggers Burgeon). Multiple cores detonating simultaneously compound self-damage within milliseconds.
- Thoma's Burst: Triggers Fiery Collapse every 1 second for 15 seconds
- Mavuika's Burst: 500% ATK AoE Pyro every 3 seconds, slower but controlled
Mavuika Burgeon Analysis
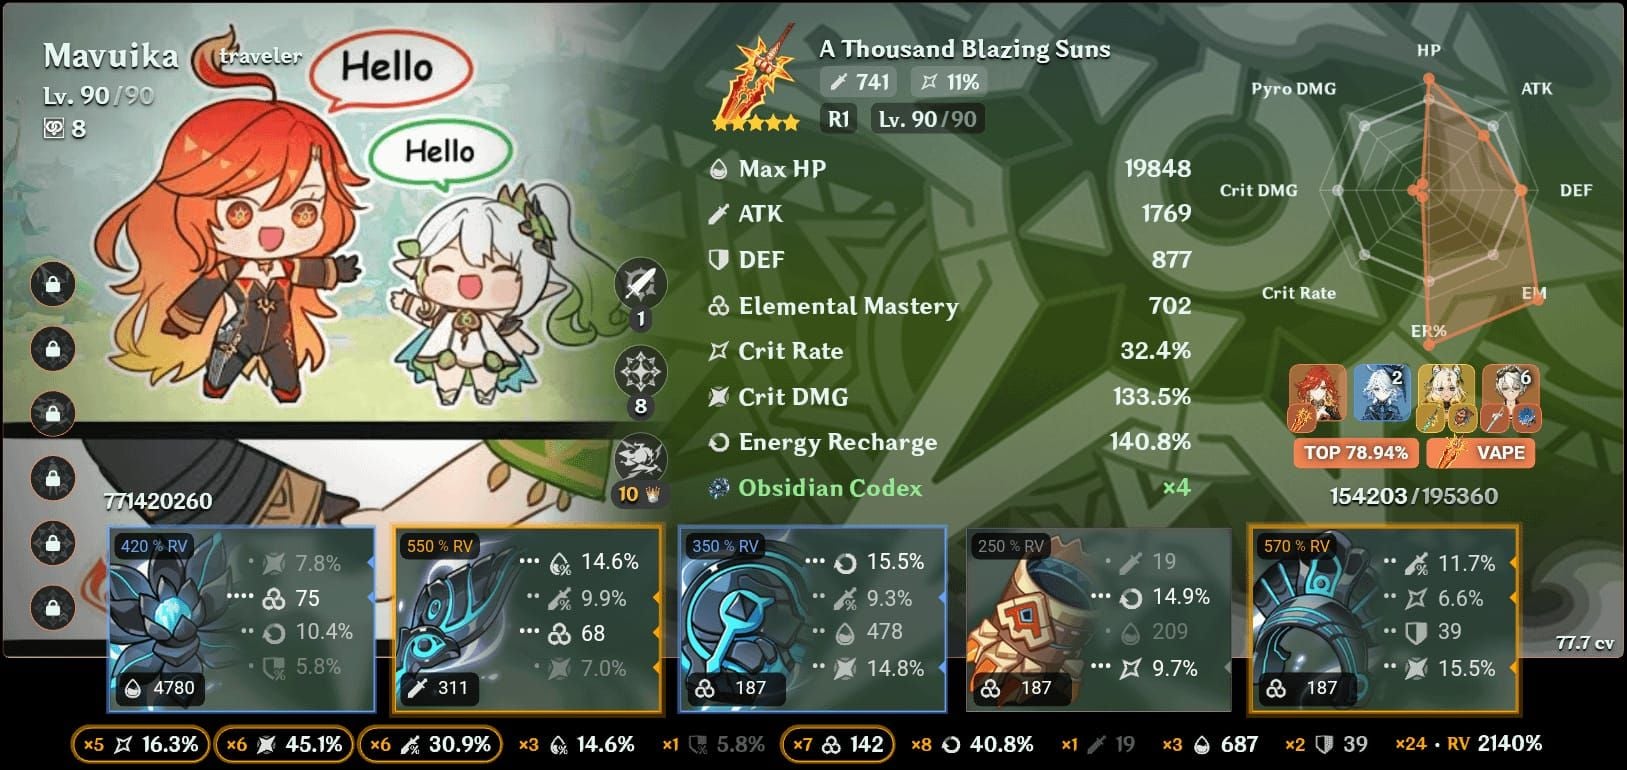
Mavuika: 5-star Pyro Claymore, 12552 base HP, 359 base ATK, 88.4% CRIT DMG at Level 90. Kit prioritizes offense over defense—high-risk playstyle demanding precise team building.
Elemental Burst Hour of Burning Skies: 200% ATK initial AoE Pyro, then 500% ATK AoE Pyro every 3 seconds. Slower than Thoma's 1-second ticks, providing breathing room for healers between triggers.
Elemental Skill The Named Moment: Summons Ring of Searing Radiance, decreases enemy DEF by 20%. Amplifies team damage beyond Burgeon reactions.
Survivability Features
- No shields, damage reduction, or healing
- 12552 base HP vs Thoma's 10331 (~21% more raw HP)
- Fighting Spirit mechanic encourages extended field time, conflicting with quick-swap healing rotations
- Must rotate to healers before HP drops below 40%
Optimal Artifacts
Pure Burgeon: 4pc Flower of Paradise Lost (+80 EM, +40% Burgeon damage) Hybrid: Scroll of the Hero of Cinder City (personal damage + team Pyro bonus)
Main stats:
- Sands: EM (damage) or HP% (survival in shieldless)
- Goblet: Pyro DMG% (personal damage) or EM% (Burgeon)
- Circlet: EM (pure Burgeon) or CRIT (hybrid)
Substat priority: ER to threshold > EM > HP% > CRIT
Constellation Impact
C0 requires dedicated healing and careful rotations. No survivability tools in base kit. C2 enhances damage, not defense. C6 Thoma increases party Normal/Charged/Plunge damage by 15% for 6 seconds—Thoma enables through protection, Mavuika through damage.
Thoma Burgeon: Shield-Based Strategy
Thoma's viability: consistent Pyro application + self-sustaining shields.
Elemental Skill Blazing Barrier: 8-second shield, 15-second cooldown. Level 10: absorbs 12.96% Max HP +1525.
Elemental Burst Scorching Ooyoroi: Generates shield stacks via Fiery Collapse every 1 second for 15 seconds. Imbricated Armor passive: +5% shield strength per stack, max 5 stacks = 35.28% Max HP +4152 total absorption. At 250% Pyro effectiveness, comfortably absorbs Burgeon self-damage.
Shield Mechanics
- Burst: 20-second cooldown, 80 Energy cost
- Needs 220-230% ER without C4
- Skill generates 3.5 particles per cast
- Shield overlap: casting Skill while Burst shields active stacks absorption
Uptime: 90-95% with proper ER. Skill's 8-second duration + 15-second cooldown = 7-second gap, filled by Burst shields refreshing every second for 15 seconds.
Build Priority
Stats: 800+ EM, 220%+ ER, 25,000+ HP
Best weapon: Kitain Cross Spear R5 (achieves 210% ER benchmark, provides 110 base EM)
Artifacts: 4pc Flower of Paradise Lost, EM/EM/EM main stats
Why Thoma Dominated Pre-Mavuika
Only combination of consistent off-field Pyro + self-sustaining survivability. Shields eliminate healer need, freeing team slots. 4-star accessibility lowered entry barriers.
Meta teams:
- Kinich-Nahida-Thoma-Xingqiu
- Ayato-Thoma-Nahida-Baizhu
- Alhaitham-Thoma-Xingqiu-Nahida
Direct Comparison
Damage Output
Mavuika wins. 500% ATK Burst multipliers every 3 seconds + 88.4% base CRIT DMG + DEF reduction = substantially higher personal DPS. Testing shows Mavuika teams achieve 15-20% higher total DPS than Thoma, assuming survival met.
Survivability
Thoma: 35.28% Max HP +4152 shields at 250% Pyro effectiveness = 10,000-12,000 absorption per cycle on 30,000 HP builds. Absorbs 3-4 Burgeon triggers comfortably.
Mavuika: Needs healers providing 3,000-4,000 HP per rotation minimum. Baizhu, Kokomi, or Yaoyao mandatory, consuming team slots.
Energy & Rotations
Thoma: 80 Energy, needs 220-230% ER via Kitain Cross Spear + ER Sands. Rotation: Skill → Burst → swap to enablers → return for Skill refresh. 20-second Burst cooldown aligns with standard rotations.
Mavuika: 80 Nightsoul points every 15 seconds. Smoother in Natlan-heavy teams, requires careful management in traditional Burgeon comps.
Team Flexibility
Thoma: Self-sufficient shielding allows pure damage dealers + enablers without healers. Max offensive potential.
Mavuika: Mandates healer, reducing flexibility. DEF reduction + higher personal damage justify trade-off where raw DPS outweighs comfort. Genshin Top Up Cheap via BitTopup offers competitive rates for optimizing these teams.
Surviving Without Shields: Healing Strategies
Each Burgeon trigger deals ~5% of explosion damage as self-damage. 30,000 damage Burgeon = 1,500 self-damage per trigger. Mavuika's 3-second interval allows 2-3 triggers per rotation = 3,000-4,500 self-damage before enemy attacks.
Healer requirement: 4,000+ HP per rotation to maintain safe thresholds above 50% HP.
Calculating Healing Per Second
Total self-damage per rotation ÷ rotation length = HPS needed.
20-second rotation with 4,500 Burgeon self-damage = 225 HPS minimum. Adding 1,000 average enemy damage = 275 HPS required.
Best Healers
Baizhu: Highest healing + Dendro application + Crystallize shields. Burst scales with Max HP, provides team shields. Triple-role functionality.
Yaoyao: Budget healing + Dendro, but needs HP builds sacrificing personal damage.
Kokomi: Superior Hydro for Core generation while healing, but occupies Hydro slot.
Rotation Timing
Place healer abilities immediately after Mavuika's Burst, allowing HoT to tick during Burgeon triggers.
Example: Nahida Skill → Xingqiu Burst → Baizhu Skill+Burst → Mavuika Burst
Stagger Pyro application to allow healing ticks between triggers. Don't cluster all Burgeon at rotation start before healing activates.
Interruption Resistance
Without shields, interruption resistance critical. Mavuika's Claymore provides inherent poise vs light attacks. Position behind enemies or against walls to minimize knockback.
Kokomi provides interruption resistance during Burst. Time Mavuika's Burst during these windows for smooth rotations.
Tested Team Compositions
Mavuika Shieldless
Team: Mavuika + Nahida + Xingqiu + Baizhu
Artifacts:
- Mavuika: 4pc Flower of Paradise Lost (EM/Pyro DMG/CRIT)
- Nahida: 4pc Deepwood Memories (EM/EM/EM)
- Xingqiu: 4pc Emblem of Severed Fate (ATK/Hydro/CRIT)
- Baizhu: 4pc Deepwood or Ocean-Hued Clam (HP/HP/Healing Bonus)
Thoma Standard
Team: Thoma + Nahida + Ayato + flex (Dendro/Anemo)
Thoma build: 4pc Flower of Paradise Lost, EM/EM/EM, 800+ EM, 220%+ ER via Kitain Cross Spear
Spiral Abyss Floor 12 Results
Mavuika teams: Maintained 60-70% average HP with proper rotations. Deaths from rotation errors—delaying healer or clustering triggers before healing ticked.
Thoma teams: Maintained 80-90% HP, minimal risk. Clear times 10-15 seconds slower than Mavuika due to lower personal damage, but higher consistency.
Overworld Performance
Mavuika: Superior burst damage secures faster clears in <30 second encounters. Self-damage doesn't accumulate to threatening levels. Healers optional for exploration.
Thoma: Shields provide QoL in extended domain farming with multiple waves. Eliminates mental load of HP monitoring during repetitive content.
Advanced Optimization
Weapon Selection
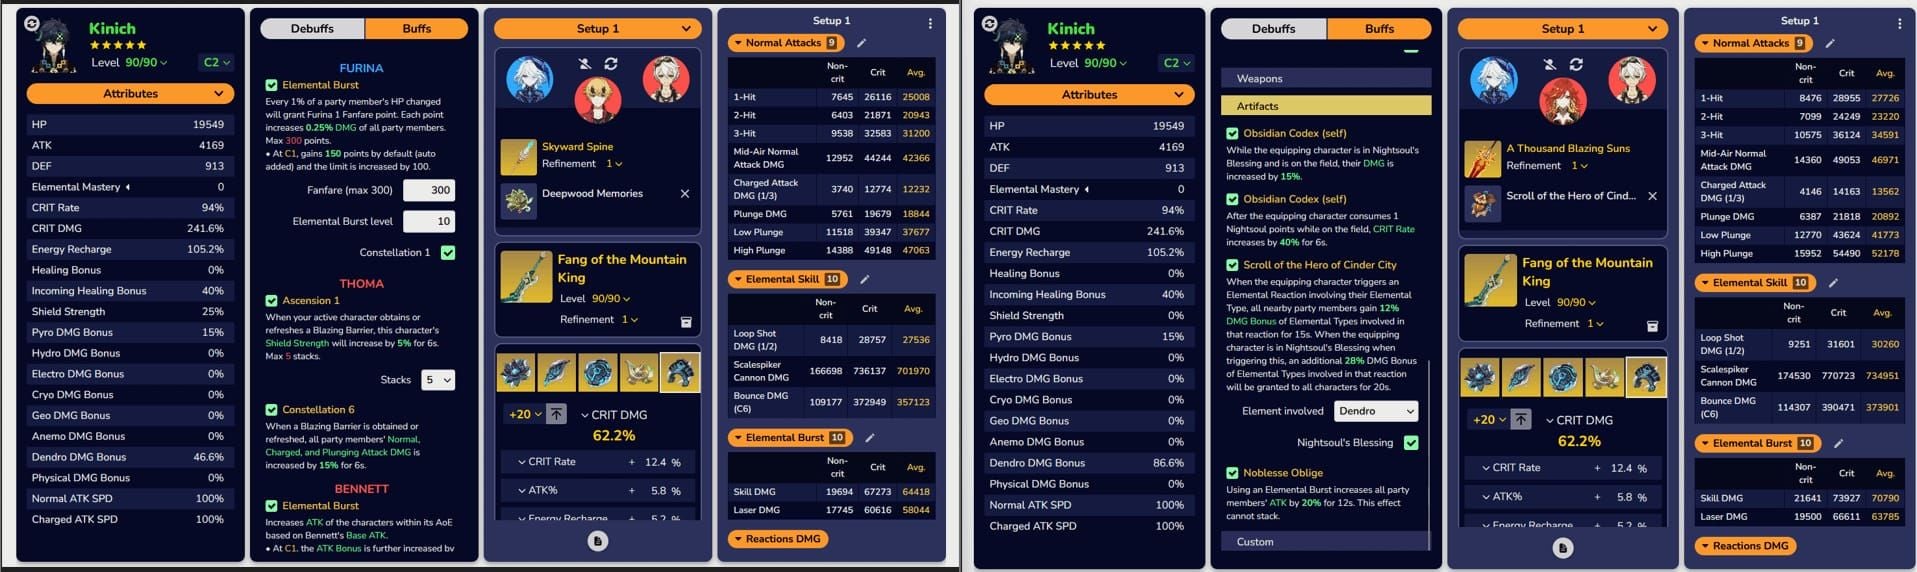
Mavuika:
- Fang of the Mountain King: Offensive stats for hybrid builds
- Scroll of the Hero of Cinder City: Team-wide Pyro damage
- Limited 4-star Claymore EM options restrict flexibility
Thoma: Kitain Cross Spear (565 base ATK, 110 EM) best-in-slot for Burgeon
EM Breakpoints
Burgeon damage increases linearly with EM without diminishing returns until 1000+.
Practical targets:
- 800 EM: Strong damage without excessive investment
- 1000+ EM: Maximum output, requires perfect substats
Thoma reaches 800 EM easier via Kitain Cross Spear (110 EM) + 4pc Flower (80 EM). Mavuika needs EM main stats on Sands/Goblet/Circlet, sacrificing personal damage.
Healer Stats
Healers need 30,000+ HP for sufficient output. Healing Bonus Circlets increase effectiveness by 35-40%, often outperforming HP% Circlets.
ER requirements:
- Baizhu: 180-200%
- Kokomi: 140-160% (70 Energy Burst)
Common Mistakes
Over-Investing in EM
Pure EM on Mavuika sacrifices substantial personal damage from high base ATK + CRIT DMG. Hybrid builds balancing EM with offensive stats often outperform pure Burgeon in total team damage.
Thoma benefits from pure EM since personal damage minimal regardless. Shield scales with HP, but EM takes priority.
Ignoring Interruption Resistance
Without shields, positioning critical. Stay mid-range, use terrain, time Bursts during enemy cooldowns. Mavuika's Claymore provides super armor during certain animations—learn timings to tank light attacks.
Poor Rotation Timing
Activating Mavuika Burst before healer abilities causes HP to drop dangerously. Proper sequence: healing first, allowing HoT before Burgeon self-damage begins.
Don't extend Mavuika field time beyond necessary Burst casts. Minimize active time, swap to healers immediately.
Practical Tips
Positioning
Cores spawn at enemy positions after Hydro+Dendro. Maintain distance from clustered enemies to prevent multiple simultaneous detonations compounding self-damage.
Focus Pyro on isolated enemies first, triggering separated cores rather than clusters.
Food Buffs
DEF foods don't protect against Burgeon self-damage. HP-increasing dishes expand health pool. Adeptus' Temptation (+372 ATK, +8% CRIT) or Jade Parcels (+320 ATK, +10% CRIT DMG) for offense, but neither affects survivability.
Sweet Madame or Mondstadt Hash Browns for emergency recovery between Abyss chambers.
Dodge vs Tank
Light attacks (2,000-3,000 damage) can be tanked if healing exceeds combined damage. Heavy attacks (5,000+) require dodging—create HP deficits too large for HoT recovery.
Learn enemy telegraphs. Minimize unnecessary dodges to maintain DPS uptime.
Enemy-Specific Adjustments
Frequent AoE enemies (Ruin Guards, Lawachurls) need conservative positioning + higher healing. Maintain HP above 60% to survive unexpected combos.
Against single-target bosses with predictable cycles, time Burgeon during recovery phases when incoming damage pauses.
Final Verdict
Mavuika: High-skill, maximum damage. Shieldless gameplay demands HP management and healing timing. Rewards mechanical proficiency with superior clear times. For players comfortable with active management and confident rotations.
Thoma: Accessible, forgiving. Shields eliminate HP monitoring stress. 15-20% DPS sacrifice worthwhile for consistency and reduced cognitive load. For players prioritizing comfort.
Investment Requirements
Thoma: 4-star accessible, straightforward 4pc Flower farming, Kitain Cross Spear craftable. Functional teams within 2-3 weeks focused resin.
Mavuika: 5-star acquisition, potential weapon banner, 5-star healers (Baizhu/Kokomi). 4-6 weeks minimum, constellations increase requirements.
Future-Proofing
Thoma: Stable role regardless of future releases. Shield utility + consistent Pyro ensure continued viability. Long-term value for reliable performance.
Mavuika: Higher damage ceiling positions favorably for difficulty increases. Superior output maintains relevance as Abyss demands greater DPS. Offensive scaling adapts to power creep effectively.
Choose based on resources, mechanical comfort, content priorities. Casual players favor Thoma's consistency, competitive players leverage Mavuika's damage potential.
FAQ
Does Mavuika take less Burgeon self-damage than Thoma? No, both receive identical self-damage based on EM. Mavuika's 12552 base HP vs Thoma's 10331 (~21% more) provides larger buffer, but doesn't reduce incoming damage.
Can Burgeon survive without shields? Yes, with 4,000+ HP per rotation healing. Baizhu, Kokomi, or Yaoyao built with 30,000+ HP enable shieldless gameplay, requiring more active HP management.
How much healing for Mavuika Burgeon? Minimum 225-275 HPS. Calculate: (self-damage 3,000-4,500 + enemy damage 1,000-2,000) ÷ rotation length 18-22 seconds. Higher EM increases self-damage proportionally.
Is Thoma's shield necessary? No, but provides significant QoL. 35.28% Max HP +4152 at 5 stacks absorbs 10,000-12,000 damage, eliminating healer need and freeing team slots. Shieldless achieves comparable performance with proper healer investment.
What HP threshold is safe shieldless? Maintain above 50%. Below 40%, heavy attacks + simultaneous Burgeon can cause sudden death before HoT recovers. High-pressure Abyss: maintain 60%+.
Does EM affect self-damage? Yes, scales proportionally. 800 EM causes ~1,500 self-damage per trigger, 1000+ EM increases to 1,800-2,000. Balance EM against healing capacity.


