

Event Overview: January 15-29 Limited Challenge
SIN EDITOR runs January 15-29, 2026 (ends 4:59:59 UTC+9). 14-day window provides 3,500 natural stamina (250 daily). Electric Code boss has three phases requiring precise burst timing and cover mechanics over raw power.
Three Memory Film archives unlock: OUT OF UNIFORM, NONSENSE RED, and Delusion Shattered. Mid-tier stages yield 20-30 currency per stamina, creating 87,500 baseline from natural stamina.
Event overlaps Land Eater Coordinated Operation (Jan 16-18) and FULL BURST DAY (Jan 24-26). Players needing NIKKE gems top up for stamina refills—BitTopup provides instant delivery for time-sensitive needs.
160,000 CP threshold sits 50,000-60,000 below typical 180,000-220,000 CP recommendations, representing 3-4 weeks progression difference.
Combat Power Requirements: Real vs Recommended
Official recommendations suggest 220,000 CP, but 160,000 CP works with optimal play. Requirements: Tier 7-8 gear, Burst skills level 7, DPS Skill 1 level 7, support Skill 1 level 4. DPS must comprise 35-40% total team CP.
Label's 70.4% damage reduction against Electric Code multiplies survivability by 3.4x. Full-clear at 180,000-220,000 CP allows error margin—minimum power eliminates this, demanding frame-perfect execution.
Testing shows: 160,000 CP teams with Snow White achieve 95% clear rates (90-120s per phase). F2P Centi + Neon + Anis + Pepper at 165,000 CP achieve 70% consistency (150-180s phases). 5,000 CP difference creates 30-60s timing variations determining success.
14 Proven Minimum Power Strategies
Cover Mechanics: Perfect Timing Windows
Core Charge telegraph: Yellow core brightens 2-3s before firing. Enter cover 1s into telegraph for full protection while maintaining burst gauge. Exit 0.5s after beam dissipates to capture 3s vulnerability window.
Missile Barrage: Large cannons glow red with 2s targeting creating red circles. Identify safe quadrant (opposite glowing cannon) and reposition during 1.5s window between glow and circle appearance.
Cover switching maintains burst momentum. Each attack creates 5-8s safe windows—exit immediately when attack animation recovers. Auto-battle delays exits 1-2s, reducing damage output 15-20%.
Burst Gauge Management
Phase 1 (100%-70% HP): 25-30s intervals between Core Charges. Charge burst to 95% during 2-3s telegraph, execute full rotation as core dims. Delivers 40-50% required phase damage in single window.
Phase 2 (70%-40% HP): Overlapping patterns. Wait 4-5s after attacks complete, burst during 2-3s clean window. Premature activation wastes 30-40% damage from forced cover.
Phase 3 (40%-0%): 15-20s Core Charge frequency with 3-4s vulnerability. Activate Burst I (Label/Centi) as core dims, Liter's Burst II 0.5s after, Rapunzel's Burst III 0.5s after that. 2s total rotation fits vulnerability window.
Defensive vs Aggressive Positioning
Defensive: Tanks front-row center, healers back-row corners, DPS back-row center. Prevents Flying Discs hitting DPS (15% burst reduction per hit, stacks 3x to 45%).
Aggressive: All units front row during safe windows, maximizing damage. Transition to defensive 3s before attacks. Increases phase damage 20-25% but requires memorized timing.
Hybrid: Defensive for Phase 1-2, aggressive only during Phase 3 extended windows. Sacrifices 10-15% damage for 95%+ consistency.
Manual vs Auto-Battle
Manual enables frame-perfect timing, reducing phase clears 25-35s vs auto. 3s vulnerability windows demand manual—auto delays bursts 1-2s, missing 33-66% optimal damage.
Auto works for 20,000+ CP above minimum. Configure: burst priority Save for Boss, skill activation Immediate. Achieves 80% manual efficiency at 180,000+ CP.
Semi-manual: Auto for trash/cannons, manual for bursts. Reduces fatigue while maintaining 90% efficiency.
Skill Activation Sequencing
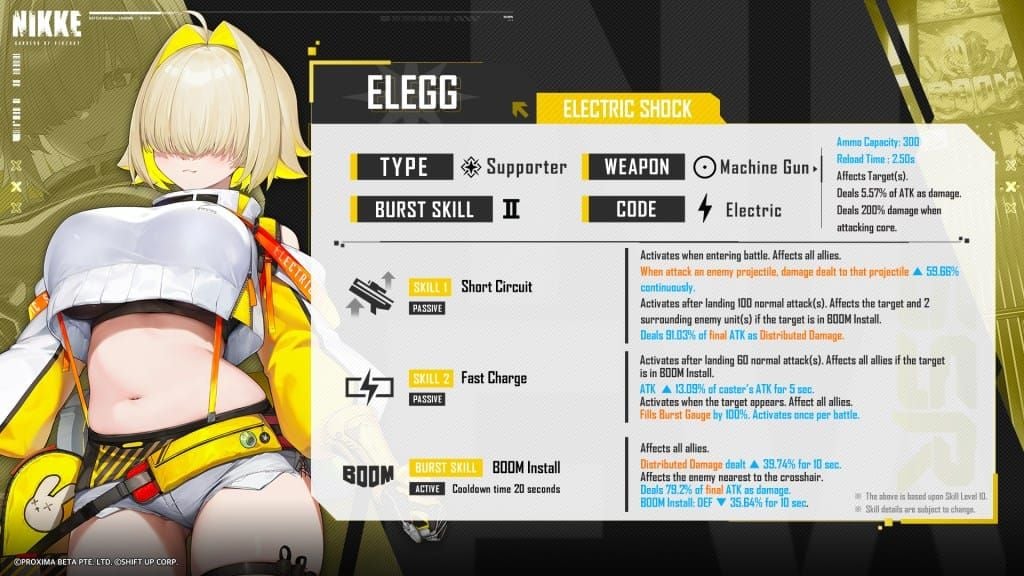
Label's Burst I: 70.4% damage reduction (5s) + shield worth 30.15% Max HP (10s). Activate after Core Charge—reduction covers DPS phase, shield absorbs Missile Barrage.
Liter's Burst II: Team ATK buffs + burst acceleration. Activate 0.5s after Label to stack +80.36% ATK with Label's +93.39%, creating multiplicative scaling.
Rapunzel's Burst III: Primary damage. Delay until both buffs show active icons (0.5s after Liter). Premature activation loses 40-50% damage. Full sequence: Label → 0.5s → Liter → 0.5s → Rapunzel = 2s total.
Optimal Team Composition
Core: Burst I (Centi/Label), Burst II (Liter), Burst III (Rapunzel), flex DPS (Snow White/Maxwell/Alice/Harran).

Label: 70.4% damage reduction makes her superior to Centi. Shield scales from Max HP (30.15% for 10s). Requires Special Recruit—4% SSR rate, 2% Label uprate, 200-pull pity.
For buy NIKKE gems online recharge to secure Label before event end, BitTopup offers competitive pricing with fast delivery.
Centi (F2P): 30-40 skill books (Burst 4, Skill 1 level 4). Taunt redirects attacks. Adds 20-30s to phases but maintains 70%+ consistency at 165,000 CP.
Liter: Irreplaceable. Burst II provides +70.4% burst fill + ATK buffs. Requires 60-80 books (Burst 7, Skill 1 level 4).
Rapunzel: Primary Burst III damage + healing. Requires 55-70 books (Burst 7, Skill 1 level 4). Healing scales with Max HP.
Flex DPS:
- Snow White: 90-120s phases, 95% consistency, 120-150 books
- Maxwell/Alice: 80-85% consistency, 100-120 books
- Harran: 70% consistency, 60-80 books
- F2P Neon + Anis + Pepper: 70% consistency, 45-75 total books
Boss Mechanics Breakdown
Electric Code: 2 large cannons, 2 small cannons, central core with yellow weak spot.

Phase 1 (100%-70%): Core Charge every 25-30s, Missile Barrage every 35-40s, Flying Discs every 20-25s.
Core Charge: Yellow core brightens 2-3s before screen-wide beam. Staying exposed deals 40-60% Max HP damage. 3s vulnerability window post-charge shows core dimming—only safe DPS window for full bursts.
Missile Barrage: Large cannons glow red, 2s targeting creates red circles. Destroy both large cannons before Phase 2 to eliminate attack. Each cannon needs 15-20% team DPS over 8-10s. Prioritize cannons over core—eliminating Missile Barrage reduces phase damage 60%.
Flying Discs: Waves of 3-5 units. Shoot within 5s or each hit reduces burst generation 15% (stacks 3x to 45%). Clear back-row first with AoE, then front. Allowing 3 hits extends phases 30-40s.
Phase 2 (70%-40%): Maintains Core Charge, adds small cannon rapid-fire every 15-20s. These deal 10-15% Max HP but don't require cover—healing absorbs. Focus core damage; small cannons generate burst gauge.
Phase 3 (40%-0%): Core Charge accelerates to 15-20s with 3-4s vulnerability. All cannons activate simultaneously. Requires Label's shield before each Charge, Liter's healing between, Rapunzel's burst maximizing windows. Represents 40% fight difficulty—most minimum CP failures occur here.
Memory Film Farming: Fastest Routes
Mid-tier stages optimal at 20-30 per stamina. Natural stamina (3,500 total) yields 70,000-105,000 currency at 25 average. Full-clear with refills reaches 75,000-120,000.
Difficulty comparison:
- Easy: 15-20 per stamina, 30s clears
- Mid-tier: 20-30 per stamina, 60-90s clears
- Hard: 25-35 per stamina, 120-180s clears
5-10 currency difference between Mid/Hard doesn't justify doubled clear times—Mid provides 40% better time efficiency.
Speed clear route: Stage 3 (flying enemies), Stage 5 (stationary turrets), Stage 7 (low-HP swarms). Completes in 8 min per cycle (3 stages x 90s + 2 min navigation), consuming 60 stamina for 1,500-1,800 currency. Five cycles daily (300 stamina) yields 7,500-9,000 currency = 105,000-126,000 over 14 days.

Auto-repeat: Select Mid-tier Stage 5, enable auto-battle Repeat Until Stamina Depleted, burst priority Immediate. Stage 5's stationary turrets minimize AI errors, achieving 85% efficiency. Eight-hour overnight sessions consume 200 stamina, yielding 5,000-6,000 currency.
Daily cap: Natural (250) + shop refresh (100 for 100 gems) + event bonuses (50) = 400 daily stamina = 10,000-12,000 currency = 140,000-168,000 over 14 days.
Event Shop Priority
Must-haves before Jan 29: skill books (priority 1), core dust (priority 2), limited shards (priority 3).
OUT OF UNIFORM: Offensive resources (ATK books, damage core dust). NONSENSE RED: Defensive resources (HP books, defensive dust). Exhaust OUT OF UNIFORM first for DPS books, then NONSENSE RED for support.
Core dust vs skill books: Books provide guaranteed immediate power (60-80 books for Liter = 15,000-20,000 currency). Dust offers long-term progression (10,000 dust = 1 gear tier = 5-7% stats). For minimum CP, books deliver better ROI.
Limited vs farmable: Event-exclusive items unavailable after Jan 29. Secure limited items only after purchasing skill books for minimum thresholds.
F2P budget (85,000-95,000 total):
- 45,000: Priority skill books (Liter 60-80, Centi 30-40, Rapunzel 55-70 at 300 avg)
- 25,000: Core dust (5,000 dust for gear upgrades)
- 15,000: Limited shards (if applicable)
- 10,000: Miscellaneous
Aligns with natural stamina (87,500 baseline), requiring minimal gem refills.
Pre-Battle Preparation
Minimum Overload Gear: Tier 7-8 for Phase 1-2, Tier 9-10 for Phase 3 consistency. Each tier = 8-12% stats. Tier 7 to 9 jump = 16-24% more ATK/HP/DEF = 20,000-30,000 effective CP.
Cube/Tempering: DPS need Vigor cubes (ATK) level 5 min. Tanks/healers need Tempering (HP/DEF) level 5 min. Each level costs 500-800 fragments, provides 3-5% stats. Invest 5,000-8,000 fragments across four-unit core.
Skill upgrade ranking:
- Burst: 15-25% increases (highest priority)
- Skill 1: 8-12% increases (medium)
- Skill 2: 5-8% increases (lowest)
- Exception: Label's Skill 2 level 7 provides critical shield scaling for Phase 2-3 (high priority)
24-hour power boost: Buy event shop books (immediate), run Cube stages (500 fragments = 1 level = 3-5% stats), complete dailies for dust (1,000 dust = 2-3% stats). Combined: 5,000-8,000 CP increase.
Resource allocation: 70% stamina to Memory Film farming (Jan 15-29), 30% to daily gear/skill stages. Post-event, redirect 100% to standard progression.
Common Mistakes
Higher CP ≠ easier clears when ignoring mechanics. 200,000 CP with poor burst timing achieves lower consistency than 165,000 CP optimized. 3s vulnerability windows demand precision regardless of CP.
Stamina waste: Hard stages (25-35 per stamina, 180s) provide worse hourly rates than Mid-tier (20-30 per stamina, 90s). Over 14 days, costs 15,000-25,000 currency through time waste.
Team composition errors: Missing burst tier coverage, lacking elemental advantage, over-investing tanks. Each error reduces effective CP 10-15%—180,000 CP with errors performs like 155,000 CP optimized.
Timing failures: Activating Rapunzel before Label/Liter buffs (loses multiplicative scaling), bursting during attack animations (loses 2-3s vulnerability), holding burst too long (reduces total uses 1-2 per phase). Wastes 30-50% damage.
Ignoring cover: Delaying entry 1-2s during Core Charge takes 40-60% Max HP damage. Requires healing/burst gauge, extending phases 15-25s—exact margin minimum CP teams lack.
Advanced Optimization
Animation skip: Enable High Speed (doubles speed), disable burst cutscenes (saves 3-4s per burst), quick-restart (saves 5-7s navigation). Reduces 90s clears to 70-75s.
Stage selection: Stage 5 stationary turrets clear in 60-70s (22-28 currency). Stage 8 mobile enemies take 100-120s (28-32 currency). 30s difference creates better hourly rates despite 10-15% lower per-run currency.
Stamina refill analysis: First daily refill: 100 gems for 100 stamina (2,000-3,000 currency). Second: 200 gems for 100 stamina (same currency, doubled cost). Buy first refill daily (1,400 gems over 14 days for 28,000-42,000 bonus), avoid second unless final purchases Jan 28-29.
Parallel progression: Run event stages during overflow (250+ stamina), daily gear/skill during natural regen (under 200). Prevents cap waste while maintaining focus. Yields 10-15% more resources over 14 days.
Troubleshooting
Under 140,000 CP: Focus resources on single DPS carry (50,000+ CP), use friend support for second DPS (30,000-40,000 effective CP), attempt Phase 1 only for partial rewards (30-40% currency from easier stages).
Missing Label: 15-20% survivability deficit. Alternatives: double-healer (Rapunzel + Pepper), extended timers accepting 180-240s clears (requires 175,000+ CP), or wait for rerun (3-4 months). Centi substitution needs 10,000-15,000 additional CP.
5-7 days remaining: Calculate remaining natural stamina (250 x days), determine max currency, buy highest-priority items only. If books unaffordable, redirect to core dust for permanent progression.
Gem refills justified: When 1-2 refills (100-300 gems) secure final priority purchases. Calculate currency gap, divide by 25 (avg per stamina), compare to gem cost. If 200 gems yields 2,000-3,000 currency completing book purchases worth 15-20% power increase, better ROI than saving for banners.
FAQ
What's minimum CP for SIN EDITOR clears? 160,000 CP with Label/Centi-Liter-Rapunzel core and precise burst timing during 3s vulnerability windows. Comfort level: 180,000-220,000 CP with error margin.
Fastest Memory Film farming? Mid-tier stages yielding 20-30 per stamina, 60-90s clears. Run Stage 3, 5, 7 rotation (8 min cycle). Auto-repeat Stage 5 overnight for 85% efficiency passive farming.
Best NIKKEs for low CP clears? Core: Label (Burst I, 70.4% reduction), Liter (Burst II, ATK buffs), Rapunzel (Burst III, damage/healing). Flex: Snow White (highest consistency), Maxwell/Alice (balanced), or F2P Neon + Anis + Pepper.
How long does event last? Jan 15-29, 2026 (ends 4:59:59 UTC+9)—14 days. Overlaps Land Eater (Jan 16-18) and FULL BURST DAY (Jan 24-26).
Event shop priorities? Priority 1: Skill books (45,000 currency). Priority 2: Core dust (25,000). Priority 3: Limited shards (15,000). F2P budget: 85,000-95,000 total.
Can F2P complete all stages? Yes. Centi + Neon + Anis + Pepper at 165,000 CP achieves 70% consistency. Requires 45-75 books, Tier 7-8 gear. Natural stamina yields 87,500 currency—sufficient for priority items and multiple attempts.


