

Understanding the Golden Frame: Top 3% Requirements
Raid Frame III rewards the top 3% with 1,800-6,000 gems based on exact placement. Top 35 players globally get 3,000-6,000 gems plus Mother Whale Frame III, while 0%-1% earns 1,800-2,400 gems.
Challenge Mode syncs all Nikkes to level 400, making composition and execution more important than raw power. You unlock it by clearing all 7 Normal Mode levels (17M-329M HP). While 50,000 points is baseline competitive, Golden Frame realistically starts at 70,000. Top performers hit 100,000+ with 14 seconds remaining. Players with 220k-240k CP regularly score 70k-80k with optimized strategies. For faster progression, nikke gems top up through BitTopup provides secure resource access.
Scoring Mechanics
- 70% base damage to boss
- 20% time bonus for faster clears
- 10% survival bonus for keeping teams alive
Each entry allows 5 team deployments. Nikkes can't be reused, requiring strategic roster allocation. Boss phase transitions at 75%, 50%, 25% HP trigger invulnerability—hold bursts within 5-10% of thresholds to avoid wasted damage.
Core Team Building Principles
Three-Pillar Structure: DPS, Buffer, Sustain
DPS Pillar: Burst 3 characters deliver primary damage—Alice, Snow White, Scarlet, Modernia, Maxwell, Helm, Yulha, Noir. Prioritize equipment investment here.
Buffer Pillar: CDR specialists accelerate burst generation:
- Liter: 40% CDR to highest ATK unit
- Dorothy: 20% team CDR, occupies highest ATK slot
- Blanc/Noir: 20-second CDR synergy when paired
- Volume/Dolla: Alternative CDR options
Sustain Pillar: Healers maintain survival—Helm, Summer Mary, Pepper, Soda, Noise. Survival is 10% of score, but wipes eliminate time bonus.
Element Advantage vs Raw Power
Element matching provides damage multipliers, especially pierce vs Iron bosses like Alteisen. Pierce specialists (Alice, Maxwell, Dorothy, Laplace) gain significant effectiveness with element advantage.
However, well-invested meta units often outperform poorly-synergized element-matched teams. A fully-built Scarlet team can beat element-matched alternatives through superior burst damage.
Overload Gear Priorities:
- Tier 1: ATK%, Max Ammo, Elemental Damage%
- Tier 2: Critical Rate%, Critical Damage%, Hit Rate%
- Minimum: Tier 8+ equipment with level 5+ overload for main DPS
Burst Generation Fundamentals
Optimal rotation: 20-25 second intervals with CDR buffers staggered by 2-3 seconds for continuous uptime. Don't overlap Liter and Volume perfectly—staggering extends total buff window.
Dorothy's 20% team CDR makes her ideal for highest ATK position when not primary DPS. This ensures her CDR applies to main damage dealer while contributing meaningful damage.
Burst Sequence:
- Apply CDR buffs first
- Layer damage amplification buffs second
- Unleash Burst 3 DPS during peak buff window
Whale-Tier Teams: Maximum Performance
High-Investment Pierce Team (Alteisen):
- Dorothy (B1) - CDR and pierce damage
- Harran (B3) - Primary DPS
- Laplace (B3) - Secondary DPS
- Pepper (B1) - Sustain
- Noise (B1) - Additional healing
Achieves 70,000+ points through coordinated pierce damage during turret destruction windows.
Blanc/Noir Synergy Team:
- Liter (B1) - CDR specialist
- Blanc (B2) - Damage amplification
- Noir (B2/3) - DPS and CDR synergy
- Harran (B3) - Primary DPS
- Dorothy (B3) - Secondary DPS and CDR
Creates exceptional 20-second CDR synergy for near-continuous burst cycling.
Volume Alternative Team:
- Liter (B1) - Primary CDR
- Volume (B1) - Secondary CDR
- Pepper (B1) - Sustain
- Dorothy (B3) - DPS and CDR
- Harran (B3) - Primary DPS
Volume provides CDR flexibility without Blanc/Noir. Stagger Liter and Volume bursts by 2-3 seconds for overlapping CDR windows.
F2P Golden Frame Teams
F2P viability assumes core level 7, skills 7-10, tier 7-8 equipment—achievable through daily farming without premium spending.
Accessible 70k Team:
- Dorothy (B1) - F2P pierce DPS
- Harran (B3) - Permanent pool DPS
- Laplace (B3) - Wishlist-available pierce
- Pepper (B1) - SR healer
- Noise (B1) - Event welfare healer

Verified 70,000+ scores during December 11-18 Alteisen raid with specified investment. Requires precise turret timing and burst coordination, but no limited characters.
Investment Priority for Limited Resources
Focus enhancement on primary Burst 3 DPS first—skill level 10 and tier 8 equipment before distributing to supports. A single hyper-invested DPS with adequate support outperforms evenly-distributed mediocre investment.
CDR buffers like Liter function at Burst 1 with minimal skill investment—skill level 7 provides sufficient CDR uptime. Healers need only enough to prevent wipes (skill 7, tier 6-7 equipment). For additional resources, buy goddess of victory nikke gems from BitTopup for competitive pricing and instant delivery.
Character Role Analysis
Top DPS Characters
Alice: Dominates pierce-weak encounters through Burst 3 nuke potential. Synergizes exceptionally with CDR teams for frequent burst cycling. Premier choice for Alteisen-type bosses.
Snow White: Sustained Burst 3 damage with less team reliance. Literless team: Miranda (B1), Dolla/Helm (B2), Snow White/Maxwell/Yulha (B3), Helm/Noise flex sustain.
Scarlet/Modernia: Fire and iron element specialists. Scarlet's burst damage ceiling exceeds most alternatives during optimal buff windows. Modernia provides consistent DPS across extended encounters.
Maxwell: Pierce damage with Burst 3 timing, similar to Alice but different buff synergies.
Helm: Uniquely combines Burst 2 healing with respectable DPS for roster efficiency.
Essential Buffers
Liter: 40% CDR to highest ATK unit—single most impactful support. Burst 1 timing allows early-rotation CDR that accelerates subsequent burst generation.
Dorothy: Dual value as 20% team CDR buffer and legitimate pierce DPS. Position in highest ATK slot maximizes CDR distribution.
Blanc/Noir: Unmatched 20-second CDR synergy when paired. Requires both roster slots but pays dividends in burst-heavy compositions.
Volume/Dolla: Alternative CDR for rosters lacking optimal buffers. Less powerful than Liter individually but sufficient when staggered.
Advanced Burst Rotation Strategies
Optimal Timing Windows
Standard 20-25 second cycle: Liter CDR → stagger Volume/Dorothy CDR 2-3 seconds later → Blanc/Noir damage amps → Burst 3 DPS during peak stacking.
Boss-Specific Adjustments (Alteisen):
- Hold bursts within 5-10% of 75%, 50%, 25% HP thresholds
- QTE circles at 1:20 remaining and after 1:40 elapsed
- Turret spawns: First left 2:42-2:36, right missiles 2:12-2:02, additional left 2:00, final wave 1:31-1:22
- Turrets blink red 1-2 seconds before firing—destroy immediately
Coordinating Buffs with DPS
CDR buff duration determines Burst 3 activation window. Activate within 2-3 seconds of CDR application to maximize buffed shots.
Damage amps stack multiplicatively with CDR. Ideal sequence: Liter CDR → Blanc amp → Burst 3 DPS, all within 5 seconds.
Boss targets highest ATK unit unless taunted. Placing primary DPS here ensures single-target buffs but draws aggression that may interrupt bursts.
Boss-Specific Strategies
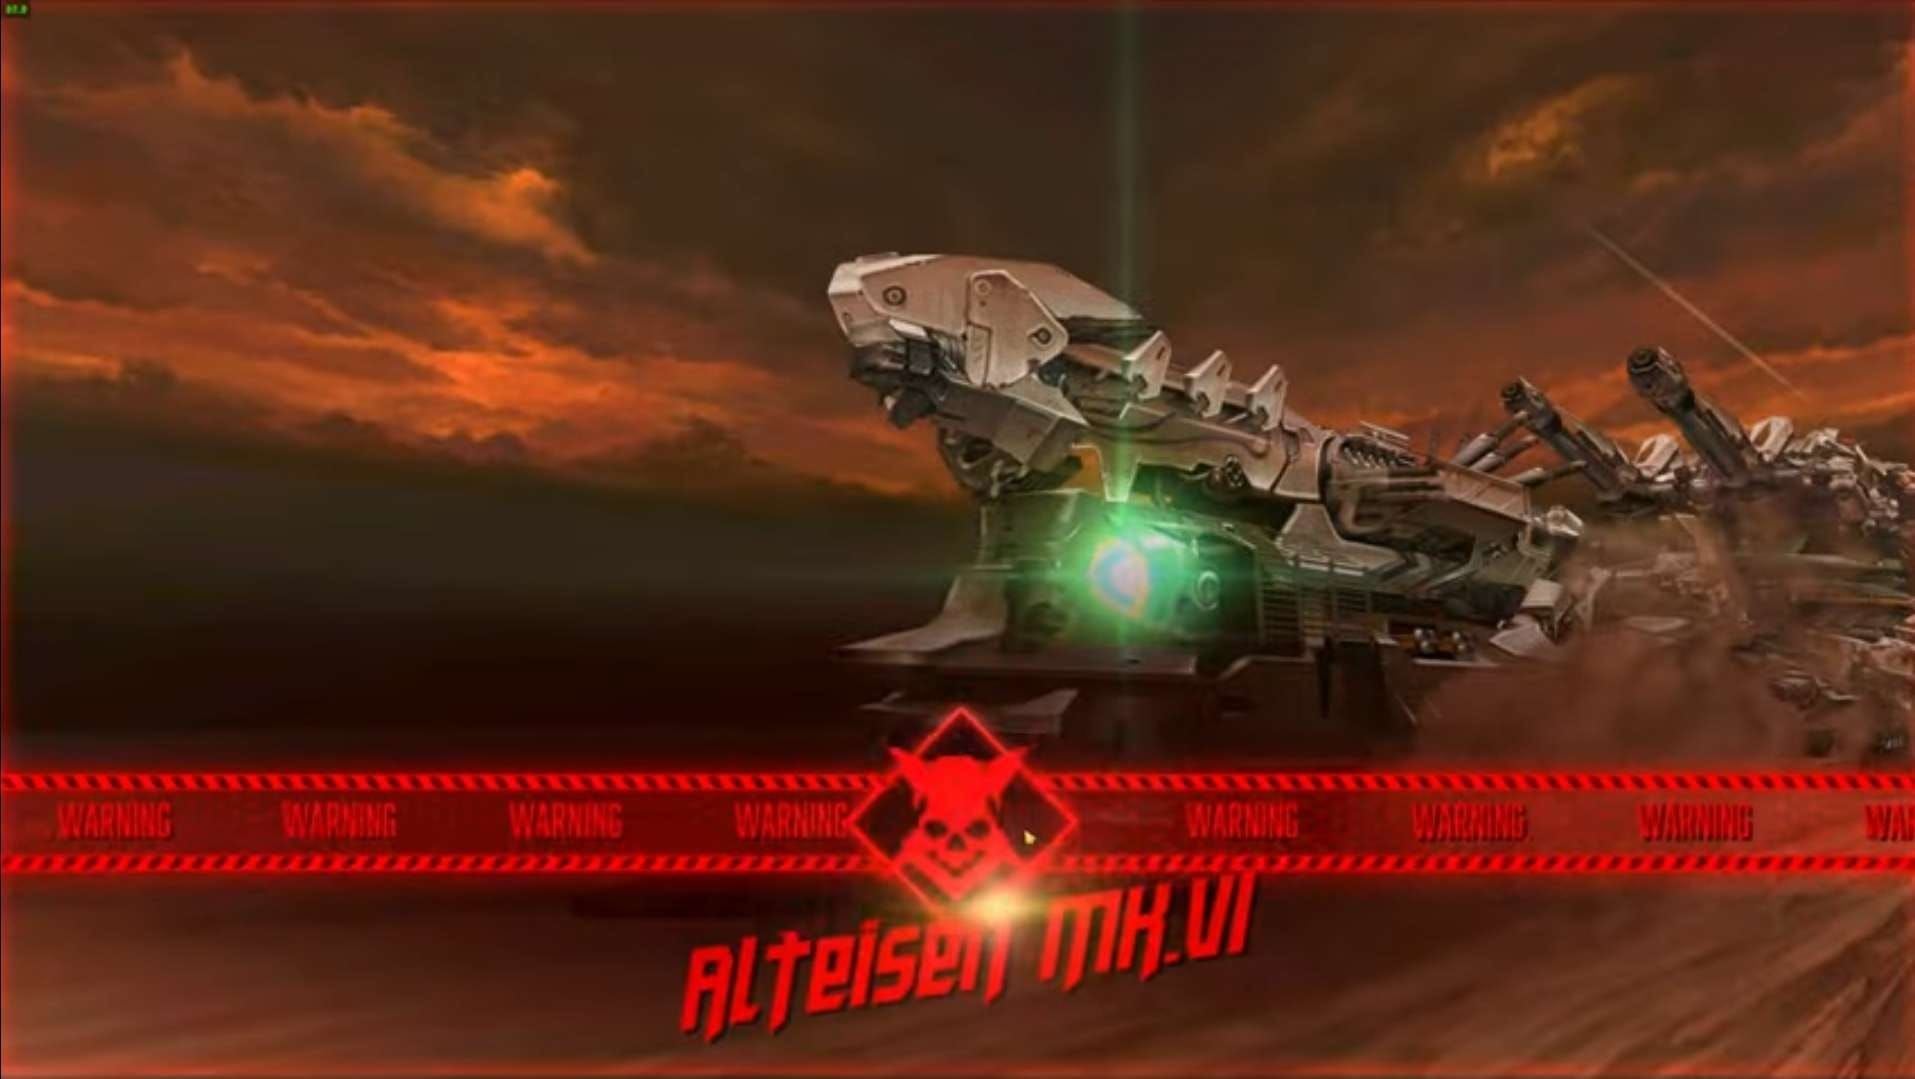
Alteisen (Iron Element, Pierce Weak)
Ran December 11-18. Iron element makes pierce specialists (Alice, Dorothy, Laplace, Maxwell) significantly more effective.
Turret Mechanics:
- Attack right missile launchers from left side
- Red blinking 1-2 seconds before firing—destroy in this window
- Phase transitions at 75%, 50%, 25% HP trigger brief immunity
Harvester (Water Shield)
12 laser attacks and 12 machine gun volleys. First QTE at 2:24 remaining, Knock-Down at 1:28 triggers elemental shield.
Water units shoot through shield—essential for maintaining DPS during defensive phase. Teams lacking water units experience severe downtime.
Pierce DPS (Alice, Maxwell) remain effective, but water specialists gain advantage during shield. Snow White's sustained damage suits extended encounter better than burst-focused alternatives.
Maiden/Diesel provide taunt mechanics to redirect aggression from fragile DPS during machine gun volleys.
Equipment and Skill Optimization
Must-Have Equipment
Tier 8+ on primary DPS is baseline for competitive scores. Stat differential between tier 7 and 8 creates measurable gaps that compound across 3-minute encounters.
Overload Priority:
- Tier 1: ATK%, Max Ammo, Elemental Damage%
- Tier 2: Critical Rate%, Critical Damage%, Hit Rate%
- Minimum: Level 5+ overload on primary DPS
Max Ammo particularly benefits sustained DPS with continuous fire. Critical builds need balanced rate and damage investment.
Skill Level Breakpoints
Skill 10: Burst 3 DPS characters—prioritize above all else. Multiplier increases create exponential damage scaling.
Skill 7: CDR buffers and supports—sufficient functionality. Liter's CDR percentage doesn't scale dramatically with levels.
Skill 7: Healers with tier 7 equipment—adequate for survival. Overinvesting wastes resources better spent on DPS.
Common Mistakes Costing Golden Frame
Misconceptions
Power Requirements: Many assume whale-level investment required. Verified 70,000+ F2P teams with core 7 and tier 7-8 equipment disprove this. Execution and synergy often outweigh raw power.
Element Obsession: Poorly-synergized element-advantaged teams underperform well-coordinated neutral element meta compositions through superior burst cycling.
Survival Overvaluation: 10% survival contribution means keeping teams alive matters, but overinvesting beyond survival thresholds diverts from 70% base damage component.
Timing Errors
Phase Transition Waste: Burst activation during invulnerability wastes entire damage windows. Triggering Burst 3 at 76% or 51% HP loses critical seconds.
Unsynchronized Buffs: Activating Burst 3 before CDR applies, or letting CDR expire before Burst 3, creates suboptimal windows that compound across cycles.
Turret Delays: Against Alteisen, hesitation allows damage accumulation threatening survival and interrupting DPS. The 1-2 second warning provides sufficient destruction time.
Resource Management
Efficient Allocation
Focus all materials on single primary DPS before distributing to secondary members. Hyper-invested Burst 3 DPS with adequate support outperforms evenly-distributed mediocre investment.
Skill Book Priority:
- Burst 3 DPS to skill 10
- CDR buffers to skill 7
- Sustain to skill 7
Equipment Priority:
- Primary DPS: Tier 8+ with level 5+ overload
- Buffers: Tier 7-8 with level 3-4 overload
- Healers: Tier 6-7 with minimal overload
Cost-Effective Development
Wishlist Optimization: Prioritize permanent pool meta (Liter, Laplace) over niche options for steady progression.
Event Welfare: Characters like Noise provide accessible sustain at baseline investment, eliminating premium healer banner spending.
Standard Recruitment: Accumulates through daily missions for consistent character acquisition without premium currency. Patient players build competitive rosters entirely free, though timeline extends significantly.
FAQ
What score do you need for Golden Frame in NIKKE Solo Raid? 70,000 points is the realistic minimum for top 3%. Top performers hit 100,000+, while competitive range typically falls between 70,000-90,000 depending on boss difficulty and meta accessibility.
Can F2P players get Golden Frame? Yes, with core 7, skills 7-10, tier 7-8 equipment. Verified teams using Dorothy, Harran, Laplace, Pepper, Noise scored 70,000+. Success requires optimized synergy, precise timing, and mechanic mastery over premium rosters.
How does scoring work? 70% base damage, 20% time bonus, 10% survival bonus. Prioritizes damage while rewarding speed and competency. Each of 3 daily entries allows 5 team deployments with non-reusable Nikkes.
Which team composition is best? Core structure: one Burst 3 DPS (Alice, Snow White, Scarlet, Modernia), one CDR buffer (Liter, Dorothy, Volume), one damage amp (Blanc/Noir, Dolla), one-two sustain (Pepper, Noise, Helm). Pierce specialists excel vs Iron bosses like Alteisen.
What burst rotation should I use? 20-25 second cycles: Liter CDR → stagger secondary CDR 2-3 seconds later → damage amps → Burst 3 DPS during peak stacking. Hold bursts within 5-10% of phase thresholds (75%, 50%, 25% HP) to avoid invulnerability waste.
What equipment should I prioritize? Primary DPS needs tier 8+ with level 5+ overload focusing Tier 1 stats (ATK%, Max Ammo, Elemental Damage%) and Tier 2 (Crit Rate%, Crit Damage%, Hit Rate%). Supports function with tier 7-8 and level 3-4 overload. Healers need only tier 6-7 with minimal overload.
Ready to dominate Solo Raid? Power up efficiently with BitTopup—instant delivery on gems, battle passes, and packages at competitive prices. Secure your Golden Frame resources today!


