

Getting the Hang of Alhaitham’s Team Building in 2025
Breaking Down Alhaitham’s Kit and What Teams Need from It
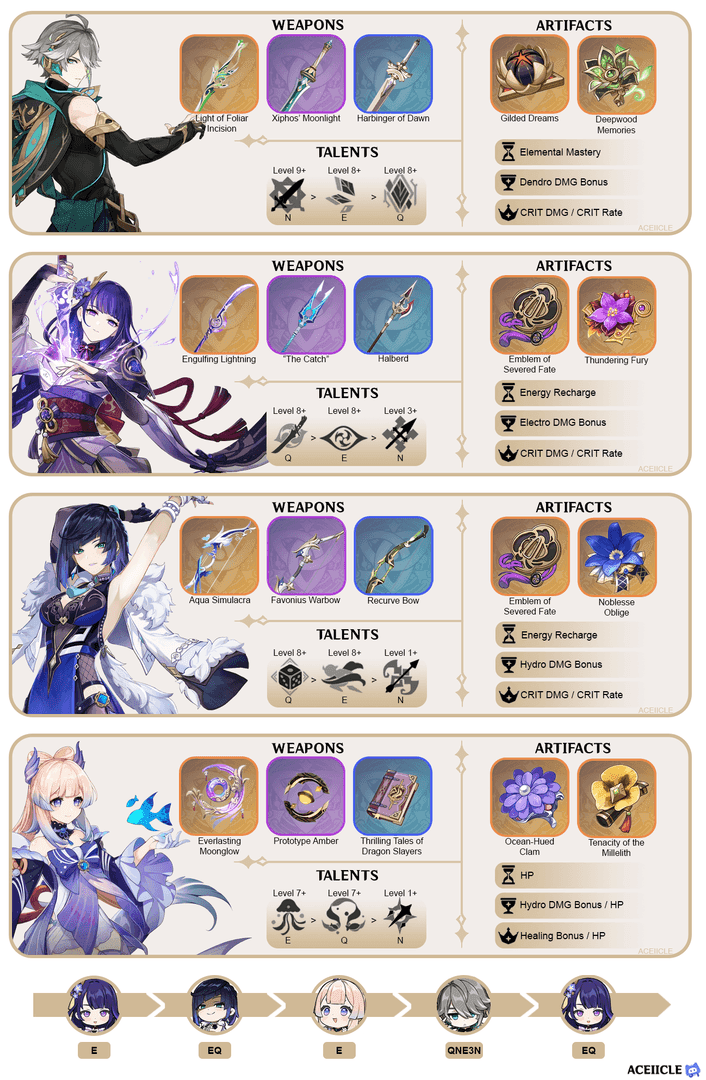
Alhaitham, that 5★ Dendro Sword guy who dropped in Version 3.4 back on January 18, 2023, hits Level 90 with 13,348 HP, 314 base ATK, 782 DEF, and a hefty 28.8% Dendro DMG Bonus. His Chisel-Light Mirrors build up through his Skill (1-2 stacks on an 18s CD, dealing 193.6% ATK plus 154.9% EM in a rush of damage), a Passive that tosses in one stack every 12s on Charged or Plunge attacks, and his Burst, which eats three to spit out zero—but wait, up to three fresh ones. Those Projections? They amp your Normal, Charged, and Plunge hits: Level 1 does 67.2% ATK + 134.4% EM per stack, infusing Dendro for 4 seconds. The trick is holding 2-3 Mirrors steady. Full Dendro teams lean on resonance for that +50 EM base and +30 EM on Quicken (lasting 6s), while mixed ones crave Nahida’s EM buffs to keep things humming. His Ascension perks pump up the Dendro DMG Bonus, too.
Prioritize cranking his Skill to 15 first—grab those Ingenuity books (9/63/114) on Tuesdays, Fridays, and Sundays from the Steeple of Ignorance. Then hit Normal Attack and Burst (you’re looking at 4,957,500 Mora, 3 Crowns of Insight, 18 Faded Red Satin, 66 Trimmed Red Silk, 93 Rich Red Brocade, and 18 Mirror of Mushin from Shouki No Kami). For gems, farm Nagadus Emeralds (1 Sliver, 9 Fragments, 9 Chunks, 6 Gemstones) off Dendro Hypostasis or Jadeplume. Don’t forget 168x Sand Grease Pupa in the Desert of Hadramaveth and 46x Pseudo-Stamens from Setekh Wenut to cap him at Level 90 (420,000 Mora total). —As someone who’s farmed those pupa a few too many times, trust me, stock up early.
How the Dendro Meta Has Shifted Since Version 3.4
Fast-forward to 2025’s Version 5.x, and Dendro’s all about EM scaling, especially with Gilded Dreams artifacts (2pc for +80 EM; 4pc bumps ATK by 14% for same-element teammates or +50 EM for different ones, stacking up to three times after reactions for 8s). Full Dendro squads can push +100 EM through resonance alone. But mixed teams? They thrive on Hyperbloom’s core multipliers for that sweet AoE punch. Enter Lauma from Version 6.0 , who layers in RES shred with her Silken Moon’s Serenade to supercharge full Dendro. Back in the early days, kits were all raw DPS, no frills. Now, we’re mixing in shields from Zhongli or heals from Baizhu to shrug off interruptions. Shoot for 130% ER with a Dendro battery in the mix—plug your numbers into Genshin Optimizer to nail that 1:2 EM-to-CRIT ratio. Version 5.3 gave reaction damage a nice boost, and Quickbloom (Alhaitham + Lauma + Furina + Kuki) still gets my ★★★★★ nod for low-investment setups. Ever wonder why EM feels so kingly these days? It’s the reactions— they just multiply everything.
What Counts as an ‘Optimal’ Team? The Key Stats
You want teams that juggle Projection DPS (with 2-3 Mirrors granting +100% DMG via Mysteries Laid Bare, scaling per EM) alongside 125-135% ER for his Burst (70 Energy cost, 18s CD, 121.6% ATK + 97.3% EM per instance, scaling with 2/4/6 Mirrors). Full Dendro shreds an extra 30% Dendro RES through Deepwood for single-target dominance. Mixed Hyperbloom? It spawns multiple cores for AoE mayhem. Data shows full teams crank Alhaitham’s output 20-30% higher, but mixed lifts the whole squad by 40% in group fights. Aim for 200-300 primary EM, 50-60% CRIT Rate, and ATK% on subs. With Lauma’s September 2025 banner, Lunar-Bloom becomes a real contender. —From my testing, it’s that balance that keeps rotations feeling smooth, not frantic.
For seamless gameplay in Genshin Impact, consider Genshin Genesis Crystals recharge through BitTopup, offering competitive pricing, instant delivery, safe compliant top-ups, 24/7 support, wide game coverage, and high user satisfaction ratings.
Diving into Full Dendro Team Setups
What Makes a Team ‘Full Dendro’ for Alhaitham?
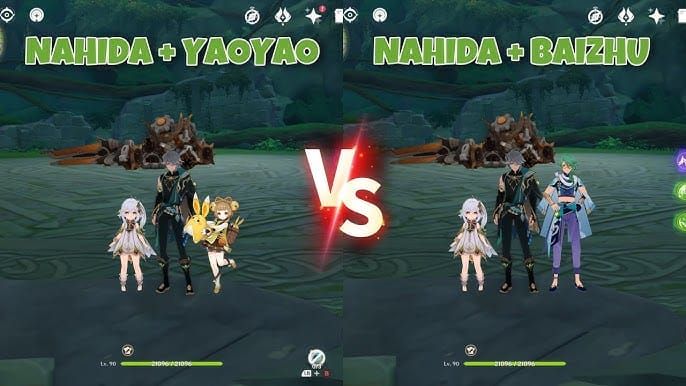
These are your 3+ Dendro unit lineups (Alhaitham as main DPS, backed by Nahida, Baizhu, or Yaoyao) that fire up resonance (+50 EM base; +30 EM on Quicken for 6s) without messing up your infusions. Slap 4pc Deepwood Memories on Alhaitham or a support (2pc +15% Dendro DMG; 4pc -30% enemy Dendro RES for 8s off-field), and push ER to ~160% with Favonius weapons. A solid example: Alhaitham + Nahida (for EM buffs) + Baizhu (heals and a bit of shielding) + Yaoyao (Dendro applicator). It maxes out Projections—Normals at Level 1 go from 49.5% ATK on the 1-Hit to 83.9% on the 5-Hit, all plus EM scaling. Put Deepwood on Nahida, and level talents Skill > Burst > Normal to 9 (168x Sand Grease Pupa, 46x Pseudo-Stamens). Short and sweet: resonance is the glue here.
The Upsides (and Downsides) of Dendro Resonance
Resonance hands you +50 EM at its core, stacking to +100 with Quicken to juice Projection DMG (0.1% per EM, capping at 100%) and Spread reactions (+20 EM for 6s). The payoff? 15-20% more single-target damage against bosses. But it falls short on AoE sustain and hates interruptions—shields are a must. For F2P folks, swap in 2pc Wanderer’s Troupe (+80 EM) or 4pc Instructor (+120 party EM after reactions). Kick it off with 2+ Dendro units, and toss in Lauma for +30 EM on Burning— just dodge Anemo or Cryo overrides. —I’ve wiped a few times ignoring the shield part; learn from my pain.
Main Full Dendro Flavors (Nahida, Yaoyao, or Baizhu Leads)
Go Nahida-style: Alhaitham + Nahida + Yaoyao + Zhongli for killer EM and DMG buffs. Or Baizhu route: Alhaitham + Baizhu + Yaoyao + Bennett for heals and ATK in single-target scraps. Nahida’s Burst amps EM and reaction DMG; Baizhu slaps Dendro normals without ICD. Try the Giga Buffed setup (Alhaitham + Bennett + Yaoyao + Zhongli)—Yaoyao’s C1 adds +25% Dendro DMG, Zhongli shreds RES. Rotation: 1. Zhongli shield; 2. Yaoyao Skill; 3. Bennett Burst; 4. Alhaitham Skill → Charged → unleash 6 Projections. It earns ★★★★ for 2025 boss fights. Versatile, right?
Keeping Energy Flowing in Full Dendro
Hit 160% ER on Alhaitham with Favonius supports; Nahida as battery drops it to 130%. His Burst chows three Mirrors but rebuilds inversely after 2s. C6 spits out three post-Burst for CRIT perks. Flow: 1. Skill for starter Mirrors; 2. Burst at three stacks; 3. Cycle Dendro supports for particles. It holds up better in Abyss than mixed’s 130% off-field needs.
Mixing It Up: Hyperbloom, Quickbloom, and Spread Teams
Hyperbloom Setups: Alhaitham Driving Dendro + Hydro + Electro
Hyperbloom thrives on Dendro + Hydro + Electro to birth cores (with that x3 multiplier), and Alhaitham leads the charge (think Alhaitham + Yelan + Raiden + Yaoyao). Yelan’s Burst slathers on Hydro; Raiden or Kuki pops the cores. Premium pick: Alhaitham + Yelan + Nahida + Kuki—Nahida for EM, Kuki for heals and triggers, nailing consistent AoE with chained Hyperblooms. Run it like: 1. Yelan Burst; 2. Nahida Skill/Burst; 3. Kuki Skill; 4. Alhaitham Skill → Attacks → Electro swap. Solid ★★★★ for 2025 group clears.
Quickbloom Twists: Juggling Three Elements
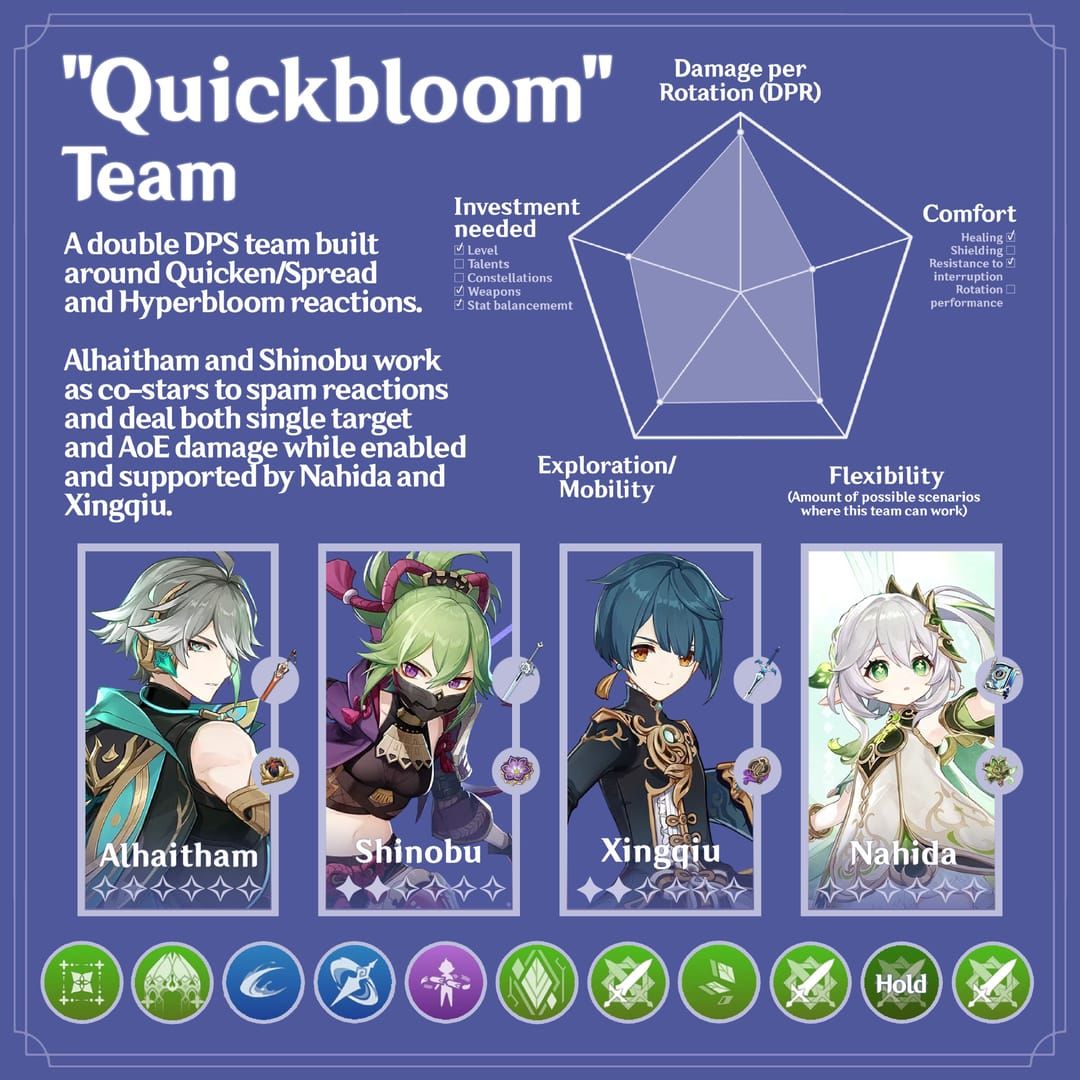
Quickbloom mixes Spread and Hyperbloom (Alhaitham + Lauma + Furina + Kuki), with Lauma’s RES shred fueling Quicken (+30 EM) and core spawns. Furina ramps DMG through HP swings. It keeps Quicken auras alive for EM scaling; Lauma’s Hold Skill makes Hyperblooms safer. Sequence: 1. Lauma Skill (Hold); 2. Furina Skill/Burst; 3. Kuki Skill; 4. Alhaitham Skill/Plunge → share field time. ★★★★★ low-investment in Version 6.0—why chase complexity when this flows so well?
Spread Teams with Electro Helpers
For Spread, build a Quicken aura (Electro applied first) to snag +20 EM/6s (Alhaitham + Yae Miko + Nahida + Zhongli). Yae drops off-field Electro; Nahida cores the Dendro. Aggravate variant: Alhaitham + Yae + Nahida + Kuki—Nahida’s Burst boosts EM and reaction DMG, pushing higher personal ceilings than Hyperbloom. Steps: 1. Yae Skill x3; 2. Nahida Skill/Burst; 3. Kuki Skill; 4. Alhaitham Burst → 2 Projections → Skill → 2 Projections → Charged → 2 Projections. Great for single-target at ★★★.
Why Mixed Teams Flex So Hard
Mixed brings sustain via heals and shields, plus AoE from cores (outranking Projections in mobs), hiking team DPS by 40%. Compared to full, it adds CC—swap in Venti for Quicken grouping (Alhaitham + Kuki + Venti + Fischl). Quickbloom shreds Abyss waves quicker. Adapt: Electro first for Spread, Hydro for Bloom. It handles 2025 Hydro foes like Aino effortlessly. —In my book, this versatility is what keeps the meta fresh.
To enhance your Genshin Impact experience with reliable resources, top up Genshin Impact crystals via BitTopup provides fast secure transactions at affordable rates, wide game coverage, excellent after-sales service, and top user reviews for hassle-free recharges.
Face-Off: DPS and How They Stack Up
Crunching Single-Target Numbers
Full Dendro pulls 20-30% more Alhaitham DPS through resonance and Deepwood (Projections at 300 EM hit +100% bonus). Mixed Spread adds EM from Quicken (1.2x multiplier). Light of Foliar Incision (542 ATK, 88.2% CRIT DMG, +120% EM after NAs) elevates both, but full pulls ahead on bosses. Simulate in tools: 250+ EM for mixed, CRIT-heavy for full. Based on available data, it’s a clear edge for focused fights.
Handling AoE and Wave After Wave
Mixed Hyperbloom surges team DPS 40% with cores (Kuki chaining multiples); full Dendro just can’t match the spread. Quickbloom with Lauma’s shred clears groups 2x faster. Prep: Pre-apply Hydro/Electro; keep Alhaitham on-field 8-12s. Waves demand this adaptability.
Peak Bursts vs. Long-Haul DPS
Screenshots love full’s Burst peaks (4+6 instances); sustained play favors mixed reactions (Hyperbloom edges Aggravate in AoE). Nail that 1:2 CRIT ratio. C1 shaves 1.2s off Skill CD per hit.
Pairings and Swaps: Who Works Best with Alhaitham
Top Dendro Backups: Nahida, Baizhu, or Yaoyao?
Nahida excels in AoE application and EM buffs for mixed Spread or Hyperbloom. Baizhu sticks to single-target with persistent Dendro and heals (plus a mobile shield). Yaoyao’s your F2P go-to for Dendro app (+25% DMG at C1). Stack Nahida + Baizhu for double resonance. Start with Nahida’s Burst; swap Yaoyao in full teams for extra heals.
Hydro Options: Xingqiu, Yelan, Kokomi Breakdown
Yelan drives cores with her Burst Hydro for Hyperbloom. Xingqiu keeps it steady (great Burgeon alt). Kokomi adds heals and Bloom orbs. Dual up with Yelan + Xingqiu for max cores. Rain Xingqiu’s Burst before Alhaitham to dodge Quicken overrides.
Electro Igniters: Fischl, Kuki, Raiden
Kuki brings EM and heals for Hyperbloom (tons of triggers). Fischl off-fields Spread (C6 maxes Electro). Raiden batteries and sub-DPS. Fischl’s A4 sidesteps Spread proc glitches. Fire Yae or Fischl’s Skill pre-Alhaitham.
Budget F2P and 4★ Swaps
F2P core: Traveler (Dendro) + Lisa + Barbara for Quickbloom. Iron Sting (510 ATK, 165 EM) fits right in. 4pc Instructor +120 party EM. Sub Fischl for Yae; Yaoyao for Nahida. Keeps it accessible.
Rotation Tips and Execution Hacks
Basic Full Dendro Flow
Fast-hold Skill → Plunge or Charged → 8-12s of Projections (swap at 1 Mirror left). Detailed: 1. Nahida Skill; 2. Alhaitham Skill; 3. Burst at 3 Mirrors; 4. Attacks till they fade. Hold 2s post-Burst for boss windows.
Optimizing Hyperbloom Rotations
Yelan Burst → Alhaitham Skill/Burst → Normals pop cores → Electro refresh. Locks Dendro onto Hydro. 1. Hydro setup; 2. Nahida; 3. Alhaitham drives; 4. Kuki tops it off.
Pro Quickbloom Moves
Lauma Hold → Furina setups → Kuki → Alhaitham Skill/Plunge → split time. Holds Quicken and Hyperbloom tight. Practice swaps on low ping for 6 Projections. Smooth.
Pitfalls in Rotations and Fixes
Common slip: Letting Mirrors decay (overstay on-field). Fix: Clock 1.6s intervals; pre-apply Electro for Spread. Funnel ER with battery supports. C2’s +50 EM per Mirror helps big time.
Tailoring Teams to Content
Spiral Abyss Floor 12: Full or Mixed?
Quickbloom mixed for wave AoE (cores rule); full Dendro for boss raw DPS. Version 5.3 clears: Hyperbloom 3-stars multi-target. Left side? Spread. Right? Full with shields.
Bosses: Shields and Mechanics
Full Dendro tanks tanky ones like Jadeplume (no adds); mixed pierces shields with Hyperbloom. Zhongli shields block interrupts. Reset Burst for Mirrors; skip Burning by doubling Hydro.
Overworld and Domains: Efficiency Picks
Full resonance sustains exploration; mixed reactions speed domain farms. Sapwood Blade as F2P EM weapon. Short rotations sans Burst save time.
Events and Time Attacks
Quickbloom balances trials; Spread nails single-target events. 2025 events lean EM builds. Adapt quick.
Tweaking Builds by Team
Artifact Choices: Gilded Dreams or Deepwood?
Gilded suits mixed for EM/ATK on reactions; Deepwood shreds RES in full. Subs: EM > ER > CRIT > ATK%. Mixed gets EM Sands, Dendro Goblet, CRIT Circlet.
Stat Tweaks Across Types
Mixed craves 250+ EM for reactions; full scales on CRIT/ATK. 130% ER mixed, 160% full. Prioritize EM in Hyperbloom.
ER Breakpoints per Setup
Base 125-135%; full solo adds +30%. Nahida batteries cut it down. Favonius supports shine.
Weapons Matched to Archetypes
Light of Foliar for mixed EM; Mistsplitter stacks DMG in full. F2P Iron Sting +6% DMG per hit. Uraku Misugiri for Geo-full twists.
Investment Order and Constellations
How Cons Affect Alhaitham’s Fit
C1 cuts Skill CD 1.2s per hit (smoother rotations); C2 +50 EM per Mirror; C6 generates 3 post-Burst. C0 works mixed; C1/C6 elevate full. Core to 9; grab C1 first.
What to Level on Supports
Nahida talents 8+ for buffs; Kuki EM-focused. Deepwood on them. Level 80 min for F2P.
Starter Teams for Newbies
F2P Hyperbloom: Alhaitham + Traveler + Lisa + Barbara. 4pc Gilded; 130% ER. Follow the steps above.
Endgame Whale Tweaks: C6 Alhaitham
C6 Quickbloom with Lauma: Max CRIT on Mirrors. +3x uptime. Overkill, but fun.
Building Alhaitham for the Long Haul
Guessing Dendro Meta Trends
Mixed rules 5.x+ for versatility; full climbs with RES tools. EM stays hot; Quickbloom leads. —My hunch? Reactions keep evolving.
Switching Between Full and Mixed
Flip to mixed for AoE Abyss; full for single-target. Test DPS, tweak ER.
FAQ
What’s the real split between Full Dendro and Mixed for Alhaitham?
Full Dendro packs 3+ Dendro units, resonance (+50 EM, +100 on Quicken), Deepwood shred for single-target bosses, and 160% ER. Mixed throws in Hydro/Electro for Hyperbloom (cores x3) or Spread (+20 EM), team AoE, and 130% ER with Nahida battery.
Which Alhaitham setup hits hardest in 2025?
Quickbloom (Alhaitham + Lauma + Furina + Kuki) at ★★★★★ balances Spread DPS and Hyperbloom for Abyss. Full Dendro: 20-30% higher single-target Alhaitham. Mixed: 40% team boost in AoE.
Does Alhaitham really need Dendro Resonance?
Absolutely—+50 EM base, +30 on reactions, pumping Projections 0.1% DMG per EM (up to 100%). Full stacks +100 EM for raw DPS; mixed layers multipliers. Skip it? 15-20% output dip. Always 2+ Dendro like Nahida or Baizhu.
Best supports for Alhaitham in full Dendro?
Nahida for EM/DMG buffs and AoE app; Baizhu for persistent Dendro and single-target heals; Yaoyao as F2P (+25% DMG C1). Nahida + Baizhu doubles resonance; Deepwood on Nahida for -30% RES shred. Skills to 8 for sustain.
Hyperbloom Alhaitham vs. Spread—how do they compare?
Hyperbloom: ★★★★ steady team DPS in AoE (Kuki/Yelan cores); Spread: ★★★ higher personal single-target (Yae/Nahida Quicken EM). Hyperbloom owns multi-wave Abyss; Spread bosses. Both need 250+ EM; pre-Hydro for Hyperbloom, Electro for Spread.
ER needs for Alhaitham by team?
130% in mixed (Nahida battery); 160% full solo (Favonius). Base 125-135% for Burst uptime; C6 eases it. EM Sands, CRIT Circlet; Dendro particles. Lauma Quickbloom drops to 120%.


