

Understanding F2P Varesa Hydro Loop Fundamentals
Varesa's Hydro Loop leverages her Nightsoul point system for continuous elemental cycles. Released March 26, 2025 (Version 5.5), she offers F2P players viable plunge-focused DPS. Level 90 stats: 12,699 HP, 356 ATK, 782 DEF, 24.2% CRIT Rate.
Core mechanic: Elemental Skill Riding the Night-Rainbow grants 20 Nightsoul points per charge (2 charges total). Each Plunging Attack adds 25 points. Elemental Burst Guardian Vent! restores Nightsoul to max and triggers Apex Drive. At max Nightsoul, Varesa enters Fiery Passion state for 15 seconds with amplified damage.
Top up Genesis Crystals at BitTopup for resin refreshes and character development with secure transactions.
What Makes Varesa F2P Viable
Constellation-zero viability and F2P weapon compatibility. The Widsith and Tome of the Eternal Flow provide substantial damage without gacha investment. Ascension 1 passive Rainbow Crash adds shockwave damage: 50% ATK (normal state), 180% ATK (Fiery Passion).
Energy economy: 70 base energy cost, reducing to 30 in special states. Elemental Skill: 9-second cooldown. Ascension 4 passive: +35% ATK for 12 seconds after Nightsoul Burst, stacks 2x.
Hydro Loop Mechanic
Sequence: Elemental Skill → Charged Attack → Plunging Attack, repeated with second Skill charge. Builds Nightsoul efficiently while maintaining elemental application. Plunging Attack's 25-point contribution is the largest single source—plunge frequency = primary damage multiplier.
Overvape Reaction Basics
Overvape maintains simultaneous Hydro and Electro auras, allowing Pyro to trigger Electro-Charged, Vaporize, and Overload simultaneously. Triple-reaction mechanic multiplies damage beyond standard Vaporize. Requires 180%+ Energy Recharge for 15-second cycles and precise elemental sequencing.
Why Pre-Phase 2 Clear Matters
Iktomisaurus (Stage 2 boss, Stygian Onslaught 6.2):
- Phase 1: 4,344,257 HP
- Phase 2: 7,972,064 HP
- 70% resistance to all elements except Cryo (110%)
Breaking the 24U Cryo Shield before Phase 2 inflicts 10% max HP loss + 50% absorbed damage (caps at 35% max HP)—eliminating 1.5M+ HP instantly.
Phase 2 adds aggressive attacks and Cryo Gadgets (8U shield, 9.6U damage each). Difficulty 6 requires sub-180 second clears for premium rewards.
Iktomisaurus Boss Mechanics Version 6.2
Boss telegraphs major attacks with visual cues, providing windows for uninterrupted Plunging Attack sequences. Cryo Ward (24U shield) requires elemental reactions—standard damage ineffective. Pyro consumes 2U per application (12 hits to break). Overvape naturally generates sufficient reaction frequency.
Attack Patterns and Vulnerability Windows
Three primary sequences:
Ground Slam: 2-second windup. Safe window for Charged Attack → Plunging Attack combo.

Ice Projectile Barrage: Mid-range punishment. Stay close to minimize exposure.
Charging Rush: 4-second recovery window (longest). Accommodates full Skill-Charged-Plunge rotation. Position near walls to reduce boss travel distance.
Phase 1 vs Phase 2 Difficulty
Phase 1: 4.3M HP, requires ~36,000 DPS for 120-second clear. Achievable with F2P Varesa teams.
Phase 2: 7.9M HP, adds Cryo Gadgets disrupting positioning. Decoy Vortexes reduce Anemo RES by 35%, destroy 2U shield per stack (max 3). Environmental hazards break rotation flow.
Shield Mechanics and Counters
24U Cryo Shield needs strategic elemental application. Pyro most efficient (2U per application). Varesa's Hydro enables Pyro teammates to trigger Vaporize, simultaneously damaging and reducing shield strength.
Shield break triggers 3-second knockdown with increased damage taken. Perfect window for Elemental Burst → full Skill-Charged-Plunge sequence. Shield-break damage bonus eliminates 35% of Phase 1 health.
Optimal DPS Windows
Three windows per boss cycle:
- Post-ground slam: 2 seconds
- Post-projectile barrage: 1.5 seconds
- Post-charge recovery: 4 seconds
Prioritize charge recovery window. Coordinate Varesa's Elemental Burst here for max Fiery Passion uptime. Position near boss after Elemental Skill for particle collection before next attack.
Complete F2P Varesa Build
4-piece Long Night's Oath: 25% Plunging DMG (2-piece) + 15% Plunge DMG per stack every 1 second (max 5 stacks, 6-second duration). Up to 100% total Plunging DMG increase at full stacks.

Main stats: ATK% Sands, Electro DMG Goblet, CRIT Rate/CRIT DMG Circlet. Varesa's 24.2% base CRIT Rate needs ~50% additional to reach 70-75% optimal threshold.
Best Genesis Crystals top up at BitTopup for artifact farming efficiency with competitive pricing and instant delivery.
Artifact Priority
Long Night's Oath: Premier choice for plunge builds. Stacking aligns with extended encounters, reaching max effectiveness in 5 seconds.
Transitional builds: 2-piece Long Night's Oath + 2-piece Gladiator's/Shimenawa's (+18% ATK) provides 70-80% optimal performance.
Stats and Substats
Substat priority: Energy Recharge > CRIT Rate/CRIT DMG > ATK%
Energy Recharge: 140% (strong battery supports) to 180% (solo Hydro). Ensures 15-second rotation cycles.
CRIT: Maintain 1:2 ratio. Target 70% CRIT Rate, 140% CRIT DMG for F2P. Each 10% CRIT Rate below 70% > equivalent CRIT DMG increases.
ATK: Aim for 1,800-2,000 total before buffs. Ascension 4 passive (+35% ATK for 12s, stacks 2x) boosts this during combat.
F2P Weapon Tier List
The Widsith: Premier F2P option. CRIT DMG secondary stat, random buffs (ATK%/Elemental DMG%/EM) lasting 10s every 30s. Elemental DMG buff synergizes with Electro-infused attacks during Fiery Passion (48-96% damage increase by refinement).
Tome of the Eternal Flow: Consistent performance, no RNG. Energy Recharge secondary stat, HP-scaling damage bonuses (16-32% based on max HP). Simplifies Energy Recharge requirements.
Both perform within 10-15% of each other when optimized. Choose based on availability and playstyle.
Energy Recharge Breakpoints
180% Energy Recharge enables 15-second cycles in Overvape teams (assumes 15-20 particles per rotation). Teams with Fischl/Electro Traveler batteries reduce to 140-160%.
Dual energy cost (70 base, 30 special state): 30-energy cost needs 4-5 Elemental Skill uses. Initial 70-energy burst critical for establishing rhythm.
Test: Execute 3 consecutive rotations vs training dummies. If burst available before third rotation completes, Energy Recharge sufficient. If lagging, increase by 20% increments.
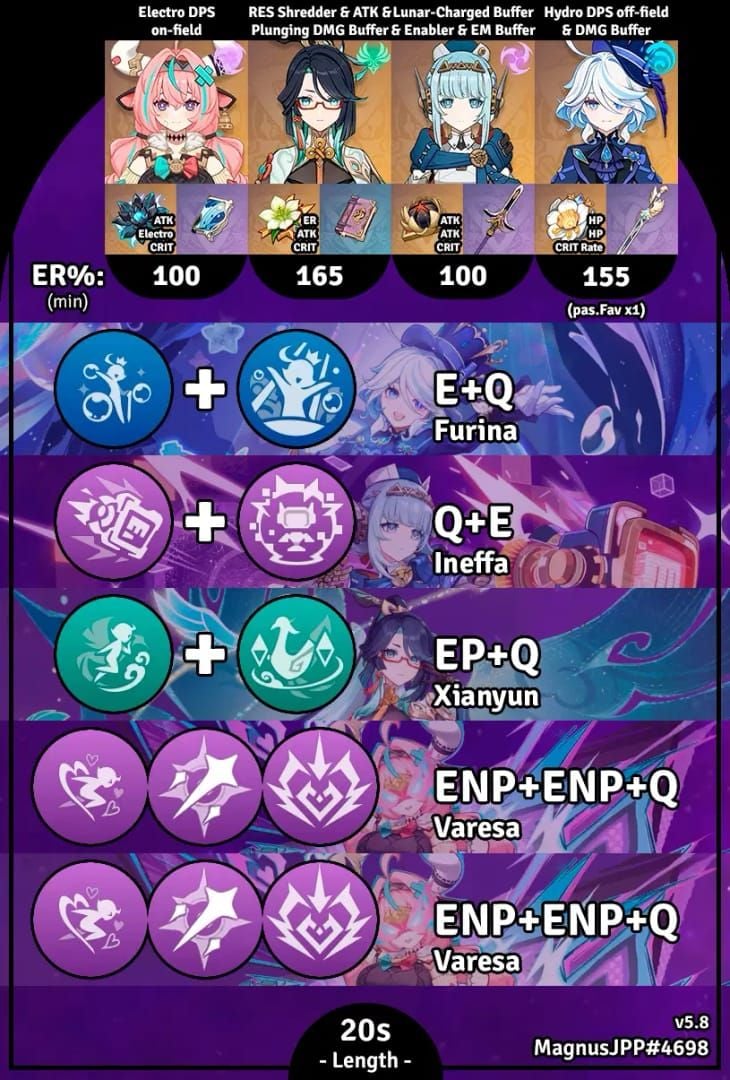
Optimal F2P Team Composition
Core: Varesa (primary DPS) + Xingqiu (Hydro) + Fischl (Electro) + Bennett (Pyro/heal/buff).
Xingqiu: Burst applies Hydro with each Normal Attack. Damage reduction (24-46%) + minor healing reduces interruption risk.
Fischl: Oz delivers consistent off-field Electro (100% uptime when managed). A4 passive generates additional Electro damage per Electro-related reaction.
Bennett: Triple duty—healer, ATK buffer (56-119% based on talent/base ATK), Pyro applicator. Universal Starglitter shop availability.
Core Structure and Roles
Rotation: Bennett Elemental Skill → Fischl Elemental Skill → Xingqiu Elemental Burst → Varesa full rotation.
Bennett's ATK buff: 12 seconds (covers Varesa's damage window). Fischl's Oz: 10 seconds (25s with C6). Xingqiu's burst: 15 seconds. Overlapping buff/application windows.
F2P Support Alternatives
Barbara replaces Xingqiu (emergency): Less consistent Hydro application. Elemental Skill applies Hydro to active character—requires close range. Higher healing than Bennett.
Kuki Shinobu replaces Fischl: Elemental Skill applies Electro every 1.5s in area. Adds healing but 15-20% less damage than Fischl.
Xiangling replaces Bennett: Pyronado applies Pyro rapidly, increasing Overvape frequency. Eliminates ATK buff/healing—skilled players only.
Resonance Benefits
Hydro Resonance (2 Hydro): +25% max HP. Benefits Tome of Eternal Flow users but breaks Overvape (sacrifices Electro/Pyro).
Pyro Resonance (2 Pyro): +25% ATK. Xiangling + Bennett achieves this while maintaining Overvape via Fischl + Varesa. Trades Xingqiu's defense for offense.
Optimal F2P (Varesa-Xingqiu-Fischl-Bennett) sacrifices resonance for reaction consistency and survivability.
Step-by-Step Hydro Loop Rotation
Complete sequence: ~15 seconds, aligning with support durations and energy cycles. Pre-battle: Position team in Bennett's burst radius before engaging. Deploy Fischl's Oz before Varesa takes field.
Pre-Battle Setup
- Bennett Elemental Burst (creates ATK buff field)
- Fischl Elemental Skill (summons Oz)
- Xingqiu Elemental Burst (prepares Hydro application)
- 5-second setup establishes buffs/auras
Energy funneling: Keep Varesa on-field when Bennett/Fischl generate particles. Xingqiu's particles benefit him directly.
Exact Skill Order
Varesa rotation: E → CA → PA → E → CA → PA → Q → E → CA → PA
- Each E: 20 Nightsoul points
- Each PA: 25 Nightsoul points
- After two E-CA-PA cycles: ~90 Nightsoul points (40 from Skills, 50 from Plunges)
Activate Elemental Burst at this threshold → restores Nightsoul to max, triggers Fiery Passion.
During Fiery Passion (15s): Continue E-CA-PA pattern. Ascension 1 passive increases shockwave to 180% ATK. Maintain aggressive positioning.
Normal Attack Weaving
Charged Attacks bridge Elemental Skills and Plunging Attacks (~1 second animation). Apply Hydro, contribute to Overvape. Avoid Normal Attack chains—they waste time without Nightsoul generation.
Energy Particle Collection
Particles travel to active character. After Varesa's Elemental Skill, stay on-field 1-2 seconds to collect before Charged Attack.
Fischl's Oz: Generates particles every 1 second when damaging. Position near enemies.
Xingqiu's Skill: 5 particles. Brief field time after activation to collect.
Bennett's Skill: 2-second cooldown (tap) or 4-second (hold), 2-3 particles. Use tap for faster generation.
Rotation Loop Maintenance
Monitor burst cooldowns and energy across team. Varesa's 18-second burst cooldown dictates pacing. With 180% Energy Recharge and proper collection, energy reaches 70+ before cooldown completes.
Support cooldowns: Bennett (12s), Fischl (25s), Xingqiu (21s). Varesa's 15s rotation fits within these windows.
Iktomisaurus Phase 1: 3-4 complete cycles. Each deals ~1.1-1.3M damage, totaling 4.4M+ for 120-second clear.
Overvape Reaction Mastery
Overvape triggers multiple reactions simultaneously: Electro-Charged, Vaporize, Overload. Each contributes independent damage, exceeding standard Vaporize by 40-60%.
Sequencing: Hydro + Electro must coexist before Pyro application. Xingqiu's burst applies Hydro per Normal Attack. Fischl's Oz applies Electro every 1 second. Natural overlap maintains dual auras for Bennett's Pyro triggers.
Overvape vs Standard Vaporize
Standard Vaporize consumes Hydro aura entirely, requiring reapplication. Creates gaps in reaction availability.
Overvape maintains persistent Hydro through Electro-Charged's unique mechanics. When Pyro contacts dual aura: Vaporize triggers vs Hydro, Overload vs Electro, Electro-Charged persists. Tri-reaction generates 2.5-3x damage per Pyro application vs solo Vaporize.
Application Order and ICD
Internal Cooldown (ICD): Typically restricts reactions to once per 2.5s or every third hit.
Xingqiu's burst: Bypasses standard ICD—applies Hydro with each sword wave.
Fischl's Oz: Standard ICD—applies Electro ~once per second.
Bennett's burst field: Pyro every 1 second.
Varesa's Charged Attacks: Standard ICD—supplementary aura, not primary applicator.
Damage Calculation
F2P Varesa (1,800 ATK, 70% CRIT Rate, 140% CRIT DMG): ~25,000 damage per Plunging Attack before reactions.
Vaporize: 25,000 × 1.5 = 37,500 damage
Overvape: 25,000 base + Vaporize (12,500) + Overload (15,000) + Electro-Charged (10,000) = 62,500 total (166% increase vs Vaporize's 150%)
Against Iktomisaurus (70% resistance): 62,500 × 0.3 = 18,750 per Plunge. 15-second rotation with 8 Plunges = 150,000 from Plunges alone.
Including Skill/Charged/Burst: 400,000-500,000 per rotation. Four rotations: 1.6-2.0M from Varesa + 2.4-2.8M from supports = 4.4M+ required.
Common Overvape Mistakes
Premature Pyro: Wastes reaction potential. Verify dual aura (Electro-Charged damage numbers) before Bennett activation. Wait 1-2s after Xingqiu/Fischl.
Excessive Pyro: Overwhelms Hydro aura. Bennett's field applies Pyro every 1s. Stand at edge, enter only during attack animations.
Neglecting Energy Recharge: Breaks rotation consistency. Xingqiu needs 180-200%, Fischl 120-140%, Bennett 160-180%.
Pre-Phase 2 Clear Strategy
Deal 4,344,257 damage in 100-110 seconds = 39,500-43,400 DPS. F2P Varesa Overvape achieves 35,000-45,000 DPS when optimized.
Shield break timing: Breaking 24U Cryo Shield triggers 10% max HP loss (434,425) + 50% absorbed damage up to 35% max HP (1,520,489 max). Absorb full shield before breaking for max damage.
DPS Requirements
Minimum: 39,500 sustained DPS (110s clear). F2P teams: 35,000-45,000 DPS properly built.
Benchmark test: Masanori (training dummy). Execute 3 rotations (45s), record damage. Divide by 45 = DPS. Values >35,000 = ready. <30,000 = need build improvements.
Critical Timing Windows
Shield-break knockdown (3s): Highest damage opportunity. Coordinate Varesa's Elemental Burst with shield break for Fiery Passion during knockdown. Potentially 600,000+ damage in 3s.
Post-charge recovery (4s): Occurs 3-4 times in Phase 1. Reserve Varesa's second Skill charge. Position near walls for faster recovery.
Ground slam recovery (2s): Brief windows for single Plunges/Charged Attacks. Use for particle collection or support activation.
Positioning and Dodging
Optimal: Close range (within 5m) minimizes ice projectile exposure, maximizes melee opportunities. Circle-strafe during animations.
Ground slam dodge: Visual cue = boss raises both arms. Dodge 0.5s after animation begins.
Charge attack: Boss lowers head, scrapes ground. Move perpendicular (not backward) to minimize distance.
Phase Transition Indicators
HP bar color: White → red at ~5% HP (217,000 remaining). Achievable in single rotation. Prioritize damage over safety.
Movement speed increase: Faster attacks, reduced recovery = proximity to transition. Activate all remaining bursts regardless of cooldown.
Shield reformation (boss glowing blue): 2-second animation = final elimination opportunity. Deploy all burst damage—successful kill cancels transition mid-animation.
Advanced Optimization
Device and Ping Adjustments
High ping (100ms+): Input abilities 0.1-0.2s earlier than visual cues. Practice vs training dummies to calibrate.
Low-end devices: Simplify rotations, reduce input frequency to match capabilities.
Energy drain (Difficulty 6): Reduces regeneration by 30%. Increase Energy Recharge to 210-230%.
100-150ms ping: Input Skills 0.15s before intended timing.
30 FPS mobile: Animations extended by 16-33ms. Slightly delay subsequent inputs.
Energy Drain Mechanics
High-difficulty modifiers reduce particle effectiveness by 30%. Raise Energy Recharge: Varesa 210-230%, Xingqiu 220-240%, Bennett 190-210%.
Alternative: Extend rotation to 18-20s for additional particle time. Sacrifices DPS ceiling but improves reliability. Still achieves pre-Phase 2 clear within 120s.
Backup Strategies
If Phase 2 occurs: Destroy Cryo Gadgets immediately. Anemo characters (Venti/Sucrose) excel via Decoy Vortex mechanics.
Adjust team: Replace Fischl with Venti/Sucrose. Trades Electro for Gadget control. Alternative teams: Venti-Durin-Bennett-Fischl or Sucrose-Fischl-Durin-Kokomi.
Constellation Impact
C0: Adequate for pre-Phase 2 clears with precise execution.
C2: Plunging Attack energy restoration (11.5 Energy per ground impact). Reduces Energy Recharge needs by 20-30%.
C4: +500% ATK to Plunging DMG (max 20,000) + 100% Burst DMG. Increases rotation damage by 35-45%.
C6: +10% CRIT Rate, +100% CRIT DMG to Plunging Attacks. Amplifies damage by 40-50%.
F2P focus: C0 optimization. Constellations provide comfort but unnecessary for skilled players.
Common Mistakes and Fixes
Rotation Timing Errors
Premature Charged Attacks: Cancels Skill effects. Wait for Nightsoul point increase confirmation before next ability.
Delayed Plunging Attacks: Creates gaps. Charged Attack completes at 1.0s. Input jump + attack simultaneously at 1.0s mark.
Energy Management Failures
Insufficient Energy Recharge: Forces extended rotations (20-25s vs optimal 15s). Prioritize Energy Recharge to 180% before CRIT stats.
Improper particle funneling: Bennett's Pyro particles = 3 energy to Pyro, 1 to off-element. Collect element-matched particles on appropriate characters.
Incorrect Application Sequences
Pyro before Hydro-Electro: Triggers inferior reactions, reduces damage by 40-60%. Follow strict sequencing: Bennett → Fischl → Xingqiu → Varesa (1s between each).
Excessive Hydro without Electro: Creates Vaporize-only scenarios. Ensure Fischl's Oz active throughout, redeploy immediately upon expiration.
Positioning Mistakes
Excessive distance (10m+): Prevents melee execution, reduces particle collection. Sacrifices 30-40% damage. Practice dodge timing for close-range confidence.
Standing in Bennett's field: Applies Pyro every 1s, overwhelms Hydro, breaks Overvape. Position at edge, enter only during attacks.
FAQ
What is the optimal F2P Varesa Hydro Loop rotation order?
E → CA → PA → E → CA → PA → Q → E → CA → PA. Maximizes Nightsoul generation (20 per Skill, 25 per Plunge) while maintaining damage. Complete rotations: 15 seconds.
How does Overvape work in Genshin 6.2?
Maintains simultaneous Hydro + Electro auras. Pyro triggers Electro-Charged, Vaporize, Overload simultaneously. Multiplies damage by 2.5-3x per Pyro application vs standard Vaporize. Requires Xingqiu (Hydro), Fischl (Electro), Bennett (Pyro), 180%+ Energy Recharge for 15s cycles.
Can F2P teams skip Iktomisaurus Phase 2?
Yes. Properly built Varesa Overvape deals 4,344,257 damage in 100-110s. Requires 39,500+ sustained DPS, achievable with 4pc Long Night's Oath, Widsith/Tome of Eternal Flow, Varesa-Xingqiu-Fischl-Bennett. Breaking 24U Cryo Shield inflicts up to 1,520,489 bonus damage.
Best artifacts for F2P Varesa Hydro builds?
4pc Long Night's Oath: 25% Plunging DMG (2pc) + 15% per stack, max 5 stacks (4pc). Main stats: ATK% Sands, Electro DMG Goblet, CRIT Rate/CRIT DMG Circlet. Substats: Energy Recharge > CRIT Rate/CRIT DMG > ATK%. Target 180% Energy Recharge, 70% CRIT Rate, 140% CRIT DMG.
How much Energy Recharge does Varesa need?
180% for 15-second cycles in Overvape (assumes moderate particle generation). Teams with Fischl/Electro Traveler batteries: 140-160%. Difficulty 6 energy drain: 210-230%.
What team enables Hydro Loop with Varesa?
Optimal F2P: Varesa (DPS) + Xingqiu (Hydro/defense) + Fischl (Electro) + Bennett (Pyro/ATK buff/heal). Maintains Overvape with survivability. Alternatives: Barbara for Xingqiu, Kuki for Fischl, Xiangling for Bennett (15-25% effectiveness reduction).
Master F2P Varesa faster! Top up Genesis Crystals at BitTopup for resin refreshes and battle pass rewards. Trusted by millions with instant delivery and secure transactions.


