

Let’s be honest – Wanderer and Faruzan represent both the pinnacle of Anemo synergy and one of the most technically demanding duos in Genshin. The payoff is massive, but the execution? That’s where things get interesting.
Faruzan brings serious firepower to the table: 30% Anemo RES Shred, 34% Anemo DMG Bonus at talent level 10, and if you’ve got C6, that game-changing 40% Anemo CRIT DMG. Her A4 passive isn’t flashy, but it adds flat damage equal to 32% of her Base ATK to Anemo attacks – every bit counts when you’re chasing those big numbers.

Here’s where it gets technical. Wanderer’s A1 passive is basically a buffet of bonuses depending on what element he touches: 30% ATK from Pyro contact, 20% CRIT Rate from Cryo, or energy restoration from Electro. His rapid-fire Normal Attacks consistently trigger Faruzan’s C6 off-field Pressurized Collapse effects. It’s beautiful when it works.
For players looking to unlock these premium combinations, safe Genesis Crystals checkout through BitTopup ensures you get what you need without the headaches – competitive pricing, instant delivery, secure transactions.
The Energy Reality Check
ER Requirements That Actually Work
Pre-C6 Faruzan (brace yourself):
Double Anemo teams: 250-280% ER minimum
Single Anemo teams: Up to 300% ER (yes, really)
With perfect Favonius procs: 220-240% ER (2 Pressurized Collapse shots)
When things go sideways: 275-300% ER (1 Pressurized Collapse shot)
C6 Changes Everything:
Double Anemo teams: 175-200% ER
Roughly 40% reduction from pre-C6 requirements
Finally lets you focus on actual damage stats
Look, I’ve tested this extensively – Faruzan’s 80-cost Burst combined with her limited particle generation creates what I can only describe as energy hell. Her Elemental Skill generates just 2 Anemo particles, and only from that Pressurized Collapse vortex. Worse yet, there’s a strict 5.5-second particle generation cooldown that affects everything – C1’s second arrow, C6’s off-field procs, the works.
Favonius: Your Best Friend (Whether You Like It or Not)
Favonius Warbow isn’t just recommended pre-C6 – it’s mandatory. Build 30-60% CRIT Rate minimum for consistent procs. Each successful Favonius proc reduces Faruzan’s ER needs by roughly 35% if she catches the particles, about 25% if teammates snag them instead. R5 Favonius? The cooldown aligns perfectly with rotation timing. Chef’s kiss.

Other Options (but honestly, why?):
Elegy for the End: Actually becomes superior at C6 with those team ATK% and EM buffs
Sacrificial Bow: ER stat stick, but that extra skill doesn’t generate particles due to ICD
End of the Line: F2P ER option when you’re working with what you’ve got
Energy Funneling That Actually Works
Here’s the sequence that’ll save your sanity:
Cast Faruzan E at maximum range (particle travel time matters)
Switch to your energy recipient immediately
Time that switch for proper particle catching
Always account for that 5.5-second ICD when planning multiple sources
Pro tip: Pre-funneling uses Faruzan’s E → Charged Shot before Burst to generate particles for her own needs. It’s not glamorous, but it works.
Weapons and Artifacts: The Real Talk
Faruzan’s Weapon Hierarchy
Pre-C6 S-Tier:
Favonius Warbow: Mandatory for energy management (I cannot stress this enough)
Elegy for the End: High ER with team buffs
C6 Considerations: This is where Elegy starts looking really attractive. Those team-wide ATK% and EM buffs provide serious value when you’re not desperately chasing energy anymore. Favonius remains solid for that extra energy support though.
Wanderer’s Arsenal
Weapon Analysis (from someone who’s tested them all):
Tulaytullah’s Remembrance: BiS with 48% Normal Attack DMG ramp and 10% attack speed
Lost Prayer: Strong alternative, that movement speed feels amazing
The Widsith: Best 4-star option with those rotating buffs
Cashflow Supervision: Optimal with Furina for consistent passive uptime
Artifact Strategy That Makes Sense
Faruzan Pre-C6: ER takes absolute priority over everything else. Set bonuses? Forget about them until you hit your ER threshold. ER Sands is mandatory, Goblet and Circlet get chosen based on ER substats.
When You Actually Meet ER Requirements:
4pc Noblesse: 20% team ATK buff
4pc The Exile: 6 flat energy to teammates
2pc Emblem + 2pc Exile: 40% ER from sets alone
Faruzan C6: 4pc Tenacity becomes BiS since those off-field Pressurized Collapse procs consistently trigger the 20% ATK buff.
Wanderer’s Setup:
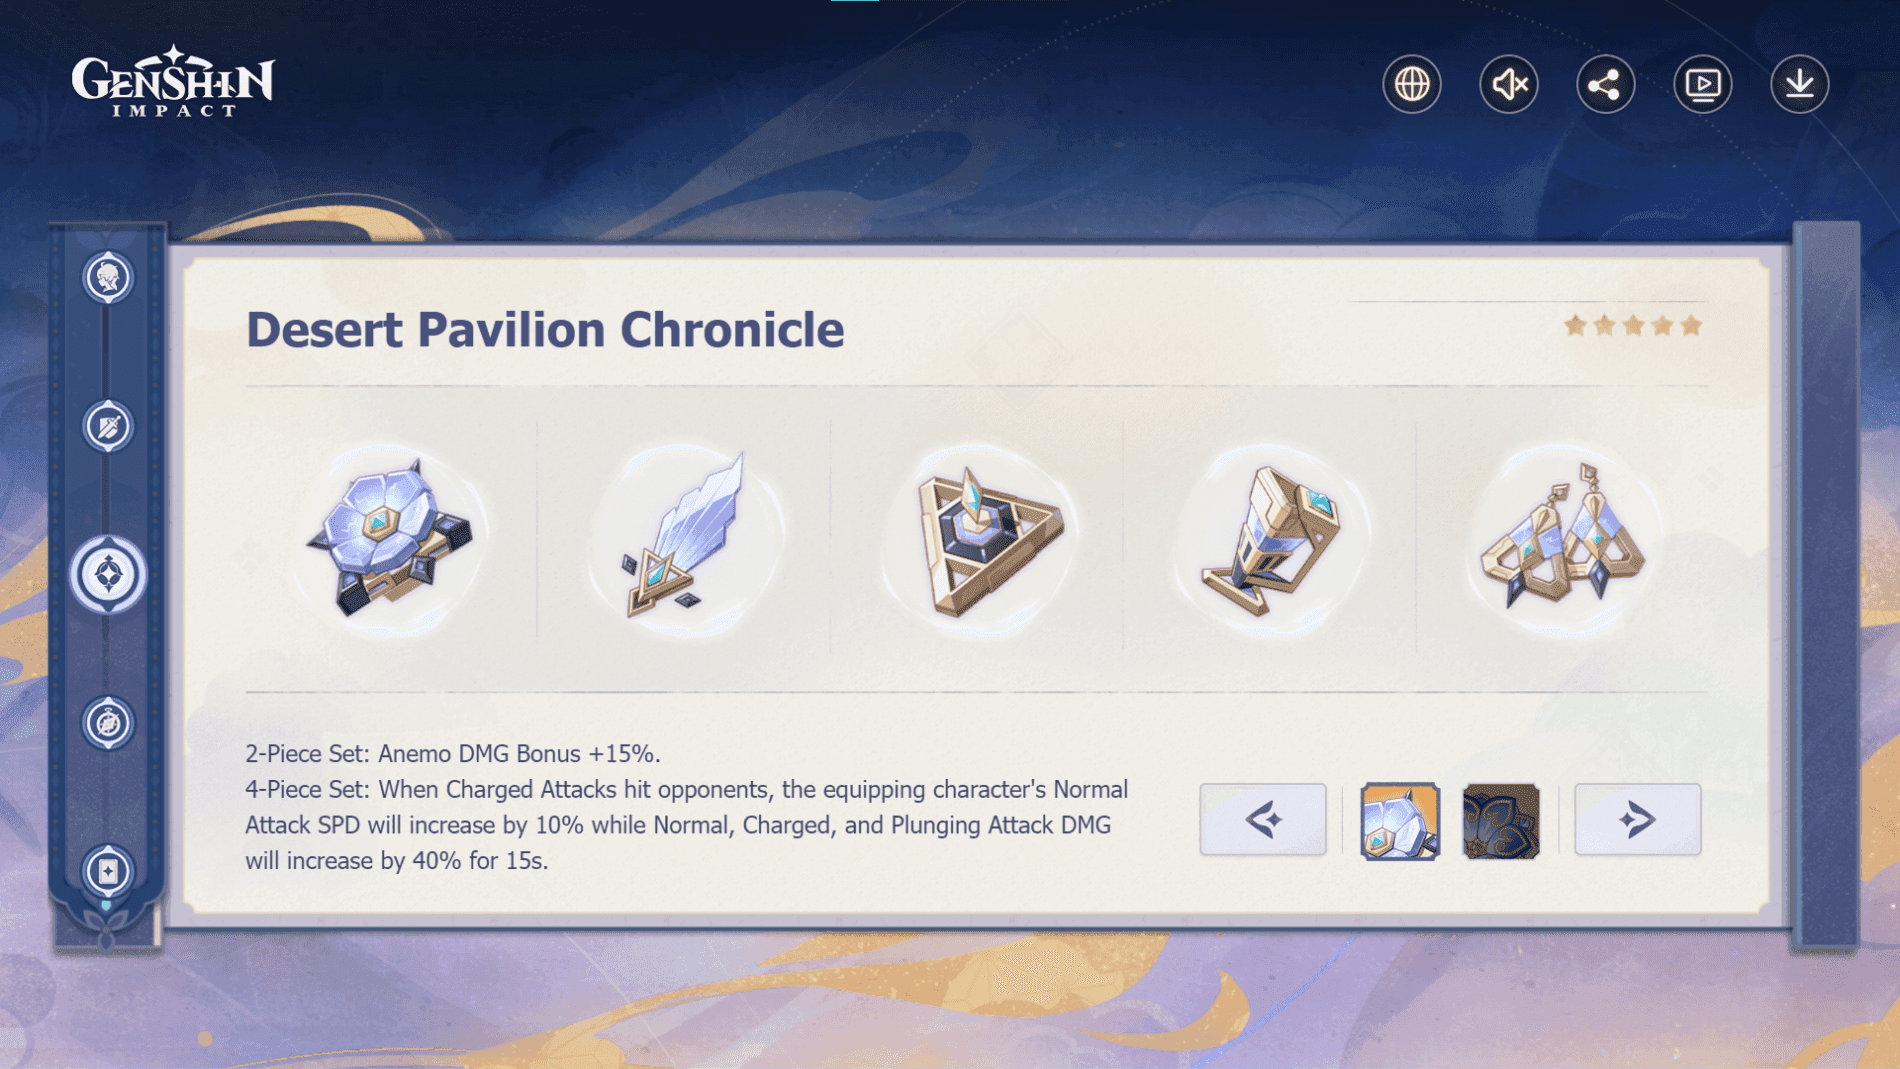
BiS: 4pc Desert Pavilion (15% Anemo DMG, 40% NA/CA/Plunge DMG, 10% ATK SPD)
With Furina: 4pc Marechaussee Hunter for up to 36% CRIT Rate
Team Compositions That Actually Work
The Premium Tier
SS-Tier Teams (59,000+ DPS):
Wanderer + Faruzan + Yelan + Bennett: 59,250 DPS

Provides Pyro (30% ATK), Hydro (flight stamina), universal buffs
Fair warning: requires skilled dodging since there’s no shielding
S-Tier Teams (43,000+ DPS):
Wanderer + Faruzan + Rosaria + Bennett: 43,093 DPS
Cryo for that 20% CRIT Rate buff
More accessible constellation requirements
Budget Reality
F2P Variations (because not everyone’s a whale):
Wanderer + Faruzan + Xiangling + Bennett: All free characters
Wanderer + Faruzan + Thoma + Flex: Shield and Pyro resonance
Wanderer + Faruzan + Diona + Flex: Cryo buff with healing and shielding
For optimization strategies and character acquisition, the Genshin Impact top up guide 2025 provides comprehensive resources. BitTopup offers competitive Genesis Crystal packages with instant delivery and secure payment processing.
Situational Adaptations
Triple Anemo: Adding Venti or Kazuha creates grouping synergy for multi-target scenarios. Plus, energy and cooldown reduction.
Geo Core: Wanderer + Faruzan + Chiori + Zhongli leverages Geo resonance with basically unbreakable shielding.
Rotation Mastery
The Standard Sequence
Meta Rotation (20-22 seconds):
Zhongli Hold E (2s): Shield and RES shred
Faruzan E → Charged Shot → Q (4s): Particles, buffs, debuffs
Bennett E → Q (3s): ATK buff, Pyro A1 passive
Wanderer E → Combo → Q (10s): Damage phase with stacked buffs
Cleanup (3s): Prep for next rotation
Critical Timing Notes
Faruzan’s Charged Shot can be canceled immediately after Hurricane Arrow fires – saves you 0.5-1 seconds of field time. Bennett’s Burst must activate before Wanderer’s Skill for that Pyro contact. And always respect Wanderer’s A4 passive trigger (you’ll see a visual glow plus audio cue).
Energy Management Rules:
Never fire C1’s second arrow immediately – respect that ICD
Time Favonius procs when your intended recipient is on-field
Account for particle travel time in funneling
Prioritize consistent energy over maximum generation
Constellation Investment Strategy
Faruzan’s Breakpoints
Key Constellations:
C1: Second Hurricane Arrow, minimal impact due to particle ICD
C2: Extends Burst from 12s to 18s, improving uptime to 22s total
C4: 2-4 flat energy per vortex, provides slight ER relief
C6: Reduces ER needs by roughly 40% while adding 40% Anemo CRIT DMG
Honestly? C2 represents the optimal stopping point before C6. You get rotation flexibility without the massive investment.
Wanderer’s Value Proposition
Constellation Breakpoints:
C1: 10% ATK SPD and A4 buffs, quality-of-life improvement
C2: Up to 200% Burst DMG bonus, makes ER investment worthwhile
C6: Additional damage instance and flight extension
C0 Wanderer performs excellently. Constellations are luxury, not necessity.
Spiral Abyss Performance
Floor-Specific Adaptations
Floor 12 Strategy:
12-1: Leverage grouping, consider Triple Anemo for multi-target
12-2: Single-target optimization, prioritize shield uptime
12-3: Adapt to boss mechanics, ensure energy consistency
Meta teams achieve sub-90 second clear times on Floor 12 chambers. That 59,250 DPS ceiling? It places Wanderer + Faruzan among the absolute top-performing combinations.
Enemy Matchups
Where They Excel: Single large enemies, predictable patterns, grounded enemies Where They Struggle: Highly mobile enemies, flying enemies, energy-draining mechanics
Mistakes I See Everyone Make
Energy Management Disasters
Underestimating ER: Building 200% ER pre-C6 guarantees Burst downtime
Ignoring particle ICD: Firing C1’s second arrow immediately wastes field time
Poor Favonius building: Insufficient CRIT Rate leads to inconsistent procs
Terrible funneling: Not accounting for particle travel time
Rotation Failures
Poor buff stacking. Wasting Wanderer’s A4 passive by dashing before the trigger. Extending rotations due to energy failures. Getting interrupted during damage phase from inadequate shielding.
Advanced Optimization
Target Stats That Matter
ATK: 2,000+ (before buffs)
CRIT Rate: 70-80%
CRIT DMG: 160-200%
Energy Recharge: 100-130% (C2+ builds for frequent Bursts)
Min-Max Strategies
Prioritize CRIT substats over ATK% in most scenarios. Balance ER requirements with offensive stats based on constellation levels. Only consider set bonuses after meeting stat thresholds.
Advanced Techniques (for the truly dedicated):
On-field TF Faruzan: 4pc Thundering Fury for rapid-fire Hurricane Arrows
Hybrid Damage: C6 Faruzan with 4pc Golden Troupe for personal damage
Quick FAQ
How much ER does Faruzan actually need? Pre-C6: 250-300% ER with Favonius Warbow mandatory. C6: 175-200% ER thanks to off-field particle generation.
What’s Faruzan’s best weapon? Favonius Warbow is BiS pre-C6 with 30-60% CRIT Rate for consistent procs. At C6, Elegy for the End becomes competitive.
How do I fix Faruzan’s energy issues? Favonius Warbow with sufficient CRIT Rate, 250-300% ER pre-C6, understand that 5.5-second particle ICD, optimize energy funneling. C6 reduces ER needs by 40%.
Best teams for Wanderer and Faruzan? Wanderer + Faruzan + Yelan + Bennett (59,250 DPS) or Wanderer + Faruzan + Rosaria + Bennett (43,093 DPS). Budget options use Xiangling or Thoma.
Is Faruzan C6 required? Not required, but it transforms the entire experience. Pre-C6 functions with proper ER building. C6 provides quality-of-life and that 40% Anemo CRIT DMG bonus.
Rotation order? Zhongli Hold E → Faruzan E/Charged Shot/Q → Bennett E/Q → Wanderer E/Combo/Q. Stack buffs before Wanderer’s damage phase, respect energy timing.


