

Understanding Xilonen's Buffer Role in Phase 2 F2P Geo Teams
Here's what I've learned after weeks of testing Xilonen since her October 9th release: she's genuinely game-changing for budget Geo teams. That 33% RES shred through her Sampler system? It's the real deal, and you don't need whale investments to make it work.
For those looking to expand their roster efficiently, cheap genshin impact primogems top up for free 4-star selector pulls through BitTopup provides secure access to additional characters at competitive rates.
What Makes Phase 2 Geo Teams Different

Phase 2 teams flip the script on traditional hypercarry strategies. Instead of pumping everything into one character, you're spreading the love – and it works surprisingly well:
- Multi-element compositions with 2+ non-Geo characters (those PECH requirements aren't negotiable)
- Geo Resonance doing its thing (+15% shield strength, +15% damage after Crystallize)
- Damage distributed across multiple characters
- Way lower individual investment requirements
The beauty here? You can actually clear content without maxing out a single character.
Xilonen's Core Mechanics (The Stuff That Actually Matters)
Sampler System: This is where Xilonen shines, but there's a catch. You need 2+ PECH teammates (Pyro/Hydro/Electro/Cryo) to unlock:
- Up to 40% Elemental DMG Bonus through artifact synergy
- Nightsoul Mode healing activation
- RES shred scaling with DEF (sweet spot is 2,500+ DEF)
Investment Reality Check: Buffer builds are refreshingly cheap:
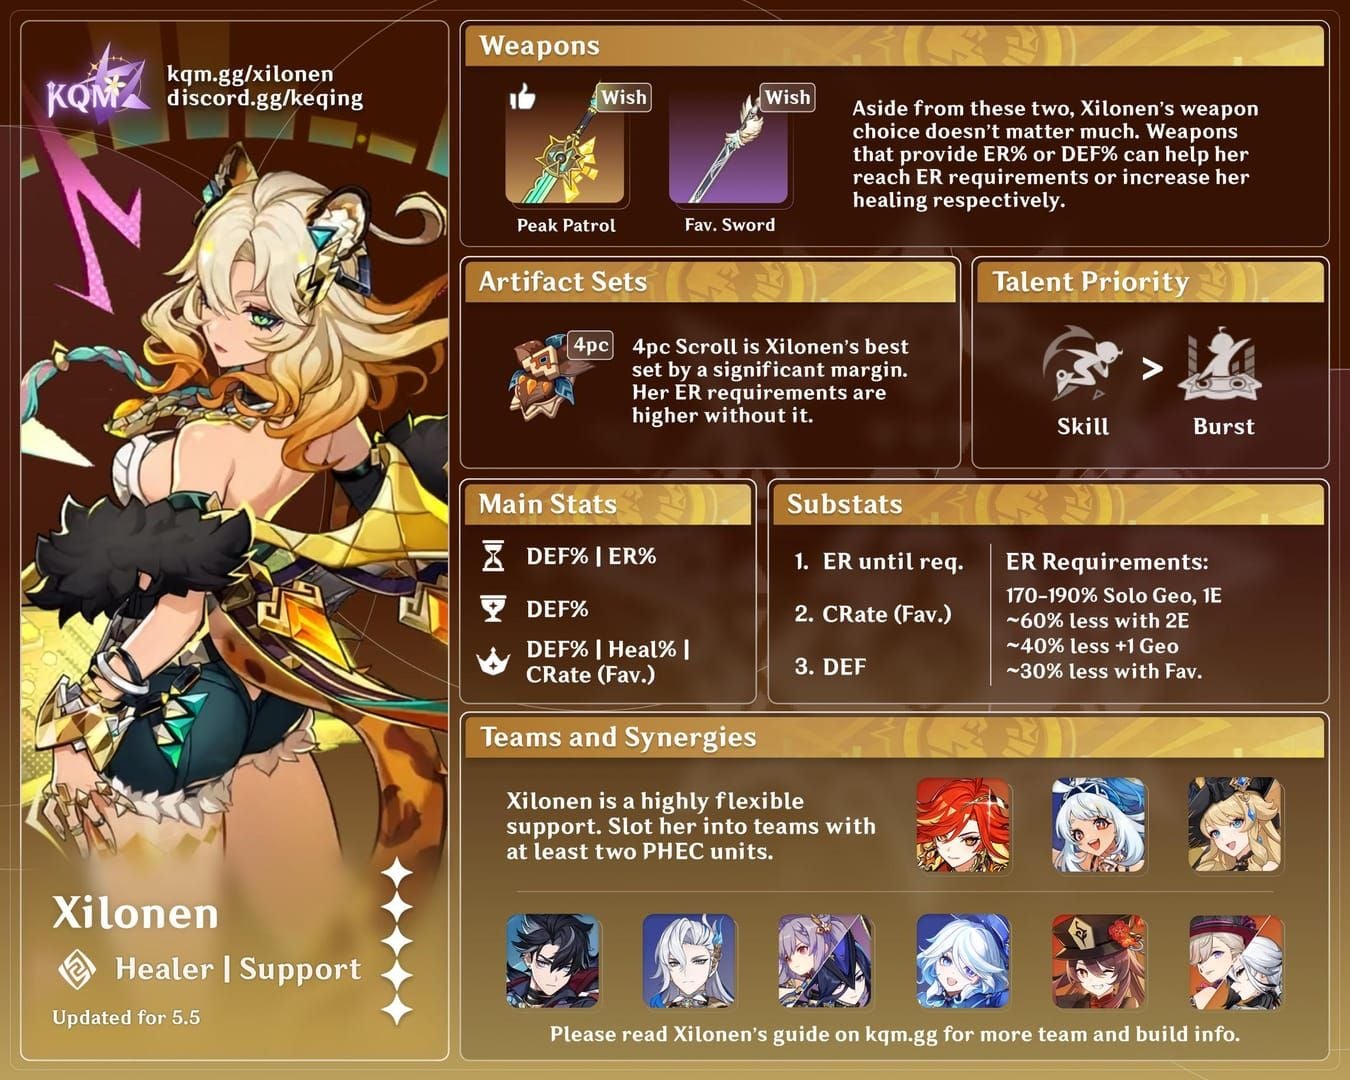
- Talent priority: Skill → Burst → Normal Attack (6/6/6 gets you there)
- Energy Recharge ≥190% and DEF focus
- C0 provides 95% of maximum potential
That last point bears repeating – you don't need constellations to make Xilonen work.
6.2 Abyss Floor 11 Analysis
Enemy Lineup and What Actually Works
Chamber 1: Ruin Grader + Wayob Manifestation The Ruin Grader's spinning attack creates a perfect window – hit that eye when it's exposed. For the feet, wait until it's stationary. Don't get greedy with damage windows.
- Target weak points during spinning attacks (eye) and stationary phases (feet)
- Maintain elemental auras for Wayob shield breaking
- Clear time target: 90 seconds
Chamber 2: Mixed Elemental Shields (Abyss Mages + Fatui) This chamber's all about preparation, not raw DPS. Know your counters before you start.
- Prioritize shield breaking over damage
- Use appropriate elemental counters
- Clear time target: 105 seconds
Chamber 3: Cryo + Geo Lawachurl Here's where Geo teams really shine. That Geo Lawachurl resists everything except Geo damage, so your investment finally pays off.
- Focus Geo Lawachurl first (resists non-Geo damage)
- Sustained Pyro for Cryo shields
- Clear time target: 120 seconds
6.2 Blessing Benefits
That +200 Elemental Mastery isn't just a number – it genuinely enhances:
- Crystallize shield absorption values
- Reaction damage for mixed teams
- Vaporize synergy with Pyro/Hydro characters
Core F2P Xilonen Buffer Build
For those wanting to accelerate their progress, instant primogems buy for 6.2 new domain resin refills through BitTopup offers fast, secure transactions with excellent service.
Weapon Rankings (Tested and Verified)
Tier 1: Peak Patrol Song (Craftable)
- Base ATK: 565 | DEF: 82.7%
- Passive: +20% DEF, Normal Attack scaling
- Perfect synergy with her kit
This weapon was clearly designed for her. The DEF scaling matches perfectly, and being craftable means everyone can access it.
Tier 2: Favonius Sword
- Base ATK: 454 | ER: 61.3%
- Requires 30%+ CRIT Rate for particle generation
- Superior energy support
Don't sleep on Favonius. If you're struggling with energy, this solves the problem completely.
Tier 3: Freedom-Sworn (Limited)
- Base ATK: 608 | EM: 165
- Team ATK and damage bonuses
- Premium but limited availability
Artifact Priority
Primary: 4pc Scroll of the Hero of Cinder City
- 2pc: +12% Elemental DMG for Nightsoul characters
- 4pc: +12% Elemental DMG to party members
- Perfect Sampler synergy
This set was made for her. The synergy is so obvious it hurts.
Alternative: 4pc Noblesse Oblige
- Universal +20% ATK team buff
- Readily farmable
- Less kit synergy but consistent benefits
Stats and Substats
Main Stats: ER/DEF% Sands | DEF% Goblet | CRIT Rate/DMG Circlet
Substat Priority:
- Energy Recharge (190%+ target)
- DEF% (2,500+ total DEF target)
- CRIT Rate (30%+ for Favonius)
- CRIT DMG
- ATK%
Talent Levels:
- Skill: Priority 1 (level 8+ for RES shred)
- Burst: Priority 2 (level 8+ for healing)
- Normal Attack: Level 1-6 sufficient
Top 3 F2P Team Compositions
Team 1: Xilonen + Noelle + Yun Jin + Gorou
Why This Works: Pure F2P accessibility with DEF scaling focus
- Noelle: Main DPS with DEF scaling
- Xilonen: RES shred and healing
- Yun Jin: Normal Attack DMG bonus
- Gorou: DEF% team buff
Rotation: Gorou Skill/Burst → Yun Jin buffs → Xilonen Samples → Noelle DPS phase
This team costs exactly zero primogems to build. Noelle's from the beginner banner, everyone else is free or easily obtainable.
Team 2: Xilonen + Navia + Xiangling + Bennett
Why This Works: Hybrid Geo-Pyro with reaction damage
- Navia: Crystallize-focused DPS
- Xiangling: Off-field Pyro and reactions
- Bennett: ATK buff and Pyro resonance
- Enhanced by 6.2 blessing for Vaporize reactions
Rotation: Bennett setup → Xiangling off-field → Xilonen Samples → Navia DPS with Crystallize
Team 3: Xilonen + Geo Traveler + Kaeya + Rosaria
Why This Works: Freeze-Geo hybrid for crowd control
- Geo Traveler: Construct utility and energy
- Cryo duo: Freeze reactions and CRIT sharing
- Effective against mobile enemies
Rotation: Rosaria CRIT buff → Kaeya Cryo aura → Traveler constructs → Xilonen coordination
Optimal Rotations and Mechanics
Standard 20-Second Framework
Phase 1 (0-6s): Support setup and elemental auras Phase 2 (6-12s): Xilonen Sample generation + 2 Normal Attacks Phase 3 (12-18s): Main DPS with buff overlap Phase 4 (18-20s): Xilonen Burst and transition
Key Timing Points
Here's what actually matters in practice:
- Sample duration: 15 seconds with 7-second skill cooldown
- Recast timing: 12-13 seconds for continuous uptime
- Burst integration: 18-second cooldown, 80 energy cost
- Energy funneling during Xilonen field time
Geo Resonance Optimization
Shield Management: The trick with Crystallize isn't just making shields – it's collecting them at the right time. Those shards give you immediate +15% damage, but only if you grab them during your DPS windows.
- Crystallize shields scale with level and EM
- Collect shards during DPS windows for immediate +15% damage
- Layer multiple shield sources for extended uptime
- Position for efficient 15-second shard collection
Investment and Constellation Guide
C0 Performance Baseline
Let me be clear: C0 Xilonen is completely functional. You get:
- Full 33% RES shred potential
- Complete Sampler mechanics
- Nightsoul healing with PECH setup
- 95% of maximum buffer effectiveness
Constellation Value
C2 (High Priority): Geo RES shred + permanent Geo Samples This is the big one. Enables mono-Geo compositions and represents a significant power spike for Geo-focused accounts.
C1/C4/C6: Quality of life improvements, not essential for F2P viability
Support Character Priorities
Gorou: C1 sufficient, C6 for dedicated Geo teams Yun Jin: C2 for improved buff duration Bennett: C1 maximum (avoid C6 like the plague)
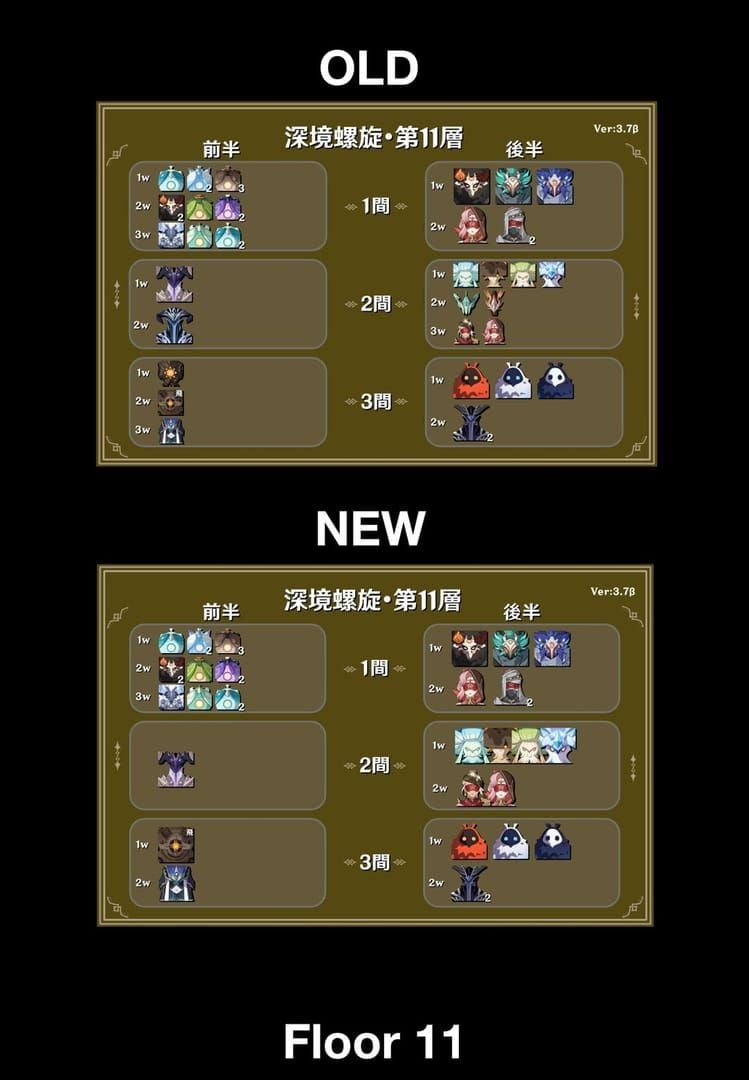
Floor 11 Clear Strategy
Team Assignment
First Half: Xilonen Geo teams (excel against Ruin enemies and Geo Lawachurls) Second Half: Elemental reaction teams (better shield variety coverage)
This assignment isn't arbitrary – Geo teams genuinely perform better against the mechanical enemies in the first half.
Chamber-Specific Tactics
Chamber 1: Focus weak point exploitation with Geo attacks Chamber 2: Prioritize shield breaking, use Crystallize for defense Chamber 3: Geo Lawachurl first, coordinate Pyro for Cryo shields
Time Management
Target times: 90s/105s/120s per chamber for comfortable 3-star completion. If you're exceeding targets by 15+ seconds, just reset. Don't waste time on failed runs.
Troubleshooting Common Issues
Energy Problems
This is the #1 issue I see with new Xilonen players:
- Increase Xilonen ER to 200%+
- Equip multiple Favonius weapons
- Improve particle collection timing
- Pre-funnel energy before encounters
Survivability Issues
- Prioritize Crystallize shield collection
- Build HP% substats on vulnerable characters
- Invest in Xilonen Burst talent for healing
- Improve positioning and dodge timing
DPS Deficiency
Usually it's not your damage – it's your buff management:
- Verify buff uptime and overlap
- Check CRIT ratios on damage dealers
- Upgrade main DPS talents to 8+
- Optimize rotation efficiency
Resource Optimization
Resin Allocation (Weekly 1,680 total)
- Artifacts: 840 resin (50%)
- Talents: 420 resin (25%)
- Ascension: 252 resin (15%)
- Weapons: 168 resin (10%)
Investment Thresholds
Xilonen: 80/90, 6/8/6 talents, +16 artifacts Main DPS: 90/90, 8/8/8 talents, +20 artifacts Supports: 70/80, 6/6/6 talents, +16 artifacts
Farming Priority
- Scroll of Cinder City domain for Xilonen artifacts
- Talent books on designated days with Condensed Resin
- Boss materials combined with daily routes
FAQ
Q: Can Xilonen work effectively at C0? Absolutely. C0 provides complete buffer functionality with 33% RES shred and full mechanics. Just make sure you have 2 PECH teammates – easily achieved with F2P characters.
Q: Minimum Energy Recharge needed? 190%+ for consistent Burst uptime. Favonius weapons and proper funneling enable reliable 18-second rotations. Don't go below this threshold.
Q: Best F2P weapon? Peak Patrol Song (craftable) for DEF synergy, or Favonius Sword for energy support with 30%+ CRIT Rate. Both are excellent choices for different reasons.
Q: How does she compare to Gorou? Different roles entirely. Xilonen provides universal 33% RES shred vs Gorou's DEF buffs. Xilonen excels in mixed teams with healing, Gorou dominates mono-Geo compositions.
Q: Key artifact stats? ER (190%+) and DEF (2,500+). Use 4pc Scroll of Cinder City or Noblesse alternative. ER/DEF% sands, DEF% goblet, CRIT circlet. Don't overthink it.
Q: Floor 11 shield breaking capability? Excellent against Geo Lawachurls via Geo Resonance. Include Pyro for Cryo shields. Crystallize provides defense while maintaining offense – it's surprisingly effective.


