Why C0R0 Zibai Actually Works (And Why Most Players Get It Wrong)
Let's be honest – when Zibai dropped, everyone assumed she'd be another constellation-locked DPS. Wrong.
C0R0 means zero constellations, zero weapon refinements. Basically, what most players actually have access to. And here's what the theorycrafters missed initially: her entire damage ceiling lives in mechanical execution, not monetary investment.
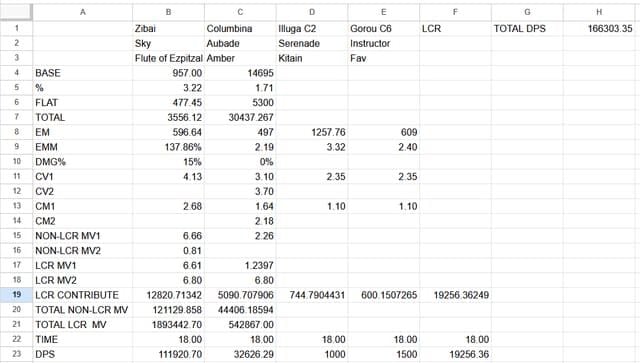
The 150K DPS benchmark? That's sustained damage across full rotation cycles – not some cherry-picked screenshot moment. We're talking real combat scenarios with setup time, cooldowns, the works.
Zibai's Elemental Skill Heaven and Earth Made Manifest does the heavy lifting. It triggers Lunar Phase Shift, converting your Normal and Charged Attacks to Geo damage while building Phase Shift Radiance stacks. Her signature weapon at R0 provides DEF scaling bonuses and Lunar-Crystallize damage enhancement – honestly, it's more than sufficient for competitive performance.
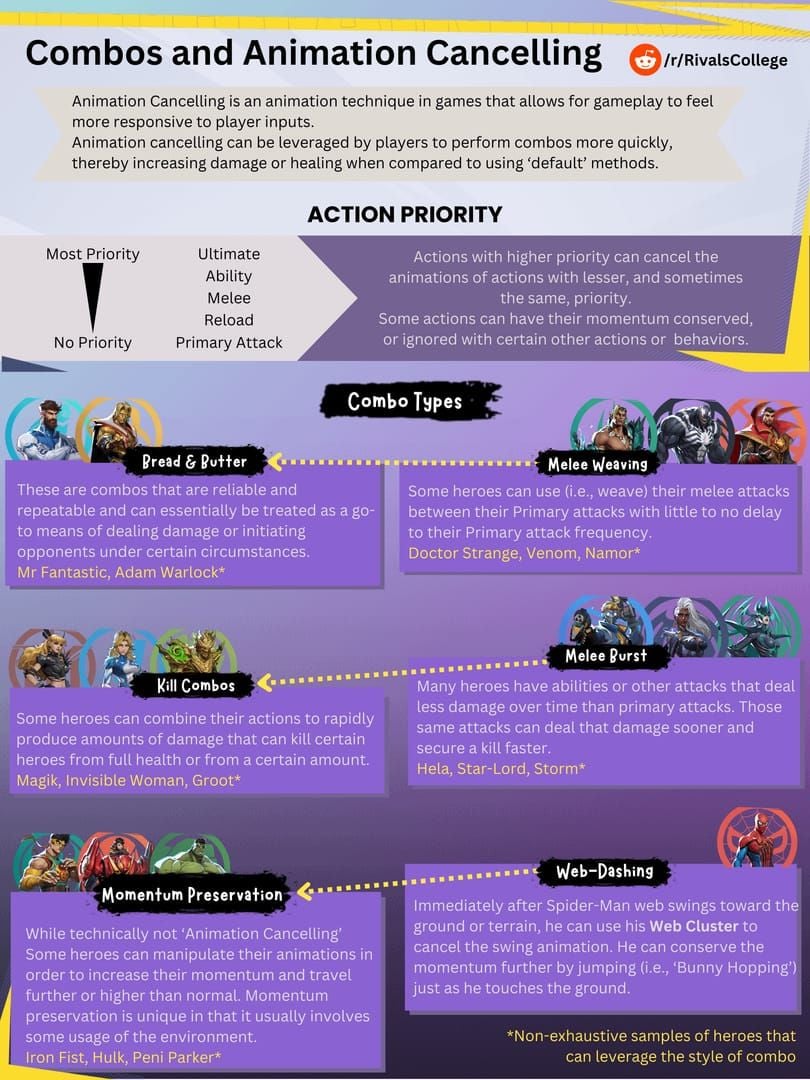
The magic happens when you understand her damage sources: Geo-converted attacks during Phase Shift, Spirit Steed's Stride consumption with proper Lunar-Crystallize scaling, Elemental Burst dual-hits, and sustained damage through animation canceling. For players serious about optimization, instant primogems top up for columbina 6.3 pre-farming prep through BitTopup ensures you've got the resources for artifact upgrades and talent materials.
That one C6 4-star requirement? It's not arbitrary. It represents reasonable F2P investment – the kind you naturally accumulate over time.
The Complete DPS Loop (And Why Timing Is Everything)

Zibai's optimal rotation runs 20-22 seconds. Sounds long? It's not when you see the damage output.
Here's the sequence that actually works:
Phase 1: Setup (2-3 seconds) Cast Elemental Skill for Lunar Phase Shift. Don't rush this – the animation matters for energy generation.
Phase 2: Building Momentum (4-6 seconds)
Execute 3-4 Normal Attacks for Phase Shift Radiance stacks. This isn't filler damage – you're setting up the big hit.
Phase 3: The Payoff (2-3 seconds) Trigger Spirit Steed's Stride. When this connects with proper Lunar-Crystallize setup, you'll see why we chase this rotation.
Phase 4: Burst Integration (3-4 seconds) Elemental Burst for dual-hit damage. Timing this after Stride consumption maximizes reaction scaling.
Phase 5: Support Cycling (8-10 seconds) Your C6 4-star does their thing while Zibai's abilities cool down.
Critical timings you need to nail: Skill animation takes ~1.2 seconds (dash-cancel it), Phase Shift lasts 8-10 seconds, Stride trigger window is 2-3 seconds for optimal damage, and burst works best immediately after Stride consumption.
Energy requirements sit around 130-160% ER depending on your team. Same-element particle funneling drops this significantly – more on that later.
Choosing Your C6 4-Star (This Decision Matters More Than You Think)
Bennett C6: The controversial choice that actually works brilliantly here. Massive ATK scaling, healing, Pyro particles. His burst snapshot mechanics let you time buffs perfectly during Zibai's highest damage phases. Yes, the Pyro infusion can interfere with some comps, but with Zibai's Geo conversion, it's rarely an issue.
Noelle C6: This is the sleeper pick. Most synergistic option for DEF-scaling teams. She converts DEF to ATK during burst, provides Geo resonance (enhanced shield strength, Geo damage bonus), generates particles, and her DEF scaling buffs directly enhance Zibai's passives. Plus, dual-DPS potential means flexible field time.
Sucrose C6: The ceiling option. 20% Elemental DMG Bonus on burst absorption, substantial EM sharing, Viridescent Venerer resistance shredding, crowd control. Her EM scaling directly benefits Lunar-Crystallize reactions – highest damage ceiling among 4-star options, but requires more precise execution.
In practice? Noelle C6 gives the most consistent damage through Geo synergy. Sucrose C6 offers higher peaks via reaction optimization. Bennett C6 serves as the most versatile option with substantial ATK scaling that benefits all damage sources.
For serious Geo team optimization, fast genesis crystals recharge before hexerei selector deadline through BitTopup provides the character development resources you'll need.
Animation Canceling: The 20-30% DPS Increase You're Missing

Here's where mechanical skill separates good Zibai players from great ones.
Animation canceling isn't just about looking flashy – it increases DPS by 20-30% while reducing rotation duration. But you need to know the right cancel windows.
Critical Cancel Points:
- N2C combo for optimal DPS strings
- Skill cast dash-cancel for faster Phase Shift entry
- Burst animation jump-cancel for immediate follow-up
- Stride consumption cancel for seamless continuation
Attack String Optimization: N2C pattern provides the best balance of damage, efficiency, and resource conservation. But experienced players know when to adapt: N1C for mobility situations, N3C for stationary targets, N2 dash-cancel for speed optimization, Charged Attack spam for maximum radiance generation.
The Cancel Techniques That Actually Work: Dash canceling offers the fastest interruption (~20 frames) with stamina cost and repositioning capability. Jump canceling provides stamina-free alternatives with slightly longer frames – better for extended combos and conservation. Advanced players combine both techniques within rotations.
Don't try to master everything at once. Start with basic N2C combos, then gradually incorporate cancels as muscle memory develops.
Energy Management (Or: How to Never Miss a Burst Window)
Baseline 130% ER assumes optimal particle funneling and same-element support. But several factors affect your actual requirements: team composition, encounter duration, rotation timing, weapon ER substats.
Same-element particles provide triple energy value versus off-element sources. This isn't just theory – it's the difference between consistent burst uptime and energy starvation.
Funneling Strategies That Work: Cast support skills before swapping to Zibai for collection. Time skill usage with energy needs rather than damage windows. Manage particle travel time – they're not instant. Avoid energy overflow through careful burst timing.
Noelle serves as an excellent Geo battery with consistent particle generation. Bennett provides reliable Pyro particles. Sucrose generates Anemo particles while providing EM buffs.
Pre-funneling Technique: Generate particles before your main rotation for immediate burst availability. Process: cast support skills at encounter start, swap to Zibai for collection before skill usage, build energy reserves before Phase Shift, time first burst for maximum damage window.
Build Requirements: What 150K DPS Actually Takes

Stat Targets (Realistic Ranges):
- DEF% 150-200% for passive optimization
- CRIT Rate 60-70% for consistency
- CRIT DMG 120-150% for damage ceiling
- Elemental Mastery 100-200 for Lunar-Crystallize
- Energy Recharge 130-160% for burst consistency
Husk of Opulent Dreams provides optimal DEF scaling. Emblem of Severed Fate enhances burst damage. Don't stress about perfect substats – proper execution matters more than min-maxed artifacts.
F2P Weapon Options: Prototype Rancour (DEF scaling/ATK), Iron Sting (EM/reactions), Amenoma Kageuchi (ER/skill synergy), The Flute (balanced ATK). Choose based on your artifact stat distribution and team requirements.
Talent Priority: Elemental Skill > Normal Attack > Elemental Burst. Target 8/8/8 baseline, 9/9/9 optimal. Crown Elemental Skill for maximum impact – it's the foundation of everything.
The Mistakes That Kill Your DPS (And How to Avoid Them)
Mistiming Burst Windows Don't cast burst the moment it's available. Align it with maximum buff coverage. Consider support buff duration, enemy vulnerability windows, energy timing, cooldown synchronization.
Wrong Skill Priority Elemental Skill provides the foundation for all damage – highest priority for timing and execution. Avoid delaying skill usage, prioritizing burst over sustained Phase Shift benefits, or mismanaging Stride timing.
Energy Starvation Collect particles on the correct characters. Time skill usage for generation. Avoid over-investing ER at damage expense. Utilize same-element particle bonuses.
Over-Extending Field Time Balance individual DPS with team coordination. Recognize optimal active duration. Manage cooldowns for seamless cycling. Consider total team DPS over individual maximization.
Advanced Tips (For When You're Ready to Push Further)
Snapshot Mechanics Support burst buffs get captured by Zibai's abilities. EM bonuses extend reaction windows. ATK scaling preserves during transitions. Master timing for Bennett burst placement, Sucrose EM sharing, ability duration understanding.
Pre-Casting Strategy Use support abilities before Zibai swap for immediate buff activation. Bennett burst placement, Sucrose skill for EM activation, Noelle skill for particles and shields, elemental application for reaction setup.
Stamina Conservation Alternate dash and jump cancels for balance. Manage Charged Attack usage. Utilize terrain efficiently. Plan recovery windows during support phases. This prevents execution failures during critical damage windows.
FAQ
Can I reach 150K DPS without C6 supports? Yes, through exceptional execution and build optimization, though it's more challenging. Focus on artifact optimization, weapon upgrades, and perfect rotation execution to compensate.
How does this compare to C1+ rotations? C1 provides increased Stride usage and damage, but fundamental principles remain unchanged. C0 mastery provides an excellent foundation for future constellation upgrades.
What if I lack optimal artifacts? Begin rotation practice with suboptimal artifacts while gradually improving through farming. Maintain proper stat ratios and set bonuses – mechanical skill development takes priority.
Spiral Abyss viability? Performs well across most floors with minor adaptations for specific mechanics. Practice adaptations for energy drain, shield breaking, and time pressure scenarios.
Mastery timeline? Basic competency: 1-2 weeks focused practice. Optimization and consistency: several months. Prioritize accuracy before speed. Build muscle memory through systematic improvement.
What should I focus on first? Learning progression: basic sequence → energy management → simple cancels → advanced optimization → situational adaptations. Establish consistent burst availability and skill timing first.


