

Look, I'll be straight with you—Chevreuse is fantastic for Overload teams, but she's not exactly F2P friendly. And honestly? You don't need her to absolutely demolish Abyss 11-3 with Xilonen.
After testing dozens of team combinations and rotation timings, I've found several budget alternatives that'll get you those precious 36 stars without breaking your primogem bank.
Understanding Xilonen Phase 2 Overload Rotation Mechanics
What Actually Defines Phase 2 Rotation in Xilonen's Kit
Here's where things get interesting. Xilonen's Phase 2 isn't some arbitrary marketing term—it's her Elemental Skill's second activation phase that generates Source Samples based on your PECH teammates (Pyro, Electro, Cryo, Hydro).
When you've got 2+ non-Geo teammates, she provides up to 33% multi-element RES shred for 15 seconds off-field. But here's the catch—you need at least 190% Energy Recharge and 2,500 DEF for this to work consistently.
The rotation operates on clean 20-second cycles:
- 0-6 seconds: Support setup
- 6-12 seconds: Xilonen's Skill activation plus 2 Normal attacks (this triggers the 15-second buff)
- 12-18 seconds: Your main DPS window
- 18-20 seconds: Burst healing
Pro tip? Her Skill can be recast at 12-13 seconds due to the 7-second cooldown. This overlap is crucial for maintaining buff uptime.
For convenient genesis recharge for drzislav puzzle achievement primos, BitTopup offers secure transactions and competitive pricing to help F2P players access essential resources.
Why Overload Actually Synergizes with Xilonen (Despite What You've Heard)
I know, I know—everyone says Overload is just for early game. They're wrong.
Overload reactions deal AoE Pyro damage in a 5-meter radius, scaling with character level and Elemental Mastery. At Level 90, base Overload damage hits 3,978.85 before EM multipliers. But here's what changed everything: Version 5.2 increased the multiplier from 2.0 to 2.75. That's a massive 37.5% damage boost that most players haven't fully grasped yet.
Xilonen enhances Overload teams through adaptive RES shred. When paired with Pyro and Electro teammates, her Skill automatically generates Pyro and Electro Source Samples, providing 33% RES shred for both elements. Combine this with Scroll of the Hero of Cinder City 4-piece (+12% Elemental DMG on reactions), and suddenly Xilonen's amplifying Overload damage substantially.
And here's the kicker—Overload's Blunt Attack property excels against Geo shields and heavy enemies that resist knockback. Perfect for current Abyss rotations.
Chevreuse's Role and Why Players Seek Alternatives
Chevreuse provides 40% Pyro/Electro RES shred via her A1 Passive when Overload reactions occur. Her A4 Passive grants up to 40% ATK buff when reaching 40,000 Max HP, scaling at 1% per 1,000 HP for 30 seconds.
But here's the reality check: Chevreuse requires specific team compositions (Pyro + Electro only) and significant HP investment. F2P players often lack her constellations, with C6 providing crucial +10% Max HP healing and 60% stacking Pyro/Electro DMG Bonus.
Alternative supports offer more accessible team building while maintaining Overload viability. Bennett provides universal ATK buffs and healing, Xiangling delivers consistent off-field Pyro application, and both are guaranteed through events and Starglitter shop rotations.
Abyss 11-3 Enemy Analysis and Team Requirements
Enemy Composition and Elemental Weaknesses

Abyss Floor 11 Chamber 3 is where Overload teams really shine. First Half features Eremite Sunfrost and Daythunder enemies that require simultaneous engagement to prevent 50% HP regeneration and crowd control immunity when one dies first.
Second Half? Those annoying Veteran Tainted Water-Spouting Phantasm and Water-Splitting Phantasm that are Freeze-immune and become enraged. The trick is focusing the left Spouting Phantasm first.
Overload's AoE nature excels against both configurations. That 5-meter explosion radius effectively damages grouped Phantasms, while the Blunt Attack property helps break shields and stagger heavy enemies.
DPS Check Thresholds and Time Constraints
Chamber 3 requires approximately 25,000-30,000 total team DPS for 3-star clear timing. Here's where Overload teams surprise people—they contribute significant damage through reaction scaling. Level 90 Overload with 200 EM deals roughly 6,000 damage per trigger, with 1-second cooldown per attacker allowing multiple overlapping triggers.
Energy requirements become critical: Xilonen needs 190%+ ER for consistent Burst healing, while Pyro supports require 140-180% ER depending on team composition. Same-element particle funneling provides 3 energy versus 1 for off-element—this matters more than most guides tell you.
The 20-second rotation cycle aligns perfectly with Chamber 3's wave structure, allowing 2-3 complete cycles per wave.
Top F2P Chevreuse Substitutes: Detailed Comparison
Bennett: The Universal Solution
Bennett remains the gold standard for good reason. He provides universal ATK buffs scaling with Base ATK plus weapon—at Level 90 with Prototype Rancour, Bennett grants approximately 700-800 ATK buff to characters within his Burst field.
His healing scales with HP, making HP% Goblet and Healing Bonus Circlet optimal. For Overload teams, Bennett's Pyro application triggers reactions with off-field Electro. His 4-piece Noblesse Oblige provides additional 20% party ATK buff, stacking with his Burst.
Energy requirements range from 180-220% ER depending on team composition. In practice, this means prioritizing ER substats until you hit that threshold, then focusing on HP for healing.
Xiangling: Off-Field Pyro Powerhouse
Xiangling excels as off-field Pyro enabler through Pyronado Burst, which snapshots ATK buffs and provides consistent Pyro application for 14 seconds. With 4-piece Emblem of Severed Fate, her Burst damage scales significantly while reducing ER requirements to 140-180% with proper funneling.
Her Guoba provides additional Pyro application and 10% ATK buff to all party members—a detail many players overlook.
Safe genshin primogems buy before 6.3 crystallize banners through BitTopup ensures you have resources for optimal artifact farming and weapon upgrades.
Xiangling requires careful energy management and Bennett synergy. Her Burst must be cast within Bennett's field to snapshot the ATK buff. The Catch weapon provides excellent F2P scaling with ER main stat and Burst damage bonus.
Thoma: The Underrated Shield Support
Thoma provides unique utility through Blazing Barrier shield, which absorbs damage while applying Pyro through Fiery Collapse triggers. His shield scales with HP, requiring HP% main stats across Sands, Goblet, and Circlet.
The shield's Pyro application occurs every 1 second when taking damage or every 3 seconds automatically, providing consistent Overload triggers with off-field Electro.
However, Thoma's damage contribution remains minimal compared to Bennett or Xiangling. His primary value lies in survivability and consistent reaction enabling—perfect for players who struggle with dodging.
Yanfei: On-Field Pyro DPS Alternative
Yanfei functions as both Pyro enabler and main DPS, offering charged attack damage scaling with ATK and Pyro DMG Bonus. Her Scarlet Seals mechanic provides enhanced charged attacks with reduced stamina consumption.
With Prototype Amber, Yanfei gains healing utility and ER support, partially replacing dedicated healers. Her consistent Pyro application through normal and charged attacks triggers frequent Overload reactions.
What works best is using Yanfei when you need more field time for Pyro application—she's particularly effective against single-target scenarios.
Complete F2P Xilonen Overload Team Compositions
Team 1: Xilonen + Bennett + Fischl + Flex Slot
This composition maximizes universal buffs and consistent reaction triggers. Bennett provides ATK buffs and healing, Fischl offers reliable off-field Electro through Oz, and Xilonen delivers RES shred plus additional healing.
Rotation sequence:
- Bennett Skill → Burst (establish ATK buff field)
- Fischl Skill (deploy Oz for Electro aura)
- Xilonen Skill → 2 Normal attacks (activate RES shred)
- Bennett Skill (trigger Overload, maintain energy)
- Xilonen Burst (healing and damage)
- Repeat cycle
Energy requirements: Bennett 180-200% ER, Fischl 120-140% ER, Xilonen 190%+ ER. Favonius weapons reduce requirements by 10-20% through particle generation.
Team 2: Xilonen + Xiangling + Beidou + Healer
This composition emphasizes off-field damage through Xiangling's Pyronado and Beidou's Stormbreaker. Both Bursts snapshot buffs and provide sustained elemental application for continuous Overload triggers.
Rotation sequence:
- Healer Burst/Skill (establish healing field)
- Beidou Skill → Burst (Electro aura and damage reduction)
- Xiangling Skill → Burst within healer field (snapshot buffs)
- Xilonen Skill → Normal attacks (RES shred activation)
- Maintain positioning for Overload triggers
This team requires higher ER investment—Xiangling 160-180%, Beidou 140-160%—but delivers superior AoE damage against grouped enemies.
Budget Weapon Recommendations
Xilonen: Peak Patrol Song (craftable, DEF 82.7% substat) provides optimal scaling. Alternative: Flute of Ezpitzal or Cinnabar Spindle for DEF scaling.
Bennett: Prototype Rancour offers highest Base ATK among F2P options, maximizing ATK buff potential. Favonius Sword provides energy generation but reduces buff scaling.
Fischl: Stringless enhances Oz damage through EM and Skill DMG bonus. F2P alternatives: Prototype Crescent for ATK scaling or Favonius Warbow for energy support.
Xiangling: The Catch (free from fishing) provides perfect scaling with ER main stat and Burst DMG/CRIT Rate bonuses.
Constellation Requirements and C0 Viability
All recommended characters function effectively at C0. But let's talk about the game-changers:
Bennett C1: Removes HP restriction on ATK buff, dramatically improving utility and highly recommended. Fischl C6: Transforms her into top-tier off-field DPS through additional Electro damage on Normal/Charged attacks. Xiangling C4: Extends Pyronado duration by 40%, improving uptime significantly. Xilonen C0: Retains 95% of her support potential.
F2P players can achieve consistent Abyss 11-3 clears with C0 teams through proper artifact investment and rotation execution.
Step-by-Step Rotation Guide with Frame Timing
Pre-Combat Setup and Energy Funneling
Begin each chamber with Bursts available on key characters. Use previous chamber's final moments to generate particles through Skill usage—this is free energy you're probably wasting.
Position the team to maximize initial Skill effectiveness. Fischl's Oz placement should cover expected enemy spawn locations, while Bennett's Burst field should encompass the primary combat area.
Energy funneling requires same-element particle collection. Catch Bennett's particles with Bennett, Fischl's with Fischl, to maximize energy gain (3 energy vs 1 off-element).
Phase 1: Skill Activation Sequence (0-8 seconds)
Seconds 0-2: Bennett Skill → Burst Cast Bennett's Skill first to generate particles, then immediately Burst to establish ATK buff field.
Seconds 2-4: Fischl Skill deployment Deploy Oz in optimal position for enemy coverage. Fischl's Skill has 25-second duration, providing consistent Electro application.
Seconds 4-6: Xiangling setup Cast Xiangling Skill (Guoba) for additional Pyro application and ATK buff. If energy permits, cast Burst within Bennett's field to snapshot ATK buff.
Seconds 6-8: Xilonen activation Cast Xilonen's Elemental Skill followed by 2 Normal attacks to generate Source Samples and activate 15-second RES shred buff.
Phase 2: Burst Window and Reaction Triggers (8-20 seconds)
Seconds 8-12: Primary DPS window Focus on triggering Overload reactions through coordinated elemental application. Xiangling's Pyronado and Fischl's Oz provide consistent aura for reactions, while Xilonen's RES shred amplifies damage.
Seconds 12-16: Skill refresh and maintenance Recast Xilonen's Skill at 12-13 seconds (7-second cooldown) to maintain RES shred uptime. Refresh Bennett's Skill for energy generation.
Seconds 16-20: Burst healing and cycle preparation Cast Xilonen's Burst for team healing and additional damage. Begin preparing for next rotation cycle by monitoring cooldowns and energy levels.
Animation Cancel Opportunities
Bennett animation cancels: Cancel Skill recovery frames with dash or jump to reduce downtime. Xilonen optimization: Cancel Normal attack recovery frames with dash after the second Normal attack. Fischl efficiency: Switch characters immediately after Oz deployment to maximize field time for other characters.
Experienced players know these cancels can shave 2-3 seconds off each rotation cycle—that's the difference between 2-star and 3-star clears.
Artifact and Stat Optimization for Overload Teams
Xilonen Main DPS Artifact Priority
Set recommendation: 4-piece Scroll of the Hero of Cinder City for support builds, providing +12% Elemental DMG on reactions. Alternative: 2-piece Husk of Opulent Dreams + 2-piece Archaic Petra.
Main stats: DEF% Sands, DEF% or Geo DMG Goblet, DEF% or CRIT Circlet depending on role focus.
Substat priority: Energy Recharge (until 190%+ threshold) > DEF% > CRIT Rate/DMG > ATK%.
Target benchmarks: 2,500+ DEF, 190%+ ER, 30%+ CRIT Rate for Favonius weapon procs.
Support Character Artifact Set Recommendations
Bennett: 4-piece Noblesse Oblige for 20% party ATK buff. Main stats: ER or HP% Sands, HP% Goblet, Healing Bonus or HP% Circlet.
Fischl: 4-piece Golden Troupe for off-field DPS optimization. ATK% Sands, Electro DMG Goblet, CRIT Circlet.
Xiangling: 4-piece Emblem of Severed Fate for Burst damage scaling. ER or ATK% Sands, Pyro DMG Goblet, CRIT Circlet.
Energy Recharge Breakpoints for Burst Uptime
Xilonen: 190% minimum for solo energy generation, reducible to 170% with Favonius weapons on teammates. Bennett: 180-220% depending on team composition and weapon choice. Xiangling: 140-180% with Bennett battery support, 200%+ without dedicated Pyro battery. Fischl: 120-140% due to excellent energy generation through Oz.
Advanced Rotation Techniques and Optimization Tips
Animation Canceling for Faster Skill Cycles
Dash canceling: Cancel recovery frames on Normal attacks and some Skills by dashing immediately after damage registration. Xilonen's Normal attacks after Skill activation benefit significantly.
Jump canceling: Alternative to dash canceling that preserves stamina while reducing animation time.
Swap canceling: Switch characters immediately after Skill cast to minimize downtime. Fischl's Oz deployment and Xiangling's Guoba placement can be swap-canceled.
Energy Particle Routing Strategies
Same-element funneling: Ensure particle generators catch their own particles for maximum energy gain. Bennett should catch his Skill particles, Fischl should catch Oz particles when possible.
Favonius coordination: Coordinate CRIT hits on Favonius weapon users to generate neutral particles for the entire team. Maintain 30%+ CRIT Rate on Favonius users for consistent procs.
Positioning for Overload Knockback Management
Here's where most players mess up—they don't account for Overload knockback.
Wall utilization: Position enemies against walls or terrain features to prevent Overload knockback from scattering targets.
Heavy enemy focus: Prioritize heavy enemies that resist knockback for sustained Overload assault. Phantasms, Ruin Guards, and large enemies maintain position despite reaction knockback.
Grouping techniques: Use positioning to group enemies before Overload triggers. Tight grouping maximizes AoE damage and prevents target scattering.
Common Mistakes and Troubleshooting
Energy Regeneration Problems and Solutions
Insufficient ER investment: Most rotation failures stem from inadequate Energy Recharge on key characters. Prioritize ER substats and main stats until reaching recommended thresholds.
Poor particle funneling: Failing to catch same-element particles reduces energy generation by 66%. Practice character swapping to ensure particle generators collect their own particles.
Solutions: Increase ER through artifacts and weapons, practice particle collection timing, use Favonius weapons for additional energy generation, extend rotation cycles if necessary.
Overload Knockback Disrupting DPS
Light enemy scattering: Overload knockback sends lighter enemies flying, disrupting damage focus and requiring repositioning time.
Solutions: Use terrain and walls for containment, focus on heavy enemies when possible, delay Overload triggers until enemies are properly positioned.
Mistimed Burst Rotations Losing Buff Synergy
Snapshot failures: Casting damage Bursts outside buff fields prevents snapshot mechanics, significantly reducing damage output. Xiangling's Pyronado loses substantial damage without Bennett's ATK buff snapshot.
Solutions: Practice rotation timing, use visual cues for buff field identification, maintain consistent rotation cycles, prioritize buff uptime over perfect damage timing.
Practical Abyss 11-3 Clear Demonstration
Wave 1 Strategy and Skill Usage
Enemy spawn positioning: Eremite Sunfrost and Daythunder spawn on opposite sides. Immediately group them to prevent separation and HP regeneration mechanics.
Initial setup (0-5 seconds):
- Bennett Burst in center position to cover both enemies
- Fischl Skill placement for maximum enemy coverage
- Xilonen Skill activation with Normal attacks for RES shred
Critical timing: Both enemies must die within 2-3 seconds of each other to prevent 50% HP regeneration and CC immunity buff.
Wave 2 Burst Timing and Rotation Adjustments
Phantasm engagement strategy: Target the left Water-Spouting Phantasm first due to slower movement speed. The right Water-Splitting Phantasm moves more aggressively but should be damaged simultaneously.
Modified rotation for Phantasms:
- Bennett Burst for ATK buff and healing
- Fischl Skill for consistent Electro application
- Xiangling Burst within Bennett field for snapshot
- Xilonen Skill + Normal attacks for RES shred
- Focus damage on Spouting Phantasm while maintaining AoE hits
Finish timing: Eliminate the second Phantasm within 3-4 seconds of the first to prevent revival mechanics.
Time Stamps and DPS Window Analysis
Optimal clear timing breakdown:
- Wave 1: 30-40 seconds with proper grouping and simultaneous elimination
- Wave 2: 45-60 seconds focusing Spouting Phantasm first
- Total target: 90-110 seconds for 3-star clear
DPS window analysis:
- Primary damage occurs during overlapping buff windows (seconds 8-20 of rotation)
- Overload reactions contribute 25-35% of total damage output
- Burst snapshots provide 40-60% damage amplification during active windows
Upgrading Your Account: Resource Investment Guide
Talent Level Priority for Each Character
Xilonen talent priority: Elemental Skill > Elemental Burst > Normal Attack. Crown her Skill for maximum RES shred effectiveness. Burst to level 8-9 for healing scaling.
Bennett talent priority: Elemental Burst > Elemental Skill > Normal Attack. His Burst scaling directly affects ATK buff magnitude, making this the highest priority.
Fischl talent priority: Elemental Skill > Elemental Burst > Normal Attack. Oz damage scales significantly with Skill level.
Xiangling talent priority: Elemental Burst > Elemental Skill > Normal Attack. Pyronado represents majority of her damage output and should be crowned.
Weapon Ascension Cost-Benefit Analysis
High priority weapons:
- The Catch (Xiangling): Free weapon with perfect scaling, maximum priority
- Peak Patrol Song (Xilonen): Craftable with optimal DEF scaling
- Prototype Rancour (Bennett): Highest Base ATK among F2P options
Resource allocation: Prioritize weapons that provide team-wide benefits (Bennett's Base ATK, Xilonen's DEF scaling) over personal damage increases.
Resin-Efficient Farming Routes
Artifact farming priority:
- Emblem of Severed Fate domain for Xiangling and Beidou
- Noblesse Oblige domain for Bennett
- Scroll of the Hero of Cinder City for Xilonen
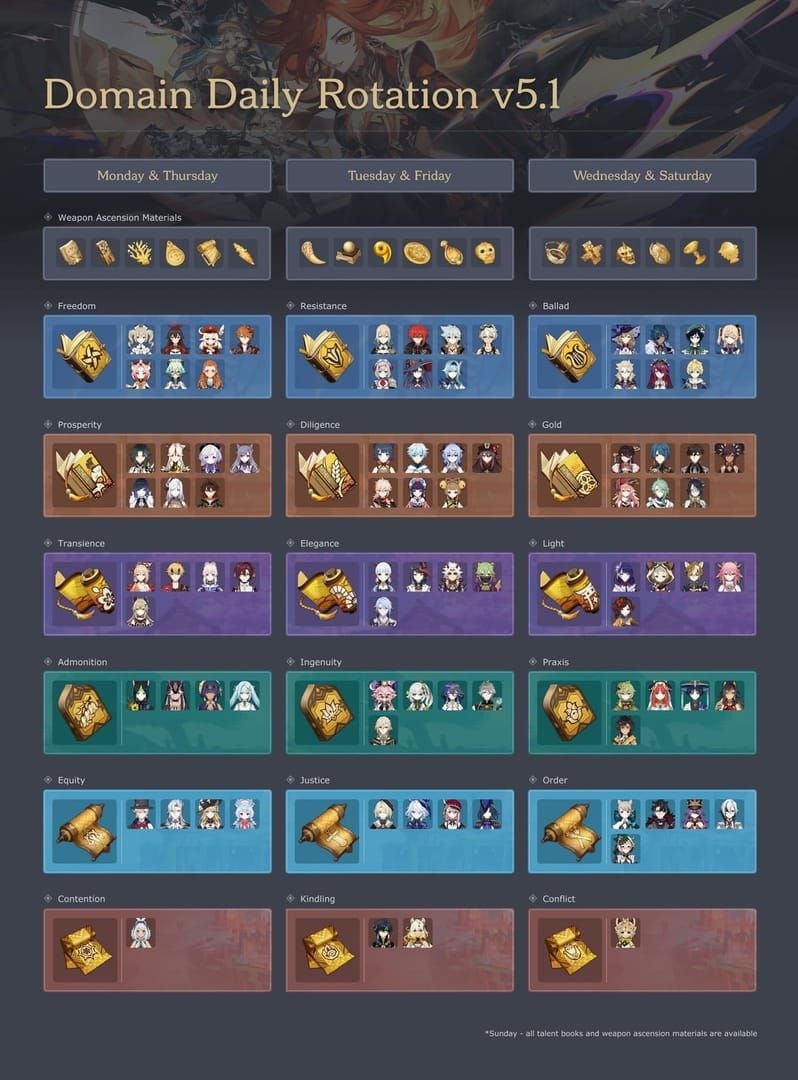
Talent material coordination: Farm talent domains on specific days to maximize efficiency. Coordinate multiple characters sharing the same talent books.
When to Consider Pulling for Chevreuse
Performance thresholds: Consider pulling for Chevreuse if consistently failing Abyss 36-star clears despite optimal F2P builds. Her 40% RES shred and ATK buffs provide substantial team improvements.
Banner evaluation: Only pull for Chevreuse on banners featuring desired 5-star characters. Never pull solely for 4-star characters due to unpredictable acquisition rates.
F2P sustainability: Evaluate pulling decisions based on long-term account goals and primogem income. Consistent Abyss clears with F2P teams often provide better resource efficiency.
Frequently Asked Questions
What does Xilonen Phase 2 rotation mean? Phase 2 refers to Xilonen's Elemental Skill's second activation phase where she generates Source Samples based on PECH teammates, providing up to 33% RES shred for 15 seconds. The rotation operates on 20-second cycles with specific timing for maximum buff overlap.
Who can replace Chevreuse in Xilonen Overload teams? Bennett serves as the best substitute with universal ATK buffs and healing, followed by Xiangling for off-field Pyro application. Thoma provides shielding with consistent Pyro triggers, while Yanfei offers on-field DPS with reaction enabling.
Is Bennett a good substitute for Chevreuse with Xilonen? Absolutely. Bennett provides superior universal utility with 700-800 ATK buff, healing, and 4-piece Noblesse support. While lacking Chevreuse's specific 40% Pyro/Electro RES shred, his broader team benefits and guaranteed availability make him an excellent alternative.
How do you build F2P Overload team for Abyss 11-3? Use Xilonen + Bennett + Fischl + flex slot composition. Prioritize ER requirements (Xilonen 190%+, Bennett 180%+), focus on reaction triggers through coordinated elemental application, and utilize terrain for Overload knockback management. Target 25,000-30,000 team DPS for 3-star clears.
What is the optimal Xilonen skill rotation order? Bennett Skill/Burst → Fischl Skill → Xiangling setup → Xilonen Skill + 2 Normal attacks → maintain reactions → Xilonen Burst → repeat 20-second cycle. Timing ensures buff overlap and consistent RES shred uptime.
Does Overload reaction work well in Spiral Abyss? Yes, Overload excels in Abyss due to AoE damage (5-meter radius), effectiveness against heavy enemies, and multi-wave scenarios. Level 90 Overload deals 3,978 base damage with EM scaling, contributing 25-35% of total team damage in optimized compositions.


