Why This Off-Meta Approach Actually Works
Look, I get it. When you see Acheron without Jiaoqiu, your first instinct is probably skepticism. But here's the thing – the Pela + Hanya combo leverages something most guides miss: mechanical synergy over raw stat stacking.
Sure, you're missing out on Acheron's full +60% damage bonus (you only get +15% with one Nihility ally). But what you gain? Pela's devastating 40% DEF shred that hits everyone, plus Hanya's action advance shenanigans that can literally double your Ultimate frequency.
For players looking to expand their options, buy Honkai Star Rail Reforged Remembrance LC pulls through BitTopup's platform – they've got competitive pricing and instant delivery for all your gacha needs.
The Real Magic: Action Advance in Apocalyptic Shadow
Apocalyptic Shadow rewards speed. Not just character SPD stats, but how quickly you cycle through rotations while maintaining damage output. And that's where this comp shines.
Pela brings near-permanent 40% DEF reduction (we're talking 25-30% effective damage increase) while staying SP-positive. Her Ultimate generates crucial Slashed Dream stacks, and her Talent keeps the energy flowing with +10 per debuff application.
Hanya? She's your secret weapon. That 20% SPD buff scales off her SPD, the 60% ATK boost lasts two turns, and the action advance can squeeze an extra Ultimate cycle into tight windows. Plus, Burden debuff recovers SP through ally attacks – maximum efficiency.
Current Meta Context: Instigation of the Locusts
The current phase (November 10 - December 22, 2025) Stage 6 features Sky-Shrouding Stardevourer Swarm and Opportunistic Provocateur. Lightning weakness on the Provocateur? Perfect for Acheron. Those annoying Gnaw Stings and Lesser Stings that buff the boss? Acheron's AoE Ultimate clears them while dealing massive damage to the main target.
It's almost like this rotation was designed for this specific encounter.
Breaking Down the Core Mechanics
Pela: Your DEF Shred Queen
Pela's 110 Energy Ultimate isn't just damage – it's a dual-purpose tool. That 40% DEF reduction hits all enemies for two turns while generating Slashed Dream stacks through Acheron's Talent. The beauty? It's self-sustaining.
Her Talent provides +10 Energy when inflicting debuffs after attacking. Translation: she can maintain Ultimate uptime without external energy support. In practice, you'll see Pela cycling Ultimates every 2-3 turns while staying SP-neutral or positive.
Hanya: The Action Advance Specialist
Here's where things get interesting. Hanya's Ultimate doesn't just buff – it manipulates the action economy. That 20% SPD buff based on her SPD stat, combined with significant action advance, can push Acheron into immediate Ultimate range.
Burden debuff is criminally underrated. 30% damage amplification plus SP recovery through ally attacks (1 SP per 2 hits, maximum 2 triggers per turn). What experienced players know: properly timed Burden application can fund your entire rotation's SP needs.
The Slashed Dream Stack Engine
Acheron needs 9 Slashed Dream stacks for Ultimate, and damage scales with Crimson Knot stacks removed. This rotation maximizes both through coordinated debuff timing.
Pela ensures steady stack generation while spreading Crimson Knots. Hanya's Burden adds both stack generation and damage amp. The result? You're hitting Ultimate thresholds faster than traditional rotations while maintaining competitive damage output.
Build Requirements That Actually Matter
Acheron E0S0: Stats vs. Synergy
Pioneer Diver of Dead Waters 4-piece is your go-to – 12% damage against debuffed enemies, plus 4% CRIT Rate and 12% CRIT DMG with 3+ debuffs. That bonus doubles for one turn after receiving debuff, which happens constantly in this rotation.
Target stats: 70-80% CRIT Rate, 160-224% CRIT DMG, 3000-3500 ATK, 134+ SPD. That SPD breakpoint ensures immediate action after Hanya's advance – non-negotiable for rotation consistency.

Light cone wise? Good Night and Sleep Well S5 gives 24% damage per debuff (maximum 72%). For a 4-star option, that's absurd value. Boundless Choreo S5 offers 16% CRIT Rate and 48% CRIT DMG against DEF reduced enemies – perfect synergy with Pela.
Pela: Speed Demon with Purpose
160+ SPD for 2-turn cycles. Eagle of Twilight Line 4-piece provides action advance after Ultimate – more turn manipulation for the pile. 67% EHR handles most content, but prioritize SPD over EHR if you have to choose.
What works best: building her as a fast debuffer who happens to do damage, not a damage dealer who happens to debuff.
Hanya: The Support That Supports
147-160+ SPD with 3800+ HP for survivability. Messenger Traversing Hackerspace 4-piece provides +6% SPD and +12% team SPD after Ultimate – that team buff affects subsequent turn order, so plan accordingly.
For optimization options, HSR Feixiao E1 light cone stellar jade purchase is available through BitTopup's comprehensive platform.
Dance! Dance! Dance! S5 provides 16% team action advance after Ultimate. Her E1 adds 15% action advance on ally kills, E2 provides +20% SPD after Skill usage. Nice to have, not required.
The Complete Rotation Breakdown
Turn 1: Foundation Setting
Use Pela's Technique before battle for that 20% DEF reduction head start. First action priorities: Ultimate for 40% DEF reduction and Slashed Dream generation, or Skill for buff dispel and energy building.
Hanya follows with Skill applying Burden. This sets up your damage amp and SP recovery engine for the entire rotation.
Turn order matters: Pela (160+ SPD) > Hanya (147+ SPD) > Acheron (134+ SPD). Debuffs before damage, always.

Mid-Rotation: The Action Advance Dance
Time Hanya's Ultimate when Acheron has 6-7 Slashed Dream stacks. Action advance pushes her to immediate Ultimate at 9 stacks – that's your damage window.
Monitor Burden triggers religiously. 2 ally hits = 1 SP recovery, maximum 2 triggers per turn. In practice, this funds most of your rotation's SP needs.
Pela maintains Ultimate uptime through her energy generation. When Ultimate's down, use Skill for energy building and additional debuff application.
Ultimate Sequencing: Maximum Impact
Prioritize targets with 3 Crimson Knot stacks for maximum damage multiplier. Acheron's Ultimate consists of 3 Rainblades (up to 372% ATK single-target plus 300% AoE) followed by Stygian Resurge.
Target the main boss for single-target Rainblades while ensuring AoE clears summoned enemies. Post-Ultimate, Acheron gains Quadrivalent Ascendance stacks (maximum 3) that get refunded after subsequent Ultimate – enabling consecutive cycles.
SP Economy: The Make-or-Break Factor
Maintain SP neutrality through Hanya's Burden recovery and Pela's SP-positive operation. Avoid Acheron Basic attacks except in emergency SP situations.
What experienced players know: monitor SP levels during extended rotations, adjusting Skill frequency to maintain Ultimate timing windows. Running out of SP kills this rotation faster than anything else.
SPD Tuning: The Technical Deep Dive
Critical Breakpoints You Can't Ignore
Pela: 160+ SPD for 2-turn cycles and first position. This isn't negotiable – she needs to apply debuffs before everyone else acts.

Hanya: 147-160+ SPD for second position. Her Ultimate SPD buff scales from her SPD, so higher investment pays dividends.
Acheron: 134+ SPD to act immediately after action advance. Any slower and you lose rotation efficiency.
Preventing Desync Disasters
Enemy SPD debuffs or action delays can wreck your turn order. Hanya's Messenger 4-piece provides +12% team SPD after Ultimate, which affects subsequent turn order calculations.
Practice in lower-difficulty content first. You need to identify desync points and develop contingencies before attempting Stage 6.
Action Value Mathematics
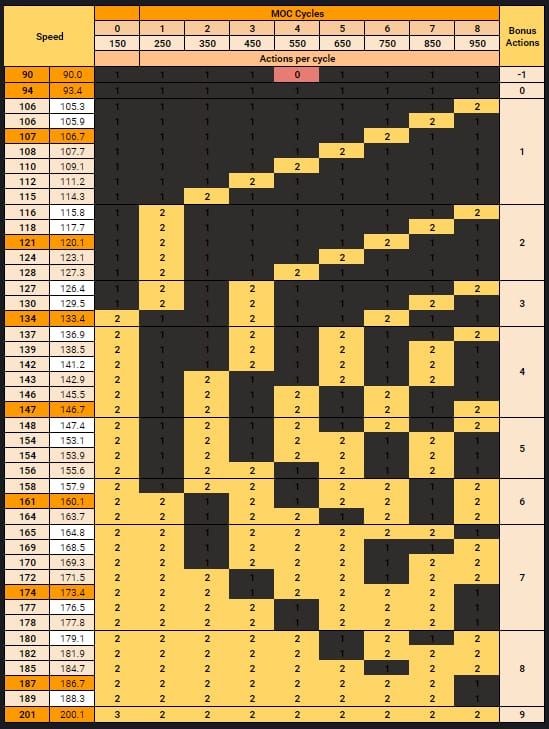
Hanya's action advance reduces Acheron's Action Value cost, granting additional actions within the same time frame. Properly executed rotations achieve 15-20% Action Value savings compared to standard sequences.
The math: calculate savings against opportunity cost of Hanya's actions for net efficiency gains. It's not just about individual character performance – it's about team action economy.
Stage 6 Specific Strategy
Boss Mechanics That Matter
Sky-Shrouding Stardevourer features Steadfast Safeguard: 50% damage reduction before Weakness Break, 100% increased damage after break. Those Gnaw Stings from Insect Egg Fission buff boss ATK by 3x when present.

Acheron's AoE Ultimate efficiently clears summons while damaging the primary target. This is why the rotation works so well here – you're solving multiple problems with one ability.
Opportunistic Provocateur summons Abundance/Destruction Lotus that need defeat to remove Toughness Protection. Acheron's Lightning exploits boss weakness while handling summon management. Pela's Ice covers the first boss weakness while DEF shred affects all enemies.
Wave-by-Wave Adjustments
Wave 1: Focus rapid Weakness Break for vulnerability window. Use Pela Ultimate immediately, followed by Hanya action advance for quick Acheron cycling. Prioritize AoE targeting – clear those Gnaw Stings while damaging the boss.
Wave 2: Prioritize summons to remove Toughness Protection before focusing Opportunistic Provocateur. Acheron's Lightning weakness exploitation is crucial here for efficient clear times.
Performance Benchmarks
Well-executed rotations achieve 8-10 cycle clears, placing you in T1.5 performance category. Benchmark metrics: 70%+ Ultimate uptime for Acheron, consistent Pela debuff application, efficient SP economy.
You're looking at performance within 15-20% of premium teams while requiring significantly lower investment. That's a win in my book.
Advanced Optimization and Troubleshooting
Action Advance Overlap Management
Multiple turn manipulation sources can create timing conflicts. Develop contingencies for when Acheron receives advance with high Action Value – sometimes delaying Hanya Ultimate or adjusting targets is the right call.
Monitor enemy abilities that provide action advance or SPD manipulation. They can throw off your carefully tuned rotation.
Maximizing Slashed Dream Generation
Coordinate debuff application across all sources while maintaining Ultimate timing. Use Acheron Skill strategically for +1 stack while applying Crimson Knots. Leverage Techniques before battle for initial setup.
The key: monitor stack counts for Ultimate timing alignment with action advance windows. You want to hit 9 stacks right as Hanya's action advance kicks in.
Energy Management Mastery
Balance multiple energy sources while maintaining efficiency. Pela's Data Collecting provides +10 Energy per debuff application. Acheron generates energy from damage received and ability usage.
Consider aggressive positioning for energy acceleration, balanced with survivability needs. Sometimes taking a hit to accelerate energy generation is the right play.
Common Rotation Killers
Poor Hanya Ultimate timing wastes action advance or misses damage windows. Neglecting SP economy causes rotation breakdown faster than anything else.
Incorrect Acheron Ultimate targeting reduces damage efficiency – always prioritize high Crimson Knot targets. Failing to maintain SPD tuning through upgrades gradually degrades performance over time.
Off-Meta vs Premium: The Real Comparison
Performance Gap Reality Check
Standard teams using Jiaoqiu/Sparkle achieve 20-30% higher DPS through superior debuff application and CRIT amplification. But here's what most guides won't tell you: the performance gap narrows significantly in time-sensitive content where action advance provides comparable value.
Off-meta excels in consistent performance without energy management complications. Premium teams offer higher ceilings but require precise resource management that can backfire under pressure.
Investment Cost Analysis
Pela + Hanya requires significantly lower resources while achieving 80-85% of premium performance. Total cost difference often exceeds 100+ pulls – that's multiple limited characters you could be saving for.
Trace materials favor the 4-star approach through lower weekly boss costs. Light cone requirements favor budget approach with excellent F2P options. The math is pretty clear here.
When to Consider Upgrades
Consider upgrades when you're consistently failing clear time requirements or approaching your current composition's ceiling. But here's the thing – players with built off-meta teams already possess the foundation for premium compositions.
Evaluate based on account-wide needs rather than single-team optimization. Sometimes the suboptimal choice is actually optimal for your account.
Resource Optimization Guide
Trace Investment Priority
Acheron: Ultimate > Skill = Talent > Basic, A4 > A6 > A2. Focus Ultimate/Skill to 8+ before touching other characters.
Pela: Ultimate and Talent for debuff application and energy generation. Don't sleep on her Talent – that energy generation is crucial.
Hanya: Ultimate and Talent for action advance mechanics. Balance investment across all three rather than maxing individuals.
Relic Farming Efficiency
Coordinate farming to maximize efficiency across characters. Pioneer domain provides Acheron's optimal set plus alternatives for supports. Prioritize main stat correctness over substat optimization initially.
Focus Acheron first – damage determines team performance. But don't neglect support builds entirely; they need functional stats to enable the rotation.
Light Cone Accessibility
Prioritize accessible options providing functional performance without limited investments. Good Night and Sleep Well is excellent for Acheron through debuff-scaling bonus.
Pela options focus SPD and utility over damage. Hanya benefits from SPD, energy generation, or team utility effects. Function over form – always.
FAQ: Your Burning Questions Answered
How exactly does Hanya's action advance work with Acheron? Hanya's Ultimate advances Acheron's action while providing SPD and ATK buffs for 2 turns. This enables sooner action and potentially multiple Ultimate cycles within single rotation sequence. Think of it as time compression – you're fitting more actions into the same window.
Is Pela actually better than Silver Wolf for E0S0 Acheron? For multi-enemy content like Stage 6? Absolutely. Pela provides 40% AoE DEF shred vs Silver Wolf's 45% single-target, but offers superior SP economy and energy generation. Silver Wolf's great for single-target, but Pela's AoE capabilities and lower maintenance make her preferred here.
Can this actually clear Stage 6 without 5-star supports? Yes – I've seen consistent 8-10 cycle clears with proper execution. While premium supports provide higher ceilings, this approach offers sufficient performance for competitive clear times and full rewards. It's not theoretical; it works.
What SPD does Pela actually need? 160+ SPD for 2-turn cycles and proper turn order. This ensures first action to apply debuffs before other members, maximizing Slashed Dream generation efficiency. Any slower and your rotation timing falls apart.
How many Slashed Dream stacks does Pela generate per cycle? 1 stack per debuff application through Acheron's Talent. Ultimate provides 1 from DEF shred, Skill can generate additional through buff dispel. You're averaging 1-2 stacks per cycle – not massive, but consistent.
Does Hanya need high investment to function? Moderate investment focusing SPD tuning (147-160+) and survivability (3800+ HP). Eidolons provide benefits but aren't required for basic functionality. Priority: Ultimate and Talent traces for action advance and SP recovery mechanics.
The bottom line? This rotation proves you don't need the latest limited characters to compete at high levels. Sometimes the best strategy is the one that works with what you have.


