

Understanding Melee-Only Mode Mechanics
Melee-Only Combat transforms Northridge Hotel into close-quarters battleground—firearms completely disabled. Event starts Jan. 16, 2026, 05:00 UTC+0 (update Jan. 15, 2026, 03:00 UTC+0). Bladed weapons only.
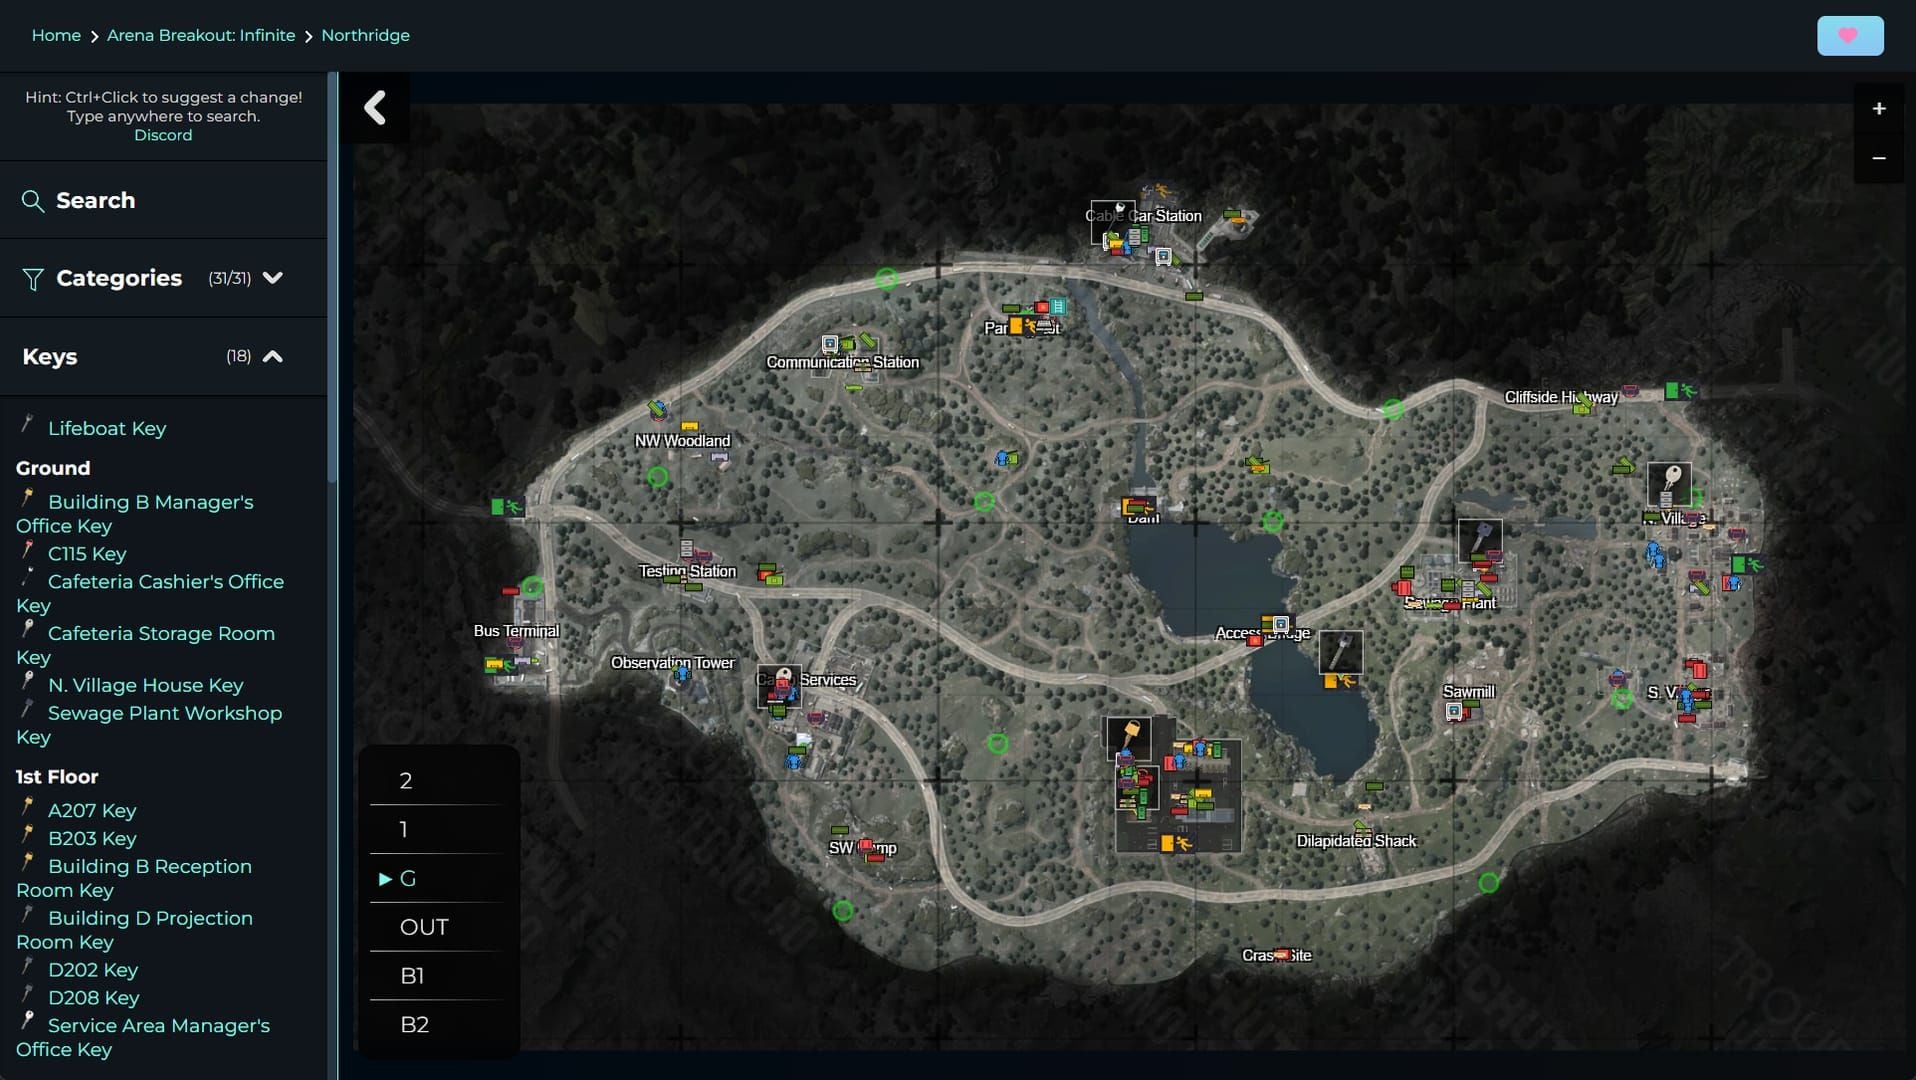
Players get 5 free tickets via Events page. Map features 9 safes (vs. standard 8)—8 in Buildings A, B, C, D. This increases loot opportunities for players who know optimal routes.
For premium resources: Arena breakout bonds top up through BitTopup ensures fast delivery and secure transactions.
Core Rules and Weapons
Top Weapons:
- Arasaka SpecOps Blade: BaseDamage 47-50, ArmorDamage 14 (best choice)
- Banishing Blades: BaseDamage 46-49, ArmorDamage 14
- Riptide Striker Purple Knife: BaseDamage 45-49, ArmorDamage 14
- Assault Dagger lvl30: BaseDamage 43-46, ArmorDamage 13
- M9 Saber: BaseDamage 35-39, ArmorDamage 11 (budget option)
Stamina management is critical. Each swing depletes reserves—running out mid-fight leaves you vulnerable. Use hit-and-retreat rhythm: 2-3 strikes, then create 2-3 meters separation to regenerate.
Boss AI Behavior
Frade Lee (recognizable by hood) drops Universal Keycard Chain instead of Wedding Ring. This keycard unlocks 5 safes in locked rooms—essential for max loot.
Detection works on proximity and line-of-sight. Crouching reduces detection ~30% but doesn't eliminate it. Audio cues matter—footsteps, doors, weapon swings all alert the boss.
Why Northridge Hotel Works
Unlocks at Level 11. 40-minute raid duration provides ample time. Building A's 2-floor narrow corridors create chokepoints. Building B (5 entrances) offers multiple approaches but higher PVP risk. Connected Building C extends tactical options. Building D's 5-entrance movie room is high-traffic.
Central pool area (airdrop zone) creates natural focal point. Environmental design forces close-quarters engagements.
Boss Fundamentals: Spawn, Patrol, Patterns
Frade Lee spawns at three locations: Northridge Hotel, Campus Services, Cable Car Station. Hotel spawn is primary focus for melee-only.
Boss follows predetermined patrol routes cycling every 3-5 minutes through Buildings A-D. Critical timing: Hotel Main Entrance extraction activates 10 minutes in via switch flip, then 2-minute extraction window.
Spawn Timer and Confirmation
Boss appears 2-4 minutes after raid start. Early arrivals secure prime spots before patrol begins.
Visual ID: distinctive hood. Movement more deliberate than regular NPCs, pauses at doorways/corners.
Audio: heavier footsteps than NPCs. Use headphones to detect approach direction and distance for precise strike timing.
Complete Patrol Route
Route cycle:
- Main Hotel entrance → Building A
- Ascends to second floor, patrols corridor
- Descends, exits to Building B
- Enters Building B (prefers main entrance or side wall hole)
- Ground floor circuit → Building C
- Building C-to-D transition (interception opportunity)
- Building D movie room circuit
- Returns to main Hotel entrance, restarts
Building C-to-D transition offers exposed path with multiple escape routes.
Detection Ranges
Visual detection:
- Well-lit areas: 15-20 meters
- Dark corridors: 8-12 meters
- Crouching: -30% range
- Stationary: further reduction
Audio detection:
- Sprinting: 25+ meters
- Walking: 12-15 meters
- Crouch-walking: 5-8 meters
Building A's narrow corridors amplify sound (+20% detection range). Open areas reduce audio effectiveness but expand visual detection.
Essential Gear and Preparation
Weapon Tier List
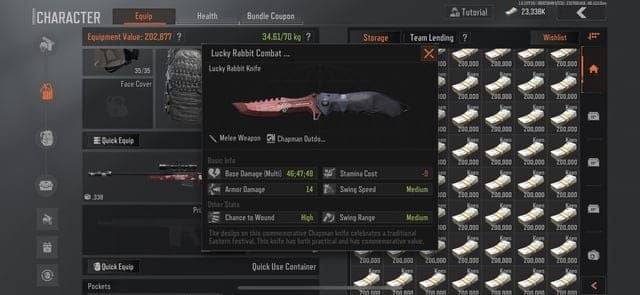
S-Tier: Arasaka SpecOps Blade (47-50 damage, 14 armor damage, 8-10 hits to kill)
A-Tier: Banishing Blades, Riptide Striker Purple Knife (comparable performance)
B-Tier: Assault Dagger lvl30 (43-46 damage, faster swing speed)
C-Tier: M9 Saber (35-39 damage, 12-15 hits to kill, budget option)
Optimal Armor and Stamina
Level 3 armor = sweet spot. Absorbs 2-3 boss strikes while maintaining manageable stamina drain.
Enter fights with full stamina. Avoid pre-fight sprinting. Medium backpacks balance loot capacity with mobility—survival > marginal loot gains.
Consumables Priority
Must-have:
- Energy drinks (instant stamina restoration)
- Instant medkits (emergency healing)
- Bandages (post-fight recovery)
- Pain medication (maintains movement speed when injured)
Place stamina items in quick-access slots for mid-combat use.
Spot #1: Building A Second Floor Corridor Corner
Best for: Solo players, controlled environment
Position: 2-3 meters from corner, opposite boss approach. Crouch behind structural pillar in darker corridor center.
Advantages:
- Narrow corridor restricts boss movement
- 90-degree angle maximizes surprise
- Both stairwells provide escape routes (3-5 seconds)
- Audio echoes give 3-5 seconds advance warning
Entry: Eastern stairwell (30-40 seconds from Hotel entrance) or western stairwell (+15-20 seconds, avoids high-traffic)
Timing: Boss first pass at 5-7 minutes. Perfect strike when boss reaches corridor midpoint (8-10 meters from corner). Close gap with 2-second sprint, target upper body/head.
Follow-up: 2-3 rapid strikes, create 2-3 meters separation, assess counterattack, repeat.
Spot #2: Building B Side Wall Hole
Best for: High-skill players comfortable with PVP risk
Position: 1-2 meters inside hole, angled toward interior. Exterior escape available.
Advantages:
- Irregular geometry creates visual dead zones
- Jagged edges break up silhouette
- Ambient sounds mask player noise (-20% audio detection)
- Quick access to 2-3 Building B safes (30 seconds)
Challenges: 5-entrance configuration = high third-party risk
Backup NPCs: Expect 1-2 additional NPCs within 15-20 seconds. Maintain boss focus—Universal Keycard Chain > NPC loot. Use hole for defensive funnel if needed.
Post-Kill: Secure keycard immediately. If clear, 10-15 second full loot. If threats detected, hit nearby safes fast.
Spot #3: Building D Movie Room Entrance
Best for: Experienced players, dynamic threat assessment
Position: 3-4 meters inside, behind rear seating row. Cover primary entrance, maintain peripheral vision on secondary entrances.
Advantages:
- Boss enters darker interior from bright corridor (reduced visual acuity)
- 5 exit routes for flexibility
- Proximity to 3-4 safes + central pool airdrop
Risk: 5-entrance = 360-degree threat potential
Multi-Threat Management:
- Distinguish boss footsteps from player sounds
- If boss <30% health + player threat: finish boss, engage player
- Conservative: let player-boss fight occur, third-party winner
Extraction: Hotel Main Entrance 45-60 seconds via Building D eastern exit. Alternative: Armored Vehicle (requires 2 dog tags, 30-second window).
Advanced Spots (Experienced Players)
Spot #4: Hotel Main Entrance Stairwell
Position: Second-floor landing for downward strike angles
Timing: 10-15 minute window when extraction switch activates (audio masking from foot traffic)
Extraction: 10-15 seconds to Hotel Main Entrance
Spot #5: Building C Connector Hallway
Position: Behind structural columns in B-to-C transitional hallway
Advantages:
- Singular approach path
- Acoustic amplification (5-7 seconds audio warning)
- Isolated from high-traffic areas
Loot: Access to Building B and C safes within 60 seconds
Spot #6: Central Pool Area Perimeter
Position: Behind pool-side structures
Risk: Highest-risk location. Three Sniper Hills overlook area.
Reward: Potential airdrop access + boss loot
Timing: Position 30-60 seconds before airdrop. Leverage chaos when multiple players converge.
Spot #7: Building A Ground Floor Corner Room
Position: Far corner of single-entrance room
Strategy: Defensive ambush—boss enters confined space on your terms. 2-meter doorway funnel eliminates boss mobility advantage.
Patience required: Boss may pass multiple times before entering. Wait for full entry.
Combat Execution
First Strike
Initiation: Approach from blind spot (rear/side). Target upper torso/head. Strike during boss animation transitions (turning, starting movement) for critical hit chance.
Arasaka SpecOps critical first strike removes 15-20% boss health.
Stamina Management
Each swing = 10-15% stamina. You get 6-7 strikes before regeneration needed.
Rhythm: 2-3 strike combo → 3-5 seconds regeneration at 3-5 meters distance → re-engage at 60-70% stamina
Use consumables when <30% stamina during combat lulls (not mid-combo).
Dodging and Repositioning
Boss counterattack pattern: After 2-3 hits, power attack with 1-2 second wind-up.
Dodge: Lateral (perpendicular to boss) > backward. Maintains strike range while evading.
Positioning: Keep boss between you and nearest exit. Continuously adjust to prevent corner traps.
Common Mistakes
Crouching Makes You Invisible
False. Crouching reduces detection ~30%, doesn't eliminate it. Movement within 5 meters triggers detection even crouched.
Proper use: Crouch during approach, stand for first strike (faster closing speed).
Overcommitting Without Escape Plan
Identify primary and secondary exits before engagement. Note which lead to extraction, which to safe rooms.
Boss kills after 15-minute mark leave minimal extraction time. Abort late attempts—preserve gear for next raid.
Ignoring Third-Party Threats
Combat sounds attract players. During stamina regeneration windows, perform quick 360-degree scans (1-2 seconds).
If third party detected:
- Boss <30% health: finish kill, engage player
- Conservative: break off, let them fight, third-party winner
Post-Boss Strategy
Loot Priority
- Universal Keycard Chain (secure container immediately)
- High-value, low-weight items (premium ammo, medical, rare attachments)
- Skip boss armor/weapons (time-inefficient)
Decision within 10-15 seconds: extended looting or immediate extraction?
Third-Party Defense
Position with cover between you and approach vectors while looting. Keep weapon ready—slower looting beats dying.
If third party arrives before looting completes and you have keycard: prioritize extraction over additional combat.
Fastest Extraction Routes
Building A: Eastern stairwell → Hotel Main Entrance (35-45 seconds)
Building B/C: Connecting corridors → Hotel Main Entrance (45-60 seconds)
Building D: Hotel Main Entrance (45-50 seconds) or Armored Vehicle if 2 dog tags available (30-second window)
For premium currency: Buy arena breakout bonds online through BitTopup for optimal loadouts.
Advanced Tips
Solo vs Squad
Solo: Complete control, 100% loot, requires near-perfect execution
Squad: Specialized roles (ambush initiator + overwatch), 40-50% faster kills, requires voice comms
Economic Optimization
Start with mid-tier weapons (Assault Dagger lvl30) while learning. Upgrade only after 60%+ success rate.
Universal Keycard Chain justifies moderate risk. Prioritize 5 locked room safes over standard safes—better profit margins.
Track success rates and returns per attempt. Adjust strategies for economic sustainability.
Event-Specific
5 free tickets starting Jan. 16, 2026, 05:00 UTC+0. Use first 2-3 for learning, not profit.
Focus single-objective raids: boss kill + keycard extraction > comprehensive safe looting.
Mid-event timing offers best balance (initial chaos subsided, varied skill levels remain).
FAQ
Where does Frade Lee spawn? Three locations: Northridge Hotel, Campus Services, Cable Car Station. Hotel spawn is melee-only focus. Appears 2-4 minutes after raid start. Recognizable by hood. Patrols Buildings A-D in 3-5 minute cycles.
Best melee weapon? Arasaka SpecOps Blade (47-50 damage, 14 armor damage, 8-10 hits to kill). Banishing Blades comparable. Budget: Assault Dagger lvl30 (43-46 damage, 13 armor damage).
How to avoid detection? Crouch reduces detection ~30%. Maintain 8-10 meters until strike. Approach from rear/side. Time approaches during boss movement transitions. No sprinting within 25 meters.
Can you solo the boss? Yes. Arasaka/Banishing Blades enable 30-60 second kills with proper stamina management. Experienced players achieve 60%+ success rates at optimal spots (Building A corridor, Building B hole).
What does boss drop? Universal Keycard Chain (unlocks 5 locked room safes). Also premium ammo, medical supplies, rare attachments. Keycard is primary value target.
Safest extraction? Hotel Main Entrance (switch at 10 minutes, 2-minute window). Accessible 35-60 seconds from most spots. Alternative: Armored Vehicle (requires 2 dog tags, 30-second window).
Master Arena Breakout with BitTopup! Get Koen, battle passes, and exclusive gear. Fast delivery, secure transactions, 24/7 support for serious players!


