

Understanding Arlecchino's Core Identity
What Makes the Knave Special?
Arlecchino stands apart in Genshin's roster as a 5-star Pyro Polearm DPS who literally can't be healed by teammates. With 13,103 HP, 342 ATK, 765 DEF, and 88.4% CRIT DMG at max level, her stats look fairly standard. But here's where it gets interesting—her entire kit revolves around something called Bond of Life, which fundamentally changes how you approach combat.
You'll need 168 Rainbow Rose from Fontaine and 46 Fragment of a Golden Melody from the Legatus Golem to fully ascend her. Not the worst farming requirements, honestly.
Bond of Life: The Mechanic That Changes Everything
Think of Bond of Life as anti-healing that actually makes you stronger. When active, it appears as a red outline around your HP bar and can stack up to 200% of your Max HP. Here's the crucial part: any healing directed at Arlecchino gets absorbed by this Bond instead of restoring her health.

But here's why that's actually amazing—once you hit 30% Max HP in Bond value, Arlecchino enters her Masque of the Red Death state. This gives her permanent Pyro infusion that can't be overridden (sorry, Bennett C6 users, you're fine here) and adds extra damage equal to her ATK multiplied by her Bond percentage.
The system works like this: each Normal Attack consumes 7.5% of her Bond while reducing her Skill cooldown by 0.8 seconds. It's a beautiful risk-reward loop where managing your Bond becomes the key to maximizing damage.
How to Build Bond Effectively
Your Elemental Skill applies 65% Max HP Bond per Blood-Debt Directive to enemies. Wait five seconds, and those Directives upgrade to Dues worth 130% each (capped at 145% per Skill cast). Her signature weapon, Crimson Moon's Semblance, adds another 25% Bond on Charged Attacks.
Here's a pro tip I learned the hard way: enemies marked with Directives grant 130% Bond when defeated, even if Arlecchino's off-field. This makes her surprisingly effective for quick-swap scenarios.
Weapon Tier List: From Signature to F2P
The Clear Winner: Crimson Moon's Semblance
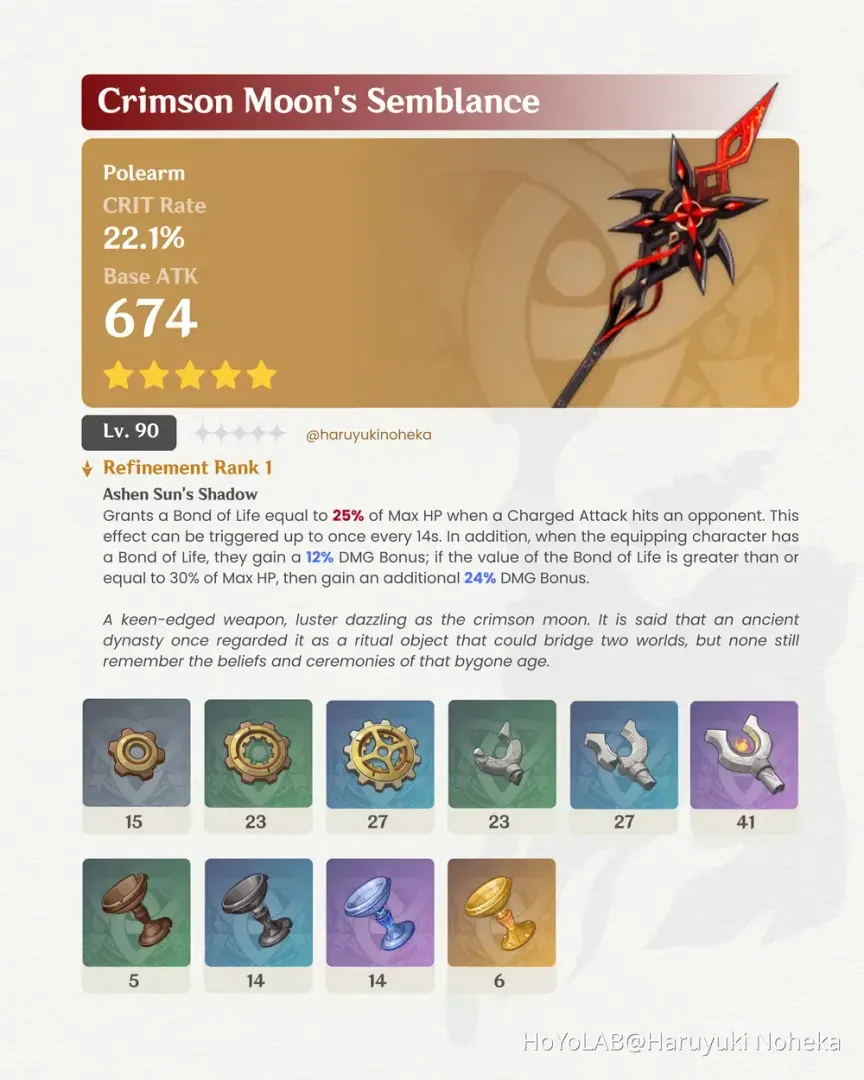
674 Base ATK and 22.1% CRIT Rate make this weapon solid on paper, but the passive is what makes it broken. That 25% Max HP Bond generation on Charged Attacks every 14 seconds, combined with 12% DMG Bonus (24% at high Bond), enables those satisfying 130-155% Bond rotations that outperform other options by 10-15%.
If you're serious about Arlecchino, this is where your primos should go first.
Premium Alternatives
Staff of Homa remains excellent despite lacking Bond generation. 608 ATK, 66.2% CRIT DMG, plus that sweet HP-to-ATK conversion (0.8-1.8% depending on current HP) keeps it competitive. Staff of the Scarlet Sands deserves mention for Vaporize teams—that 52% EM-to-ATK conversion can surprise you.
4-Star Champions
Deathmatch from the Battle Pass is your best bet here. 454 ATK, 36.8% CRIT Rate, and either 16% ATK/DEF or 24% ATK depending on enemy count. The CRIT Rate helps immensely with building optimal ratios.
Ballad of the Fjords actually upgrades Deathmatch in specific Vaporize setups with three different elements—that 120 EM and 0.6% DMG per EM scaling can add up.
F2P Reality Check
White Tassel R5 punches way above its weight class. 401 ATK, 23.4% CRIT Rate, and 48% Normal Attack DMG bonus from a weapon you can grab through exploration? Yeah, it often beats gacha 4-stars because Arlecchino's damage comes from Normal Attacks.
Prototype Starglitter exists if you need Energy Recharge, but it's not doing much for your damage.
Artifact Strategy: What Actually Works
The New Meta: Fragment of Harmonic Whimsy
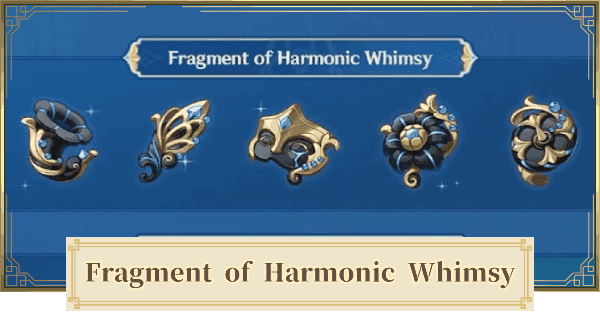
This set was practically designed for Arlecchino. 18% ATK from the 2-piece is nice, but the 4-piece effect—18% DMG per Bond fluctuation—is where the magic happens. You'll maintain near-100% uptime on three stacks, giving you 54% DMG bonus that outperforms alternatives by 15-20%.
Gladiator's Finale works as a fallback with 35% Normal Attack DMG, and you can farm it from World Bosses without committing to domain runs.
The Ping-Dependent Option
Echoes of an Offering delivers 70% Normal Attack DMG on triggers, but here's the catch—you need stable sub-100ms ping. If your connection isn't rock-solid, skip this entirely. Trust me on this one.
Substat Priorities That Actually Matter
Main stats are straightforward: ATK% Sands, Pyro DMG Goblet, CRIT Rate or CRIT DMG Circlet. Vaporize builds can experiment with EM Sands if you're running Staff of the Scarlet Sands.
For substats: CRIT Rate/DMG > Energy Recharge > ATK% ≥ Elemental Mastery.
Target benchmarks: 2,000+ ATK, 70-80% CRIT Rate, 160%+ CRIT DMG. Energy Recharge needs vary wildly—150%+ for solo Pyro teams, 120% with triple Pyro, or literally 0% if you're skipping her Burst entirely.
One critical note: HP substats do absolutely nothing for Arlecchino since her damage scales off ATK. Any CRIT or ATK roll beats HP every time.
Talent Investment: Where Your Books Matter Most
Priority Order That Makes Sense
Normal Attack first, always. This is your primary damage source with scalings from 120.41% to 216.42% at Level 10, plus that massive 305.2% Bond percentage bonus during Masque state.
Elemental Skill comes second for Directive application and those crucial 5 Particles. Elemental Burst? Honestly, you can leave it at Level 6. It's utility, not damage.
Material Reality Check
Getting one talent to Level 10 requires 18 Recruit's, 66 Sergeant's, and 93 Lieutenant's Insignia from Fatui Skirmishers. Add 114 Philosophy of Order books from the Pale Forgotten Glory domain (Wednesday/Saturday/Sunday), 18 Fading Candle from the Knave boss fight, and nearly 5 million Mora.
Plan accordingly.
Team Building: Who Actually Works
The Vaporize Standard

Arlecchino/Yelan/Bennett/Kazuha represents the most consistent setup. Your rotation looks like: Skill off-field → Yelan EQ N1 → Bennett EQ → Kazuha N1 hEP → Charged Attack into six N3D combos.
Yelan edges out Xingqiu for single-target through her DMG% ramping, but Xingqiu offers better defensive utility if you're struggling with survivability.
The Melt Ceiling
Arlecchino/Citlali/Xilonen/Bennett achieves the highest theoretical DPS. Rotation: Skill → Bennett EQ → Citlali E/Q → Xilonen hED N1 → Charged Attack into four N4D combos with 2.5-second pauses for Cryo maintenance.
This requires precise timing but the payoff is substantial.
Support Character Analysis
Bennett remains irreplaceable for ATK scaling, Pyro Resonance, and emergency healing through her Burst. His C6 doesn't interfere thanks to her unoverrideable infusion.
Zhongli provides universal utility—shield for interruption resistance and 20% RES shred. Xilonen offers 15-second RES shredding plus 4pc Scroll DMG% buffs.
When optimizing your Arlecchino experience, consider genshin arlecchino bond of life top up through BitTopup for reliable resource management with competitive pricing and instant delivery.
Constellation Value: What's Worth Your Primos
The Game-Changers
C1 enhances Masque to 120% effectiveness and adds interruption resistance. This translates to a 20-25% damage increase plus significant quality-of-life improvements. It's often prioritized over her signature weapon.
C2 makes Directives start as Dues and triggers 900% ATK AoE damage with 20% RES shred on absorption. Accelerates Bond generation for 15-20% DPS improvement.
The Whale Territory
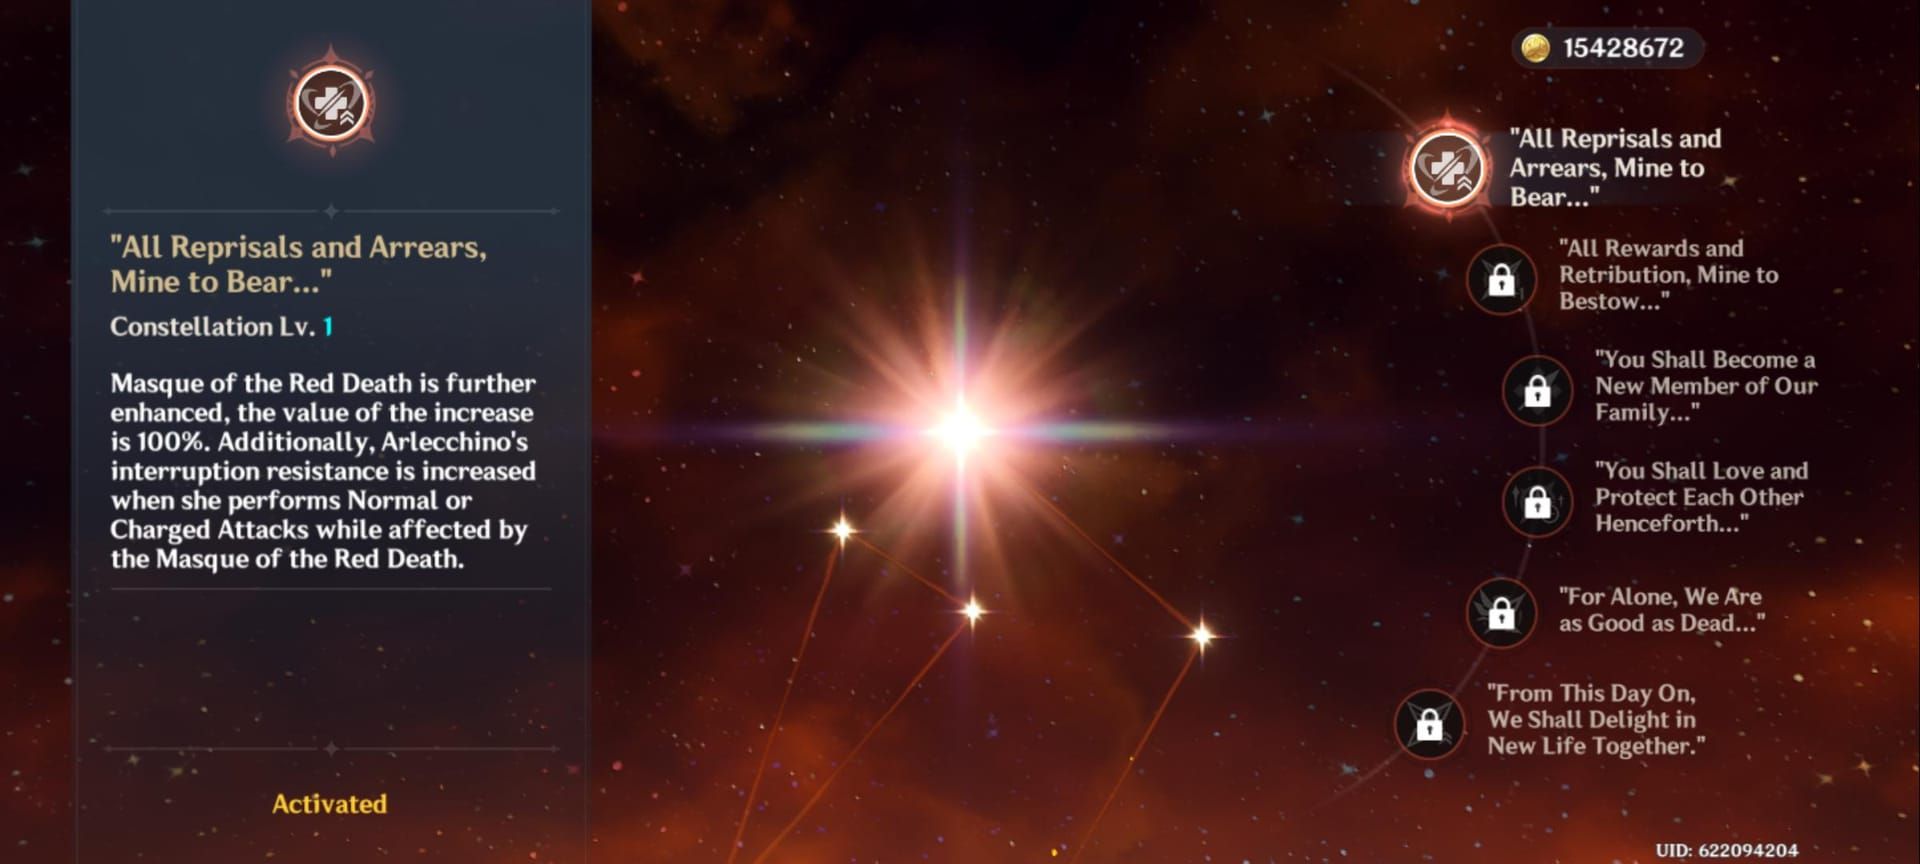
C6 transforms her Burst into a legitimate damage source with +700% ATK × Bond% scaling, plus 20 seconds of +10% CRIT Rate and +70% CRIT DMG after using her Skill. We're talking ~40% overall damage increase.
Investment Philosophy
For most players, C1 vs R1 signature weapon favors C1 due to the damage increase and interruption resistance. C2 represents a natural stopping point for moderate spenders. C6 appeals to heavy investors seeking maximum performance.
Spiral Abyss Mastery
Floor 12 Strategies
Vaporize Arlecchino/Yelan/Bennett/Zhongli delivers consistent 9-star clears. Melt teams with Citlali achieve the highest single-target potential—we're talking sub-30-second boss clears against appropriate targets. Overload teams with Chevreuse excel in multi-wave content.
Rotation Timing
Standard Vaporize timing breaks down to: Skill off-field (2s) → Yelan EQ N1 (4s) → Bennett EQ (3s) → Kazuha N1 hEP (3s) → Charged Attack into six N3D combos (12s). Total rotation: 24 seconds.
Melt requires more precision with those 2.5-second pauses for Cryo aura maintenance, but the damage ceiling justifies the effort.
How She Stacks Up
vs Other Pyro DPS
Compared to Hu Tao, Arlecchino offers superior quality-of-life with self-healing and no HP drain mechanics. Her damage ceiling matches or exceeds Hu Tao while providing more flexible team building options.
Against Yoimiya, she brings superior AoE damage and more engaging gameplay through Bond management.
Mavuika currently outperforms due to Lunar reactions, but Arlecchino maintains advantages in sustained encounters where her self-sufficiency shines.
Common Pitfalls and Pro Strategies
Mistakes That Kill Your DPS
Don't include external healers—Bond prevents all healing except her Burst, making them dead weight. Avoid using her Burst mid-combo as it wastes accumulated Bond. Never prioritize HP stats since her damage scales purely off ATK.
Advanced Optimization
For Bond optimization, wait 5+ seconds before absorption in single-target scenarios to ensure Due upgrades. N5D combo strings provide better stamina efficiency than N3D in extended encounters. Dash-cancel Normal Attack 6 to prevent those lengthy recovery frames.
Quick Answers to Common Questions
How exactly does Bond of Life work? It prevents external healing by absorbing it instead. At 30%+ Max HP Bond, Arlecchino enters Masque state with Pyro infusion and extra damage equal to ATK × Bond percentage. Generate through Elemental Skill—65% per Directive, 130% per Due.
Which weapon should I prioritize? Crimson Moon's Semblance for best-in-slot performance. Staff of Homa as premium alternative. Deathmatch for 4-star, White Tassel R5 for F2P.
Best artifact setup? Fragment of Harmonic Whimsy 4-piece for 54% DMG bonus. ATK% Sands, Pyro DMG Goblet, CRIT Circlet. Prioritize CRIT stats over everything, avoid HP entirely.
Is C1 worth pulling? Absolutely. 20-25% DPS increase plus interruption resistance often beats her signature weapon for value. It's the most impactful constellation for most players.
What teams work best? Vaporize with Yelan/Bennett/Kazuha for consistency. Melt with Citlali for peak damage. Always include Bennett, never include external healers.
How's her Spiral Abyss performance? Excellent with proper support. Consistent 9-star Floor 12 clears, with Vaporize for general content and Melt for single-target bosses. Prioritize shields over healing for survivability.
For those looking to maximize their Arlecchino investment, buy genesis crystals for arlecchino banner pulls through BitTopup's secure platform, which offers competitive rates and instant delivery for your gacha needs.


