Understanding Armory's Extraction System
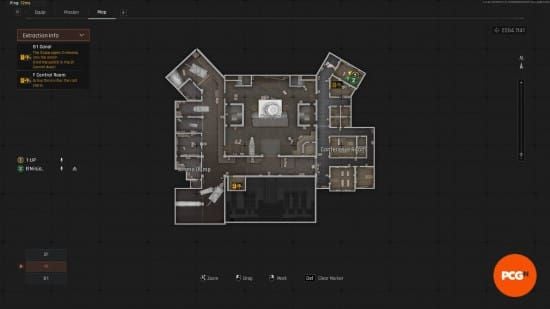
Armory splits between outdoor areas and underground bunker complex. 8 spawn points separate into northern and southern clusters via central canal. Northern spawns sit farther from Armory bunker entrance; southern spawns cluster closer to main facility. This geography determines your extraction strategy before you fire a shot.
No-key extractions require specific activation procedures and timing constraints rather than physical keys. Four options available:
- Canal (bunker-based): Pull switch in control room, 3+ minutes elapsed, single-use, triggers alarms, spawns aggressive bots
- Radar Station (outdoor): Shared switch activation, 2:30+ minutes elapsed, single-use, spawns bots
- Mine (outdoor): Shared switch with Radar, 5+ minutes elapsed, unlimited usage, must enter before final 20 seconds
- No-Backpack (outdoor): Random location opposite spawn side, no switch needed, ditch backpack and contents, 1-minute window
Players optimizing gear loadouts can top up arena breakout cheap through BitTopup's secure platform for better equipment and safer raids.
Complete Extraction Points Overview

Outdoor spawns:
- Radar Station Spawn (near radar facility)
- Gas Station Spawn (fuel depot area)
- Tunnel Spawn (repair facility)
- Tank Spawn (map corner, closest bunker access)
- Hole in the Wall Spawn (broken wall entrance)
Bunker entrances (timed):
- Hole in the Wall entrance: 1:40 timer
- Mid entrance: 1:40 timer
- Tank entrance: 1:00 timer (fastest)
Extraction locations:
- Canal: Bunker basement level
- Radar Station & Mine: Outdoor near landmarks
- No-Backpack: Randomized outdoor, opposite spawn cluster
Why Extraction Camping Happens
No-key extractions create predictable convergence points with limited approach angles. Shared Radar/Mine switch forces players into single building. Canal's alarm announces extraction attempts. No-Backpack spawns in limited zones experienced campers pre-position around.
Common camping positions:
Canal: Upper bunker floors overlooking basement, control room near switch, corridor chokepoints
Radar/Mine: Rooftop overlooking activation building, interior corners in switch room, concealed positions between building and extraction zones
No-Backpack: Perimeter positions in possible spawn locations
Late-raid timing (final 5-10 minutes) sees highest camper concentration as aggressive players abandon looting for extraction kills.
The 3 Safest No-Key Extraction Routes (500+ Raids Tested)
Route 1: Perimeter Approach - Lowest Camper Encounters

Targets Mine extraction using outdoor navigation, avoiding bunker entirely. From northern spawns (Radar Station, Gas Station, Tunnel), move along map's outer edge toward central activation building while maintaining maximum distance from bunker entrances. Adds 2-3 minutes but reduces camper encounters by ~60%.
Execution:
- Wait until 5 minutes elapsed (Mine requirement)
- Approach activation building from side opposite nearest bunker entrance
- Observe building for 30 seconds, listen for movement/gunfire
- Enter quickly, flip switch, exit through different door
- Move to concealed position 30-40m from building
- Wait 60-90 seconds for bots to disperse
- Approach Mine using terrain cover, not direct paths
- Enter extraction zone at 30-20 seconds remaining (prevents early camping, meets 20-second cutoff)
Route 2: Interior Sprint - Fast, Timing-Critical
Utilizes No-Backpack extraction for rapid escapes with low-value loot. Works best from spawns on one canal side when No-Backpack appears opposite. Automatic availability eliminates switch activation risks.
Execution:
- Identify spawn cluster immediately (northern vs southern)
- Northern spawns move directly south; southern spawns move north
- Avoid main pathways and bunker entrance zones
- Watch for No-Backpack marker as you approach opposite side
- Drop backpack in concealed terrain 50-100m from extraction (prevents loot loss if killed)
- Approach zone using irregular movement patterns
- Enter quickly, maintain defensive positioning during timer
Route 3: Adaptive Path - Mid-Raid Flexibility
Combines Radar Station extraction with dynamic route adjustment based on player activity. Works any spawn location, provides fallback options. Radar's 2:30 timer allows earlier extraction than Mine while avoiding Canal's alarm.
Execution:
- Move toward central activation building using indirect approaches with observation points
- If you see recent combat signs (bodies, blood, open doors, scattered loot), delay and circle to alternative positions
- Use 30-second observation protocol before entering building
- After flipping switch, relocate 40-60m away (not directly to Radar)
- Wait 90-120 seconds, separating from bot spawns and potential campers
- Approach Radar from unexpected angle using available cover
- If resistance encountered, fallback to Mine (if 5+ minutes) or No-Backpack
Step-by-Step Navigation
Landmark-Based System

Key landmarks:
- Radar tower (visible from most outdoor positions)
- Gas station building with fuel pumps
- Tank at map corner
- Repair facility's large garage doors
- Broken wall section (Hole in the Wall)
From Radar Station Spawn: Activation building sits ~150m southeast. Keep tower at 10-11 o'clock as you move southeast.
From Gas Station Spawn: Activation building ~120m east-northeast. Move along northern perimeter fence to repair facility, then angle southeast.
From Tunnel Spawn: Activation building ~100m south-southwest. Use garage doors as reference, keep them at your back moving south.
From Tank Spawn: Activation building 140-160m northwest. Move northwest using tank as rear reference.
From Hole in the Wall Spawn: Activation building ~180m north-northwest from broken wall.
Critical Decision Points
At 2:30 elapsed: Radar becomes available. If activation building area clear with no combat signs, proceed with Radar. If gunfire/players observed, delay until 5:00 for Mine's unlimited usage.
After switch activation: If bots engage directly, fight from cover near building. If bots spawn but don't detect you, relocate 40-60m perpendicular to intended extraction, wait for dispersion, approach from new angle.
If players near extraction: Assess No-Backpack viability. If carrying <50,000 Koen, ditching backpack often offers better expected value than fighting. For high-value raids, retreat to concealed position, wait 3-5 minutes for campers to extract.
Movement Speed Optimization
Sprint only when:
- Crossing unavoidable open ground (3-5 second bursts)
- Relocating after switch activation
- Final approach to extraction when area confirmed clear
Tactical walk (crouch) for:
- Final 60-80m approaching activation building
- All movement within 40m of extractions
- Areas with limited visibility/multiple cover positions
Normal walk for:
- Mid-range navigation 100+ meters from high-risk areas
- Movement between landmarks
- Repositioning after observing distant threats
Camper Detection: Pre-Extraction Observation
Sound Cues Revealing Campers
Footsteps: Indicate players within 30-50m. Repetitive patterns (two steps, pause, two steps) suggest position checking, not transit movement.
Weapon handling: Reloading, switching, magazine checking near extractions strongly suggests camping. Carries 20-30m.
Healing sounds: Medkit/bandage use indicates recovery from combat, potential camping while regenerating.
Environmental interactions: Doors, containers, item pickups near extractions during late-raid (15+ minutes) indicate active camping or preparation.
Visual Indicators
Bodies: Recent combat within 2-5 minutes. Looted bodies suggest someone felt secure enough to remain stationary.
Open doors: Spawn closed, so any open door = player interaction. Multiple open doors suggest thorough clearing by occupant who may remain.
Scattered loot: Dropped weapons, discarded gear, empty containers show inventory management. Near extractions = camping preparation.
30-Second Observation Protocol
Seconds 0-10: Position in cover 40-60m from extraction with sightlines covering two approach angles and extraction point. Remain stationary, listen for audio cues.
Seconds 10-20: Slow visual scan of extraction zone and surroundings. Check elevated positions, interior corners, positions behind cover with extraction sightlines, concealment spots.
Seconds 20-30: Scan approach routes other players might use. If another player approaches, remain concealed and assess behavior. Direct/quick movement = extracting. Slow/corner-checking = camping or cautious extraction. Let them commit first.
Timing Your Extraction
Early (0-10 Minutes)
Pros: Minimal camper presence, aggressive players hunt loot areas not extractions
Cons: Limited availability (Canal 3+, Radar 2:30+, Mine 5+, only No-Backpack immediate), reduced loot potential (30-50% of full raid)
Best for: Risk-averse players, early high-value finds justifying immediate extraction
Mid-Raid (10-20 Minutes) - Sweet Spot
All extractions available. Player distribution spreads across map. Camper presence moderate but predictable.
Optimal windows:
- 10-12 minutes: Before first camper wave
- 15-16 minutes: Between camper waves
Aggressive players extract 12-15 minutes. Slower players extract 16-20 minutes. Mine's unlimited usage shines here—10 minutes of availability allows earlier players to use and leave.
Late (20+ Minutes) - Highest Risk
Maximum loot potential, highest camper concentration. Remaining players concentrate near extractions. Assume camper presence at every extraction.
Requirements:
- Extend observation to 45-60 seconds
- Assume every extraction has campers
- Prioritize Mine's unlimited usage for multiple attempts
- Better gear essential—arena breakout bonds recharge through BitTopup provides reliable equipment access
Anti-Camper Tactics
Grenade Checking
Radar camping positions: Activation building rooftop, small structure corners adjacent to extraction, prone in tall grass 20-30m from zone
Mine camping positions: Elevated rocky terrain around entrance, mine structure interior, behind large containers near mine
Canal camping positions: Upper bunker floors, control room, corridor between switch and extraction
Procedure:
- From cover 30-40m away, throw grenade 2-3m from suspected position (not directly on it)
- Immediately reposition 10-15m from throw location
- Listen for movement, damage indicators, return fire
- Movement sounds = occupied position
Alternative Extraction Decision Matrix
- Assess No-Backpack: If backpack <40,000 Koen and available, ditch it
- Evaluate alternative timed extraction: Radar camped? Try Mine (shared switch, different location)
- Wait out campers: 15+ minutes into raid, campers may extract in 3-5 minutes. Find concealed position 60-80m away with sightline, watch for extraction activity
- Canal as last resort: Despite alarm/bots, can be safer than camped outdoor extractions if already in bunker
Fight vs Flee
Fight when:
- Positional advantage (detected camper first, superior cover)
- Equipment advantage (better armor/weapons)
- No viable alternatives
- Already detected with no escape route
Flee when:
- Detected but not under accurate fire
- Viable alternatives available
- Outgunned/outarmored
- Create 100+ meters distance and break line of sight
Tactical repositioning: Move 40-60m to different approach angle. Campers cover obvious routes; unexpected angles bypass sightlines.
Spawn-Specific Strategies
North Spawns
Radar Station: Loot immediate area (2-3 min), move to activation building at 4-5 min, activate at 5 min for both options, extract via Mine at 6-7 min (avoids 2:30 Radar rush).
Gas Station: Balanced access to all extractions. Heavy bunker combat? Use outdoor extractions. Active outdoor areas? Consider bunker/Canal.
Tunnel: Use repair facility as staging point. Observe 3-4 min. Southern players pushing north? Enter bunker via Mid, use Canal. Players staying south/in bunker? Use Mine at 8-10 min.
South Spawns
Tank: Fastest bunker access (1 min timer). Enter immediately for interior combat, use Canal at 10-12 min. Or avoid bunker, move northwest along perimeter to outdoor extractions at 8-10 min.
Hole in the Wall: Excels for No-Backpack. Move directly north away from bunker. No-Backpack spawns in northern area (opposite southern spawn). Reach in 4-5 min, extract by 6-7 min with high survival rates.
Counter-intuitive approach: Southern spawns using outdoor extractions, northern spawns using Canal reduces camper encounters (opposite of expected patterns).
Loadout for Extraction Success
Budget Build (Total ~150,000 Koen)
Armor: Class 3 full coverage (6B23-1, 40,000-50,000 Koen) over Class 4 chest-only
Weapon: AKM platform with 7.62x39mm PS ammo (60,000-70,000 Koen for weapon, mods, 120 rounds)
Helmet: Class 3 SSh-68 (25,000-30,000 Koen), skip face shields
Medical (15,000-20,000 Koen):
- 2x AI-2 medkits
- 2x bandages
- 1x Morphine/painkiller
- 1x CMS kit/Surv12
Utility (10,000-15,000 Koen):
- 2-3 grenades (F-1/RGD-5)
- 1-2 flashbangs
- 1 smoke grenade
- Weapon flashlight/tactical device
Ammo: 120-150 rounds (90 in mags, 30-60 loose), one magazine premium ammo for emergencies
Backpack Management
Large backpacks (Pilgrim, MBSS): Max capacity but -5-8% movement speed, larger profile. Use for No-Backpack extraction plans.
Medium backpacks (Berkut, ScavBP): Best balance. Use for Radar/Mine/Canal plans.
Keep weight <25kg for optimal mobility. Drop low-value items for high-value replacements. 30kg backpack reduces sprint speed/stamina enough to make approaches 20-30% slower.
Common Mistakes
This Extraction Looks Empty So It's Safe
Skilled campers remain motionless during observation, only revealing when targets commit. Solution: Assume camper presence always. Use 30-second protocol even when area appears clear. Approach from unexpected angles. Move between cover in final 20m.
Loot Tunnel Vision at Extraction
Checking one more body/container near extraction kills more players than anything else. Campers leave loot as bait.
Solution: Establish loot cutoff time. Within 100m of extraction, stop looting entirely. Ignore bodies, containers, scattered items. If you find high-value loot early, extract immediately.
Overconfidence After PvP Wins
Winning fights creates psychological high impairing risk assessment. You've expended ammo, meds, possibly taken damage—you're weaker, not stronger.
Solution: Pause 2-3 minutes after any PvP. Heal completely, reload, reorganize inventory, let adrenaline subside. Assess if fight changed extraction plan.
Solo vs Squad Differences
Solo Advantages
Move silently, decide instantly, present single target. Stealth-based extraction significantly more effective. Prioritize No-Backpack more heavily (one player's loot vs entire squad's). Greatest advantage: unpredictability. Approach from wrong direction, move through exposed areas, extract at unusual times.
Squad Coordination
Roles: Point (leads, checks corners), rear security (watches followers), overwatch (covers extraction from distance)
Sequence:
- Overwatch positions 40-60m from extraction with approach sightlines
- Point and rear security move to zone using observation protocol
- Once immediate area clear, overwatch relocates
- Most experienced player extracts last (most vulnerable)
Communication: Minimize radio chatter. Use hand signals or minimal callouts: Contact,Hold,Clear,Extract. Keep tactical and minimal in final 100m.
Real Case Studies
Case 1: Camped Extraction Reroute
Solo, 14 min elapsed, approaching Radar with 120,000 Koen loot. Hears single footstep during observation, then silence.
Decision: Footstep + silence = camper. Radar compromised. Mine available (14 min > 5 min), same switch, different location. Not worth ditching 120K for No-Backpack.
Action: Retreat 80m, navigate to Mine via perimeter (+3 min travel). Approach from western angle. Extended 45-second observation. No threats. Extract at 18 min.
Outcome: Successful with full loot. 4 extra minutes prevented likely death.
Case 2: Early High-Value Extraction
Solo, 6 min elapsed, found rare mod worth 180,000 Koen. Total loot ~220,000 Koen.
Decision: High value justifies immediate extraction. Mine available (6 min > 5 min). 100m from Mine.
Action: Abandon loot route, move directly to Mine. Standard observation. Area clear (most players still looting at 6 min). Extract at 7 min with 220K profit.
Outcome: Highly successful despite short duration. Recognized high-value find changed risk-reward calculation.
Case 3: Squad Under Pressure
3-player squad, 16 min elapsed, one killed in bunker PvP, two injured with blacked limbs. Moderate loot, low meds. Third floor bunker, hostiles on lower floors.
Decision: Canal closest but hostiles between current position and basement. Outdoor extractions require exiting through camped entrances. Injured, low supplies, time pressure.
Action: Defensive position in third floor control room. Heal, reload. After 2 min, movement below ceases. Move to basement cautiously. Activate Canal, defensive positions watching approaches. Bots spawn but don't push basement. Extract at 19 min.
Outcome: Successful despite unfavorable circumstances. Waiting for hostiles to clear prevented additional casualties.
FAQ
What are the safest extraction points in Armory without keys?
Mine extraction offers safest overall option: unlimited usage, outdoor location with multiple approach angles, 5-minute timer reducing early traffic. No-Backpack provides highest safety for low-value raids—no switch activation, spawns opposite starting location.
How do I avoid extraction campers?
Use 30-second observation protocol: position in cover 40-60m away, listen for audio cues, scan for visual indicators, approach from unexpected angles. Extract during off-peak windows (10-12 or 15-16 minutes) rather than high-traffic periods.
Where do campers hide near Armory extractions?
Radar: activation building rooftop, adjacent structure corners, tall grass 20-30m from zone. Mine: elevated rocky terrain, mine interior, behind large containers. Canal: upper bunker floors, control room, corridors between switch and extraction.
What time should I extract to avoid players?
10-12 minutes (before first camper wave) or 15-16 minutes (between waves). Avoid round numbers (exactly 10, 15, 20 minutes). 5-minute mark sees Mine activation traffic, 2:30-3:00 sees Radar rushes.
How do I check if extraction is camped?
Observation protocol: cover 40-60m away, 10 seconds stationary listening, 10 seconds visual scan of camping positions, 10 seconds scanning approach routes. Grenade suspected positions if available. Look for fresh bodies, open doors, scattered loot.
Which spawn has safest extraction access?
Gas Station provides most balanced access to outdoor extractions and bunker entrances, allowing adaptation based on player activity. Hole in the Wall excels for No-Backpack strategy with direct routes to northern sections.
Ready to optimize Arena Breakout performance? Visit BitTopup for secure, instant Arena Breakout Bonds recharge with competitive pricing. Better equipment directly improves extraction success rates.


