

Understanding Hunt Rampage: Core Mechanics & January 2026 Meta
Hunt Rampage differs from standard Battle Royale through its gift box drop system and point-based progression. Eliminated players drop gift boxes containing health, ammo, and speed bursts. This rewards aggressive play by immediately replenishing resources after eliminations, creating self-sustaining cycles for skilled players.
Point thresholds unlock progressive buffs, incentivizing consistent performance over single high-value kills. This shifts optimal strategies compared to survival-focused modes.
Dark Take Pass launched January 15, 2026, introducing P90 BAS Attachment Burst Bolt as a free reward, fundamentally altering close-quarters combat. Players can efficiently acquire resources through Blood Strike Golds top up on BitTopup for competitive advantages.
What Makes Hunt Rampage Different
Traditional Battle Royale emphasizes positioning and survival. Hunt Rampage inverts this—elimination count is the primary victory condition. Gift boxes ensure aggressive players maintain resource parity with passive opponents.
Point threshold buffs create power spikes at specific milestones. Early aggression to reach first-tier buffs provides compounding advantages. Players securing 10-15 early eliminations gain statistical edges that snowball throughout matches.
Respawn mechanics allow continuous engagement, making individual deaths less catastrophic and encouraging risk-taking.
Dark Take Pass Impact
Elite Strike Pass costs 520 Gold, refunding the full amount upon completion—effectively free. P90 Burst Bolt enables 5-round burst firing maintaining damage beyond standard 25-meter falloff, extending threat range significantly.
Premium cosmetics (M4A1-Sea Wraith, HANK-Corsair) provide no stat advantages but serve as status markers. Elite tier unlocks Kar98k-Glacier, Spear-Glacier, JACK-Pirate, and SPIKE-Pirate.
January 12 Noble Coin Shop added Vector-Flame Fox for 5000 Noble Coins, offering alternative acquisition for players preferring Vector's 1200 RPM with 35-round mags.
Why Aggro Builds Dominate
Restore Energy launched January 8, 2026 in Battle Royale Matchmaking/Room modes, with Ranked/Peak implementation January 15, 2026. Loot Crates spawn after enemy defeats, containing health, armor, Evolution energy, and skill cooldown reductions. Restoration scales with defeated enemy armor level, maximizing at Level 3.
Auto-pickup triggers when health drops below 30% or armor depletes, ensuring aggressive players sustain extended engagements without manual management.
Evolution tiers: Tier 1 at 100 points, Tier 2 at 250 points (15% skill cooldown reduction), Tier 3 at 500 points (25% enhanced skill effects). Aggressive players accumulate points faster through eliminations.
Restore Energy Spawn Rules: Complete Mechanics
Restore Energy appears exclusively in Loot Crates after defeating enemies—no random environmental spawns. Energy control depends entirely on combat success.
Scaling based on enemy armor creates strategic target prioritization. Level 3 armor yields maximum restoration, incentivizing focus on well-equipped enemies.
Skill cooldown reduction varies by character. Ghost's 25-second cooldown with 8-second invisibility receives 8-second reduction, enabling near-continuous stealth. Sparkle's drone cooldown drops from 30 to 22 seconds while maintaining 40 HP restoration over 5 seconds.
Energy Spawn Timing & Predictability
Unlike traditional spawns with fixed intervals, Restore Energy operates on elimination-triggered generation. Each defeat immediately creates a Loot Crate—spawn timing is player-controlled.
Auto-pickup at 30% health creates safety net for aggressive engagements. Players can commit to risky pushes knowing successful eliminations automatically restore resources when critically low.
Evolution energy accumulation accelerates tier progression. Tier 2's 15% cooldown reduction enables more frequent ability chaining, while Tier 3's 25% enhanced effects provide decisive advantages.
Energy Denial Wins Matches
Eliminating opponents before they utilize accumulated Restore Energy creates resource denial. Maintaining offensive pressure prevents enemies from reaching critical health thresholds that trigger auto-pickup.
Controlling high-traffic areas where eliminations concentrate creates energy abundance. Players dominating central locations accumulate more energy through increased elimination opportunities.
Balancing high-value eliminations against tactical threat removal requires situational awareness based on match state and point standings.
Best Aggro Builds After Dark Take Pass: Top 5 Loadouts
P90 SMG is the cornerstone of aggressive builds post-Dark Take Pass. 18-21 damage per shot at 900 RPM with 50-round magazine delivers sustained close-quarters firepower. Effective range of 15-25 meters extends to 30 meters with Extended Barrel's 20% range increase, while Compensator reduces vertical recoil 15%.
Vertical Foregrip's 12% recoil reduction + Tactical Stock's 8% ADS speed = 27% total recoil reduction with Compensator. Burst Bolt from free Dark Take Strike Pass enables 5-round bursts maintaining damage beyond standard falloff.
For comprehensive loadouts, efficient resource management through Blood Strike Golds recharge online via BitTopup ensures optimal attachments without grinding delays.
Build #1: P90 Rush Dominator
Primary: P90 with Compensator, Extended Barrel, Vertical Foregrip, Tactical Stock, Burst Bolt. 27% total recoil reduction, 15-30 meter engagement range.

Character: Ghost provides 8-second invisibility on 25-second base cooldown, reduced to 17 seconds with Restore Energy. Enables aggressive flanking and disengagement.
Tactics: Prioritize high-traffic spawn areas. 50-round magazine allows multi-target engagement without reloading. Target Level 2-3 armor for maximum energy restoration.
Evolution: Rush Tier 1 (100 points) through early eliminations, reach Tier 2 (250 points) before mid-game. 15% cooldown reduction enables Ghost cycling every 14.5 seconds with Restore Energy.
Build #2: Bizon Energy Hunter
Primary: Bizon SMG with Flash Hider, Lightweight Barrel, Angled Foregrip, Skeleton Stock. 64-round magazine, 16 damage per shot at 750 RPM. 24% recoil reduction, 15% mobility increase, 6% movement speed bonus.
Synergy: Flash Hider's 10% recoil reduction + Angled Foregrip's 14% horizontal control = stable sustained fire. Lightweight Barrel + Skeleton Stock = superior repositioning.
Application: Control central zones where gift boxes concentrate. 64-round magazine enables suppressive fire denying area access. Effective range 12-22 meters suits close-quarters contestation.
Resources: BAS 32-Round R.I.P Drum provides 33% more capacity than standard 24-round mags. Prioritize armor upgrades to maximize Restore Energy scaling.
Build #3: RPK Close-Quarter Executioner
Primary: RPK LMG with Heavy Compensator, Heavy Barrel, Bipod, Padded Stock. 24-34 body damage at 600-650 RPM with 75-round magazine. Heavy Barrel increases damage 8%, extends range 25% from 20-35 meters to 43 meters.
Recoil: Heavy Compensator reduces vertical recoil 18%, Bipod provides 20% when prone/crouched, Padded Stock adds 10% = 48% total when deployed.
Execution: Slower handling requires pre-positioning. Establish firing positions near anticipated rotations, using 43-meter range to engage before opponents reach optimal SMG ranges.
Deployment: Most effective mid-to-late game when point standings are established. Early game mobility limitations make this vulnerable to P90/Bizon rushes.
Build #4: Vector Mobile Assassin
Primary: Vector SMG with 1200 RPM, 35-round extended magazine. Vector-Flame Fox from January 12 Noble Coin Shop (5000 Noble Coins) provides cosmetic distinction.
Philosophy: Extreme fire rate delivers fastest time-to-kill within 10 meters. 35-round magazine provides ~1.75 seconds continuous fire, requiring burst discipline.
Mobility: Pair with movement attachments to maximize hit-and-run. Engage point-blank for guaranteed eliminations, disengage to reload/reposition, re-engage from unexpected angles.
Synergy: JET's missile barrage fires 7 missiles dealing 150 damage each within 25-meter accuracy. Combined with Vector's close-range lethality, creates overwhelming pressure in confined spaces.
Build #5: Balanced Aggressor
Primary: P90 with meta attachments (Compensator, Extended Barrel, Vertical Foregrip, Tactical Stock, Burst Bolt) for 15-30 meter performance.
Secondary: High-damage pistol or shotgun for emergency close-quarters when P90 depletes mid-fight.
Character: ETHAN deploys 400 HP one-way bullet barrier lasting 30 seconds. Enables safe Restore Energy pickups during contested eliminations, creates advantageous peek angles.
Adaptability: Maintains effectiveness across all game phases and map zones. Tier 2's 15% cooldown reduction enables barrier deployment every 25.5 seconds.
Weapon Selection for Aggressive Playstyle
SMGs dominate aggressive meta through superior mobility, fast ADS times, and effective ranges matching typical engagement distances. P90, Bizon, and Vector serve distinct niches while maintaining aggressive compatibility.
P90's 900 RPM balances damage with controllability—most versatile aggressive option. 50-round magazine provides multi-target capacity without reload vulnerability. Burst Bolt accessibility through free pass ensures competitive viability.
Bizon's 64-round magazine addresses SMG weakness of frequent reloading, enabling extended suppressive fire. 16 damage per shot requires more hits than P90's 18-21, but superior capacity compensates through sustained pressure.
Primary Weapons Tier List
S-Tier: P90 with Burst Bolt dominates through optimal balance of damage, fire rate, capacity, range. 27% recoil reduction maintains accuracy, Extended Barrel's 30-meter range covers most engagements.
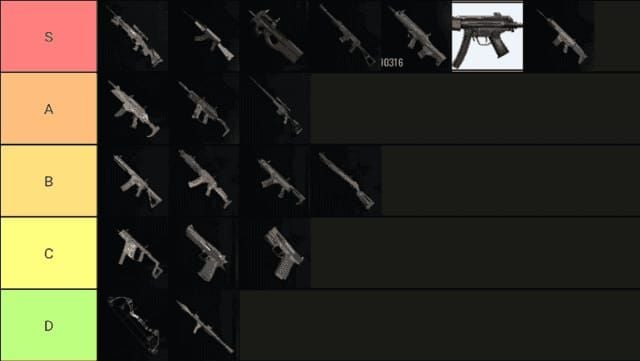
A-Tier: Bizon excels in spawn control requiring sustained fire and repositioning. 24% recoil reduction with mobility bonuses creates superior rotation. Vector for specialists managing extreme fire rate and limited capacity.
B-Tier: RPK serves niche defensive-aggressive hybrid, providing superior damage/range but sacrificing mobility. 48% deployed recoil reduction creates unmatched accuracy for pre-positioned lanes.
C-Tier: Assault rifles like M4A1 offer insufficient advantages over SMGs in Hunt Rampage's close-to-medium ranges. Lack mobility and close-quarters time-to-kill for aggressive energy contestation.
Dark Take Pass Exclusive Weapons
P90 Burst Bolt represents most impactful addition, fundamentally altering engagement profile. 5-round burst maintains damage beyond standard 25-meter falloff, extending threat range to 30+ meters with Extended Barrel. Requires P90 level cap 100.
Vector-Flame Fox provides no statistical advantages over standard Vector—visible status marker only. 5000 Noble Coin cost appropriate only for dedicated Vector specialists.
M4A1-Sea Wraith offers cosmetic distinction without gameplay impact. Assault rifles remain viable but occupy lower meta tiers for aggressive playstyles.
Attachment Optimization
Recoil reduction takes priority—sustained accuracy during movement determines fight outcomes. P90's Compensator (15%) + Vertical Foregrip (12%) = 27% total reduction.
Range-extending attachments like Extended Barrel provide disproportionate value. P90's 20% range increase from 25 to 30 meters captures additional tactical opportunities.
Mobility and ADS speed enable aggressive positioning and rapid engagement. Tactical Stock's 8% ADS improvement reduces window between acquisition and accurate fire. Bizon's Lightweight Barrel + Skeleton Stock = 21% total mobility/movement increases.
Character Selection & Ability Synergies
Ghost's invisibility provides unmatched aggressive positioning, enabling flanking and disengagement. 8-second invisibility on 25-second base cooldown becomes 17 seconds with Restore Energy, 14.5 seconds with Tier 2's 15% reduction.
ETHAN's 400 HP one-way barrier creates tactical advantages during energy spawn contestations. 30-second duration enables extended area control. Barrier placement skill determines effectiveness.
JET's 7-missile barrage dealing 150 damage each within 25-meter accuracy provides burst area denial and multi-target damage. Excels at clearing defensive positions, forcing repositioning.
Top 3 Strikers for Aggressive Play
#1 Ghost: Invisibility enables flanking, safe energy pickup, disengagement. Versatility across all phases makes Ghost most consistent aggressive choice. Near-constant stealth with Restore Energy reduction.
#2 ETHAN: Barrier provides defensive utility complementing aggressive positioning. 400 HP withstands significant damage, creating temporary safe zones. One-way firing maintains offensive pressure.
#3 JET: Missile barrage excels at area denial and burst damage. 150 damage per missile creates elimination potential against wounded opponents. 25-meter accuracy suits close-to-medium engagements.
Ability Combos for Energy Spawns
Ghost invisibility into flanking enables uncontested pickups from unexpected angles. Opponents monitoring primary vectors cannot detect invisible flanking.
ETHAN barrier on spawn points creates defensive zones forcing unfavorable engagements. One-way firing enables safe elimination of approaching enemies while absorbing return fire.
JET missile barrage on contested spawns forces displacement, creating windows for safe pickup. Area denial clears defensive positions, interrupts healing.
Movement vs Combat Abilities
Movement abilities like Ghost's invisibility provide superior value through positioning advantages that translate to favorable engagements. Controlling engagement timing/angles outweighs raw combat power.
Combat abilities like JET's missiles excel in specific scenarios but lack consistent utility. Cooldown-dependent nature creates vulnerability windows.
Defensive abilities like ETHAN's barrier occupy hybrid role, providing positioning advantages through area control while offering combat utility. Versatility makes defensive abilities viable when used proactively.
Advanced Aggro Strategies: Energy Spawn Control
Early-game spawn control establishes compounding resource advantages. Prioritize central locations where gift boxes concentrate. Auto-pickup at 30% health enables aggressive trading.
Mid-game pressure balances elimination accumulation with Evolution progression. Reaching Tier 2's 15% cooldown reduction before opponents creates snowballing advantages. Maintain offensive tempo.
Late-game aggression demands calculated risk assessment based on point standings. Players with leads adopt selective aggression. Trailing players must maximize elimination rate through high-risk plays.
Early Game Rotation Paths
Spawn near central zones with high player density, natural cover, multiple approach vectors. Early eliminations yield concentrated gift boxes for area controllers. Avoid peripheral spawns requiring extended rotation.
Identify high-traffic chokepoints where opponents must rotate. Pre-position with range-advantaged weapons (RPK, Extended Barrel P90), eliminating rotating opponents before optimal ranges.
Coordinate with teammates for crossfire positions covering primary approach vectors. Overlapping fields of fire prevent safe approaches. Mutual support enables trading eliminations.
Mid-Game Pressure Tactics
Maintain offensive initiative by constantly pressuring positions, preventing safe healing and resource accumulation. Restore Energy rewards continuous aggression through self-sustaining cycles.
Target isolated opponents separated from teammates. Avoid extended engagements against grouped opponents unless holding significant advantages. Goal is efficient elimination accumulation.
Use Evolution tier advantages to force unfavorable engagements. Tier 2's 15% cooldown reduction enables more frequent ability usage opponents cannot match.
Late Game: Push vs Hold
Point standings determine late-game aggression. Players with leads adopt selective aggression, eliminating specific threats while avoiding unnecessary risks. Goal shifts to maintaining advantages.
Trailing players must maximize elimination rate through high-risk plays, accepting unfavorable trades providing elimination opportunities. Restore Energy enables sustained aggression through resource restoration.
Zone positioning becomes critical as playable area contracts. Establish positions controlling remaining energy spawns, forcing opponents through predictable vectors.
Countering Defensive Meta
ETHAN's barrier forces defensive players from static positions through one-way firing advantages. Deploy barriers cutting off retreat paths while providing push cover.
JET's missile barrage clears defensive positions through area denial and burst damage. 7 missiles covering 25-meter zones force repositioning or inflict significant damage.
Ghost's invisibility enables flanking bypassing defensive firing lanes. Defensive players monitoring primary vectors cannot detect invisible flanking.
Utility for Flushing Positions
Ability coordination creates overwhelming pressure. Combine JET missiles for denial with ETHAN barriers for approach cover, while Ghost flanks from unexpected angles.
Grenade/explosive utility forces defensive players from static positions. Coordinate deployment with teammate pushes to capitalize on forced repositioning.
Sustained suppressive fire from Bizon or RPK prevents defensive players from safely returning fire or healing. Psychological pressure forces mistakes. Coordinate suppression with flanking.
Timing Pushes Around Energy Spawns
Restore Energy spawns immediately after eliminations—predictable timing. Coordinate pushes with teammate eliminations, ensuring energy availability for resource restoration.
Monitor opponent elimination notifications to predict their Restore Energy availability. Opponents who recently eliminated teammates likely have full resources—delay pushes until they expend resources.
Evolution tier progression creates power spike windows. Reaching Tier 2 before opponents provides 15% cooldown advantage. Time major pushes with tier progression.
Common Mistakes Killing Success
Over-aggression without energy awareness leads to resource depletion and elimination. Blind rushing without monitoring health, armor, ammo creates unnecessary deaths. Restore Energy rewards successful aggression but cannot compensate for reckless play.
Poor loadout economy wastes resources on suboptimal attachments. Prioritize meta attachments providing measurable advantages (recoil reduction, range extension, mobility) over cosmetics. P90 meta configuration takes priority.
Ignoring team composition creates tactical vulnerabilities. Coordinated team play with complementary abilities and loadouts multiplies effectiveness. Avoid redundant character selections or conflicting playstyles.
Over-Aggression Without Awareness
Successful aggression requires eliminating opponents to generate Restore Energy. Engaging without realistic elimination probability wastes resources, feeds opponent points. Assess risk-reward before committing.
30% health auto-pickup provides safety margin but requires confidence in elimination capability. Players consistently winning fights while sustaining damage can leverage auto-pickup. Players frequently losing should adopt conservative criteria.
Ammunition management becomes critical during extended sequences. P90's 50-round and Bizon's 64-round magazines provide buffer, but sustained fighting depletes reserves. Monitor counts, disengage to resupply.
Poor Loadout Economy
Attachment priority: recoil reduction > range extension > mobility enhancement. Recoil reduction provides immediate accuracy improvements. Range extension expands tactical options. Mobility enables positioning but provides minimal value without accuracy.
Character ability upgrades through Evolution tiers provide more value than minor weapon stat improvements. Prioritize Tier 2 for 15% cooldown reduction before marginal weapon upgrades.
Resource allocation between multiple weapons dilutes effectiveness. Focus resources on single primary weapon to maximize attachment optimization. P90 meta build with full suite outperforms multiple partially-configured options.
Ignoring Team Composition
Balanced teams include movement (Ghost), defensive utility (ETHAN), combat abilities (JET) to cover varied situations. Redundant selections lack versatility.
Weapon loadout diversity ensures effectiveness across engagement ranges. Exclusively close-range SMGs struggle against range-advantaged positions. Include both close-range specialists (P90, Bizon, Vector) and medium-range options (RPK, assault rifles).
Communication and coordination multiply individual skill. Coordinated ability usage, crossfire positioning, elimination trading create advantages individual skill cannot overcome.
Optimizing Loadout: Resource Investment
P90 attachment priority: Burst Bolt (free from Dark Take Strike Pass) > Compensator (15% vertical recoil) > Extended Barrel (20% range) > Vertical Foregrip (12% recoil) > Tactical Stock (8% ADS speed). Maximizes combat effectiveness per resource invested.
Evolution tier progression prioritizes Tier 2 (250 points) for 15% cooldown reduction before Tier 3 (500 points). Cooldown reduction provides immediate tactical value through increased ability availability.
Character unlocks take priority over cosmetics when resource-constrained. Ghost, ETHAN, JET provide distinct tactical capabilities expanding strategic options. Allocate resources to functional improvements before cosmetics.
Priority Upgrades
Weapon level progression to unlock attachment slots provides foundational improvements. P90 requires level cap 100 to unlock Burst Bolt—primary progression goal.
Armor upgrades maximize Restore Energy scaling. Energy restoration scales with defeated enemy armor level up to Level 3. Maintaining Level 3 ensures maximum pickup from eliminations.
Ammunition capacity upgrades prevent mid-fight depletion forcing unfavorable disengagements. Bizon's BAS 32-Round R.I.P Drum provides 33% more capacity than standard 24-round mags.
Dark Take Pass Rewards Worth Grinding
Free Dark Take Strike Pass provides P90 Burst Bolt—mandatory for competitive players. Fundamentally alters P90 engagement profile, extending effective range from 25 to 30+ meters.
Elite Strike Pass costs 520 Gold with full 520 Gold refund upon completion—effectively free. Cosmetic rewards (HANK-Corsair, Kar98k-Glacier, Spear-Glacier, JACK-Pirate, SPIKE-Pirate) provide no stat advantages.
Premium tier M4A1-Sea Wraith offers cosmetic distinction without gameplay impact. Assault rifles occupy lower meta tiers for aggressive playstyles. Prioritize functional rewards over cosmetics.
FAQ
What is Hunt Rampage mode in Blood Strike?
Hunt Rampage is a PvP mode where eliminated players drop gift boxes containing health, ammo, and speed bursts. Point thresholds unlock progressive buffs. Victory depends on elimination count rather than survival, rewarding aggressive playstyles.
How do Restore Energy spawn rules work?
Restore Energy appears in Loot Crates after defeating enemies, restoring health, armor, Evolution energy, and reducing skill cooldowns. Restoration scales with enemy armor level, maximizing at Level 3. Auto-pickup triggers when health drops below 30% or armor depletes.
What are the best aggro builds after Dark Take Pass?
P90 with Burst Bolt, Compensator, Extended Barrel, Vertical Foregrip, Tactical Stock provides optimal aggressive performance. Bizon with Flash Hider, Lightweight Barrel, Angled Foregrip, Skeleton Stock excels in spawn control. RPK with Heavy Compensator, Heavy Barrel, Bipod, Padded Stock suits defensive-aggressive hybrid.
Which characters work best for aggressive playstyle?
Ghost's invisibility enables flanking and disengagement with 8-second duration on 17-second cooldown (with Restore Energy). ETHAN's 400 HP barrier provides tactical positioning. JET's 7-missile barrage deals 150 damage each for area denial within 25-meter accuracy.
How did Dark Take Pass change the meta?
Free P90 Burst Bolt enables 5-round bursts maintaining damage beyond 25-meter falloff, extending effective range to 30+ meters. Widespread adoption creates new baseline for competitive loadouts. Elite Strike Pass costs 520 Gold with full refund upon completion.
When do energy spawns appear?
Restore Energy spawns immediately after defeating enemies in Loot Crates—spawn timing is player-controlled, not interval-based. System launched January 8, 2026 in Matchmaking/Room modes, January 15, 2026 in Ranked/Peak modes. Auto-pickup triggers at 30% health or depleted armor.


