Understanding Restore Energy Mechanics
Restore Energy rewards aggressive elimination streaks with immediate survivability boosts. After defeating an enemy, a Loot Crate appears containing Restore Energy that simultaneously restores health and armor, grants Evolution energy, and reduces active skill cooldowns.
Restoration scaling correlates with enemy armor levels—eliminating opponents wearing Level 3 armor yields maximum recovery, while lower-tier armor provides proportionally reduced benefits. This incentivizes targeting well-equipped enemies during kill chains.
For players looking to maximize competitive advantage through premium resources and character unlocks, blood strike gold top up services at BitTopup provide fast, secure transactions with competitive pricing.
Auto-pickup triggers when health drops below 30% or armor becomes fully depleted, eliminating manual collection delays during critical combat moments. This ensures you can maintain offensive pressure without interrupting aim or movement.
Evolution Energy Integration
Restore Energy accelerates Evolution tier advancement through consistent energy grants per elimination:
- Tier 1: 100 points required
- Tier 2: 250 points, provides 15% cooldown reduction
- Tier 3: 500 points, grants 25% enhanced effect bonuses
The cooldown reduction at Tier 2 compounds with Restore Energy's inherent cooldown reduction per pickup, creating exponential skill availability increases. Tier 3's 25% enhanced effect applies to all active abilities, amplifying healing output, damage mitigation, or offensive capabilities.
Skill Cooldown Reduction
Restore Energy pickup reduces Ghost skill cooldown by 8 seconds from its base 25-second timer, enabling near-constant invisibility uptime during active kill chains. Ghost's 8-second invisibility duration combined with accelerated cooldown recovery allows you to reset positioning between eliminations.
Sparkle's healing drone benefits equally, dropping from 30 seconds to 22 seconds per pickup. The drone's 40 HP restoration over 5 seconds provides supplementary healing between eliminations, creating dual-layered regeneration.
Pro tip: Activate abilities immediately before securing kills to ensure cooldowns begin counting down while Restore Energy reduction applies.
Weapon Loadouts for Consecutive Kills
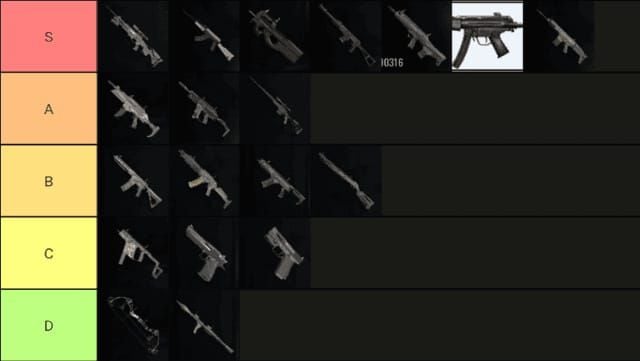
Low-recoil weapon platforms ensure consistent damage delivery across multiple targets. The P90 SMG, Bizon SMG, and RPK LMG represent optimal choices for different engagement ranges.
P90 SMG: Close-Range Chain Dominance
The P90 delivers 18 damage per shot at 900 RPM with a 50-round magazine, providing exceptional close-quarters lethality within 15-25m effective range.
Optimal P90 attachments:
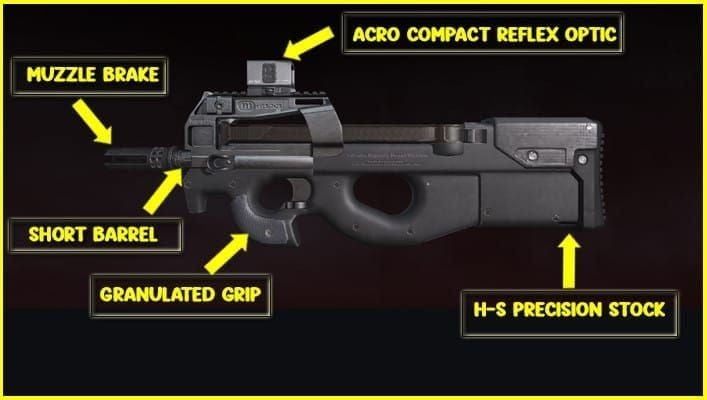
- Compensator: Reduces vertical recoil by 15%
- Extended Barrel: Increases effective range by 20% to 30m
- Vertical Foregrip: Reduces overall recoil by 12%
- Tactical Stock: Increases ADS speed by 8%
- Red Dot Sight: Clear target acquisition without magnification penalties
Burst fire 8-12 rounds at 25m+ distances to conserve ammunition while maintaining accuracy. Reload during brief engagement gaps rather than depleting magazines completely.
Bizon SMG: Sustained Pressure Through Magazine Depth
The Bizon's 64-round magazine capacity enables prolonged engagements without reload vulnerability, delivering 16 damage per shot at 750 RPM within 12-22m effective range.
Bizon attachment configuration:
- Flash Hider: Reduces recoil by 10% while concealing muzzle flash
- Lightweight Barrel: Increases mobility by 15%
- Angled Foregrip: Reduces horizontal recoil by 14%
- Skeleton Stock: Increases movement speed by 6%
- Holographic Sight: Rapid target acquisition with minimal visual obstruction
Burst fire 15-20 rounds to maintain accuracy while leveraging magazine depth. The Bizon excels in urban environments with frequent corner engagements.
For competitive players seeking to unlock premium weapon skins and attachments, recharge blood strike gold through BitTopup offers instant delivery with secure payment processing.
RPK LMG: Suppressive Fire and Range Dominance
The RPK delivers 24 damage per shot at 600 RPM with a 75-round magazine across 20-35m effective range. This platform suits controlled, methodical engagements where superior range and damage per shot compensate for lower fire rate.
RPK attachment optimization:
- Heavy Compensator: Reduces vertical recoil by 18%
- Heavy Barrel: Increases damage by 8% and range by 25% to 43m
- Bipod: Reduces recoil by 20% when prone or crouched
- Padded Stock: Reduces recoil by 10%
- 2x Scope: Provides magnification for mid-range precision
Burst fire 10-15 rounds to maintain accuracy. The RPK's bipod transforms stationary positions into kill zones where incoming enemies face overwhelming firepower.
Kill Chain Fundamentals
Successful kill chains require maintaining elimination tempo faster than Restore Energy's benefits expire. The critical timing window between eliminations determines whether you sustain regeneration or lose momentum.
Target prioritization directly impacts chain sustainability—engage isolated opponents first to build momentum safely, then leverage the health advantage to engage progressively more challenging targets.
Positioning for Target Availability
High-traffic zone control ensures consistent target availability. Urban map central buildings, objective points in ranked modes, and rotation corridors between safe zones naturally concentrate player movement.
Vertical positioning advantages compound with Restore Energy mechanics by providing superior sightlines while reducing incoming damage angles. Elevated positions force enemies to expose themselves while climbing or crossing open ground.
Safe engagement angles incorporate cover that allows immediate concealment when health drops toward the 30% auto-pickup threshold. Position near Loot Crate spawn locations to ensure minimal exposure time between elimination and collection.
Combat Flow Maintenance
Ability timing: Activate damage-dealing abilities when targets reach 40-50% health to ensure ability damage secures eliminations even if weapon accuracy falters.
Ammunition management: Reload during brief engagement gaps—after securing eliminations but before engaging new targets—rather than depleting magazines mid-fight.
Movement techniques: Strafe perpendicular to enemy aim, utilize slide mechanics to reduce hitbox exposure, and incorporate jump shots during close-range engagements.
Character Selection for Restore Energy Synergies
Character abilities that complement Restore Energy's regeneration mechanics amplify kill chain potential. Ghost and Sparkle represent top-tier choices due to direct synergies with cooldown reduction and healing amplification.
Ghost: Invisibility-Enhanced Aggression

Ghost's 8-second invisibility duration with 25-second cooldown creates natural synergy with Restore Energy's 8-second cooldown reduction per pickup. During active kill chains, you can achieve near-constant invisibility uptime.
The cooldown reduction compounds with Evolution Tier 2's 15% cooldown decrease, potentially reducing Ghost's cooldown to approximately 14 seconds with consistent pickups. This timing allows one invisibility activation per elimination during optimal chains.
Ghost's playstyle emphasizes isolated target elimination rather than multi-opponent brawls. Use invisibility to approach lone targets, secure eliminations, collect Restore Energy, then immediately reactivate invisibility for the next approach.
Sparkle: Dual-Layered Regeneration
Sparkle's healing drone restoring 40 HP over 5 seconds with 30-second cooldown provides supplementary regeneration between Restore Energy pickups. Restore Energy's cooldown reduction drops the drone cooldown to 22 seconds, enabling near-constant healing availability.
Deploy the drone before engaging targets to ensure continuous health restoration throughout the fight. This proactive deployment creates a safety net where even if you take substantial damage, the drone's healing combined with Restore Energy pickup restores health to near-maximum levels.
Sparkle excels in squad-based ranked modes where teammates benefit from shared healing, as the drone's area effect multiplies value across multiple players.
Evolution Tier Optimization
Reach Evolution Tier 2's 15% cooldown reduction as quickly as possible to maximize character ability uptime. Aggressive early-game play that secures 3-4 eliminations typically provides sufficient Evolution energy for Tier 2 access.
Tier 3's 25% enhanced effect amplifies character-specific strengths—Ghost's invisibility duration potentially extending beyond 8 seconds, Sparkle's drone healing increasing beyond 40 HP. Prioritize Evolution energy accumulation through consistent Restore Energy pickups.
Advanced Positioning Strategies for Ranked Mode
Ranked mode's competitive environment demands refined positioning that balances aggressive kill-seeking with survival-focused decision-making. Restore Energy strategies must incorporate positioning discipline that enables kill chains without exposing you to unrecoverable situations.
Zone Control and Rotation Timing
Establish control over high-value zones before enemy concentrations arrive to gain first-strike advantages. Rotate toward circle centers or objective points 30-45 seconds before major player influxes, securing defensive positions that cover multiple approach angles.
Rotation patterns between multiple combat zones maintain target availability when individual zones experience temporary lulls. Identify 2-3 nearby high-traffic areas and rotate between them based on audio cues, minimap activity, and engagement frequency.
Safe rotation routes incorporate cover that conceals movement between zones. Avoid open-ground sprinting between positions—use buildings, terrain features, and smoke grenades to mask repositioning.
Elevation Advantages and Vertical Gameplay
Elevated positions provide superior sightlines while reducing incoming damage angles. Rooftops, second-floor windows, and hillside positions enable you to engage targets before opponents achieve effective return fire range.
Vertical positioning requires awareness of ascent routes that enemies might use to challenge elevated positions. Monitor stairwells, ladders, and climbable surfaces while maintaining primary focus on ground-level targets.
Identify multiple descent routes before establishing elevated positions, ensuring escape options exist if situations deteriorate. The mobility to transition between vertical levels maintains unpredictability.
Cover Utilization During Aggressive Pressure
Maintain offensive pressure while utilizing cover by positioning that allows quick concealment without breaking line-of-sight to targets. Corner positions, partial walls, and deployable shields enable you to peek for damage then immediately return to cover.
Cover positioning should account for the 30% health auto-pickup threshold, ensuring you can retreat to full concealment when health drops toward trigger levels. Engage from cover edges rather than open positions.
Dynamic cover transitions between engagements prevent enemies from pre-aiming known positions. After securing eliminations, immediately reposition to adjacent cover rather than remaining stationary.
Common Mistakes That Break Kill Chains
Understanding chain-breaking mistakes enables you to recognize and avoid situations that prematurely end promising elimination streaks.
Overextension Beyond Sustainable Range
Pursuing fleeing targets beyond supportable distances separates you from cover, teammates, and favorable positioning. The temptation to secure one more kill often leads into unfamiliar territory where multiple enemies converge.
Sustainable engagement range correlates with weapon effective distance and available cover density. Players using close-range weapons like the P90 or Bizon should avoid pursuing targets beyond 30m, as damage falloff reduces lethality.
Set mental boundaries before initiating chains—deciding I'll engage within this building complex or I'll control this 50m radius provides clear limits that prevent chase-induced overextension.
Poor Target Selection and Engagement Sequencing
Engaging the most threatening target first rather than the most vulnerable often results in prolonged fights that drain health. Optimal target selection prioritizes isolated, distracted, or low-health enemies that enable quick eliminations.
Challenging grouped enemies simultaneously divides damage output while concentrating incoming fire. Isolate individual targets from groups through positioning or ability usage, securing eliminations sequentially.
Target prioritization should account for enemy weapon loadouts—opponents with sniper rifles or long-range weapons pose greater threats from distance and should be engaged first when approaching groups.
Ammunition Management and Reload Timing
Depleting primary weapon ammunition mid-engagement forces emergency weapon switches or vulnerable reload timing. Monitor ammunition counts during fights and reload during brief gaps between eliminations.
Carry complementary weapon types to enable switching during primary reloads, maintaining offensive capability throughout reload cycles. Pair high-capacity weapons like the Bizon or RPK with quick-reload secondaries.
Ammunition scarcity during extended chains requires looting eliminated enemies for resupply. Loot during maximum health periods rather than when damaged, as stationary positioning during looting prevents evasive movement.
Countering Enemy Restore Energy Strategies
Understanding how to counter Restore Energy builds provides defensive knowledge that improves both offensive chain execution and defensive survival against enemy chains.
Identifying Restore Energy Users
Players consistently pushing aggressively after eliminations likely utilize Restore Energy strategies. Observing enemies immediately engaging new targets after securing kills rather than healing indicates Restore Energy reliance.
Monitor enemy health during engagements—opponents whose health suddenly increases mid-fight after securing teammate eliminations are clearly benefiting from Restore Energy pickups. This should trigger immediate tactical adjustments.
Audio cues from rapid consecutive eliminations in nearby areas suggest active enemy kill chains. Establish defensive positions that force chain-focused enemies to engage on unfavorable terms.
Burst Damage Concentration
Overwhelming Restore Energy regeneration requires burst damage that depletes health faster than pickups restore it. Coordinate team focus-fire, explosive weapons, or high-damage sniper shots to create damage spikes within 2-3 second windows.
Explosive weapons and grenades prove particularly effective as they deal unavoidable area damage that forces enemies into defensive positions, breaking their offensive momentum.
High-damage weapons like sniper rifles or DMRs enable two-shot eliminations that minimize the time enemies have to collect Restore Energy between damage instances.
Disrupting Combat Flow
Utility abilities that slow, stun, or disorient enemies break the fluid combat flow necessary for kill chain maintenance. Smoke grenades obscure vision, flashbangs create vulnerability windows, and movement-impairing abilities prevent aggressive positioning.
Maintain distance from aggressive enemies to force them to cross open ground where they're vulnerable to concentrated fire. Rather than accepting close-range engagements, retreat while dealing damage.
Third-party interference during enemy kill chains exploits their divided attention and potentially depleted resources. Wait until they engage other opponents before attacking to catch them during vulnerable moments.
FAQ
What is Restore Energy in Blood Strike Season 15?
Restore Energy appears in Loot Crates after defeating enemies, restoring health and armor, granting Evolution energy, and reducing skill cooldowns. It launched January 8, 2026 in Battle Royale Matchmaking/Room modes and January 15, 2026 in Ranked/Peak modes, with restoration scaling based on enemy armor levels up to maximum benefits from Level 3 armor eliminations.
How does auto-pickup work for Restore Energy?
Auto-pickup triggers automatically when player health drops below 30% or armor becomes fully depleted, eliminating manual collection delays. This ensures you maintain offensive pressure without interrupting aim or movement, enabling clutch recoveries during multi-opponent engagements.
Which weapons are best for maintaining Restore Energy kill chains?
The P90 SMG (18 damage, 900 RPM, 50 rounds, 15-25m range), Bizon SMG (16 damage, 750 RPM, 64 rounds, 12-22m range), and RPK LMG (24 damage, 600 RPM, 75 rounds, 20-35m range) offer optimal low-recoil platforms. Proper attachments including compensators, foregrips, and extended barrels maximize accuracy and range.
How do Evolution tiers interact with Restore Energy?
Restore Energy pickups grant Evolution energy toward tier progression: Tier 1 requires 100 points, Tier 2 needs 250 points and provides 15% cooldown reduction, and Tier 3 demands 500 points for 25% enhanced effects. The cooldown reduction at Tier 2 compounds with Restore Energy's per-pickup cooldown reduction.
What characters have the best Restore Energy synergies?
Ghost benefits from 8-second cooldown reduction per pickup on his 25-second invisibility ability, enabling near-constant stealth during chains. Sparkle's healing drone cooldown drops from 30 to 22 seconds per pickup, with the drone restoring 40 HP over 5 seconds for dual-layered regeneration.
How do I counter enemies using Restore Energy builds?
Coordinate burst damage through team focus-fire to overwhelm regeneration, use explosive weapons for unavoidable area damage, and deploy utility abilities like smoke or flashbangs to disrupt combat flow. Maintain distance to force enemies across open ground, and exploit third-party opportunities when they're engaged with other opponents at low health.


