Understanding Yun Jin's C6 Mechanics and Mavuika Synergy
Yun Jin's Elemental Burst delivers 244% AoE Geo damage while granting party members Normal Attack damage bonus based on DEF. At talent level 10: 57.89% of total DEF converts to flat damage per Normal Attack hit.
Her passive Breaking Conventions adds 2.5% DEF per unique element in party (max 11.5% with 4 elements). At 2500 DEF, she provides ~145-150% DEF as bonus damage per hit across 30 triggers over 12 seconds.
C6 unlocks 12% Normal Attack speed increase for buffed characters. For Mavuika's Flamestrider (4-hit combo at 60% ATK scaling), this compresses rotation timing and fits additional attacks within buff windows.
Mavuika's Flamestrider gains 200 Base ATK but suffers 20% DEF reduction. Yun Jin's flat damage adds consistent value regardless of ATK fluctuations, creating stable damage floor.
For character development resources, Top Up Genesis Crystals Cheap through BitTopup ensures primogems for constellation pulls with competitive pricing and instant delivery.
How Yun Jin's Normal Attack Damage Bonus Works
Flat additive value applied before damage multipliers. Formula: (Yun Jin's Total DEF × 57.89% at L10) + Breaking Conventions bonus = Flat Damage per hit. Then multiplied by CRIT, Elemental DMG%, resistance modifiers.
30-trigger quota is shared pool. Mavuika's 4-hit combo consumes 4 stacks—allows ~7.5 complete combos solo. Multi-character rotations distribute stacks across team.
Energy cost: 60 with 15s cooldown creates 3s gap. Recommended ER: 200% solo Geo, 240-270% without Geo resonance. With Favonius Lance: 195-210%.
C6 Constellation Breakdown: Attack Speed Bonus
12% speed = ~0.12s saved per attack. For Mavuika's 4-hit sequence: ~0.5s saved per combo—enough for additional Charged Attack within buff windows.
Speed doesn't increase per-hit damage but boosts DPS through higher hit frequency. Improves dodge-cancel responsiveness.
Constellation value: C0-C2 provides core functionality. C2 adds 15% Normal Attack DMG for 12s. C6 is final optimization layer, not game-changing.
Why Mavuika's Normal Attack Playstyle Benefits
Flamestrider emphasizes rapid 60% ATK scaling strikes. Damage accumulates through volume. Yun Jin's flat damage elevates each hit's floor value.
12s buff duration aligns with standard 15-20s rotation cycles. Covers critical damage window when Mavuika's buffs peak.
Geo element doesn't interfere with Pyro reactions. Mavuika maintains Vaporize/Melt access while benefiting from Normal Attack buffs.
Damage Calculation: Yun Jin's Impact on Mavuika's DPS
Baseline Mavuika (L90, 2113 ATK, 56.54% CR, 228.41% CD): Flamestrider Normal Attack produces ~1900 damage per hit pre-mitigation.

Adding Yun Jin (2500 DEF, L10 Burst): 2500 × 0.5789 = 1447 flat damage. With 4-element team, Breaking Conventions adds 287 damage = 1734 total per hit.
New damage: (1268 + 1734) × CRIT multipliers = ~5700 per hit—200% increase pre-mitigation.
Against L100 enemies with 10% Pyro resistance: effective increase 40-60% depending on total damage formula.
30 triggers × 1734 = 51,900 total bonus damage. Practical consumption: 20-25 stacks = 34,680-43,350 bonus per rotation.
Scaling Analysis: Defense to Damage Conversion
Yun Jin L90 base DEF: 734. Reaching 2500 DEF requires:
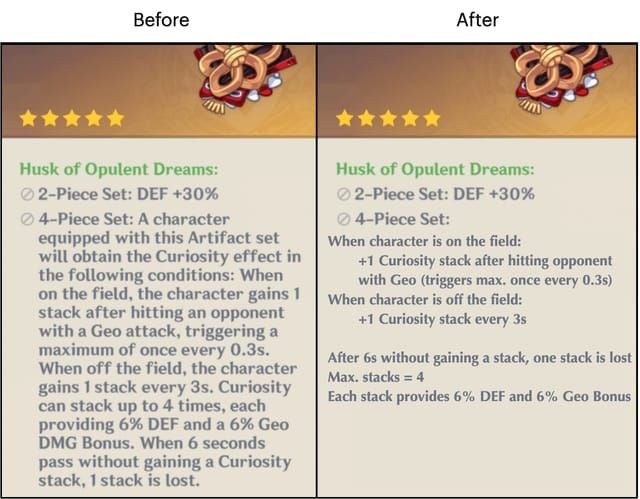
- Husk 4pc: 54% DEF (30% + 24% stacks)
- DEF% Sands + Goblet: 116.6%
- Substats: ~30%
- Calculation: 734 × (1 + 0.54 + 1.166 + 0.30) = ~2200 DEF
Footprint of the Rainbow adds 51.7% DEF (379 DEF) → ~2580 total with optimized artifacts.
Favonius Lance/The Catch sacrifice DEF for ER → 2200-2300 DEF.
Each 100 DEF adds ~58 damage per Normal Attack at L10 Burst. Linear scaling, no diminishing returns.
Breaking Conventions: mono-Pyro = 0 bonus. Rainbow team = 287 damage at 2500 DEF.
Attack Speed Interaction: Stack Wastage?
Mavuika's 4-hit combo: 2.5s base, 2.2s with 12% speed = 0.3s saved.
Over 12s: 4.8 combos without buff vs 5.45 with C6 = 19.2 vs 21.8 triggers consumed. Both within 30-stack quota.
Additional 2.6 triggers = 4,500 extra damage. Faster attacks increase total output, don't waste stacks.
Wastage only relevant when multiple characters share consumption. Optimized rotations stagger field time.
Support Comparison: Yun Jin vs Top Alternatives
Bennett: Provides ~1150 ATK buff at C5 L13, healing, Pyro resonance. 54% damage increase applies to ALL damage instances. Consolidates multiple roles.
Yun Jin's 1734 flat damage competitive numerically but only buffs Normal Attacks. Bennett's versatility favors team slot efficiency.
Yun Jin advantages: Geo doesn't interfere with reactions. In Xingqiu/Yelan teams, Bennett's Pyro can steal Vaporize.
Yun Jin vs C6 Candace
Candace: 37.5% Normal Attack DMG at L10 Burst. At 40k HP = percentage-based scaling.
For Mavuika's 1268 base damage: Candace adds 475 per hit vs Yun Jin's 1734 flat damage.
C6 Candace: +3s duration, +20% damage for Hydro-infused characters. Mavuika's Pyro infusion can't be overridden—loses C6 value.
Candace provides Hydro application for Vaporize. Reaction access potentially doubles Pyro damage.
Yun Jin vs Kazuha/Sucrose
Kazuha: 35-40% Pyro DMG% with 900-1000 EM. Applies to all Pyro damage.
Elemental DMG% occupies different formula slot—stacks multiplicatively with Yun Jin. But team slots force choices.
Sucrose: EM sharing + VV 4pc (40% resistance shred) = 20-25% damage increase.
Anemo supports excel in reaction teams. Yun Jin shines in Normal Attack-focused, non-reaction comps.
Investment Analysis: Resource Requirements
Character ascension (1→90):
- 168 Glaze Lilies, 46 Riftborn Regalia, mask materials
- 420,000 Mora
Talent leveling:
- 9 Teachings, 63 Guides, 114 Philosophies of Diligence
- 18 Ashen Hearts, 3 Crowns (triple-crown)
- 4,957,500 Mora
- ~1,200-1,400 resin
Artifacts:
- Functional 4pc Husk: 30-40 condensed runs (2,400-3,200 resin)
- Optimized substats: 50-80 runs (4,000-6,400 resin) = 27-43 days
Total resin: 7,600-11,600 (50-77 days natural regen)
Weapons:
- Favonius Lance: gacha/standard banner
- The Catch: 6-8 hours fishing
- Footprint of Rainbow: 0-12,800 primogems
Recharge Genshin Impact efficiently through BitTopup for Battle Pass materials, resin refreshes, primogems.
Constellation Requirements: C0 vs C6 Gap
C0 provides core functionality: same 1734 flat damage at 2500 DEF.
- C1: -18% Skill CD
- C2: +15% Normal Attack DMG for 12s (separate multiplier)
- C4: -20% DEF on Crystallize (minimal value)
- C5: +3 Burst levels
- C6: +12% attack speed
Performance gap: C0 achieves 75-80% of C6 value. C2+C6 combine for ~25-30% DPS improvement.
C0→C6 requires 7 copies = 70-100 pulls average (11,200-16,000 primogems). Opportunity cost: could secure limited 5-star instead.
Opportunity Cost vs Other Supports
Bennett: similar resin investment, broader applicability. Works in virtually every team.
Xingqiu/Yelan: Hydro application doubles Pyro damage via Vaporize. Value across multiple teams.
Yun Jin's specialization limits flexibility but fills niche when Bennett locked to second Abyss team.
4-star accessibility: appears in standard banner, shop rotations. Feasible for F2P over time vs limited 5-stars.
Optimal Yun Jin Build for Mavuika Teams
Artifact sets:
- Husk 4pc: 30% DEF + 24% DEF/Geo DMG at max stacks. Maximizes DEF scaling.

- Noblesse 4pc: 20% ATK to party for 12s. Universal buff, sacrifices 300-400 DEF.
- Husk 2pc + Emblem 2pc: Addresses ER needs, loses 24% DEF.
Main stats:
- Sands: DEF% or ER% (depends on weapon/team)
- Goblet: DEF%
- Circlet: DEF% or CRIT Rate (for Favonius)
Substats priority:
- DEF% (15-20% per artifact)
- Energy Recharge (10-15%)
- CRIT Rate (40-50% for Favonius)
Flat DEF provides minimal value: 19 per roll vs 48 from 6.6% DEF%.
ER breakpoints:
- Solo Geo: 240-270%
- Dual Geo: 200-220%
- Favonius teams (50% CR): 195-210%
Weapon Recommendations
Favonius Lance (Best 4-star):
- 30.6% ER at L90

- R5: 60% chance for 6 particles on CRIT
- Reduces artifact ER requirements
- Benefits entire team
The Catch:
- 45.9% ER, +32% Burst DMG, +12% Burst CR at R5
- Burst DMG only affects Yun Jin's 244% scaling (negligible)
- Suits teams with sufficient energy generation
Footprint of the Rainbow:
- 51.7% DEF, +16% DEF on reactions
- Maximizes DEF → 2600-2700 total
- No ER creates energy challenges
Engulfing Lightning:
- 55.1% ER, converts excess ER to ATK
- Too valuable for other characters (Raiden, Xiangling)
Best Team Compositions
Optimal rotation (Geo-heavy): Yun Jin → Gorou → Mavuika → Xilonen

- Yun Jin hold Skill (counter) → Burst
- Gorou Skill → Burst (DEF%/Geo DMG buffs)
- Mavuika Skill → Burst (Flamestrider)
- Xilonen Skill → 2 Normal Attacks → Burst
- Swap to Mavuika for Normal Attack sequences
Maximizes DEF synergies, Geo resonance (+15% DMG).
F2P: Mavuika, Yun Jin, Xingqiu, Flex
Xingqiu enables Vaporize, provides damage reduction/healing.
Flex options:
- Bennett: ATK buffs, healing, Pyro resonance
- Fischl: Electro application, Overload
- Sucrose: EM sharing, grouping
- Zhongli: shields, resistance shred
Premium: Mavuika, Yun Jin, Yelan, Zhongli
Yelan: Hydro application, personal damage. Zhongli: shields, universal shred. Maximum damage + survivability.
Noblesse Assignment
Yun Jin = ideal carrier when no other support needs specific 4pc.
DEF-scaling doesn't benefit from Noblesse ATK buff. Only gains 2pc Burst DMG.
Mavuika, Xingqiu, teammates gain 20% ATK—improves team damage 8-12%.
Alternatives: Bennett (diminishing returns with his ATK buff), Xingqiu (loses Emblem 4pc value).
Rotation Optimization
Perfect execution:
- Yun Jin hold Skill (counter for energy) → Burst immediately
- Support buffs (Gorou, Bennett, etc.)
- Mavuika Skill → Burst
- Normal Attack combos during 12s window
Timing precision: Cast Yun Jin Burst right before Mavuika field time. Casting early wastes duration on swaps.
Energy funneling: Catch Yun Jin's Geo particles before swapping. Favonius procs → swap to energy-hungry characters.
Common Mistakes
- Casting Yun Jin Burst at rotation start → wastes 50-66% buff duration on swaps
- Normal Attacking on supports → wastes triggers
- Neglecting ER requirements → Burst unavailable every rotation
- Yun Jin Burst Geo damage creates Crystallize → can consume elemental auras in reaction teams
When Yun Jin Excels vs Alternatives
Yun Jin excels:
- Sustained Normal Attack scenarios (10-15s Mavuika field time)
- Single tanky bosses (Perpetual Array, Ruin Serpent)
- Multiple waves with high HP
- When Bennett locked to second Abyss team
Yun Jin struggles:
- Quick-swap teams (even field time distribution)
- Mavuika as Burst sub-DPS (not Normal Attack carry)
- AoE with numerous weak enemies (Anemo grouping better)
- Content requiring healing/cleansing (Bennett non-negotiable)
Team Slot Limitations
Bennett irreplaceable when:
- Corrosion, energy drain, elemental damage floors
- No other healer/shielder available
- Early-game limited rosters
Late-game: fielding two Abyss teams. If Bennett supports Team 1, Yun Jin buffs Team 2 Mavuika.
Common Misconceptions
Myth: Needs rainbow teams Breaking Conventions adds 287 damage at 2500 DEF. Base scaling provides 85-90% of value. Mono/dual-element teams remain functional.
Myth: Fast attacks waste stacks Mavuika consumes 22-24 stacks over 12s even with C6 speed. 6-8 triggers unused. No wastage.
Myth: C6 mandatory C0 achieves 70-80% of C6 value. Functional at any constellation.
Truth: 12s duration, 15s CD = 3s gap Requires 200-270% ER for consistent uptime. 30 triggers shared across party—optimize rotations.
Final Verdict: Worth Building in 2025?
Yes if:
- Already own C4-C6 from incidental pulls
- Built core supports (Bennett, Xingqiu, Kazuha)
- Need second Abyss team Normal Attack buffer
- Late-game roster depth
No if:
- Early-game (AR <45)
- Lack universal supports
- C0-C2 without excess resources
- Mavuika used as Burst sub-DPS
Yun Jin occupies niche role, not universal meta. Specialized Normal Attack focus limits flexibility vs Bennett/Kazuha.
Future-proof: 4-star accessibility creates stable value floor. Remains functional regardless of power creep.
Investment by Account Type
Early-game (AR 1-45): Skip. Build Bennett, Xingqiu, Fischl first.
Mid-game (AR 45-55): Build if C2+ and core supports done. Accept suboptimal artifacts initially.
Late-game (AR 55+): Worthwhile for Abyss diversity. Target 2400+ DEF, 200%+ ER.
Whale: Build C6 with premium weapons, perfect artifacts for min-maxed performance.
FAQ
Does C6 Yun Jin work with Mavuika's Normal Attacks? Yes. At 2500 DEF, grants 1734 flat damage per hit across 30 triggers. C6 adds 12% speed. Increases Normal Attack DPS 40-60%.
Yun Jin vs Bennett for Mavuika? Bennett: universal value, heals, buffs entire kit. Yun Jin: specialized Normal Attack damage, higher per-hit for Normal Attacks only. Choose Bennett for general use, Yun Jin when Bennett locked to second team.
How much DEF needed? Target 2400-2500 DEF. Requires DEF% Sands/Goblet, Husk 4pc, ~30% substats. At 2500 DEF with L10 Burst: 145-150% DEF as damage bonus.
Best teammates? Xingqiu (Vaporize, damage reduction), Zhongli (shields, shred), Gorou (DEF synergy), Bennett (heals, ATK). Choose based on content/roster.
Worth building from scratch? Only if C2+ and core supports built. Requires 40-60 days resin (7,600-11,600 total). Lower priority than Bennett/Xingqiu/Kazuha.
Does buff snapshot? No. Damage bonus applies dynamically based on DEF when Burst cast. Remains constant through 12s duration. Only affects Normal Attacks during active window.
Need Genesis Crystals for constellations? BitTopup offers reliable, affordable Genshin Impact top-ups. Instant delivery, secure transactions, exclusive discounts. Power up at BitTopup!


