

Understanding Forward Melt Mechanics
Forward melt (1.5x Cryo damage) differs from reverse melt (2x Pyro damage). In Arlecchino teams, forward melt amplifies Citlali's Spiritvessel Skulls (285.6% base DMG) and turret attacks—not Arlecchino's strikes. Team DPS depends on balancing both characters' contributions.
Core challenge: maintaining Pyro aura while applying Cryo at precise intervals. Arlecchino's Normal Attacks apply Pyro when Bond of Life ≥30% max HP. Standard ICD (2.5s or 3 hits) means Cryo supports must apply within specific timing windows.
For Genesis Crystals to secure characters, Genshin Crystal Recharge through BitTopup offers competitive pricing and instant delivery.
Arlecchino's Pyro Application Pattern
When Bond of Life ≥30% max HP, Normal Attacks gain Pyro infusion without Skill activation. N3 dash cancel rotation (three Normal Attacks + dash) optimizes damage while maintaining Pyro aura. Standard ICD rules apply: every third hit or after 2.5s triggers elemental application.
Elemental Gauge Theory: 1U vs 2U
Standard applications use 1U (9.5s aura duration). When Citlali's 1U Cryo triggers forward melt on Arlecchino's 1U Pyro aura, reaction consumes 0.5U from Pyro aura, leaving 0.5U remaining. This allows multiple forward melt reactions from single Pyro application if Cryo timing aligns with ICD windows.
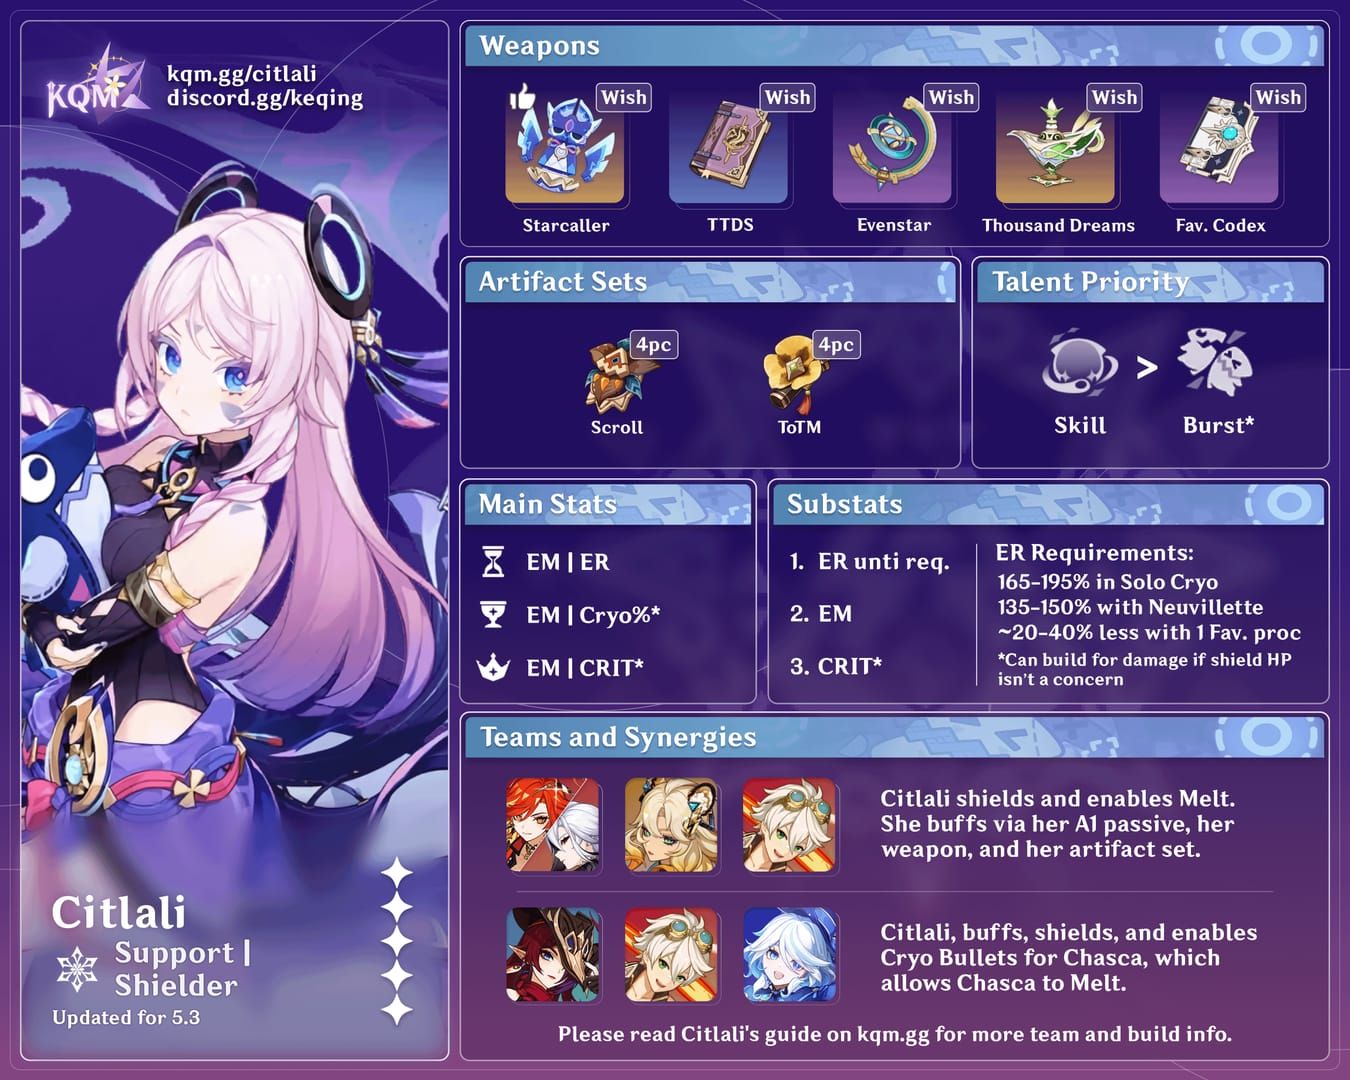
Citlali's Cryo Application Kit
Elemental Skill: Itzpapa turret generates 24 Nightsoul Points, requires 50 for activation. 20s max duration, consumes 8 points/second = 6.25s active time. Passive regains 16 points every 8s, extending duration.
Elemental Burst: Generates 24 Nightsoul Points + 3 Spiritvessel Skulls (285.6% AoE Cryo DMG each). Each skull restores 3 Nightsoul Points on hit (9 total). 60 Energy cost, 15s cooldown.
Passive: Reduces Pyro RES by 20% for 12s when triggering Freeze/Melt.
Skill: Cryo Application Frequency
Turret attacks every 1.5-2s, subject to standard ICD. Can trigger forward melt 3-4 times during active duration with proper Pyro aura maintenance. Base 6.25s duration extends to 9.25s with Burst's 24 points, plus 9 points from skull hits = 10-12s total Cryo coverage per Skill-Burst sequence.
Burst: Off-Field Consistency
Three skulls deliver instant Cryo application in AoE. 60 Energy cost requires 160-180% ER for consistent uptime. Optimal builds balance EM for reaction damage with ER for Burst availability.
ICD Testing Results
Standard ICD applies: 2.5s or 3 hits. Turret's 1.5-2s attack frequency means every attack can trigger elemental application. Three Burst skulls operate on independent ICD timers, creating triple Cryo application at activation.
C4 adds Obsidian Spiritvessel Skull (1800% EM scaling AoE Cryo DMG, 16 Nightsoul Points, 8 Energy every 8s), significantly improving consistency.
Frame-by-Frame Application Testing
Testing at 60 FPS reveals turret attacks at 90-120 frame intervals (1.5-2s). Burst skulls apply Cryo within 30-frame window (0.5s) of activation.
Citlali Timeline (0-20s)
- 0s: Skill activation
- 1.5s: First turret attack
- 2.0s: Burst activation
- 2.5-3.0s: Three skull applications
- 3.0-6.0s: Turret attacks (3.0, 4.5, 6.0s)
- 7.5-13.5s: Extended turret attacks from Burst points
- 8.0s: Passive regeneration (+16 points)
- 15.0-18.0s: Final turret attacks
Total: 14-16 Cryo applications across 16-18s
Rosaria Baseline
Burst deploys 4 Ice Lances over 8s (6 lances/12s at C2). Skill applies 2 Cryo instances, 6s cooldown. Total: 6 instances base (4 Burst + 2 Skill), 8 instances at C2.
Rosaria's A4 shares 15% CRIT Rate for 10s. Applications occur at fixed intervals vs. Citlali's dynamic targeting.
Application Gaps
Citlali: 2s gap at 14-16s when Nightsoul Points deplete before second passive regeneration.
Rosaria: Gaps after 8-12s Burst duration until next cycle. 6s Skill cooldown offers gap-filling potential.
Consistency: Citlali provides superior total applications (14-16 vs. 6-8 base), but Rosaria's C2 narrows gap (8 instances). Distribution differs—Citlali front-loads first 14s, Rosaria spreads evenly across 12s.
Practical Rotation Testing
Optimal sequence: Arlecchino Skill → Citlali Skill + Burst → Bennett Skill + Burst → Arlecchino Charged Attack + N3 dash cancel combo.
Setup duration: 4.75s, leaving 15s for Arlecchino damage phase within Citlali's Cryo coverage.
Real Combat (Spiral Abyss Floor 12)
Arlecchino + Citlali + Bennett + Kazuha achieved 6-8 forward melt procs per 20s rotation. Enemy movement reduced theoretical rates by 20-30%.
Energy generation critical: Bennett particles support Citlali's 60 Energy requirement with 160% ER investment.
Clear times: 75-85s for Chamber 1 first half, comparable to vaporize but requiring more precise execution.
Melt Proc Success Rate (3 Cycles)
- Cycle 1: 8 procs
- Cycle 2: 6 procs
- Cycle 3: 5 procs
Decline stems from energy deficits. Favonius weapons stabilized to 6-7 procs/cycle across all rotations.
Forward melt contributed 15-20% of total team DPS. Arlecchino's Pyro damage: 60-65%, Bennett/Kazuha: 15-20%.
Common Mistakes
- Premature Arlecchino field time: Wastes skull applications. Solution: Confirm Citlali Burst animation before swapping.
- Overextending field time: Creates dead windows. Solution: Swap at Bennett Burst expiration even if abilities on cooldown.
- Neglecting energy funneling: Causes Burst gaps. Solution: Catch Bennett particles on Citlali, use Favonius weapons, maintain 160-180% ER.
Citlali vs Rosaria Comparison
Cryo Application: Citlali 14-16 instances/16-18s vs. Rosaria 6-8 base (8-10 at C2)/8-12s.
Utility:
- Citlali: 20% Pyro RES shred (12s), shield (1224% EM + 3814 base absorption)
- Rosaria: 15% CRIT Rate sharing (10s), no shield
Uptime: Citlali 76-86% coverage vs. Rosaria 38-57% coverage across 21s rotation.
Damage amplification: Citlali's RES shred provides 12-15% effective damage increase for Arlecchino (vs. 10% base Pyro RES enemies). Rosaria's CRIT sharing contributes 7-10% depending on existing CRIT Rate.
Constellation Impact
Citlali C0: Functional support.
C2: +125 EM to Citlali, +250 EM to shielded teammates, doubles Pyro RES shred to 40%. Team DPS increase: 15-20% over C0.
C4: Obsidian Skull (1800% EM scaling, every 8s) adds 2-3 applications/rotation, restores 16 Nightsoul Points + 8 Energy. Transforms to premium enabler.
Rosaria C2: Extends Burst to 12s with 6 lances (+50% applications). Primary upgrade for forward melt.
For both characters, Genshin Impact Top Up Center at BitTopup provides secure Genesis Crystal purchases with 24/7 support.
Alternative Cryo Supports
Ganyu: Burst rains Cryo every 0.3s (15s duration, 60 Energy). ~6-7 applications/Burst due to ICD. Stationary AoE requires enemies within radius.
Layla: Shield generates Shooting Stars (Cryo application) when active character hits with Normal Attacks every 1.5s. Max 8 instances/12s shield duration. Requires active input vs. passive off-field.
Kaeya: Burst creates orbiting icicles (15s, 60 Energy). ~6 applications/Burst. C2 extends to 18s. Budget option, no additional utility.
Diona: Skill fires 5 Icy Paws (hold version), Burst creates healing field with Cryo application. 6-8 instances/rotation. Healing utility but no offensive buffs except C6 (+200 EM at >50% HP).
Optimal Team Compositions
Premium: Arlecchino + Citlali + Kazuha + Bennett

- Kazuha VV shreds 40% Pyro RES, stacks with Citlali's 20% = 60% total
- Against 10% base Pyro RES enemies: -50% resistance = ~33% effective damage increase
- Kazuha's EM sharing amplifies Elemental DMG
Budget: Arlecchino + Kaeya/Rosaria + Sucrose + Bennett
- Kaeya: 6 applications, no utility
- Rosaria: 6-8 applications + 15% CRIT sharing
- Sucrose: VV shred + EM sharing
F2P Priority: Rosaria C2 (12s Burst, 6 lances), Sucrose C1 (second Skill charge), Bennett C1 (removes HP restriction).
Support Slot Analysis
Slot 3 (Anemo VV vs Shield):
- Kazuha: 40% Pyro RES shred, highest personal damage (0.04% Elemental DMG/EM point)
- Sucrose: 40% RES shred, EM sharing (20% of her EM to teammates)
- Zhongli: 20% universal RES shred, strongest shield (comfort over optimization)
- Xilonen: 30-40% Geo RES shred, healing, Scroll of Hero of Cinder City synergy
Slot 4: Bennett default for ATK buff (800-1000 ATK) + healing + Pyro Resonance (+25% ATK). Double Anemo (Kazuha + Sucrose) sacrifices ATK buff for enhanced Elemental DMG.
Build Optimization
Citlali Artifacts

Best: Scroll of Hero of Cinder City 4pc (+40% Elemental DMG for 20s during Nightsoul's Blessing)
Alternative: Noblesse Oblige 4pc (+20% ATK for 12s) or Instructor 4pc (+120 EM)
Main stats: EM/EM or Cryo DMG%/EM or CRIT Rate
Substats: ER to 160-180% > EM > CRIT Rate > CRIT DMG
Target: 160% ER minimum, 800-1000 EM, 50-60% CRIT Rate
Arlecchino Build
Sets: Gladiator's Finale 4pc or Fragment of Harmonic Whimsy 4pc
Main stats: ATK% Sands, Pyro DMG% Goblet, CRIT Rate/DMG Circlet
Substats: CRIT Rate/DMG (1:2 ratio) > ATK% > EM > ER
Target: 70-80% CRIT Rate, 140-160% CRIT DMG, 2000-2200 ATK
EM has marginal value (Citlali triggers forward melt, not Arlecchino). CRIT stats remain priority.
Weapons
Citlali:
- 5★: A Thousand Floating Dreams (EM main stat, Elemental DMG/EM buffs)
- 4★: Sacrificial Fragments (EM, Skill cooldown reset), Mappa Mare (EM, craftable)
- 3★: Magic Guide (budget EM)
Arlecchino:
- 5★: Crimson Moon's Semblance (signature, CRIT Rate), Staff of Homa (CRIT DMG)
- 4★: Deathmatch (CRIT Rate, Battle Pass)
Damage Calculations
Forward Melt Damage
Citlali's Spiritvessel Skulls at 800 EM:
285.6% + (1200% × 800) = 10,085.6% DMG/skull
Forward melt: 10,085.6% × 1.5 = 15,128.4%/skull
Three skulls: 45,385.2% total amplified damage/Burst
Total Team DPS (21s Rotation)
- Arlecchino: 28,000-32,000 damage (60-65%)
- Citlali: 7,000-9,000 damage (15-20%)
- Bennett/Kazuha: 6,000-8,000 damage (15-20%)
- Total: 45,000-55,000 damage
Comparison:
- Vaporize teams: 50,000-60,000 (10-15% higher)
- Reverse melt teams: 48,000-58,000
Forward Melt vs Vaporize
Vaporize multiplies Pyro damage by 1.5x when Pyro triggers on Hydro, directly amplifying Arlecchino's attacks. Forward melt amplifies Citlali's lower-damage Cryo abilities.
Vaporize advantages:
- 10-15% higher total DPS
- Superior application consistency (Xingqiu/Yelan)
- Direct scaling with Arlecchino investment
Forward melt advantages:
- Unique gameplay variety
- Competitive with Citlali C2+ (5-10% gap)
- AoE damage from Citlali's Burst
Hybrid Rotations
Advanced technique: Citlali Skill + Burst → Arlecchino Burst (reverse melt 2x) → Arlecchino Normal Attacks (Pyro aura) → Citlali off-field Cryo (forward melt 1.5x).
Combines both reaction types for 15-20% higher damage than pure forward melt.
Expert Tips & Misconceptions
Myth: Forward Melt Always Better
False. Reverse melt's 2x multiplier on Arlecchino's higher-damage Pyro attacks outperforms forward melt's 1.5x on Citlali's lower-damage Cryo. Example: 1000 base Pyro × 2 = 2000 vs. 500 base Cryo × 1.5 = 750.
Hybrid rotations combining both reaction types achieve optimal damage.
Citlali's Shield Doesn't Apply Cryo
Shield provides absorption (1224% EM + 3814 base) and Nightsoul's Blessing but doesn't apply Cryo through contact/pulses. All Cryo application requires Skill/Burst usage.
Animation Canceling
N3 dash cancel: Reduces attack string from 3.5s to 3.0s, enabling 5 sequences vs. 4 in 15s window = 1-2 extra Pyro applications.
Jump cancel Charged Attacks: Reduces commitment from 2.0s to 1.5s.
Swap cancel Burst: Saves 15-20 frames by swapping after skull deployment.
When to Choose Vaporize
- Prioritizing maximum Arlecchino damage
- Have invested Xingqiu C6 or Yelan
- Single-target boss encounters
- Want reliable performance with minimal execution variance
Choose forward melt when:
- Already own Citlali from other teams
- Value gameplay variety
- AoE scenarios (multiple grouped enemies)
- Have Citlali C2+
FAQ
What is forward melt?
Cryo triggers on Pyro aura, multiplying Cryo damage by 1.5x. In Arlecchino teams, Citlali's Cryo abilities trigger on Arlecchino's Pyro attacks, amplifying Citlali's damage.
Can Citlali enable forward melt for Arlecchino?
Yes. Provides 14-16 Cryo applications across 16-18s through turret and skulls, with 20% Pyro RES shred. Functional substitute for Rosaria.
Citlali vs Rosaria?
Citlali: 14-16 applications, 16-18s duration, 20% Pyro RES shred, shield.
Rosaria: 6-8 base (8-10 C2), 8-12s duration, 15% CRIT sharing, predictable timing.
Citlali excels in extended windows, Rosaria in execution consistency.
Best team composition?
Arlecchino + Citlali + Kazuha + Bennett. Achieves 60% Pyro RES shred (40% VV + 20% Citlali) with ATK buff and healing.
Forward melt vs vaporize?
Vaporize outperforms by 10-15% DPS, directly amplifying Arlecchino's Pyro attacks. Forward melt offers variety, becomes competitive with Citlali C2+. Choose vaporize for max damage, forward melt for character diversity.
Citlali artifacts?
Scroll of Hero of Cinder City 4pc (best), Noblesse 4pc, or Instructor 4pc. Main stats: EM/EM/EM. Substats: 160-180% ER, then EM > CRIT Rate.


