

Energy Generation Mechanics in Ayaka Freeze
Ayaka's 80-cost burst demands dedicated Cryo battery support. Same-element particles restore 3 Energy to active characters and 1.8 Energy off-field, while different-element particles provide only 1 Energy. This 3:1 ratio makes Cryo batteries essential—relying on Hydro/Anemo particles triples Energy Recharge requirements.
Ayaka needs ~140% Energy Recharge with proper battery support. Without adequate batteries, this balloons to 180-200%, sacrificing Crit Damage and ATK%. Top Up Genshin Impact Crystals through BitTopup for competitive pricing on Genesis Crystals.
Energy Recharge Breakpoints:

- Citlali solo battery: 170-185% ER
- Double Cryo with Citlali: 170-195% ER
- Charlotte battery: 220%+ ER
These assume 20-second rotations with full skill usage. Missing one skill cast disrupts entire sequences, compounding DPS losses throughout Spiral Abyss.
Citlali Energy Analysis
Citlali's skill has 16-second cooldown, generating Cryo particles while providing 20-second shield. Scroll 2-piece regenerates 6 Energy on Nightsoul Burst, reducing ER requirements by ~10%. The 4-piece adds 12% Elemental DMG for 15 seconds and 28% damage during Nightsoul's Blessing for 20 seconds.
Her 60-cost burst with 15-second cooldown allows 4 casts per minute versus Charlotte's 3, improving particle generation consistency.
C2 Impact: Heart Devourer's Travail doubles Hydro/Pyro RES shred from 20% to 40% while providing 125 EM to self and 250 EM to shielded allies. Transforms her into premium freeze buffer.
C4 Impact: Restores 8 Energy every 8 seconds plus 16 Nightsoul points, adding ~1 Energy/second. Reduces ER requirements by 15-20%. Combined with Scroll's 6 Energy, C4 Citlali achieves near-self-sufficiency.
With 2 Natlan characters, ER requirements drop to 145-150%, though traditional Ayaka Freeze rarely includes multiple Natlan units.
Weapon Options:
- Prototype Amber: Regenerates 12-18 Energy per burst cycle. HP% substat synergizes with shield scaling. Premier F2P choice.
- Favonius Codex: 45.9% ER substat. Generates 6 Energy particles every 6-12 seconds with crits. Requires 20-30% Crit Rate investment. Superior for team energy economy.
- Thrilling Tales: 48% ATK buff but zero energy generation, forcing higher ER through artifacts.
Charlotte Energy Analysis
Charlotte's 80-cost burst with 20-second cooldown creates substantial energy pressure. Base ATK of 173 at Level 90 exceeds Citlali's 127, providing stronger ATK-based buff scaling. 24% ATK% ascension stat amplifies support capabilities.
Her kit prioritizes healing and Cryo application over particle generation, ideal for comfort-focused teams. Healing scales with ATK, creating synergy with ATK% Goblet and Healing Bonus Circlet. ER% Sands mandatory for 220%+ threshold.
Constellation Breakpoints:
- C2: A Duty to Pursue Truth provides 10%/20%/30% ATK for 12 seconds based on hitting 1/2/3 opponents. Reaches max value in AoE scenarios.
- C4: Grants 10% increased damage to marked enemies while restoring 2 Energy up to 5 times (10 Energy total per burst). Reduces ER requirements by 12-15%.
- C6: Adds 180% ATK AoE Cryo damage healing for 42% ATK every 6 seconds. Improves freeze uptime and particle generation.
Weapon Recommendations:
- Favonius Codex: 45.9% ER substat addresses demanding energy needs. Generates 6 Energy particles every 6-12 seconds with crits. Requires 30-40% Crit Rate. Optimal choice.
- Prototype Amber: Healing amplification and 12-18 Energy restoration. HP% substat provides minimal value for ATK-scaling kit.
- Thrilling Tales: 48% ATK buff to next character. Zero ER substats force extreme artifact investment, often requiring ER% Sands plus multiple ER% substats.
For maximum Genesis Crystal value, Genshin Impact Recharge Cheap at BitTopup provides secure transactions with competitive rates.
Head-to-Head Comparison
Particle Generation:
- Citlali: 4 burst casts/minute (60-cost, 15s CD)
- Charlotte: 3 burst casts/minute (80-cost, 20s CD)
Citlali's frequency advantage provides more particle generation opportunities and weapon passive triggers.
Citlali's Scroll 2-piece provides 6 Energy per rotation. Charlotte lacks equivalent passive energy unless using Prototype Amber or achieving C4. This 6 Energy differential translates to ~10% ER reduction for Citlali.
Ayaka's ER Requirements:
- With Citlali: 140% ER baseline
- With Charlotte: 150-160% ER to compensate for reduced particle frequency
Rotation Timing: Citlali's 15-second burst CD becomes available 5 seconds before 20-second rotation reset, providing timing flexibility. Charlotte's 20-second CD offers zero flexibility, requiring precise execution.
Field Time:
- Citlali: 3-4 seconds per rotation
- Charlotte: 4-5 seconds per rotation
This 1-2 second difference reduces Ayaka's damage window by 5-10% in extended encounters.
Buff Consistency
Citlali Buffs:
- Mamaloaco's Frigid Rain: 20% Pyro/Hydro RES shred for 12 seconds (40% at C2)
- Applies to frozen enemies with Hydro aura, directly amplifying Ayaka's Cryo damage
- 12-second duration covers Ayaka's 5-second burst plus setup time
Charlotte Buffs:
- C2: 10%/20%/30% ATK for 12 seconds based on enemy count
- Requires multiple enemies for max value—inconsistent in single-target
- Boss encounters yield only 10% ATK; mob floors deliver full 30%
TTDS Compatibility: Both can hold Thrilling Tales (48% ATK for 10 seconds), but Citlali's lower base ATK and EM-scaling kit make her the natural TTDS holder when Charlotte builds ATK for healing.
Snapshot Mechanics: Ayaka's burst snapshots ATK and Crit on cast—Charlotte's ATK buff and TTDS apply to all 19 hits if active during animation. Citlali's RES shred applies dynamically per hit, requiring enemies to maintain Hydro aura throughout burst.
Optimal Sequence: Citlali burst → Charlotte burst → TTDS switch to Ayaka → Ayaka burst ensures all buffs remain active during damage window.
Practical Rotations
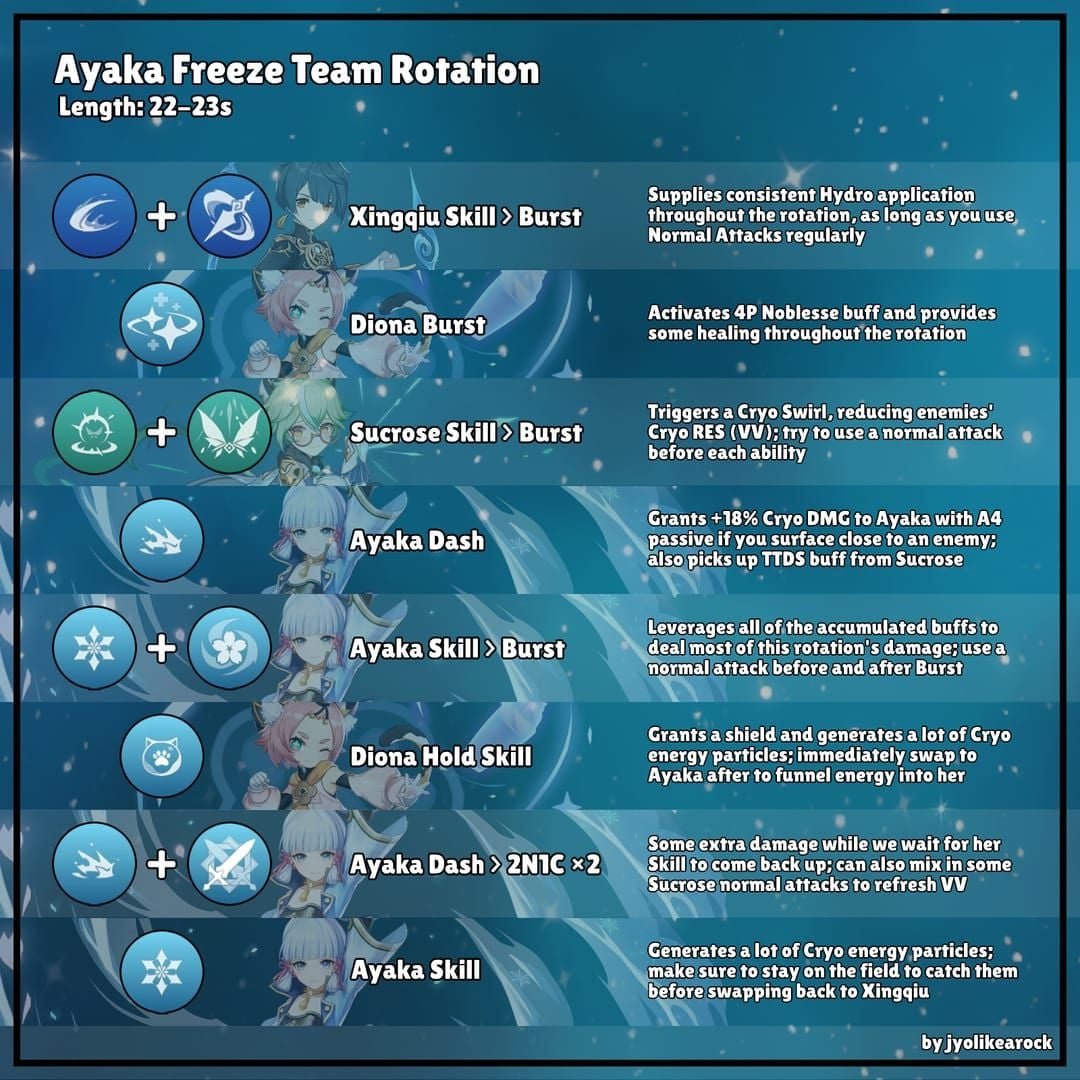
Standard Citlali Rotation (20s): Hydro skill → Citlali skill → Citlali burst → Anemo VV swirl → Ayaka dash → Ayaka burst → Ayaka charged attacks → repeat
Citlali's 16s skill CD and 15s burst CD refresh before rotation completes, providing 4-5 seconds flexibility for enemy movement or dodge windows.
Charlotte Rotation (20s): Hydro skill → Charlotte skill → Charlotte burst → Anemo VV swirl → Ayaka dash → Ayaka burst → Ayaka charged attacks → repeat
Charlotte's 20s burst CD aligns perfectly but offers zero timing flexibility. Missing burst by 1 second delays entire next rotation.
Hydro Applicator Adjustments:
- Mona: Citlali → Mona burst → Ayaka burst maximizes buff stacking. Charlotte's healing redundant with Mona's taunt.
- Kokomi: Charlotte's healing overlaps with Kokomi's, wasting team slot efficiency. Citlali's shield and RES shred provide distinct utility.
- Xingqiu F2P: Charlotte-Citlali-Xingqiu-Rosaria stacks energy-hungry characters, demanding Favonius weapons on multiple units. Rosaria provides Crit Rate for Favonius procs.
Team Synergy
Citlali Strengths:
- RES shred scales independently of team composition
- Shield enables aggressive positioning for Ayaka's melee-range burst
- Consistent value with Mona, Kokomi, or Xingqiu
Charlotte Strengths:
- Healing value increases in teams lacking dedicated healers/shields
- Benefits Mona freeze (zero defensive utility from Mona)
- Redundant in Kokomi freeze teams
Cryo Resonance: Both enable 15% Crit Rate against Cryo-affected enemies equally. Citlali's shield uptime ensures safer positioning to maintain freeze status, indirectly improving Crit Rate consistency.
Anemo Synergy:
- Kazuha: Both equally compatible—Citlali's EM-scaling and Charlotte's ATK-scaling ignore Kazuha's EM sharing in freeze.
- Venti: Energy refund restores 15 Energy to Cryo characters equally. Venti's grouping enables Charlotte's C2 to reach max 30% ATK consistently.
- VV 4pc: Stacks additively with Citlali's RES shred. Against 10% Cryo RES enemies, VV's 40% + Citlali's 20-40% Hydro shred creates substantial amplification. Charlotte provides no RES manipulation.
Investment Priority
F2P Players: Prioritize Charlotte—4-star availability through event wishes or Starglitter shop. C2 through natural pulls provides 80% max potential. Charlotte's lower investment ceiling makes her practical for resource-limited accounts.
Low Spenders: Evaluate Citlali's account-wide value beyond Ayaka freeze. Pyro/Hydro RES shred benefits melt and vaporize teams. Charlotte's healing applies universally across archetypes.
Constellation Value:
- Citlali C2: Doubles RES shred from 20% to 40% (100% increase in primary utility)
- Charlotte C2: Situational ATK buffs reaching max only in AoE
Citlali's C2 delivers superior returns per primogem.
Artifact Farming:
- Citlali: Scroll 4pc with EM/ER Sands, EM Goblet, Crit Rate/EM Circlet. Substats: ER, Crit Rate (Favonius), EM. Domain provides artifacts exclusively for Natlan characters—limited resin efficiency.
- Charlotte: Noblesse 4pc or Tenacity 4pc. ER% Sands, ATK% Goblet, Healing Bonus Circlet. Substats: ER, HP%, Crit Rate. Universal domains improve resin efficiency.
Optimization Tips
Energy Management: Maintain particle-generating character on-field for 0.5-1 second after skill cast. Switching before particles reach active character wastes energy—particles despawn after 2 seconds.
Buff Timing: Wait for Citlali's 1.5-second burst animation to complete before switching to Ayaka. Premature switching causes Ayaka to miss RES shred on initial burst hits, reducing damage by 10-15%.
ER Priority: Don't chase Crit Damage while neglecting ER. Extended rotations (25-30s instead of 20s) reduce total burst casts per chamber, lowering cumulative damage despite higher per-hit numbers.
Advanced Techniques:
- Citlali Shield: 20-second duration exceeds 16-second skill CD. Recast at 4-5 seconds remaining for permanent uptime.
- Charlotte C4: Position burst to ensure enemies remain in AoE for full 20 seconds, maximizing 10 Energy restoration.
- Favonius Timing: Cast Citlali/Charlotte skill immediately after Ayaka's burst while she's on-field. Generates particles with 3x same-element bonus directly feeding Ayaka's energy pool.
FAQ
Does Citlali generate more energy than Charlotte? Yes. Citlali's 60-cost burst (15s CD) allows 4 casts/minute vs Charlotte's 80-cost (20s CD) 3 casts/minute. Scroll 2pc provides 6 Energy per rotation. Citlali needs 170-195% ER vs Charlotte's 220%+.
Can Charlotte hold TTDS? Yes, but forces ER above 240% through artifacts alone. Favonius Codex provides superior energy economy with team-wide particles. TTDS works best on Citlali due to lower energy demands.
Which has better buff uptime? Both provide 12-second buffs covering Ayaka's 5-second burst. Citlali's 20-40% Hydro RES shred applies consistently regardless of enemy count. Charlotte's C2 ATK buff ranges 10-30% based on hitting 1-3 opponents—more consistent in AoE.
Is Citlali worth pulling? Citlali provides superior damage (40% Hydro RES shred at C2) and lower ER requirements but needs 5-star investment. F2P achieves 85-90% effectiveness with Charlotte C2. Citlali is luxury upgrade, not necessity.
How much ER does Ayaka need with Charlotte? 140-150% ER with Charlotte vs 140% with Citlali. Charlotte's less frequent bursts require modest ER compensation. Favonius Codex mitigates this through team particles.
Can Charlotte replace Diona? Yes. Charlotte provides superior healing and comparable energy generation. Charlotte's C2 ATK buff offers offensive utility Diona lacks. Diona's shield provides interruption resistance Charlotte cannot match. Choose based on damage buffs vs defensive utility priority.


