

Columbina Overview: The Moonlight Harbinger
Columbina debuts with 19.2% CRIT Rate ascension at level 90. Her passive Moonsign Benediction Borrowed Moonlight converts Electro-Charged to Lunar-Charged, Bloom to Lunar-Bloom, and Hydro-Crystallize to Lunar-Crystallize.
Elemental Skill - Eternal Tides: Summons Gravity Ripple accumulating 20 Gravity every 2 seconds (max 60). At max, triggers Kuuvahki Interference—simultaneous Lunar-Charged Electro, Lunar-Bloom Dendro, and Lunar-Crystallize Geo AoE damage.
Elemental Burst - Moonlit Melancholy: 60 Energy, 15s cooldown. Creates 12s Lunar Domain dealing continuous AoE Hydro damage.
Law of the New Moon passive: Lunar-Charged reduces thundercloud intervals by 0.5s, Lunar-Bloom generates Moonridge Dew stacks (max 3/18s), Lunar-Crystallize has 33% chance for extra attacks.
Lunacy passive: Grants 5% CRIT Rate per stack (max 3, 15% total) for 10s when Kuuvahki Interference triggers.
Damage scales with Max HP: 0.2% Lunar Reaction damage per 1,000 HP, capping at 7% at 35,000 HP. Secure pulls through Genshin 6.3 character pull top up.
Lunar-Crystallize Meta Impact
Unlike standard Crystallize shields, Lunar-Crystallize spawns 3 orbiting Moondrifts dealing periodic AoE Geo damage for 12s. Moondrifts CRIT based on triggering character's stats, creating synergy with CRIT-focused sub-DPS like Fischl or Raiden.
33% extra attack chance increases DPS by 11-15% in sustained rotations. Lunar-Bloom's Moonridge Dew stacks enhance reactions, while Lunar-Charged's faster intervals accelerate Electro application.
Moon Crystallize Mechanics Breakdown
When Moonsign Benediction Borrowed Moonlight activates (auto-triggered during Burst), all qualifying reactions become Lunar variants for Lunar Domain's duration.
Lunar vs Standard Reactions

Standard Crystallize creates defensive shields. Lunar-Crystallize spawns offensive Moondrifts orbiting active character, striking every 1.5s with Geo damage. Each persists 12s or 5 hits.
Critical distinction: Moondrifts snapshot CRIT Rate, CRIT DMG, and EM of the character applying triggering element (Pyro/Electro/Cryo/Geo) to Hydro. Well-built Fischl generates Moondrifts with 70%+ CRIT Rate and 150%+ CRIT DMG.
Lunar-Bloom operates like Hyperbloom with enhanced scaling. Benefits from 0.2% damage per 1,000 HP, plus Moonridge Dew stacks amplify damage by 8% each (24% at max 3 stacks).
Damage Formula
Lunar Reaction Damage = Base × (1 + EM Bonus) × (1 + HP Bonus) × (1 + Lunar Reaction DMG%) × CRIT Multiplier
HP Bonus caps at 7% at 35,000 HP. 200 EM grants ~40% damage increase. Combined with 7% HP bonus and artifact bonuses (20-40%), total damage exceeds 200% base values.
CRIT Multiplier applies only to Lunar-Crystallize Moondrifts and certain Lunar-Bloom instances, not Lunar-Charged. Lunar-Crystallize teams prioritize CRIT sub-DPS; Lunar-Charged teams emphasize EM on Electro appliers.
Optimal Application Sequences
Columbina's Burst applies 1U Hydro every 2s in Lunar Domain.
Lunar-Crystallize: Columbina Burst → Geo Skill → Electro/Pyro/Cryo → Columbina Skill
Lunar-Bloom: Dendro aura → Columbina Burst → Hydro → Electro trigger. Maintain 3 Moonridge Dew stacks by triggering Lunar-Bloom once per 18s.
Common Misconceptions
- Columbina doesn't need field time—Lunar Domain persists 12s regardless of active character
- 60-Energy Burst needs 110-220% ER for off-cooldown casting (weapon-dependent)
- 33% extra attack chance doesn't stack across multiple Moondrifts—each rolls independently
Best Artifacts: Tested Comparisons
4pc Aubade of Morningstar and Moon is best-in-slot: 80 EM (2pc) + 20% off-field Lunar Reaction damage (4pc), increasing to 40% during Moonsign Ascendant Gleam.
4pc Silken Moon's Serenade alternative: 20% ER (2pc) + 60-120 EM + 10% Lunar Reaction damage per Gleaming Moon stack (4pc). Reduces ER requirements by 30-40%.
Rankings with DPS Data
- 4pc Aubade: 18-22% higher Lunar Reaction damage vs mixed sets. 80 EM + 40% damage bonus during Burst windows
- 4pc Silken Moon: 92-95% of Aubade's damage, solves Energy problems. 120 EM + 30% damage at max stacks
- 2pc Aubade + 2pc Heart of Depth: 12-15% below optimal. 80 EM + 15% Hydro damage. Transitional option
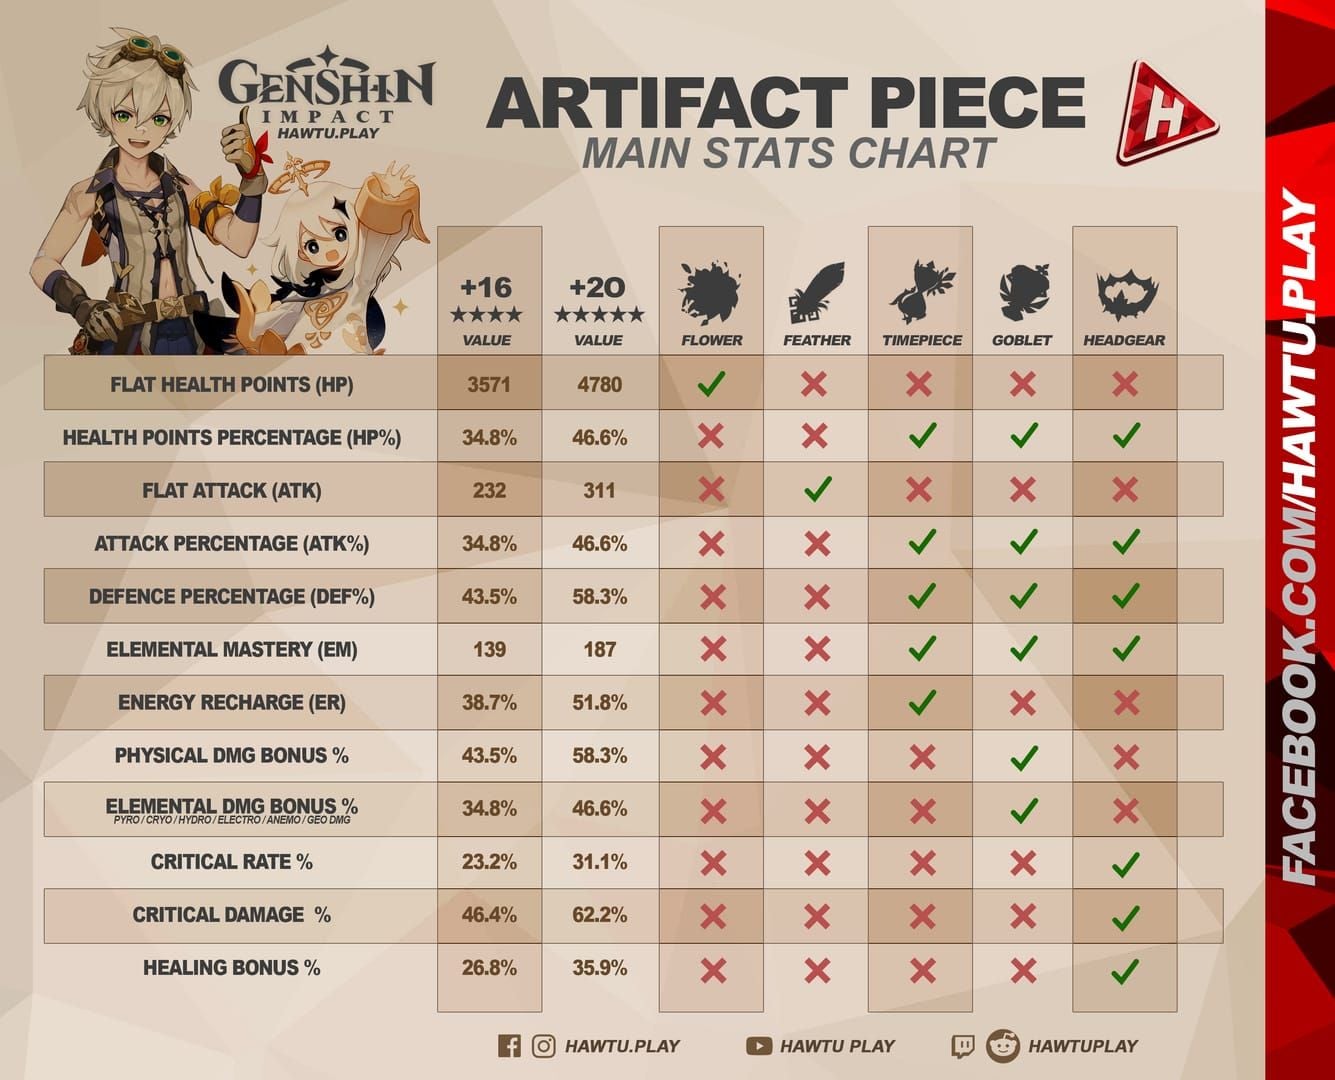
Main Stats by Slot
Sands: HP% or ER%
- HP% with Nocturne's Curtain Call (110-120% ER target)
- HP% with Prototype Amber R5 (160% ER target)
- ER% without ER weapon (220% minimum)
Goblet: HP% vs Hydro DMG%
- HP% for Lunar-Crystallize teams (5-7% more reaction damage)
- Hydro DMG% for Lunar-Bloom teams (better personal Burst damage)
Circlet: CRIT Rate or CRIT DMG
- 19.2% ascension + 15% Lunacy passive = 34.2% base CRIT Rate
- CRIT DMG viable earlier than most characters
- Target 70-75% CRIT Rate before CRIT DMG Circlet
Substat Optimization
Target stats: 30k-35k HP, 110-160% ER, 70% CRIT Rate, 140% CRIT DMG
Priority: CRIT Rate = CRIT DMG > ER (until threshold) > HP% > EM > Flat HP
Each artifact needs 2+ priority substats. Aim for 60% rolls on CRIT, 40% on ER/HP. 25% HP% substats (5% per artifact) ensures 30k HP minimum.
F2P Transition Path
- AR 45-50: 2pc Exile + 2pc Scholar (ER support)
- AR 50-55: 2pc Heart of Depth + 2pc Wanderer's Troupe
- AR 55+: 4pc Silken Moon (ER-focused) or 4pc Aubade (damage-focused)
Upgrade Circlet/Goblet/Sands to +20 first (70% value from main stats). Keep Flower/Feather at +16 until substats justify full investment.
Weapon Tier List: 5-Star vs 4-Star
Nocturne's Curtain Call (signature): 542 base ATK, 88.2% CRIT DMG at 90. Passive grants 10-18% Max HP, recovers 12-16 Energy/18s off-field, increases Lunar Reaction CRIT DMG by 60-140%.

Energy recovery reduces ER requirements by 50-60%. At R1, provides 12 Energy/rotation (20% of 60-Energy cost). Combined with particles, reduces ER from 220% to 110-120%.
Prototype Amber R5 (best 4-star): 510 base ATK, 41.3% HP. Regenerates 18 Energy/rotation (6 Energy × 3 ticks) + 18% Max HP healing. Allows HP% Sands at 160% ER.
Ensure weapon pulls through Columbina banner Primogems top up on BitTopup for competitive pricing and instant delivery.
Signature Performance
Nocturne R1 increases damage by 28-32% vs Prototype Amber R5. CRIT DMG substat contributes 15-18%, Lunar Reaction CRIT DMG passive adds 10-12%, Max HP bonus (10% = 3,000 HP) provides 0.6% reaction damage.
Refinement ROI:
- R1→R2: 8-10% damage
- R2→R3: 5-6%
- R3→R4: 4-5%
- R4→R5: 3-4%
R1 captures 70% total potential.
Best 4-Star Options
Prototype Amber R5: Best overall. 18 Energy/rotation + 41.3% HP + team healing. Self-sufficient at 160% ER.
Hakushin Ring R5: Lunar-Charged specialist. 20% Elemental DMG bonus after Electro reactions. Needs 180-200% ER.
Sacrificial Fragments: 221 EM at 90. Skill reset (40-80% chance) doubles Gravity Ripple uptime. Best for Lunar-Bloom teams.
Weapon Synergy
Nocturne's 60-140% Lunar Reaction CRIT DMG applies multiplicatively. Transforms Lunar-Crystallize Moondrifts from 15-20k non-CRIT to 45-70k CRIT (R1), 90k+ (R5).
Benefits reactions that CRIT (Lunar-Crystallize, certain Lunar-Bloom). Less valuable for Lunar-Charged (can't CRIT).
Prototype Amber healing synergizes with Furina—maintains Fanfare stacks without dedicated healers.
Talent Priority and Rotations
Priority: Elemental Skill > Elemental Burst > Normal Attack
Skill scales Gravity Ripple and Kuuvahki Interference. Burst scales with ATK (secondary). Normal Attack offers minimal returns—Charged Attack Dendro damage scales with Lunar Reaction bonuses, not talent levels.
Leveling Progression
1/6/6 baseline: 70% damage potential. Tests character before resource commitment.
1/9/9 progression: 22-28% damage increase vs 1/6/6. Skill 6→9 contributes 15-18%, Burst 6→9 adds 7-10%.
1/10/10 endgame: Crown Skill over Burst. Skill 9→10 improves 5-7%, Burst 9→10 improves 3-5%.
Optimal Rotations
Standard structure: Support setup → Columbina Skill → Columbina Burst → Reaction triggers → Columbina Skill (if available)
Lunar-Crystallize: Zhongli Hold Skill → Fischl Skill → Columbina Skill → Columbina Burst → Gorou Skill/Burst → Fischl Burst → Zhongli Burst → Columbina Skill. 18s rotation, 8-12 Lunar-Crystallize procs.
Lunar-Bloom: Nahida Skill → Nilou Skill → Columbina Skill → Columbina Burst → Kuki Skill → Nahida Burst → Nilou Skill → Kuki Burst. Permanent Dendro aura, continuous Lunar-Bloom.
Lunar-Charged: Kazuha Skill/Burst → Fischl Skill/Burst → Columbina Skill → Columbina Burst → Zhongli Hold Skill → Fischl reposition → Columbina Skill. Maximizes Electro application.
Energy Management
Columbina's Skill generates 4-5 Hydro particles/12s. On-field collection = 100% value (4-5 Energy), off-field = 60% (2.4-3 Energy).
Funneling: Cast Skill → stay 1-2s for particles → swap to supports → return before next generation.
ER by team:
- Solo Hydro + no ER weapon: 220-240%
- Solo Hydro + Prototype Amber R5: 160-180%
- Dual Hydro + Nocturne: 110-120%
- Triple Hydro: 100-110%
Advanced Mechanics
Charged Attack cancel: Dash/jump immediately after Verdant Dew consumption. Reduces 2.1s to 0.8s (15-20% DPS increase).
Burst swap: Swap 0.9s into animation (when domain appears) saves 0.3s/rotation.
Skill positioning: Place Gravity Ripple at enemy movement paths, not current location. Increases uptime from 60% to 85-90%.
Constellation Analysis: C0 to C6
Columbina achieves full functionality at C0. Constellations amplify damage, not enable mechanics. C0 delivers 75-80% of C6 potential.
C0 Viability
All Lunar Reactions, Gravity Ripple, and Lunar Domain work at C0. Energy needs careful ER investment (110-220%), but manageable with substats and rotations.
DPS: 45k-55k single-target, 70k-85k AoE (2-3 enemies). Competitive with Neuvillette and Arlecchino at equivalent investment.
High-Impact Constellations
C1 Radiance Over Blossoms and Peaks: Auto-triggers Kuuvahki Interference every 15s (aligns with Burst). Grants 6 Energy per Lunar-Charged. Increases reaction frequency by 30-40%, reduces ER by 20-30 percentage points. Best value-per-primogem.
C2 Not in Lone Splendor: Gravity accumulation +34% (20/2s → 27/2s). Kuuvahki Interference every 4.5s vs 6s. Grants 7% Lunar Reaction damage + 30% Max HP (40% with signature) for 8s after Skill. HP bonus = 9k-12k additional HP (39k-47k total). 18-22% damage improvement vs C1.
C4-C6 Whale Territory
C4 Cloudveiled Ridges: 4 Energy when Skill ends. Increases Lunar-Charged damage by 12.5%, Lunar-Bloom by 2.5%, Lunar-Crystallize by 12.5% based on Max HP.
C6 Through Darkness: 80% CRIT DMG for 8s after any Lunar Reaction (applies to triggering character). 7% all Lunar Reaction damage. 35-42% damage increase vs C0.
Investment ROI
- C0→C1: ~12,800 primos for 25-30% damage = 427-512 primos/1%
- C1→C2: ~12,800 primos for 18-22% damage = 582-711 primos/1%
- C2→C4: ~25,600 primos for 12-15% damage = 1,707-2,133 primos/1%
- C4→C6: ~25,600 primos for 15-18% damage = 1,422-1,707 primos/1%
C1 exceptional value. C2 worthwhile for mains. C4/C6 diminishing returns.
Best Team Compositions
Premium Meta Teams
Lunar-Crystallize Hyper: Columbina + Zibai + Illuga + Gorou
Gorou provides 25% Geo damage + DEF buffs (C6: 40% Geo CRIT DMG). 10-14 Lunar-Crystallize procs/rotation, near-permanent Moondrift uptime. 75k-90k DPS in AoE.
Lunar-Bloom Hyperbloom: Columbina + Nahida + Nilou + Kuki Shinobu
Nahida = Dendro + EM sharing. Nilou = 400% Bloom damage + Bountiful Cores. Kuki triggers Lunar-Bloom + healing. Moonridge Dew stacks amplify 24%. 65k-80k DPS single-target, 95k-115k DPS multi-target (3+).
F2P Teams
Budget Lunar-Charged: Columbina + Fischl + Beidou + Barbara
Fischl = Electro + particles. Beidou = AoE Electro + damage reduction. Barbara = healing + Hydro battery (reduces ER by 30-40%). 40k-50k DPS with built 4-stars (60-65% of premium performance).
Alternative Lunar-Crystallize: Columbina + Noelle + Fischl + Xingqiu
Noelle = shields + healing + Geo. Fischl/Xingqiu = off-field damage + particles. 35k-45k DPS, exceptional survivability.
Spiral Abyss Floor 12
First Half (AoE): Columbina + Nahida + Yelan + Kuki Shinobu
Yelan replaces Nilou for single-target + Energy + Hydro Resonance (25% Max HP). Lunar-Bloom spam against groups.
Second Half (Boss): Columbina + Fischl + Kazuha + Zhongli
Kazuha = Elemental DMG% + VV shred. Zhongli = shield + resistance shred. Fischl = single-target Electro. 55k-70k sustained DPS.
Support Synergy Rankings
S-Tier (30%+ contribution):
- Nahida: EM sharing, Dendro, damage
- Fischl: Electro, particles, A4 passive
- Kazuha: DMG% buff, CC, VV shred
- Zhongli: Resistance shred, shield, Geo Resonance
A-Tier (20-30%):
- Yelan: Off-field Hydro, DMG% buff, Energy
- Raiden: Electro, Energy restoration, Burst
- Nilou: Bloom amplification
- Gorou: Geo buffs
B-Tier (15-20%):
- Xingqiu: Hydro, damage reduction, healing
- Kuki: Healing, Electro
- Beidou: AoE Electro, damage reduction
- Sucrose: EM sharing, VV shred
T0 Tier Justification
T0 requires: damage output, flexibility, ease of execution, investment efficiency, meta longevity. Columbina excels in most but shows limitations preventing universal dominance.
DPS Benchmarks vs Meta
Optimized teams: 65k-90k DPS (constellation/team/enemy-dependent). Upper tier but below peak performers in optimal scenarios:
- vs Neuvillette: Matches single-target (65k-75k), falls 15-20% behind sustained AoE
- vs Arlecchino: Comparable single-target (70k-80k). Columbina superior AoE, Arlecchino superior burst windows
- vs Hu Tao: Off-field flexibility + better AoE. Hu Tao 10-15% higher single-target vaporize
Damage spreads across multiple characters triggering Lunar Reactions—actual contribution higher than personal numbers suggest.
Abyss Clear Times
Floor 12 optimized C0 + 4-star weapon: 75-90s/chamber
- Chamber 1 (AoE): 70-85s (Lunar-Bloom)
- Chamber 2 (Mixed): 75-90s (Lunar-Crystallize)
- Chamber 3 (Boss): 80-95s (Lunar-Charged)
C2+ with signature: 60-70s/chamber, matching top hypercarries. Consistency across types demonstrates versatility, though specialists achieve 5-10s faster in optimal scenarios.
Content Versatility
Spiral Abyss: Excellent across all chambers with team adjustments. Lunar Reaction flexibility adapts to shields, resistances, mechanics.
Overworld: Moderate. Hydro assists puzzles but lacks movement abilities. Less convenient than Yelan/Wanderer.
Bosses: Strong vs stationary (Primo Geovishap, Ruin Serpent). Struggles vs mobile (Maguu Kenki, Golden Wolflord)—reduces Kuuvahki frequency by 30-40%.
Domains: Excellent multi-wave/grouped efficiency. Less efficient pure single-target (10-15s slower than hypercarries).
Meta Longevity
Lunar Reaction system future-proofs well. New characters with Crystallize/Bloom/Electro-Charged synergies increase value. HP-scaling and CRIT reactions avoid ATK-scaling diminishing returns.
Vulnerabilities:
- Energy drain mechanics
- Reaction immunity enemies
- Dedicated Lunar Reaction powercreep
Off-field playstyle provides inherent longevity. Even if future DPS surpass personal damage, reaction-enabling maintains support-DPS hybrid relevance.
Common Mistakes and Optimization
5 Build Errors
1. Neglecting HP Scaling: Prioritizing ATK% over HP% reduces Lunar Reaction damage by 15-25%. 0.2% damage per 1,000 HP (7% cap at 35k) makes HP% nearly as valuable as CRIT.
2. Insufficient ER: Under-investing causes rotation delays (3-5s after cooldown). Reduces uptime from 80% to 55-60%, cutting damage by 20-30%. Meet thresholds: 220% (no ER weapon), 160% (Prototype Amber), 110-120% (Nocturne).
3. Wrong Goblet: Hydro DMG% in Lunar-Crystallize teams where Columbina triggers <40% reactions wastes potential. HP% increases team-wide reaction damage by 5-7% despite reducing personal Burst by 12-15%.
4. Talent Priority: Leveling Burst before Skill inverts optimization. Skill 9 + Burst 6 outperforms Skill 6 + Burst 9 by 8-12%.
5. Rotation Timing: Burst before Skill wastes Gravity accumulation, delays Kuuvahki. Correct (Skill → Burst) triggers first Kuuvahki at 6s vs 12s, doubling proc frequency.
ER Thresholds
- Solo Hydro + no ER weapon: 220-240%
- Solo Hydro + Prototype Amber R5: 160-180%
- Dual Hydro + Nocturne: 110-120%
- Triple Hydro: 100-110%
EM vs CRIT Priority
Prioritize EM when:
- Columbina triggers 60%+ reactions (rare)
- Lunar-Bloom focus (can't CRIT)
- Instructor set EM sharing (niche)
Prioritize CRIT when:
- Allies trigger majority (standard)
- Lunar-Crystallize focus (Moondrifts inherit CRIT)
- Using Nocturne (60-140% Lunar Reaction CRIT DMG)
Target 150-200 EM from substats/sets (Aubade 2pc = 80 EM) while prioritizing CRIT.
Rotation Mistakes
Premature Swapping: Switching before particles arrive wastes 40% Energy. Wait 1-2s after Skill.
Burst Overlap: Casting during ally Bursts delays reactions by 0.5-1s. Sequence with 0.5s gaps.
Gravity Misplacement: Place where enemies move, not current position. Increases uptime from 60% to 85-90%.
Skill Cooldown Waste: Cast Skill on cooldown (12s) regardless of Burst availability.
Investment Guide: Should You Pull?
Total Resource Cost
Character: 0-28,800 primos (0-180 pulls). Average 14,400 (50% win rate, 75-pull pity).
Ascension: 420k Mora, Varunada materials, 46 Radiant Antler (230-280 resin), 168 Winter Icelea (3-day farm).
Talents: 4,957,500 Mora, 3 Crowns, 38 Philosophies of Moonlight (340 resin), 18 weekly drops (6 weeks, 360 resin).
Artifacts: 2k-4k resin (acceptable 60/120 CRIT), 6k-10k resin (optimized 70/140 CRIT).
Weapon:
- Nocturne: 0-37,760 primos (average 18,880)
- Prototype Amber R5: 0 primos (craftable)
Total (C0 + Signature + Optimized): 33,280-66,560 primos, 5,377,500 Mora, 3k-5k resin, 3 Crowns, 6+ weeks.
Account Stage Recommendations
Early Game (AR 1-45): Low priority. Needs artifacts, teams, talents. Pull versatile supports (Kazuha, Bennett, Xingqiu) first.
Mid Game (AR 45-55): Moderate if lacking DPS. Competitive with 4-star weapons + transitional artifacts. Ensure supporting cast exists.
Late Game (AR 55+): High priority for meta diversity. Unique mechanics, off-field playstyle. Strong if lacking Hydro DPS or reaction teams.
Endgame (AR 60+, 36-star): Moderate-to-high depending on goals. Enables new archetypes, competitive clears, but doesn't outperform existing optimized teams. Pull for collection, design, or new character synergies.
vs Alternative DPS
vs Neuvillette: Neuvillette easier (charged spam), superior AoE (15-20% higher), self-healing. Columbina better single-target (5-10% higher), flexible teams, unique reactions. Choose Neuvillette for comfort, Columbina for optimization.
vs Arlecchino: Arlecchino higher burst (20-25% peak DPS), simpler rotations. Columbina superior sustained (20+ s), better AoE, off-field. Choose Arlecchino for speedruns, Columbina for sustained/multi-target.
vs Furina: Furina = support-DPS (30-50% DMG% buff). Columbina = main DPS. Synergize together, not competing.
Final Verdict: T0.5 Status
T0.5 - upper tier, not absolute peak. Excels in specific scenarios (AoE, reactions, sustained) while falling slightly behind specialists.
Strengths:
- Competitive 65k-90k DPS
- Unique Lunar Reactions, future-proofing
- Flexible team building
- Strong C0 (75-80% of C6)
- Off-field quick-swap
Limitations:
- Needs specific teams
- Energy management demands
- Mobile bosses reduce effectiveness
- Peak needs 5-star weapon + artifacts
- Slightly behind top specialists
Pull if: Value versatility, enjoy reactions, lack Hydro DPS, appreciate design.
Skip if: Own invested Neuvillette/Arlecchino, prefer hypercarries, prioritize upcoming characters.
Strong addition, not mandatory.
FAQ
Is Columbina worth pulling in Genshin 6.3?
Yes for players lacking Hydro DPS or seeking reaction teams. Achieves 65k-90k DPS at C0 with 4-star weapons, unique Lunar Reactions, strong future-proofing. Skip if owning invested Neuvillette/Arlecchino (similar performance). Value increases with Nahida, Fischl, or upcoming Geo characters (Zibai, Illuga).
What are the best artifacts for Columbina?
4pc Aubade of Morningstar and Moon: 80 EM + 20-40% Lunar Reaction damage. Use HP%/ER% Sands (weapon-dependent), HP%/Hydro DMG% Goblet (HP% for Crystallize, Hydro for Bloom), CRIT Rate/DMG Circlet. Target 30k-35k HP, 110-220% ER, 70/140 CRIT. Alternative: 4pc Silken Moon's Serenade (92-95% damage, solves Energy).
What is Moon Crystallize reaction?
Columbina's enhanced Crystallize during Lunar Domain (Burst). Generates 3 orbiting Moondrifts dealing periodic AoE Geo damage for 12s instead of shields. Moondrifts CRIT based on triggering character's stats, 33% chance for extra attacks. Scales with Columbina's Max HP (0.2% per 1k, 7% cap at 35k) + artifact bonuses.
What weapon should I use for Columbina?
Nocturne's Curtain Call (signature): 88.2% CRIT DMG, 10-18% HP, 12-16 Energy/18s, 60-140% Lunar Reaction CRIT DMG. 28-32% damage increase vs 4-stars, reduces ER to 110-120%. F2P: Prototype Amber R5 (41.3% HP, 18 Energy/rotation, healing). Achieves 70-75% of signature performance, craftable, solves Energy at 160% ER.
Is Columbina T0 tier in Genshin meta?
T0.5 (upper tier, not peak). 65k-90k DPS in optimized teams, competitive with meta carries, unique Lunar Reactions with future-proofing. Falls 10-20% behind specialists in optimal scenarios (Neuvillette AoE, Arlecchino burst). C0 viability (75-80% of C6), flexible teams, off-field capability support T0 arguments. Energy demands and mobile boss struggles prevent full T0.
What team compositions work best with Columbina?
Lunar-Crystallize: Columbina + Zibai + Illuga + Gorou (75k-90k DPS AoE). Lunar-Bloom: Columbina + Nahida + Nilou + Kuki (65k-115k DPS scaling with enemies). Lunar-Charged: Columbina + Fischl + Kazuha + Zhongli (55k-70k sustained). F2P: Columbina + Fischl + Beidou + Barbara (40k-50k). Apply support elements before Lunar Domain, cast Skill then Burst, funnel particles during downtime.


