

Understanding the Durin + Venti Overload Strategy for Floor 12-3
Here's what makes this rotation so effective: Durin's dual-state mechanics work in perfect harmony with Venti's crowd control to create devastating reaction chains against Floor 12-3's massive 10M HP boss. When Durin enters White Flame state, you get 35% resistance shred with two Magic characters on the team. Stack that multiplicatively with Venti's Viridescent Venerer 40% shred? You're looking at 75% resistance penetration.
That's the kind of math that makes bosses melt.
Instant primogems top up for spiral abyss clears through BitTopup ensures you have the resources needed for optimal team building with competitive rates and immediate delivery.
Why Overload Reaction Excels Against High-HP Bosses
Most players overlook Overload because of the knockback, but experienced Abyss runners know better. Overload reactions provide flat damage scaling with a 1.5x damage multiplier and Elemental Mastery scaling – meaning they maintain consistent output regardless of how chunky the enemy health pool gets.
The reaction's base multiplier hits 4.0x at level 90, creating substantial damage floors. Each EM point contributes 0.0015x additional multiplier, which adds up fast. But here's the real kicker: during those annoying invulnerability phases, persistent Overload effects from Fischl's Oz and Durin's White Flame keep dealing damage when direct damage completely fails.
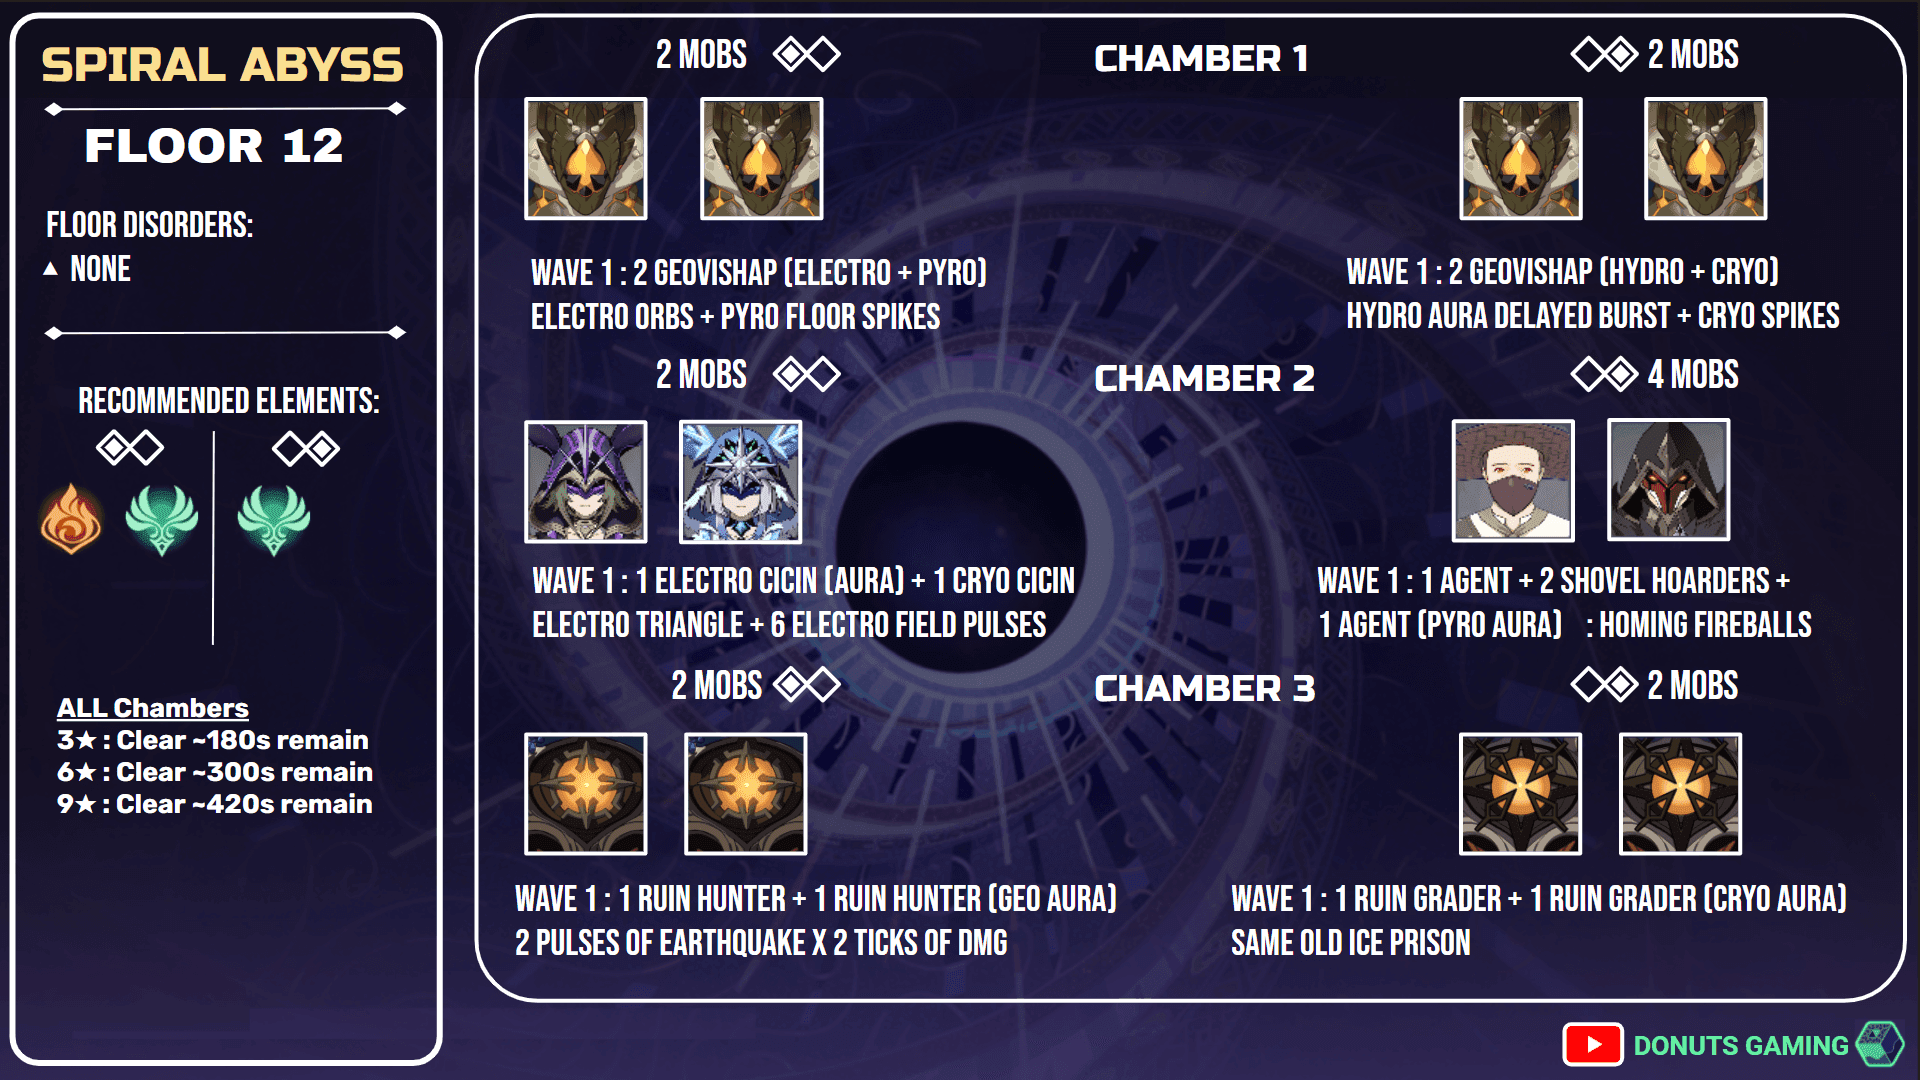
Floor 12-3 Boss Mechanics and Vulnerability Windows
This boss operates on a three-phase system with transitions at 70% and 30% health thresholds. What works best is treating these phase transitions as natural breakpoints for burst damage coordination. Those invulnerability periods? They're actually opportunities – reaction damage continues while direct damage stops completely.
Understanding these 20-second rotation cycles with vulnerability windows is crucial. It's the difference between a smooth 36-star clear and watching your DPS window slip away.
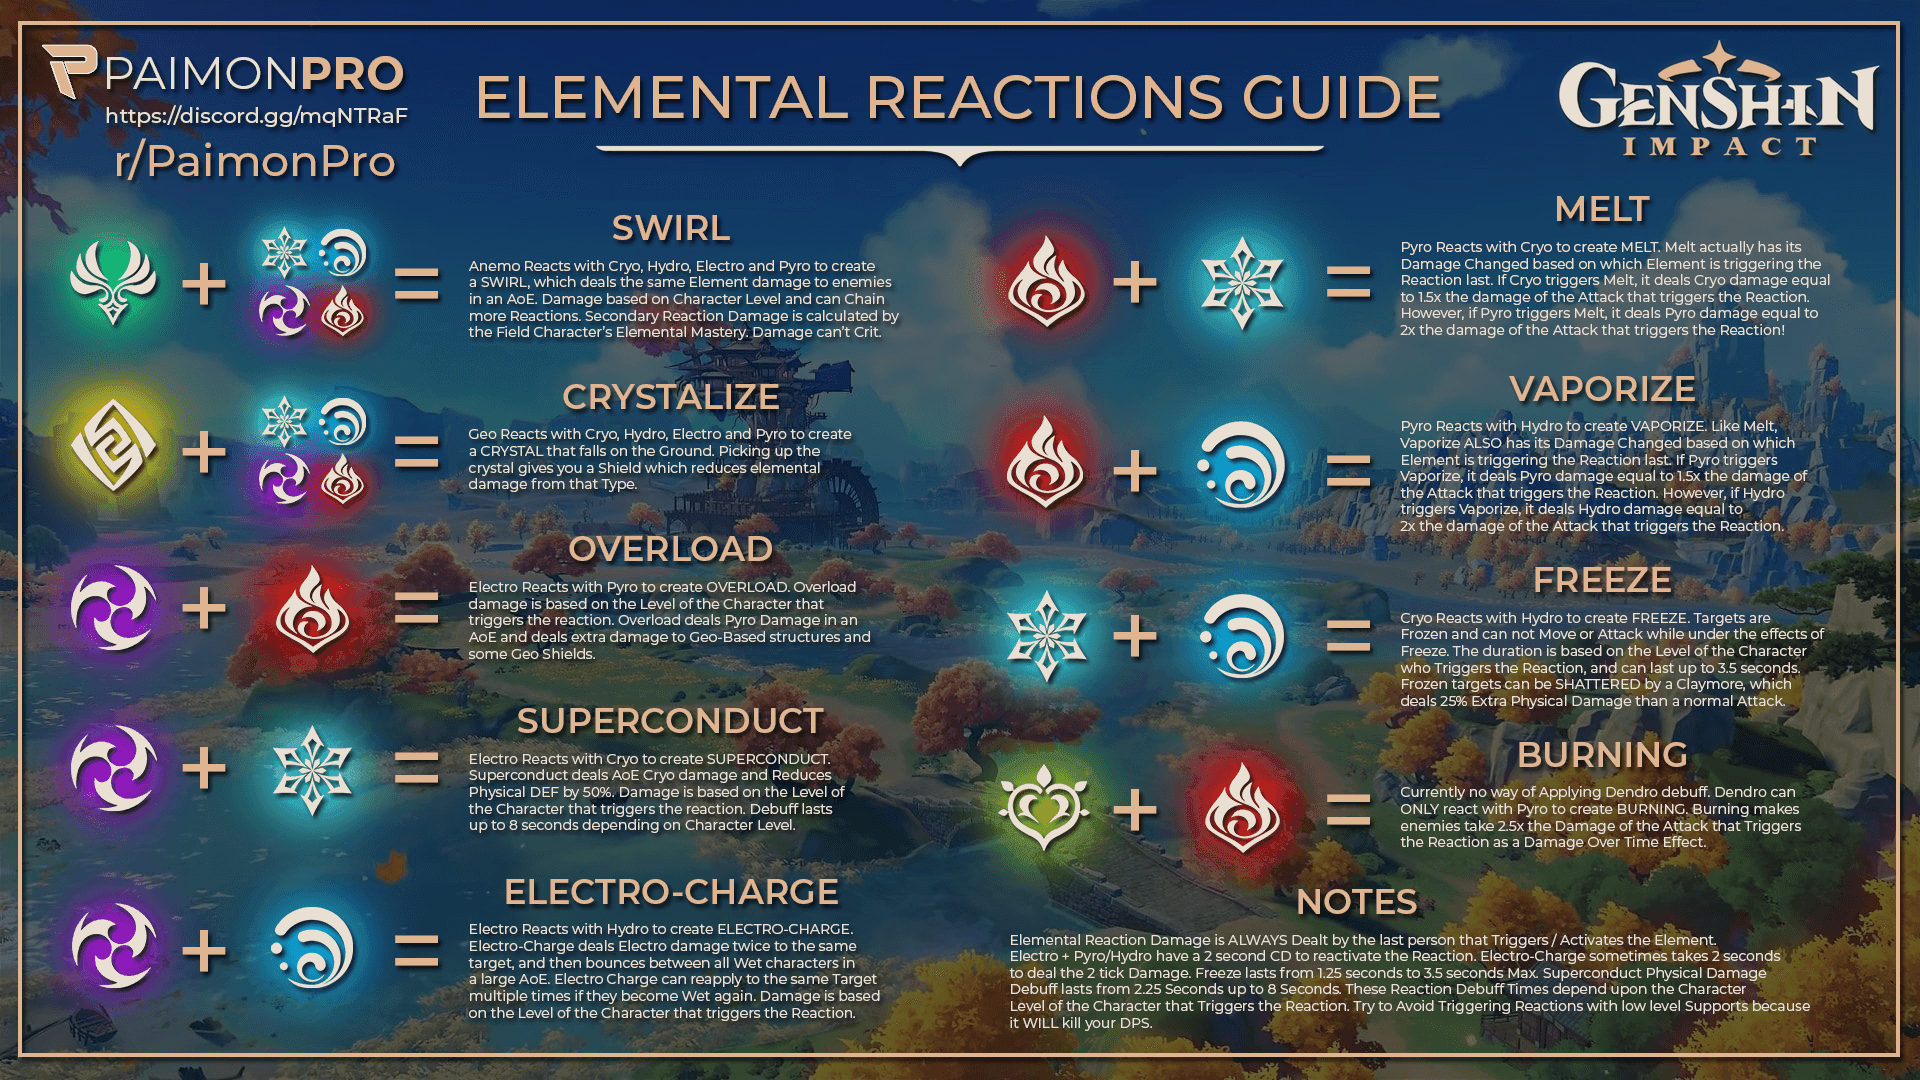
Core Mechanics: Overload Reaction and Anemo Synergy
Overload Damage Formula and VV Resistance Shred
Overload follows a completely different damage formula than most reactions – it scales with character level and Elemental Mastery rather than ATK stats. This is why it stays relevant against high-HP enemies when ATK-based damage starts feeling inadequate.
Viridescent Venerer's 4-piece provides 40% resistance reduction lasting 10 seconds, affecting all party members' damage when Venti Swirls multiple elements. This shred applies multiplicatively with Durin's White Flame 35% reduction. In practice, you're creating effective resistance values below zero for substantial DPS increases across your entire team.
Electro Application and Aura Management
Fischl's Oz provides Electro application every 1.5 seconds with 1U gauge strength, creating consistent aura for Pyro reactions throughout rotation cycles. Jahoda offers budget-friendly alternatives with 2-second application intervals and 20-second cooldowns – not quite as smooth, but definitely workable for F2P players.
Proper positioning maintains targeting on priority enemies while avoiding knockback interference from Overload reactions. And yes, the knockback can be managed effectively with wall positioning.
Optimal Team Composition for Durin Venti Overload
Core Team: Durin + Venti + Bennett + Fischl

Durin functions as your primary DPS through White Flame AoE Pyro application and Dark Decay burst potential. You'll need 140-180% Energy Recharge for consistent uptime – non-negotiable for smooth rotations.
Venti provides crowd control through his 8-second burst duration with 50% damage bonus and essential VV resistance shred. Bennett delivers 25% ATK buffs, healing, and Pyro resonance (because who doesn't love that extra ATK?). Fischl maintains 12-second Electro application through Oz summon.
This is your bread and butter composition.
Budget genesis crystals for boss rotation teams from BitTopup help secure these essential support characters for optimal team performance.
Alternative Substitutions
Jahoda can substitute for Fischl with reduced frequency but maintains core functionality through 20-second cooldown alignment with rotation cycles. Not ideal, but it works.
Sucrose replaces Venti for VV shred and EM sharing despite lacking comparable crowd control. You'll need more aggressive positioning and timing for her shorter burst duration, but the resistance shred is still there.
Complete Rotation Breakdown: Step-by-Step Execution
20-Second Rotation Cycle
Opening Sequence (0-8s): Venti Skill → Durin E+E+Q (White Flame activation) → Bennett Q → Fischl Oz summon. This establishes all elemental auras and activates resistance shreds in the proper sequence.
Mid-Rotation (8-16s): Venti Burst during Durin's White Flame peak → Animation canceling through dash/jump inputs → Hexerei stack building to 10 layers for 75% damage amplification. This is where the magic happens.
Loop Preparation (16-20s): Energy particle collection on intended recipients → Cooldown management for seamless cycle restart → Positioning for next rotation phase.
The timing feels awkward at first, but experienced players know that muscle memory develops quickly with practice.
Burst Window Optimization
Peak damage occurs during buff overlap: Venti's 50% damage bonus + Bennett's 25% ATK increase + VV resistance shred + Hexerei stack amplification. Coordinating these effects with boss vulnerability windows maximizes impact.
Proper iframe usage during burst animations avoids boss attacks without disrupting rotation timing. It's all about that smooth execution.
Durin Build Optimization for Overload Teams
Emblem of Severed Fate 4-Piece

Emblem provides 20% Energy Recharge bonus and burst damage scaling up to 75% additional damage – perfectly aligned with Durin's high ER requirements while maximizing his primary damage source.
Target stats: 2500 ATK, 60-70% CRIT Rate, 150%+ CRIT Damage, 140-180% ER for optimal performance. These aren't suggestions – they're requirements for consistent 36-star clears.
Weapon Comparison
Athame Artis: 29,702 DPS potential through 33.1% CRIT Rate and 16% burst CRIT damage bonuses. This is your optimal choice for Overload teams, no question.
Wolf-Fang: 26,717 DPS with 27.6% CRIT Rate and 510 base ATK. Accessible alternative that's still sufficient for 36-star clears, though you'll feel the difference in damage windows.
Venti Build Optimization for Maximum Support
Viridescent Venerer 4-Piece (Non-Negotiable)
VV 4-piece provides irreplaceable 40% resistance shred affecting all party members for 10 seconds. There's no substitute for this effect – it creates multiplicative damage increases for both direct damage and reactions that no other artifact set can match.
The 15% Anemo damage bonus enhances personal contribution while resistance shred amplifies team damage beyond any alternative set.
EM vs CRIT Build Trade-offs
EM Build: Maximizes Swirl damage and reaction contributions with 165 EM from Stringless + EM main stats for superior overall team performance. This is generally the way to go for Overload teams.
Weapon Options: Stringless (510 ATK, 165 EM, 48% Skill/Burst damage) for damage vs Favonius Warbow (61.3% ER, particle generation) for energy consistency. Choose based on your team's energy needs.
Advanced Techniques and Boss Strategy
Phase-Specific Execution
Phase 1: Aggressive opening builds Hexerei stacks and elemental gauges during reduced boss mobility. Perfect opportunity for optimal Venti burst positioning.
Phase 2: Invulnerability window management maintains persistent reaction damage through Oz and White Flame while regenerating energy for Phase 3. Don't panic during these phases – your reactions are still working.
Phase 3: Coordinated burst usage aligns all damage buffs during enhanced defense periods, requiring precise timing to overcome time pressure. This is where practice pays off.
Common Mistake Prevention
Position against walls to minimize Overload knockback displacement – seriously, this one tip will save you so much frustration. Collect particles on intended recipients during travel time for optimal energy distribution.
Time Venti burst with boss movement patterns to maintain grouping effectiveness. Sequence elemental applications properly to ensure intended reaction triggers. Small details, big impact.
Performance Benchmarks and Resource Management
Expected Performance Metrics
Well-built teams achieve 90-120 second clear times requiring 55,000-60,000 DPS against the 10M HP boss. Durin's C1 provides 60% party ATK and 150% Dark damage bonuses, while C2 adds 50% team Pyro and reaction damage for substantial improvements over C0 performance.
But don't worry – C0 is absolutely sufficient for 36-star clears with proper execution.
Farming Priorities
Focus Emblem domain for Durin artifacts while building team inventory. Durin requires 168 Frostlamp Flowers for ascension materials – start collecting early.
Talent priorities: Durin Burst/Skill to level 10, Venti Burst for damage and utility. Energy Recharge thresholds take priority over damage stats for consistent rotation execution. Trust me on this one.
Frequently Asked Questions
How does Durin Venti Overload rotation work in Genshin Impact? The rotation follows a 20-second cycle: Venti Skill → Durin E+E+Q (White Flame) → Bennett Q → Fischl Oz → Venti Burst. This sequence maintains Overload reactions while stacking resistance shreds from VV (-40%) and White Flame (-35%) for maximum damage amplification.
What's the best team composition for Durin Venti Overload Floor 12-3? The optimal team uses E0S1 Durin, C0 Venti, Bennett, and Fischl. F2P alternatives substitute Jahoda for Fischl while maintaining core functionality. This composition provides consistent elemental application, energy generation, and damage buffs necessary for 36-star completion.
How much Energy Recharge does Venti need for Floor 12 rotations? Venti requires 140-180% Energy Recharge for consistent burst uptime, achievable through ER Sands, Favonius Warbow, or substat investment combined with Bennett's particle generation and proper rotation timing.
Can Durin Venti Overload team clear 10M HP boss in time? Absolutely. Properly built teams achieve 90-120 second clear times. Athame Artis Durin reaches 29,702 DPS while Wolf-Fang alternatives achieve 26,717 DPS – both sufficient for comfortable 36-star completion with proper execution.
What artifacts should I use for Durin in Overload teams? Emblem of Severed Fate 4-piece provides optimal performance through 20% ER and up to 75% burst damage scaling. Target 2500 ATK, 60-70% CRIT Rate, 150%+ CRIT Damage, and 140-180% ER for maximum effectiveness.
How do I manage Overload knockback in Spiral Abyss? Position enemies against walls to minimize knockback displacement. Coordinate Venti's burst timing with Overload reactions to maintain grouping effects while preserving reaction damage for sustained AoE effectiveness. It takes practice, but it's absolutely manageable.


