

Let's be honest – Floor 12-1 isn't messing around this cycle. But with the right approach (and a solid understanding of what makes Jahoda tick), you'll be collecting those precious primogems in no time.
What Makes Floor 12-1 Such a Pain?
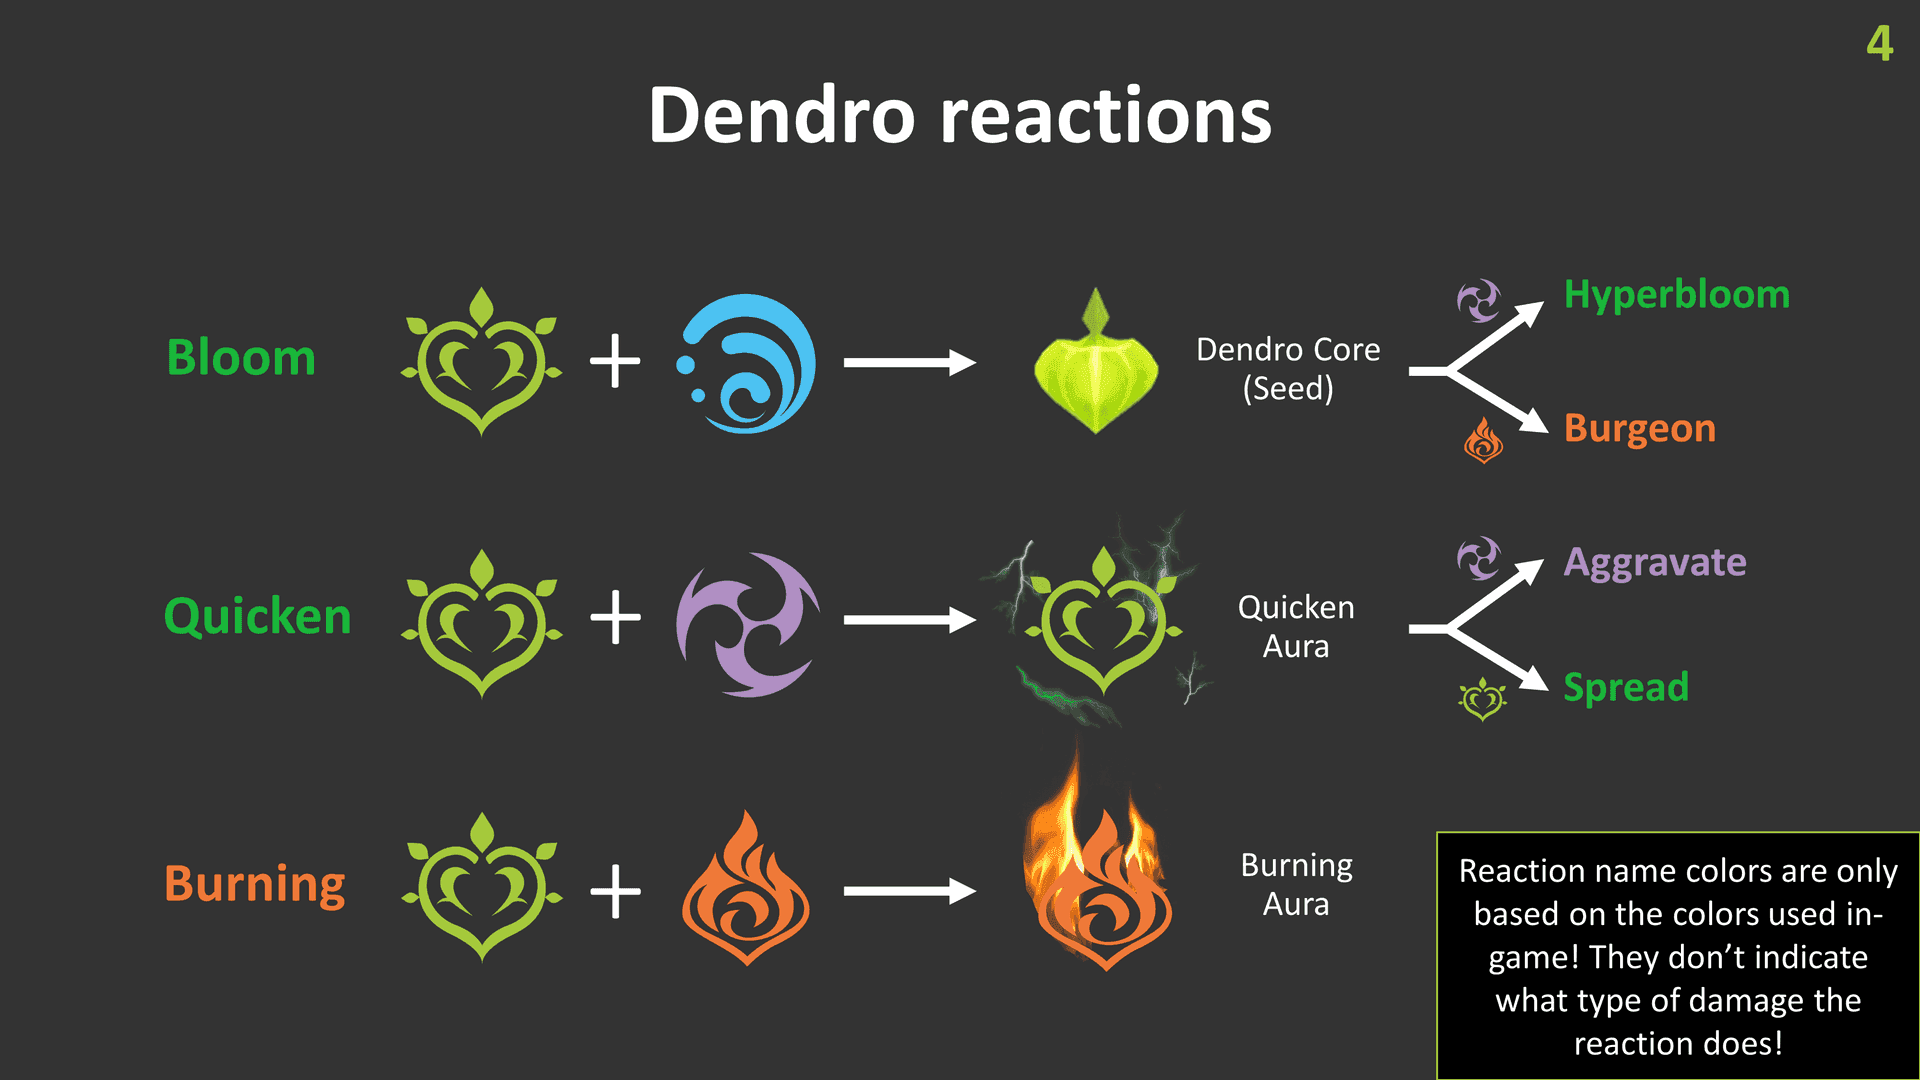
Here's what you're dealing with: Pyro-shielded crabs that won't sit still, plus Stoneborne Seeds that need specific Bloom reactions to unlock their -40% resistance debuff. The DPS check? A brutal 420 seconds total, demanding consistent 20,000+ DPS across both waves.
Wave 1 needs to go down in roughly 180 seconds – any longer and you're setting yourself up for failure in Wave 2. The 6.2 Abyss blessing actually works in our favor here, boosting Swirl damage and elemental mastery effects. Translation? Reaction-based teams (like our Jahoda setups) perform way better than traditional hypercarry comps.
And if you're looking to strengthen your roster for these demanding encounters, buy genshin impact primogems for f2p abyss clears through BitTopup's secure platform. Sometimes a few extra pulls make all the difference.
Breaking Down the Enemy Waves
Wave 1 throws 3-4 Pyro-shielded crabs at you. These guys regenerate shields, knock you around, and love to scatter across the arena. Consistent Hydro application and crowd control aren't optional – they're survival tactics.

Wave 2's where things get interesting. Those Rock Crab Stoneborne Seeds? They're not just obstacles. Trigger all 6 with Bloom reactions and you'll shred 40% resistance off everything. For F2P teams, that's a massive 20-35% damage boost. Miss it, and you're fighting an uphill battle.
Why Jahoda Works So Well for F2P Players
In practice, Jahoda solves multiple problems at once. She brings Viridescent Venerer's -40% resistance shred, reliable healing through her burst, and surprisingly good energy generation via those Meowball mechanics. Her kit just... fits together.
The Elemental Skill's forward dash with elemental absorption (Pyro/Hydro/Electro/Cryo) fills her Purr-loined Treasure Flask for solid AoE damage. What I love about the tap-to-stop mechanic? It prevents those embarrassing moments where you dash straight into enemy attacks.
Her burst summons two Purrsonal Coordinated Assistance Robots for 12 seconds. That duration isn't random – it aligns perfectly with standard rotation cycles. Plus, her C0 skill generates 6-8 energy particles per cast. With proper ER substats (140-180%), you're looking at near-100% burst uptime.
Building Jahoda on a Budget
Core setup: Viridescent Venerer 4-piece (non-negotiable), ATK% or ER Sands depending on your team's energy generation, ATK% Goblet, and either Healing Bonus% or CRIT Rate Circlet.

Favonius Warbow is your best friend here. That 61.3% ER plus 6 energy on CRIT hits (6-second cooldown) makes energy management almost trivial. At R5, you're looking at 60% proc chance – basically guaranteed with decent CRIT rate.
Talent priorities are straightforward: Elemental Burst to level 8+ for healing and AoE damage, Elemental Skill to level 4+ for VV application. Leave Normal Attack at level 1. Target 140-180% total ER – trust me, consistent burst uptime across wave transitions is everything.
Artifact Stats That Actually Matter
VV 4-piece gives you Anemo DMG Bonus +15%, Swirl DMG +60%, and that crucial -40% elemental RES debuff. For Sands, go ER% if your team lacks batteries, ATK% if you've got strong energy support. The Circlet choice balances team sustain (Healing Bonus%) with energy generation (CRIT Rate for Favonius procs).
Need to speed up artifact farming? Cheap genesis crystals top up for new version teams through BitTopup's competitive pricing can help accelerate your progress.
Three Proven F2P Team Compositions
Team 1: The Vaporize Powerhouse
**Jahoda + Yanfei + Yun Jin + Xingqiu
**
This is my go-to recommendation for most players. Yanfei with Dodoco Tales and Crimson Witch 4-piece handles primary DPS duties with excellent AoE coverage. Yun Jin (Favonius Lance, Noblesse 4-piece) buffs Normal Attacks while providing team ATK bonuses. Xingqiu (Favonius Sword, Emblem 4-piece) enables those satisfying Vaporize reactions plus damage reduction and healing.
The rotation flows like this: Yanfei Normal Attack → Xingqiu Skill/Burst → Jahoda Skill with tap-to-stop dash → Yun Jin Skill/Burst → Yanfei enhanced DPS phase. This 20-second cycle maintains consistent reaction uptime and energy funneling.
Team 2: Electrocharged Chaos
Jahoda + Fischl + Beidou + Bennett
For players who prefer off-field damage, this comp delivers. Fischl with Favonius Warbow provides consistent Electro through Oz. Beidou's burst creates chain lightning that absolutely melts grouped enemies. Bennett (Favonius Sword, Noblesse) brings healing, ATK buffs, and Pyro for Overloaded reactions.
Rotation: Bennett buff field setup → Fischl and Beidou off-field abilities → Jahoda VV shred and crowd control → team healing through Jahoda Burst. The energy generation here is fantastic, and reaction consistency is top-tier.
Team 3: The Experimental Option
Jahoda + Sethos + Aino + Ineffa
This newer comp centers around Sethos as 4-star Pyro DPS with solid AoE. Aino provides Ascendant Gleam effects for Hydro application, while Ineffa enables elemental absorption for Jahoda's skill. The 3-step cycle: Ineffa Skill/Burst → Aino Burst/Skill → Jahoda Skill with tap dash → Sethos DPS phase.
Mastering the Rotations
Here's what experienced players know: pre-buff with supports, apply VV shred through Jahoda's skill, then execute DPS phases with proper energy funneling. Pre-wave setup requires central positioning for optimal Meowball energy collection and AoE coverage.
The 20-Second Vaporize Cycle
Yanfei Normal Attack for Pyro application → Xingqiu Elemental Skill for energy particles and Hydro setup → Xingqiu Burst for sustained Hydro → Jahoda Skill with precise elemental absorption and tap-to-stop dash → Yun Jin Skill/Burst for buffs → Yanfei enhanced DPS phase.
Timing is everything here. Rush the sequence and you'll miss reactions. Take too long and buffs expire.
Wave Transition Strategy
Save your high-cost bursts for Wave 2's resistance shred window – that's when damage output becomes absolutely critical. Use skills and normal attacks to clear Wave 1 while building energy reserves. Jahoda's Burst timing should align with post-DPS phases for healing and sustained AoE damage during those awkward enemy spawn delays.
Support Character Builds That Work
Bennett: Favonius Sword, Noblesse 4-piece, 180-220% ER. Prioritize Elemental Burst for healing scaling and ATK buff. He's your safety net and damage amplifier rolled into one.
Xingqiu: Emblem 4-piece, Favonius Sword, 160-180% ER for reliable burst uptime. His damage reduction often goes unnoticed but saves runs constantly.
Yun Jin: Noblesse 4-piece, DEF% main stats, Favonius Lance for energy support. Her Normal Attack buffs transform Yanfei into a monster.
Alternative Supports: Fischl and Beidou
Fischl: Favonius Warbow, Thundering Fury 2-piece or Tenacity 4-piece. Oz provides consistent off-field Electro that just works. Simple, reliable, effective.
Beidou: Emblem 4-piece, 140-160% ER. That 80-energy cost hurts, but her AoE damage in multi-target scenarios is unmatched. Both benefit from CRIT Rate substats for Favonius weapon procs.
Energy Management: The Make-or-Break Factor
Jahoda needs 140-180% ER depending on your team comp. Favonius weapons dramatically reduce these requirements through additional energy generation. Her C0 Skill generates 6-8 particles, while Favonius weapons provide 6 energy per proc with 6-second cooldowns.
Funneling priorities? Target burst-dependent characters first, especially those 80-energy costs like Beidou or Xingqiu. Position your intended recipient on-field during particle generation for maximum absorption efficiency. Multiple Favonius weapons can overlap cooldowns for continuous energy generation.
What works best is having at least two Favonius weapons in your team. The energy generation becomes almost excessive – in a good way.
Mistakes That'll Cost You Stars
Poor Enemy Grouping
Use Jahoda's Skill dash to group enemies before applying VV shred. Position centrally in spawn areas for maximum AoE coverage. Don't chase scattered enemies individually – it's a time sink.
Wasting Bursts on Low-HP Enemies
Monitor those health bars. Reserve high-cost bursts for fresh waves. Use normal attacks and skills to finish low-HP enemies while saving burst energy for maximum impact.
Neglecting Energy Recharge
Calculate total ER requirements before finalizing builds. Target 140-180% ER on Jahoda, adjust supports based on energy costs. Use ER Sands on characters struggling with energy generation. This isn't optional.
Incorrect Rotation Order
The sequence matters: elemental application → VV shred → buffs → DPS phase. This maximizes buff overlap and reaction potential while ensuring proper debuff timing.
Advanced Techniques from Field Testing
Animation canceling on Jahoda's Normal Attacks reduces rotation time while maintaining energy generation. Dash-cancel after the second Normal Attack optimizes DPS windows without sacrificing particle collection.
Positioning Makes or Breaks Runs
Central positioning is crucial for Wave 1 crab grouping. Wave 2 seed activation requires standing between clusters for maximum Bloom coverage. Use terrain features to funnel enemy movement into favorable positions.
Practice rapid enemy assessment for priority targeting. Those crabs with full shields? Priority one. Seeds ready for Bloom reactions? Drop everything and trigger them.
Adapting to RNG Spawns
Develop multiple positioning approaches based on common spawn patterns. Pre-position near the center of potential spawn areas to minimize movement time. In practice, this saves 5-10 seconds per wave – often the difference between 2 and 3 stars.
Backup Plans: Teams Without Jahoda
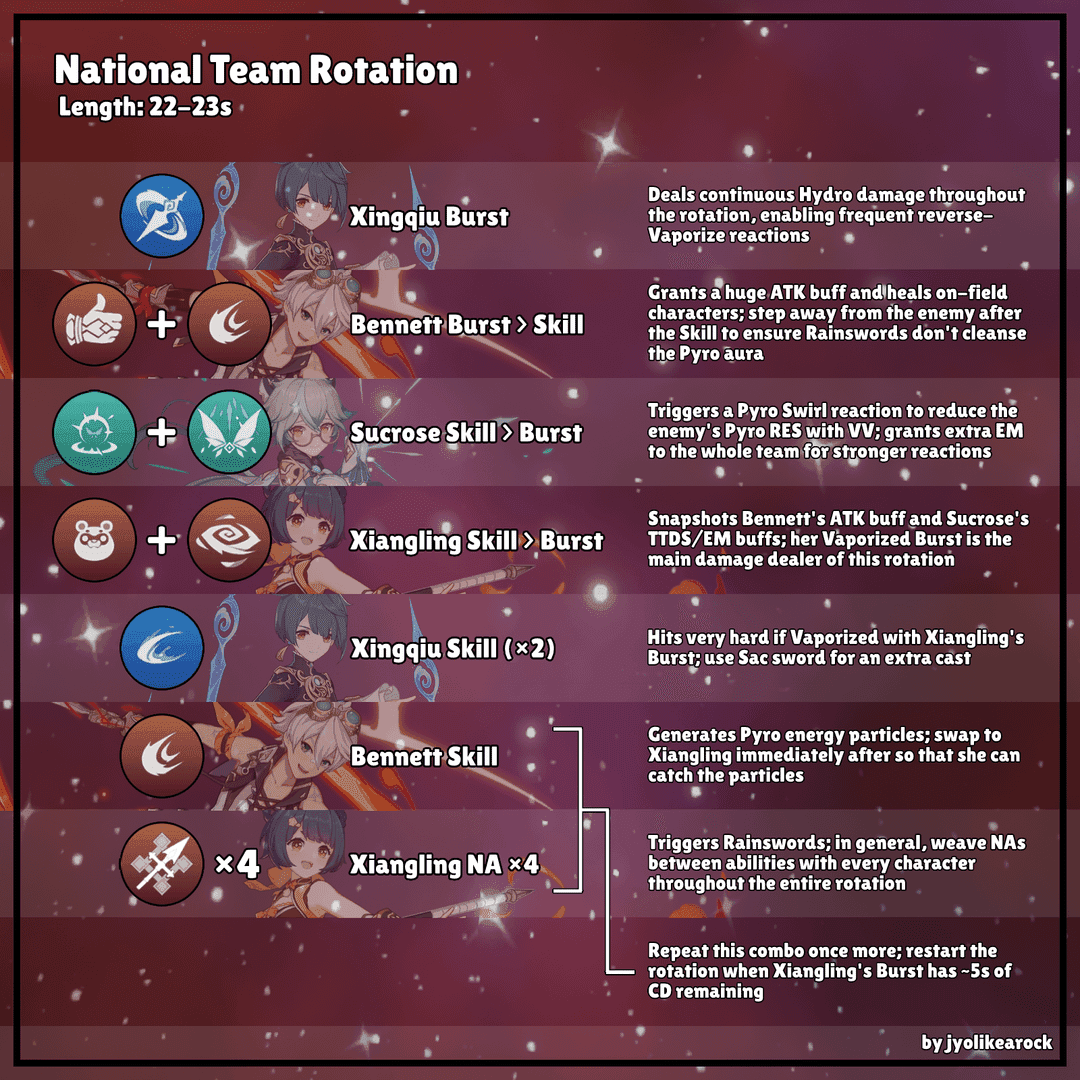
National Team variant (Bennett + Xiangling + Xingqiu + Sucrose) provides excellent AoE through Pyro Swirl reactions. It's tried, tested, and reliable.
Kaeya carry team (Kaeya + Bennett + Xiangling + Sucrose) offers Reverse Melt reactions with Blizzard Strayer 4-piece and Prototype Rancour. Surprisingly effective for F2P players.
Sucrose-centered teams (Sucrose + Fischl + Beidou + Bennett) maximize Swirl damage through EM stacking and VV shred, prioritizing reaction damage over individual character DPS.
Smart Resource Investment
Primogem priorities: character acquisition over weapon banners, always. Jahoda's effectiveness with Favonius weapons eliminates any need for 5-star weapons. Artifact domain priority: Viridescent Venerer for Jahoda and Anemo supports, Emblem for multiple support characters.
Talent material priority: Jahoda's Elemental Burst to level 8+, support talents can stay lower initially. Weapon ascension provides significant power increases for minimal resin investment. Character ascension to 80/90 for main DPS, supports can remain 70/80.
Your Questions Answered
What's the absolute best F2P Jahoda team for Floor 12-1? Jahoda (Favonius Warbow, VV 4-piece) + Yanfei (Dodoco Tales, Crimson Witch 4-piece) + Yun Jin (Favonius Lance, Noblesse 4-piece) + Xingqiu (Favonius Sword, Emblem 4-piece). The Vaporize reactions and AoE damage just work.
How much ER does Jahoda actually need? 140-180% depending on your team. With Favonius Warbow and team batteries, 140-160% works fine. Teams lacking energy support need 160-180% ER minimum.
Can F2P Jahoda teams really 3-star Floor 12-1? Absolutely. With proper builds (140-180% ER on team members, level 8+ talents on primary abilities), and understanding wave mechanics for positioning and ability usage, it's very achievable.
What's the optimal rotation for multi-target scenarios? Yanfei Normal Attack → Xingqiu Skill/Burst → Jahoda Skill (tap-to-stop dash) → Yun Jin Skill/Burst → Yanfei DPS phase. This 20-second cycle ensures reaction uptime and energy funneling.
Which artifacts are absolutely essential for F2P Jahoda? Viridescent Venerer 4-piece is non-negotiable for that -40% resistance shred. ATK% or ER% Sands, ATK% Goblet, Healing Bonus% Circlet. Target 140-180% total ER through substats and weapon.
Should F2P players pull for Jahoda constellations? Jahoda performs excellently at C0. C6 provides CRIT buffs but isn't necessary for Floor 12-1 success. Prioritize team members and weapons over constellations for maximum progression efficiency. Your primogems are better spent elsewhere.


